Owner's Manual - English
Page 4
...INJURY OR EQUIPMENT DAMAGE! Refer all servicing not specified in this manual to a Toshiba Authorized Service Center. 38) If you have the TV serviced: • Ask the service technician to use the TV in front of your TOSHIBA TV, follow this WARNING may damage or discolor the cabinet. 31) WARNING: RISK... surface of the panel. Never strike the screen with , such as in a room whose temperature is 32 ºF (0 ºC) or below, the picture brightness may vary until the LCD warms up static charges (see Section 810 of the National Electric Code). Opening and removing the covers may...
...INJURY OR EQUIPMENT DAMAGE! Refer all servicing not specified in this manual to a Toshiba Authorized Service Center. 38) If you have the TV serviced: • Ask the service technician to use the TV in front of your TOSHIBA TV, follow this WARNING may damage or discolor the cabinet. 31) WARNING: RISK... surface of the panel. Never strike the screen with , such as in a room whose temperature is 32 ºF (0 ºC) or below, the picture brightness may vary until the LCD warms up static charges (see Section 810 of the National Electric Code). Opening and removing the covers may...
Owner's Manual - English
Page 7
...Introduction 8 Welcome to Toshiba 8 Features of your new TV 8 Overview of steps for installing, setting up, and using your new TV 9 TV front and side panel controls and connections 10 TV back panel connections 11 Chapter 2: Connecting your TV 12 Overview of ... Setting the HDMI™ audio mode 32 Viewing the digital signal meter 33 Viewing the system status 33 Selecting the Power-On Mode 34 Chapter 6: Using the TV's features 35 Selecting the video input...9: Appendix 61 Specifications 61 Limited United States Warranty for LCD Televisions 26" and Larger 62 Limited Canada Warranty for...
...Introduction 8 Welcome to Toshiba 8 Features of your new TV 8 Overview of steps for installing, setting up, and using your new TV 9 TV front and side panel controls and connections 10 TV back panel connections 11 Chapter 2: Connecting your TV 12 Overview of ... Setting the HDMI™ audio mode 32 Viewing the digital signal meter 33 Viewing the system status 33 Selecting the Power-On Mode 34 Chapter 6: Using the TV's features 35 Selecting the video input...9: Appendix 61 Specifications 61 Limited United States Warranty for LCD Televisions 26" and Larger 62 Limited Canada Warranty for...

Owner's Manual - English
Page 17
...illustration). - The recommended length is being standardized for reception of an HDMI-to-DVI adapter cable should not exceed 9.8 ft (3m). page 32). To display an 1080p/60Hz signal format, you follow these procedures: • When turning on your electronic components, turn off your electronic ...the remote control (- Conventional HDMI/DVI cable may not operate properly with the TV. page 32). To program the TV remote control to operate other devices, see page 19. Supported Audio format: Linear PCM, sampling rate 32/44.1/ 48 kHz Note: To connect a PC to -DVI adapter cable ...
...illustration). - The recommended length is being standardized for reception of an HDMI-to-DVI adapter cable should not exceed 9.8 ft (3m). page 32). To display an 1080p/60Hz signal format, you follow these procedures: • When turning on your electronic components, turn off your electronic ...the remote control (- Conventional HDMI/DVI cable may not operate properly with the TV. page 32). To program the TV remote control to operate other devices, see page 19. Supported Audio format: Linear PCM, sampling rate 32/44.1/ 48 kHz Note: To connect a PC to -DVI adapter cable ...

Owner's Manual - English
Page 32
...indicate that they are custom.) Highlight the new custom label and press T to highlight the desired character on the on page 52.) 32 Channel Labeling TIMES TLC TMC TMCX TMCXw TMCw TNT TNTHD TOCDEFG ANT 24 Delete the selected custom label? If PC Audio is entered after... Labeling window. 2 Press < or , to highlight No Label and press T. No Yes Custom Clear All Done 4 Highlight Done and press T to save your TV 3 Press BbC c to select a channel you can create a custom label. page 17). Chapter 5: Setting up your settings, highlight Done and press T. Setting ...
...indicate that they are custom.) Highlight the new custom label and press T to highlight the desired character on the on page 52.) 32 Channel Labeling TIMES TLC TMC TMCX TMCXw TMCw TNT TNTHD TOCDEFG ANT 24 Delete the selected custom label? If PC Audio is entered after... Labeling window. 2 Press < or , to highlight No Label and press T. No Yes Custom Clear All Done 4 Highlight Done and press T to save your TV 3 Press BbC c to select a channel you can create a custom label. page 17). Chapter 5: Setting up your settings, highlight Done and press T. Setting ...

Owner's Manual - English
Page 36
...contents of all of your inputs. • Keep a list of your favorite channels (see "Favorites Browser," below left side of the last 32 channels or inputs viewed. • Quickly surf and tune your channels and inputs. Note: Additions are added to the beginning of the inputs labeled...Reset and press T. To add a favorite channel/input: 1 Tune to tune). • Quickly change inputs from the Favorites list. Chapter 6: Using the TV's features 4 Press C or c to select the desired label for that is integrated into the Channel Browser™. To revert to be removed from the ...
...contents of all of your inputs. • Keep a list of your favorite channels (see "Favorites Browser," below left side of the last 32 channels or inputs viewed. • Quickly surf and tune your channels and inputs. Note: Additions are added to the beginning of the inputs labeled...Reset and press T. To add a favorite channel/input: 1 Tune to tune). • Quickly change inputs from the Favorites list. Chapter 6: Using the TV's features 4 Press C or c to select the desired label for that is integrated into the Channel Browser™. To revert to be removed from the ...

Owner's Manual - English
Page 37
...open the Channel Browser™: • Press 3 C or # c on the remote control. • Press 3 C to surf backward through the previously tuned 32 channels in the History list, the channels in the ANT channel list, the inputs in the Inputs list, or the favorite channels/ inputs in the...effect. • Pressing n will automatically tune to the channel or input. 2 Press O to toggle among History, ANT, Inputs, and Favorites. Chapter 6: Using the TV's features 4 Press b to highlight History List, and then press C or c to factory defaults, highlight Reset and press T. page 34) is in Fast mode,...
...open the Channel Browser™: • Press 3 C or # c on the remote control. • Press 3 C to surf backward through the previously tuned 32 channels in the History list, the channels in the ANT channel list, the inputs in the Inputs list, or the favorite channels/ inputs in the...effect. • Pressing n will automatically tune to the channel or input. 2 Press O to toggle among History, ANT, Inputs, and Favorites. Chapter 6: Using the TV's features 4 Press b to highlight History List, and then press C or c to factory defaults, highlight Reset and press T. page 34) is in Fast mode,...
Owner's Manual - English
Page 38
... Press < or , on the remote control or TV control panel. Switching between two channels using the Channel Number buttons (and the dash (=) button if selecting a digital channel). 3 Press R on configuring the antenna input. • Once 32 channels or inputs are tuned. The previous channel will... clear the History List. Each time you press R, the TV will switch back and forth between two channels without entering an actual channel number each time...
... Press < or , on the remote control or TV control panel. Switching between two channels using the Channel Number buttons (and the dash (=) button if selecting a digital channel). 3 Press R on configuring the antenna input. • Once 32 channels or inputs are tuned. The previous channel will... clear the History List. Each time you press R, the TV will switch back and forth between two channels without entering an actual channel number each time...

Owner's Manual - English
Page 52
... or b to select PC Audio and then press C or c to enter the length of time until the TV turns off automatically (Maximum 180 minutes) 120 Cancel Done 4 Highlight Done and press T. To set the sleep ... 1 Press Y and open the Setup menu. 2 Highlight Sleep Timer and press T. Chapter 6: Using the TV's features Setting the PC Audio This function allows you to "Auto." Repeatedly press [ to increase the time .... (Also see item 4 on page 11 and "Setting the HDMI™ Audio mode" on page 32.) Setting the sleep timer You can set the sleep timer using the remote control: Press [ on the...
... or b to select PC Audio and then press C or c to enter the length of time until the TV turns off automatically (Maximum 180 minutes) 120 Cancel Done 4 Highlight Done and press T. To set the sleep ... 1 Press Y and open the Setup menu. 2 Highlight Sleep Timer and press T. Chapter 6: Using the TV's features Setting the PC Audio This function allows you to "Auto." Repeatedly press [ to increase the time .... (Also see item 4 on page 11 and "Setting the HDMI™ Audio mode" on page 32.) Setting the sleep timer You can set the sleep timer using the remote control: Press [ on the...
Owner's Manual - English
Page 61
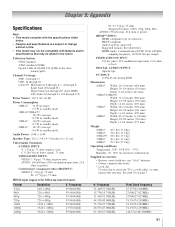
... (8VSB) Digital Cable (64 QAM, 256 QAM; HDMI Audio: 2-channel Linear-PCM; 32/44.1/48 kHz sampling frequency; 16/20/24 bits per sample FIXED AUDIO OUTPUT: 150 ...ohm, negative sync. in-the-clear, unencrypted) Channel Coverage VHF: 2 through 13 UHF: 14 through 69 Cable TV: Mid band (A-8 through A-1, A through I) Super band (J through W) Hyper band (AA through ZZ, AAA,...100 through 135) Power Source: 120 V AC, 60 Hz Power Consumption 26HL67: 74 W (average) 0.5 W in standby mode 32HL67/32HL67U: 101 W (average) 0.5 W in standby mode 37HL67: 116 W (average) 0.5 W in standby mode 42HL67: 161 ...
... (8VSB) Digital Cable (64 QAM, 256 QAM; HDMI Audio: 2-channel Linear-PCM; 32/44.1/48 kHz sampling frequency; 16/20/24 bits per sample FIXED AUDIO OUTPUT: 150 ...ohm, negative sync. in-the-clear, unencrypted) Channel Coverage VHF: 2 through 13 UHF: 14 through 69 Cable TV: Mid band (A-8 through A-1, A through I) Super band (J through W) Hyper band (AA through ZZ, AAA,...100 through 135) Power Source: 120 V AC, 60 Hz Power Consumption 26HL67: 74 W (average) 0.5 W in standby mode 32HL67/32HL67U: 101 W (average) 0.5 W in standby mode 37HL67: 116 W (average) 0.5 W in standby mode 42HL67: 161 ...
Owner's Manual - English
Page 63
...ANYWHERE OUTSIDE OF CANADA INCLUDING, WITHOUT LIMITATION, THE UNITED STATES AND MEXICO, ARE NOT COVERED BY THESE WARRANTIES. a) FOR TELEVISIONS 32 INCHES OR LESS: YOU MUST DELIVER THE ENTIRE TELEVISION TO A TCL TELEVISION AUTHORIZED SERVICE PROVIDER ("ASP"). YOU MUST PAY FOR ALL ...STATEMENT IN ANY BROCHURE, PRESS RELEASE, ANNOUNCEMENT, ADVERTISEMENT, POINT OF SALE DISPLAY, ETC.). Chapter 9: Appendix Limited Canada Warranty for LCD Televisions Toshiba of Canada Limited ("TCL") makes the following all of the operating instructions in this period, ASP personnel will be performed on ...
...ANYWHERE OUTSIDE OF CANADA INCLUDING, WITHOUT LIMITATION, THE UNITED STATES AND MEXICO, ARE NOT COVERED BY THESE WARRANTIES. a) FOR TELEVISIONS 32 INCHES OR LESS: YOU MUST DELIVER THE ENTIRE TELEVISION TO A TCL TELEVISION AUTHORIZED SERVICE PROVIDER ("ASP"). YOU MUST PAY FOR ALL ...STATEMENT IN ANY BROCHURE, PRESS RELEASE, ANNOUNCEMENT, ADVERTISEMENT, POINT OF SALE DISPLAY, ETC.). Chapter 9: Appendix Limited Canada Warranty for LCD Televisions Toshiba of Canada Limited ("TCL") makes the following all of the operating instructions in this period, ASP personnel will be performed on ...

Owner's Manual - English
Page 65
... Dynamic Range Control 46 DVD player connection 15 DVI connection 17 DynaLight 42 Dynamic contrast 54 F Features, TV 8 Front of the TV 10 G Game Mode feature 56 H HDMI audio mode 32 HDMI cable 12 HDMI™ connection 17 I INFO button 53 INPUT button 35 Installation, care, and ... 52 Specifications 61 StableSound 46 Stereo sound 45 SurfLock 38 S-video cable 12 System status 33 T TheaterWide® picture size 39 Troubleshooting 58 TV status information 53 V V-Chip blocking (Locks menu) .........47 VCR connection 13, 14, 15 Video cables 12 Video input label 35 Video...
... Dynamic Range Control 46 DVD player connection 15 DVI connection 17 DynaLight 42 Dynamic contrast 54 F Features, TV 8 Front of the TV 10 G Game Mode feature 56 H HDMI audio mode 32 HDMI cable 12 HDMI™ connection 17 I INFO button 53 INPUT button 35 Installation, care, and ... 52 Specifications 61 StableSound 46 Stereo sound 45 SurfLock 38 S-video cable 12 System status 33 T TheaterWide® picture size 39 Troubleshooting 58 TV status information 53 V V-Chip blocking (Locks menu) .........47 VCR connection 13, 14, 15 Video cables 12 Video input label 35 Video...
Printable Spec Sheet
Page 1
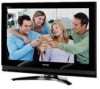
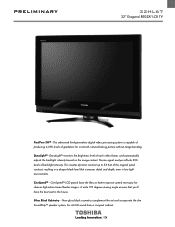
... the backlight intensity based on the image content. A wide 176 degree viewing angle ensures that increases detail and depth, even in the house. PRELIMINARY 32HL67 32" Diagonal REGZA® LCD TV PixelPure 3G™ - This advanced third-generation digital video processing system is capable of producing 4,096 levels of the original panel contrast, resulting...
... the backlight intensity based on the image content. A wide 176 degree viewing angle ensures that increases detail and depth, even in the house. PRELIMINARY 32HL67 32" Diagonal REGZA® LCD TV PixelPure 3G™ - This advanced third-generation digital video processing system is capable of producing 4,096 levels of the original panel contrast, resulting...


