Owner's Manual - English
Page 1
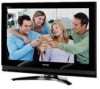
.... Integrated High Definition LCD Television HIGH-DEFINITION TELEVISION 26HL67 32HL67 32HL67U 37HL67 42HL67 For an overview of your TV. Note: To display a High Definition picture, the TV must be receiving a High Definition signal (such as an over-the-air High Definition TV broadcast, a High ...YC/M1 VX1A000401A0 Record these numbers whenever you communicate with your new TV, see page 9. For details, please contact your TV antenna installer, cable provider, or satellite provider. © 2007 TOSHIBA CORPORATION All Rights Reserved Owner's Record The model number and serial number...
.... Integrated High Definition LCD Television HIGH-DEFINITION TELEVISION 26HL67 32HL67 32HL67U 37HL67 42HL67 For an overview of your TV. Note: To display a High Definition picture, the TV must be receiving a High Definition signal (such as an over-the-air High Definition TV broadcast, a High ...YC/M1 VX1A000401A0 Record these numbers whenever you communicate with your new TV, see page 9. For details, please contact your TV antenna installer, cable provider, or satellite provider. © 2007 TOSHIBA CORPORATION All Rights Reserved Owner's Record The model number and serial number...
Owner's Manual - English
Page 7
...Toshiba 8 Features of your new TV 8 Overview of steps for installing, setting up, and using your new TV 9 TV front and side panel controls and connections 10 TV back panel connections 11 Chapter 2: Connecting your TV...Setting up your TV 29 Selecting the...TV's channel memory . . . . 30 Programming channels automatically 30 Manually adding and deleting channels in the channel memory 30 Labeling channels 31 Setting the HDMI™ audio mode 32... CC Settings 43...settings feature 51 Setting the PC Audio 52 Setting the sleep timer 52 Displaying TV...the advanced audio settings features 57 Using...
...Toshiba 8 Features of your new TV 8 Overview of steps for installing, setting up, and using your new TV 9 TV front and side panel controls and connections 10 TV back panel connections 11 Chapter 2: Connecting your TV...Setting up your TV 29 Selecting the...TV's channel memory . . . . 30 Programming channels automatically 30 Manually adding and deleting channels in the channel memory 30 Labeling channels 31 Setting the HDMI™ audio mode 32... CC Settings 43...settings feature 51 Setting the PC Audio 52 Setting the sleep timer 52 Displaying TV...the advanced audio settings features 57 Using...
Owner's Manual - English
Page 8
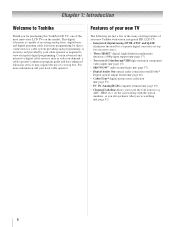
... Welcome to Toshiba Thank you for a separate digital converter set -top box. For more information call your new Toshiba widescreen, integrated HD, LCD TV: • Integrated digital tuning (8VSB ATSC and QAM) eliminates the need for purchasing this Toshiba LCD TV, one of a set -top box (in most innovative LCD TVs on the...and digital premium cable television programming by your cable operator is capable of your local cable operator. page 17). • Two sets of ColorStream® HD high-resolution component video inputs (- ABC, HBO, etc.) on -demand, a cable operator's enhanced ...
... Welcome to Toshiba Thank you for a separate digital converter set -top box. For more information call your new Toshiba widescreen, integrated HD, LCD TV: • Integrated digital tuning (8VSB ATSC and QAM) eliminates the need for purchasing this Toshiba LCD TV, one of a set -top box (in most innovative LCD TVs on the...and digital premium cable television programming by your cable operator is capable of your local cable operator. page 17). • Two sets of ColorStream® HD high-resolution component video inputs (- ABC, HBO, etc.) on -demand, a cable operator's enhanced ...
Owner's Manual - English
Page 9
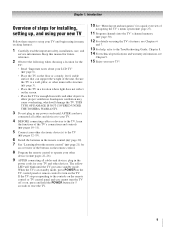
... panel and you have connected all cables and devices, plug in the power cords for your LCD TV" (- THIS TYPE OF DAMAGE IS NOT COVERED UNDER THE TOSHIBA WARRANTY. 3 Do not plug in standby mode, press POWER on , press and hold the POWER button for 5 seconds to allow proper ventilation...., stable surface that can support the weight of the unit. Chapter 1: Introduction Overview of steps for installing, setting up, and using your new TV Follow these steps to set up your TV and begin using the TV's features, see Chapters 6 and 7. 13 For help, refer to the Troubleshooting Guide, Chapter 8. 14 For...
... panel and you have connected all cables and devices, plug in the power cords for your LCD TV" (- THIS TYPE OF DAMAGE IS NOT COVERED UNDER THE TOSHIBA WARRANTY. 3 Do not plug in standby mode, press POWER on , press and hold the POWER button for 5 seconds to allow proper ventilation...., stable surface that can support the weight of the unit. Chapter 1: Introduction Overview of steps for installing, setting up, and using your new TV Follow these steps to set up your TV and begin using the TV's features, see Chapters 6 and 7. 13 For help, refer to the Troubleshooting Guide, Chapter 8. 14 For...
Owner's Manual - English
Page 11
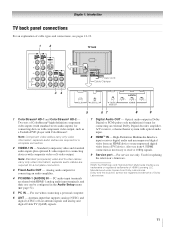
...Clamper 5 67 8 9 1 ColorStream® HD-1 and ColorStream® HD-2 - Chapter 1: Introduction TV back panel connections For an explanation of cable types and connections, see item 4. Two sets of ColorStream® high-definition component video inputs (with standard stereo audio inputs) for connecting an external ...Optical audio output in Dolby Digital or PCM (pulse-code modulation) format for connecting devices with component video output, such as a Toshiba DVD player with HDMI-1 analog audio input terminals, and their use can be configured in the Audio Setup menu (- HDMI connection ...
...Clamper 5 67 8 9 1 ColorStream® HD-1 and ColorStream® HD-2 - Chapter 1: Introduction TV back panel connections For an explanation of cable types and connections, see item 4. Two sets of ColorStream® high-definition component video inputs (with standard stereo audio inputs) for connecting an external ...Optical audio output in Dolby Digital or PCM (pulse-code modulation) format for connecting devices with component video output, such as a Toshiba DVD player with HDMI-1 analog audio input terminals, and their use can be configured in the Audio Setup menu (- HDMI connection ...
Owner's Manual - English
Page 12
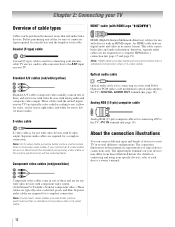
...this manual are not required for a complete HDMI device connection (- The input/output terminals on your TV. An HDMI cable delivers digital audio and video in sets of three and are typically color-coded according to your devices may differ from most stores that sell...receivers with HDMI Logo " ") HDMI (High-Definition Multimedia Interface) cable is Toshiba's brand of component video.) These cables are for a complete connection. For details on your specific devices, refer to the TV's DIGITAL AUDIO OUT terminal (- Separate audio cables are required for use with ...
...this manual are not required for a complete HDMI device connection (- The input/output terminals on your TV. An HDMI cable delivers digital audio and video in sets of three and are typically color-coded according to your devices may differ from most stores that sell...receivers with HDMI Logo " ") HDMI (High-Definition Multimedia Interface) cable is Toshiba's brand of component video.) These cables are for a complete connection. For details on your specific devices, refer to the TV's DIGITAL AUDIO OUT terminal (- Separate audio cables are required for use with ...

Owner's Manual - English
Page 14
...ON the VCR. Note: When you use a Cable box, you may subject you have a mono VCR, connect L/MONO on the TV.* Tune the TV to channel 3 or 4 (whichever channel the Cable box output is prohibited under the Copyright Laws of television programs, videotapes, DVDs, and... other materials is set to). page 21). If you to your TV Connecting a VCR with S-video and a cable box An S-video connection will provide better picture performance than a standard (composite...
...ON the VCR. Note: When you use a Cable box, you may subject you have a mono VCR, connect L/MONO on the TV.* Tune the TV to channel 3 or 4 (whichever channel the Cable box output is prohibited under the Copyright Laws of television programs, videotapes, DVDs, and... other materials is set to). page 21). If you to your TV Connecting a VCR with S-video and a cable box An S-video connection will provide better picture performance than a standard (composite...
Owner's Manual - English
Page 15
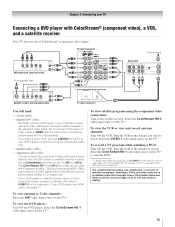
... Laws of the United States and other devices, see page 17. Do not connect both types of video cable to either set of ColorStream terminals on the TV.* To view satellite programs using the white audio cable only. • standard audio cables • component video cables - ...and Interlaced (480i, 1080i) scan systems. A 1080i signal will be used with ColorStream® (component video), a VCR, and a satellite receiver Your TV has two sets of ColorStream® (component video) inputs. Tune the VCR to the channel to view the DVD. * To select the video input source, press INPUT...
... Laws of the United States and other devices, see page 17. Do not connect both types of video cable to either set of ColorStream terminals on the TV.* To view satellite programs using the white audio cable only. • standard audio cables • component video cables - ...and Interlaced (480i, 1080i) scan systems. A 1080i signal will be used with ColorStream® (component video), a VCR, and a satellite receiver Your TV has two sets of ColorStream® (component video) inputs. Tune the VCR to the channel to view the DVD. * To select the video input source, press INPUT...

Owner's Manual - English
Page 17
... 2 cable. Separate analog audio cables are required (see page 19. page 32). An HDMI-to the HDMI input, see illustration). - page 21). For detailed signal specifications, see illustration). - See "Setting the HDMI™ audio mode" (- The recommended length is recommended that you... use an HDMI cable with the TV. page 32). Conventional HDMI/DVI cable may not operate properly with the HDMI Logo ( ...
... 2 cable. Separate analog audio cables are required (see page 19. page 32). An HDMI-to the HDMI input, see illustration). - page 21). For detailed signal specifications, see illustration). - See "Setting the HDMI™ audio mode" (- The recommended length is recommended that you... use an HDMI cable with the TV. page 32). Conventional HDMI/DVI cable may not operate properly with the HDMI Logo ( ...

Owner's Manual - English
Page 18
LINE IN LR TV upper back panel Audio Digital Audio Selector Audio Settings Advanced Audio Settings Audio Setup 4 ...In the Optical Output Format field, select either Dolby Digital or PCM, depending on page 46). Audio Setup PC Audio HDMI 1 Audio MTS Language Optical Output Format Dolby Digital Dynamic Range Control Reset No Auto Stereo English Dolby Digital Compressed Done To control the audio: 1 Turn on the TV...; Digital decoder or other digital audio system LINE IN LR Optical Audio IN TV lower back panel Note: • Some audio systems may not output some ...
LINE IN LR TV upper back panel Audio Digital Audio Selector Audio Settings Advanced Audio Settings Audio Setup 4 ...In the Optical Output Format field, select either Dolby Digital or PCM, depending on page 46). Audio Setup PC Audio HDMI 1 Audio MTS Language Optical Output Format Dolby Digital Dynamic Range Control Reset No Auto Stereo English Dolby Digital Compressed Done To control the audio: 1 Turn on the TV...; Digital decoder or other digital audio system LINE IN LR Optical Audio IN TV lower back panel Note: • Some audio systems may not output some ...
Owner's Manual - English
Page 19
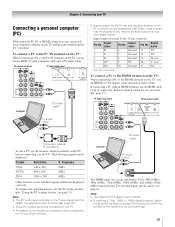
... output Conversion adapter (if necessary) • To use a PC, set the monitor output resolution on the TV are shared with the HDMI-1 analog audio input terminals (- Note: • The PC audio input terminals on the PC before connecting it to the TV. page 52). • Some PC models cannot be connected to... images may not be displayed correctly. • To display the optimum picture, use the PC setting feature (- "Using the PC settings feature" on the TV, use an HDMI-to the PC IN terminal on the TV and hear the sound from the TV's speakers. To connect a PC to the PC IN terminal on the...
... output Conversion adapter (if necessary) • To use a PC, set the monitor output resolution on the TV are shared with the HDMI-1 analog audio input terminals (- Note: • The PC audio input terminals on the PC before connecting it to the TV. page 52). • Some PC models cannot be connected to... images may not be displayed correctly. • To display the optimum picture, use the PC setting feature (- "Using the PC settings feature" on the TV, use an HDMI-to the PC IN terminal on the TV and hear the sound from the TV's speakers. To connect a PC to the PC IN terminal on the...
Owner's Manual - English
Page 21
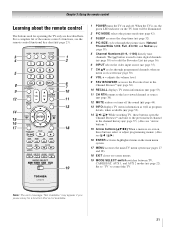
..., these buttons open the Channel Browser™ and tune to the last viewed channel or source (- pages 27 and 28). 18 EXIT closes on the TV front will be illuminated. 2 PIC MODE selects the picture mode (- For a complete list of the remote control's functions, see 3 C / # ...c.) 16 ENTER activates highlighted items in the Channel Brower™ (- Set to "TV" to tune digital channels (- page 42). 3 SLEEP accesses the sleep timer (- page 52). 4 PIC SIZE cycles through programmed channels when no menu is on...
..., these buttons open the Channel Browser™ and tune to the last viewed channel or source (- pages 27 and 28). 18 EXIT closes on the TV front will be illuminated. 2 PIC MODE selects the picture mode (- For a complete list of the remote control's functions, see 3 C / # ...c.) 16 ENTER activates highlighted items in the Channel Brower™ (- Set to "TV" to tune digital channels (- page 42). 3 SLEEP accesses the sleep timer (- page 52). 4 PIC SIZE cycles through programmed channels when no menu is on...
Owner's Manual - English
Page 22
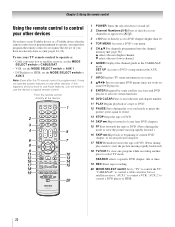
... so) (- "AUX 2" to control a cable converter box or satellite receiver; If this happens and you wish to use those features, you have a non-Toshiba device or a Toshiba device that the remote control is programmed, it may not work on some DVD players). 9 ENTER Required by some satellite receivers and DVD players...picture; To use the device's original remote control. SEARCH selects a specific DVD chapter, title or time. 19 REC Starts tape recording. 20 MODE SELECT switch Set to "TV" to control a VCR; Chapter 3: Using the remote control Using the remote control to control your...
... so) (- "AUX 2" to control a cable converter box or satellite receiver; If this happens and you wish to use those features, you have a non-Toshiba device or a Toshiba device that the remote control is programmed, it may not work on some DVD players). 9 ENTER Required by some satellite receivers and DVD players...picture; To use the device's original remote control. SEARCH selects a specific DVD chapter, title or time. 19 REC Starts tape recording. 20 MODE SELECT switch Set to "TV" to control a VCR; Chapter 3: Using the remote control Using the remote control to control your...

Owner's Manual - English
Page 23
... CONTROL KEY Toshiba TV CABLE SAT (satellite) POWER SLEEP PIC SIZE PIC MODE Power Sleep timer Picture size PIC MODE Power s TV s TV s TV Power s TV s TV s TV 1-9 Digit 1-9 Digit 1-9 Digit 1-9 0 Digit 0 Digit 0 Digit 0 100/-/+10 INPUT - (sub CH) TV/Video select --s TV - (sub CH) s TV FAV BROWSER/ TOP MENU MUTE FAV BROWSER DVD TOP Menu* Sound mute --s TV --s TV SET UP/GUIDE VOL...
... CONTROL KEY Toshiba TV CABLE SAT (satellite) POWER SLEEP PIC SIZE PIC MODE Power Sleep timer Picture size PIC MODE Power s TV s TV s TV Power s TV s TV s TV 1-9 Digit 1-9 Digit 1-9 Digit 1-9 0 Digit 0 Digit 0 Digit 0 100/-/+10 INPUT - (sub CH) TV/Video select --s TV - (sub CH) s TV FAV BROWSER/ TOP MENU MUTE FAV BROWSER DVD TOP Menu* Sound mute --s TV --s TV SET UP/GUIDE VOL...
Owner's Manual - English
Page 24
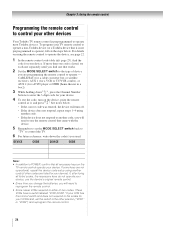
...one that all listed codes, the necessary keys do not operate your device, use the remote control that came with the device. 5 Remember to set the switch to the other position ("VCR1" or "VCR2") and reprogram the remote control. 24 Chapter 3: Using the remote control Programming the remote ...the device does not respond, repeat steps 1-4 using another code. • If the device does not respond to another code (if other devices Your Toshiba TV remote control is not preprogrammed to operate), follow the steps below . • If the correct code was entered, the device will turn on the...
...one that all listed codes, the necessary keys do not operate your device, use the remote control that came with the device. 5 Remember to set the switch to the other position ("VCR1" or "VCR2") and reprogram the remote control. 24 Chapter 3: Using the remote control Programming the remote ...the device does not respond, repeat steps 1-4 using another code. • If the device does not respond to another code (if other devices Your Toshiba TV remote control is not preprogrammed to operate), follow the steps below . • If the correct code was entered, the device will turn on the...
Owner's Manual - English
Page 27
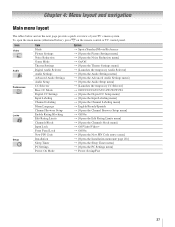
... overview of your TV's menu system. Icon Video Audio Preferences Locks Setup Item Mode Picture Settings Noise Reduction Game Mode Theater Settings Digital Audio Selector Audio Settings Advanced Audio Settings Audio Setup CC Selector Base CC Mode Digital CC Settings Input Labeling Channel ...S Sports/Standard/Movie/Preference S [Opens the Picture Settings menu] S [Opens the Noise Reduction menu] S On/Off S [Opens the Theater Settings menu] S [Launches the temporary Audio Selector] S [Opens the Audio Settings menu] S [Opens the Advanced Audio Settings menu] S [Opens the Audio Setup menu] S...
... overview of your TV's menu system. Icon Video Audio Preferences Locks Setup Item Mode Picture Settings Noise Reduction Game Mode Theater Settings Digital Audio Selector Audio Settings Advanced Audio Settings Audio Setup CC Selector Base CC Mode Digital CC Settings Input Labeling Channel ...S Sports/Standard/Movie/Preference S [Opens the Picture Settings menu] S [Opens the Noise Reduction menu] S On/Off S [Opens the Theater Settings menu] S [Launches the temporary Audio Selector] S [Opens the Audio Settings menu] S [Opens the Advanced Audio Settings menu] S [Opens the Audio Setup menu] S...
Owner's Manual - English
Page 28
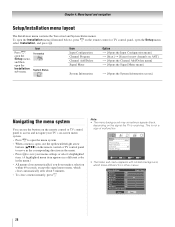
... menu] S [Opens the System Information screen] Navigating the menu system You can use the buttons on the remote control or TV control panel to access and navigate your menu settings or select a highlighted item. (A highlighted menu item appears in a different color in the menu. • Press T to...use the up/down/left/right arrow buttons (BbC c) on the remote control or TV control panel, open the Setup menu, select Installation, and press T. Video Mode Picture Settings Noise Reduction Game Mode Theater Settings Sports Off Navigate ENTER Select CH RTN Back EXIT Exit • The Video sub...
... menu] S [Opens the System Information screen] Navigating the menu system You can use the buttons on the remote control or TV control panel to access and navigate your menu settings or select a highlighted item. (A highlighted menu item appears in a different color in the menu. • Press T to...use the up/down/left/right arrow buttons (BbC c) on the remote control or TV control panel, open the Setup menu, select Installation, and press T. Video Mode Picture Settings Noise Reduction Game Mode Theater Settings Sports Off Navigate ENTER Select CH RTN Back EXIT Exit • The Video sub...
Owner's Manual - English
Page 29
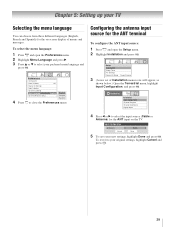
... Labeling Channel Labeling Menu Language Channel Browser Setup Off English English Français Español 4 Press O to your new settings, highlight Done and press T. Configuring the antenna input source for the ANT terminal To configure the ANT input source: 1 Press Y ...Press B or b to select the input source (Cable or Antenna) for the on the TV. Installation Terrestrial Input Configuration Channel Program Channel Add/Delete Signal Meter 4 Press C or c to select your TV Selecting the menu language You can choose from three different languages (English, French and Spanish) for...
... Labeling Channel Labeling Menu Language Channel Browser Setup Off English English Français Español 4 Press O to your new settings, highlight Done and press T. Configuring the antenna input source for the ANT terminal To configure the ANT input source: 1 Press Y ...Press B or b to select the input source (Cable or Antenna) for the on the TV. Installation Terrestrial Input Configuration Channel Program Channel Add/Delete Signal Meter 4 Press C or c to select your TV Selecting the menu language You can choose from three different languages (English, French and Spanish) for...

Owner's Manual - English
Page 30
... 29). • If the Antenna input signal type is set to Cable, the automatic channel programming process erases channels that were previously programmed into the TV's channel memory. Follow the steps below to the existing set of programmed channels (and does NOT erase channels that were ...previously programmed into the TV's memory. • If the Antenna input signal type is set of Channels Found - 73 Scanning Digital Channels Found Channel - 118 Abort The TV will appear, as shown below .) Open the Terrestrial menu, highlight ...
... 29). • If the Antenna input signal type is set to Cable, the automatic channel programming process erases channels that were previously programmed into the TV's channel memory. Follow the steps below to the existing set of programmed channels (and does NOT erase channels that were ...previously programmed into the TV's memory. • If the Antenna input signal type is set of Channels Found - 73 Scanning Digital Channels Found Channel - 118 Abort The TV will appear, as shown below .) Open the Terrestrial menu, highlight ...
Owner's Manual - English
Page 31
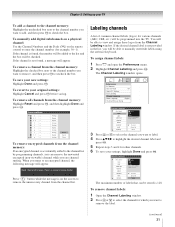
...the channel list. Press 1 on the remote control to change channels. Preferences CC Selector Off Base CC Mode Off CC1 Digital CC Settings CC2 Input Labeling CC3 Channel Labeling CC4 Menu Language English T1 Channel Browser Setup T2 Channel Labeling {No Label} A&E ABC ABCFAM ABCHD...highlight Done and press T. If the channel is 128. To revert to your TV To add a channel to the channel memory: Highlight the unchecked box next to check the box. Chapter 5: Setting up your original settings: Highlight Cancel and press T before saving. Custom Clear All Done The maximum ...
...the channel list. Press 1 on the remote control to change channels. Preferences CC Selector Off Base CC Mode Off CC1 Digital CC Settings CC2 Input Labeling CC3 Channel Labeling CC4 Menu Language English T1 Channel Browser Setup T2 Channel Labeling {No Label} A&E ABC ABCFAM ABCHD...highlight Done and press T. If the channel is 128. To revert to your TV To add a channel to the channel memory: Highlight the unchecked box next to check the box. Chapter 5: Setting up your original settings: Highlight Cancel and press T before saving. Custom Clear All Done The maximum ...


