Owner's Manual - English
Page 1
... Owner's Record The model number and serial number are on the back of steps for setting up your new TV, see page 9. Record these numbers whenever you communicate with your TV. Model number: Serial number: YC/M VX1A00088300 Integrated High Definition LCD Television HIGH-DEFINITION TELEVISION 32CV510U 37CV510U For an overview of your Toshiba dealer about this...
... Owner's Record The model number and serial number are on the back of steps for setting up your new TV, see page 9. Record these numbers whenever you communicate with your TV. Model number: Serial number: YC/M VX1A00088300 Integrated High Definition LCD Television HIGH-DEFINITION TELEVISION 32CV510U 37CV510U For an overview of your Toshiba dealer about this...
Owner's Manual - English
Page 2
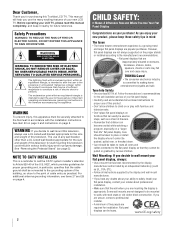
... to climb on your new LCD TV. Safety Precautions WARNING: TO REDUCE THE RISK OF FIRE OR ELECTRIC SHOCK, DO NOT EXPOSE THIS APPLIANCE TO RAIN OR MOISTURE. NO USER-SERVICEABLE PARTS INSIDE. The lightning flash with furniture and television sets. • Don't place ...purchase! WARNING: If you decide to the presence of the U.S. If you are unsure, contact a professional installer. • A minimum of this Toshiba LCD TV. Flat panel displays can become excited while watching a program, especially on dressers, bookcases, shelves, desks, speakers, chests or carts may be taken...
... to climb on your new LCD TV. Safety Precautions WARNING: TO REDUCE THE RISK OF FIRE OR ELECTRIC SHOCK, DO NOT EXPOSE THIS APPLIANCE TO RAIN OR MOISTURE. NO USER-SERVICEABLE PARTS INSIDE. The lightning flash with furniture and television sets. • Don't place ...purchase! WARNING: If you decide to the presence of the U.S. If you are unsure, contact a professional installer. • A minimum of this Toshiba LCD TV. Flat panel displays can become excited while watching a program, especially on dressers, bookcases, shelves, desks, speakers, chests or carts may be taken...

Owner's Manual - English
Page 7
... terminal 28 Programming channels into the TV's channel memory . . . . 29 Programming channels automatically 29 Manually adding and deleting channels in the channel memory 29 Labeling channels 30 Setting the HDMI™ audio mode 31 Viewing the digital signal meter 32 Setting the time zone 32 Viewing the ...system status 33 Selecting the Power-On Mode 33 Chapter 6: Using the TV's features 34 Selecting the video input source ...
... terminal 28 Programming channels into the TV's channel memory . . . . 29 Programming channels automatically 29 Manually adding and deleting channels in the channel memory 29 Labeling channels 30 Setting the HDMI™ audio mode 31 Viewing the digital signal meter 32 Setting the time zone 32 Viewing the ...system status 33 Selecting the Power-On Mode 33 Chapter 6: Using the TV's features 34 Selecting the video input source ...

Owner's Manual - English
Page 8
Chapter 7: Using the TV's advanced features 54 Using the advanced picture settings features 54 Using dynamic contrast 54 Using the static gamma feature 54 Selecting the color temperature 55 Using CableClear® digital noise reduction 55 Using ... troubleshooting 57 LED indications 59 Chapter 9: Appendix 60 Specifications 60 Acceptable signal formats for PC IN and HDMI terminals 61 Limited United States Warranty for LCD Televisions 26" and Larger 62 Limited Canadian Warranty for Toshiba Brand Flat Panel Televisions 63 Index 66 8
Chapter 7: Using the TV's advanced features 54 Using the advanced picture settings features 54 Using dynamic contrast 54 Using the static gamma feature 54 Selecting the color temperature 55 Using CableClear® digital noise reduction 55 Using ... troubleshooting 57 LED indications 59 Chapter 9: Appendix 60 Specifications 60 Acceptable signal formats for PC IN and HDMI terminals 61 Limited United States Warranty for LCD Televisions 26" and Larger 62 Limited Canadian Warranty for Toshiba Brand Flat Panel Televisions 63 Index 66 8

Owner's Manual - English
Page 9
page 45). • CableClear® digital picture noise reduction (- Overview of your new Toshiba widescreen, integrated HD, LCD TV: • Integrated digital tuning (8VSB ATSC and QAM) eliminates the need for a separate digital converter set up your TV and begin using the TV's features, see Chapters 6 and 7. 10 For help, refer to the Troubleshooting Guide, see Chapter...
page 45). • CableClear® digital picture noise reduction (- Overview of your new Toshiba widescreen, integrated HD, LCD TV: • Integrated digital tuning (8VSB ATSC and QAM) eliminates the need for a separate digital converter set up your TV and begin using the TV's features, see Chapters 6 and 7. 10 For help, refer to the Troubleshooting Guide, see Chapter...
Owner's Manual - English
Page 11
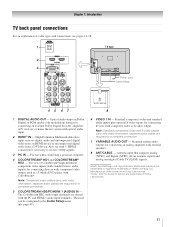
...digital video from an HDMI device or uncompressed digital video from Dolby Laboratories. Also see pages 12-18. 1 TV back 2 3 Power cord Cable Strap 4 5 67 8 1 DIGITAL AUDIO OUT - Two sets of cable types and connections, see item 5. page 49). 6 VIDEO 1 IN - Standard (composite) ...ColorStream® high-definition component video inputs (with standard stereo audio inputs) for connecting devices with component video output, such as a Toshiba DVD player with ColorStream®. For use can be configured in Dolby Digital or PCM (pulse-code modulation) format for a complete connection...
...digital video from an HDMI device or uncompressed digital video from Dolby Laboratories. Also see pages 12-18. 1 TV back 2 3 Power cord Cable Strap 4 5 67 8 1 DIGITAL AUDIO OUT - Two sets of cable types and connections, see item 5. page 49). 6 VIDEO 1 IN - Standard (composite) ...ColorStream® high-definition component video inputs (with standard stereo audio inputs) for connecting devices with component video output, such as a Toshiba DVD player with ColorStream®. For use can be configured in Dolby Digital or PCM (pulse-code modulation) format for a complete connection...
Owner's Manual - English
Page 12
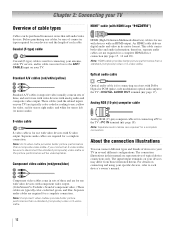
...HDMI™ cable (with HDMI Logo " ") HDMI (High-Definition Multimedia Interface) cable is Toshiba's brand of three, and are for use : yellow for video, red for stereo right audio.... Standard A/V cables (red/white/yellow) Standard A/V cables (composite video) usually come in sets of component video.) These cables are for use with video devices with component video output. (ColorStream... illustrations in its native format. For details on your specific devices, refer to the TV's DIGITAL AUDIO OUT terminal (- Before purchasing any cables, be unacceptable. Coaxial (F-type)...
...HDMI™ cable (with HDMI Logo " ") HDMI (High-Definition Multimedia Interface) cable is Toshiba's brand of three, and are for use : yellow for video, red for stereo right audio.... Standard A/V cables (red/white/yellow) Standard A/V cables (composite video) usually come in sets of component video.) These cables are for use with video devices with component video output. (ColorStream... illustrations in its native format. For details on your specific devices, refer to the TV's DIGITAL AUDIO OUT terminal (- Before purchasing any cables, be unacceptable. Coaxial (F-type)...
Owner's Manual - English
Page 13
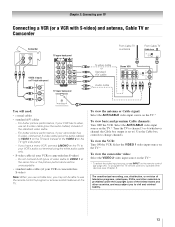
..., connect an S-video cable (plus the audio cables) instead of television programs, videotapes, DVDs, and other devices, see Chapter 3. To program the TV remote control to change channels. The unauthorized recording, use, distribution, or revision of the standard video cable. - If you have a mono VCR, ...connect L/MONO on the remote control (- Use the Cable box controls to operate other materials is set to your VCR's audio out terminal using the white audio cable only. • S-video cable (if your VCR or camcorder has S-video) -...
..., connect an S-video cable (plus the audio cables) instead of television programs, videotapes, DVDs, and other devices, see Chapter 3. To program the TV remote control to change channels. The unauthorized recording, use, distribution, or revision of the standard video cable. - If you have a mono VCR, ...connect L/MONO on the remote control (- Use the Cable box controls to operate other materials is set to your VCR's audio out terminal using the white audio cable only. • S-video cable (if your VCR or camcorder has S-video) -...

Owner's Manual - English
Page 14
... COMPONENT VIDEO S-VIDEO VIDEO R IN OUT OUT Satellite receiver with ColorStream® (component video), a VCR, and a satellite receiver Your TV has two sets of ColorStream terminals on the remote control (- Select the ColorStream HD2 video input source on the TV.* To view the DVD player: Turn ON the DVD player. To program the...
... COMPONENT VIDEO S-VIDEO VIDEO R IN OUT OUT Satellite receiver with ColorStream® (component video), a VCR, and a satellite receiver Your TV has two sets of ColorStream terminals on the remote control (- Select the ColorStream HD2 video input source on the TV.* To view the DVD player: Turn ON the DVD player. To program the...

Owner's Manual - English
Page 15
... digital content protection, which is recommended that you will need : • one HDMI cable (type A connector) per DVI device - page 31). TV upper back panel TV right side panel To connect a DVI device, you use an HDMI cable with HDMI or DVI output). HDMI device VIDEO AUDIO L R IN... select the video input source, press INPUT on your TV receives digital audio and uncompressed digital video from an HDMI source device, or uncompressed digital video from EIA/CEA-861-D-compliant[1] consumer electronic devices (such as a set-top box or DVD player with the HDMI Logo ( ). - ...
... digital content protection, which is recommended that you will need : • one HDMI cable (type A connector) per DVI device - page 31). TV upper back panel TV right side panel To connect a DVI device, you use an HDMI cable with HDMI or DVI output). HDMI device VIDEO AUDIO L R IN... select the video input source, press INPUT on your TV receives digital audio and uncompressed digital video from an HDMI source device, or uncompressed digital video from EIA/CEA-861-D-compliant[1] consumer electronic devices (such as a set-top box or DVD player with the HDMI Logo ( ). - ...
Owner's Manual - English
Page 16
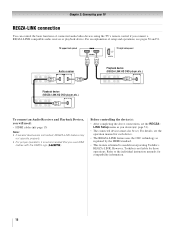
... limited to the individual instruction manuals for those operations. Refer to models incorporating Toshiba's REGZA-LINK. For details, see pages 50 and 51. Before controlling the device(s): • After completing the above connections, set . page 15) Note: • If several devices are connected, REGZA-LINK ... REGZALINK Setup menu as regulated by the HDMI standard. • This feature is not liable for compatibility information. 16 TV upper back panel TV right side panel VIDEO AUDIO L R IN OUT L R Audio receiver HDMI IN HDMI OUT Playback device (REGZA-LINK HD DVD ...
... limited to the individual instruction manuals for those operations. Refer to models incorporating Toshiba's REGZA-LINK. For details, see pages 50 and 51. Before controlling the device(s): • After completing the above connections, set . page 15) Note: • If several devices are connected, REGZA-LINK ... REGZALINK Setup menu as regulated by the HDMI standard. • This feature is not liable for compatibility information. 16 TV upper back panel TV right side panel VIDEO AUDIO L R IN OUT L R Audio receiver HDMI IN HDMI OUT Playback device (REGZA-LINK HD DVD ...

Owner's Manual - English
Page 17
...HDMI 1 Auto Stereo English On Dolby Digital Compressed Done To control the audio: 1 Turn on page 45). LINE IN LR TV upper back panel Audio Digital Audio Selector Audio Settings Audio Setup 4 In the Optical Output Format field, select either Dolby Digital or PCM, depending on the... TV's remote control and open the Audio menu. 3 Highlight Audio Setup and press T. "Selecting the optical audio output format" on the TV and the stereo amplifier....
...HDMI 1 Auto Stereo English On Dolby Digital Compressed Done To control the audio: 1 Turn on page 45). LINE IN LR TV upper back panel Audio Digital Audio Selector Audio Settings Audio Setup 4 In the Optical Output Format field, select either Dolby Digital or PCM, depending on the... TV's remote control and open the Audio menu. 3 Highlight Audio Setup and press T. "Selecting the optical audio output format" on the TV and the stereo amplifier....
Owner's Manual - English
Page 18
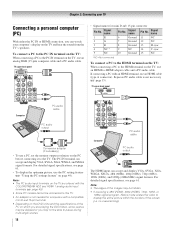
... back panel Computer PC audio cable PC audio output Conversion adapter (if necessary) • To use a PC, set the monitor output resolution on the TV, use an analog RGB (15-pin) computer cable and a PC audio cable. page 49). • Some PC models cannot be connected to the HDMI terminal ... PC audio cable is not needed for mini D-sub 15-pin connector Pin No. Signal name 1 R 2 G 3 B 4 NC * 5 NC Pin No. page 15). "Using the PC settings feature" on the TV are playing the DVD-Video, some scenes may be skipped or you are shared with an HDMI terminal, use the PC...
... back panel Computer PC audio cable PC audio output Conversion adapter (if necessary) • To use a PC, set the monitor output resolution on the TV, use an analog RGB (15-pin) computer cable and a PC audio cable. page 49). • Some PC models cannot be connected to the HDMI terminal ... PC audio cable is not needed for mini D-sub 15-pin connector Pin No. Signal name 1 R 2 G 3 B 4 NC * 5 NC Pin No. page 15). "Using the PC settings feature" on the TV are playing the DVD-Video, some scenes may be skipped or you are shared with an HDMI terminal, use the PC...
Owner's Manual - English
Page 20
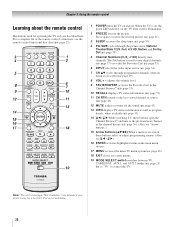
...the Channel Brower™ (- Note: The error message "Not Available" may appear if you press a key for a function that is used for operating the TV only are described here. page 34). 7 CH Bb cycles through the picture sizes: Natural, TheaterWide 1/2/3, Full, 4:3 HD, Native, and Dot by Dot...or to restore the moving picture (- page 53). 11 CH RTN returns to control the TV. page 38). 5 Channel Numbers (0-9, -/100) directly tune channels. page 38). 12 MUTE reduces or turns off . Set to "TV" to the last viewed channel or source (- Chapter 3: Using the remote control Learning about ...
...the Channel Brower™ (- Note: The error message "Not Available" may appear if you press a key for a function that is used for operating the TV only are described here. page 34). 7 CH Bb cycles through the picture sizes: Natural, TheaterWide 1/2/3, Full, 4:3 HD, Native, and Dot by Dot...or to restore the moving picture (- page 53). 11 CH RTN returns to control the TV. page 38). 5 Channel Numbers (0-9, -/100) directly tune channels. page 38). 12 MUTE reduces or turns off . Set to "TV" to the last viewed channel or source (- Chapter 3: Using the remote control Learning about ...

Owner's Manual - English
Page 21
...so) (- SEARCH selects a specific DVD chapter, title or time. 19 REC Starts tape recording. 20 MODE SELECT switch Set to "TV" to control a VCR; "AUX 1" to control the TV; "AUX 2" to select TV mode. page 37): B selects the next higher channel. press again to restart. 13 STOP Stops the tape or DVD.... switch to AUX 1. • DVD player or HTIB, set the MODE SELECT switch to AUX 2. If this happens and you wish to use your other devices. pages 23-25). To use those features, you have a non-Toshiba device or a Toshiba device that the remote control is not preprogrammed to operate, ...
...so) (- SEARCH selects a specific DVD chapter, title or time. 19 REC Starts tape recording. 20 MODE SELECT switch Set to "TV" to control a VCR; "AUX 1" to control the TV; "AUX 2" to select TV mode. page 37): B selects the next higher channel. press again to restart. 13 STOP Stops the tape or DVD.... switch to AUX 1. • DVD player or HTIB, set the MODE SELECT switch to AUX 2. If this happens and you wish to use your other devices. pages 23-25). To use those features, you have a non-Toshiba device or a Toshiba device that the remote control is not preprogrammed to operate, ...
Owner's Manual - English
Page 22
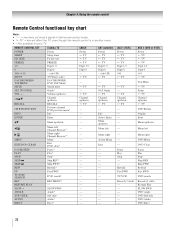
... s TV s TV s TV Digit 1-9 Digit 0 100 s TV --- REMOTE CONTROL KEY Toshiba TV CABLE SAT (satellite) POWER SLEEP PIC SIZE FREEZE Power Sleep timer Picture size FREEZE Power s TV s TV s TV Power s TV s TV s TV 1-9 Digit 1-9 Digit 1-9 Digit 1-9 0 Digit 0 Digit 0 Digit 0 100/-/+10 INPUT - (sub CH) TV/Video select --s TV - (sub CH) s TV FAV BROWSER/ TOP MENU MUTE FAV BROWSER DVD TOP Menu* Sound mute --s TV --s TV SET UP...
... s TV s TV s TV Digit 1-9 Digit 0 100 s TV --- REMOTE CONTROL KEY Toshiba TV CABLE SAT (satellite) POWER SLEEP PIC SIZE FREEZE Power Sleep timer Picture size FREEZE Power s TV s TV s TV Power s TV s TV s TV 1-9 Digit 1-9 Digit 1-9 Digit 1-9 0 Digit 0 Digit 0 Digit 0 100/-/+10 INPUT - (sub CH) TV/Video select --s TV - (sub CH) s TV FAV BROWSER/ TOP MENU MUTE FAV BROWSER DVD TOP Menu* Sound mute --s TV --s TV SET UP...

Owner's Manual - English
Page 23
... the remote control to control your other codes are programming the remote control to operate - To program your TV remote control to operate a non-Toshiba device (or a Toshiba device that works. 2 Set the MODE SELECT switch to the type of switch and does not respond to the codes for your device....device does not respond, repeat steps 1-4 using another code. • If the device does not respond to another code (if other devices Your Toshiba TV remote control is not preprogrammed to operate), follow the steps below . • If the correct code was entered, the device will turn on ...
... the remote control to control your other codes are programming the remote control to operate - To program your TV remote control to operate a non-Toshiba device (or a Toshiba device that works. 2 Set the MODE SELECT switch to the type of switch and does not respond to the codes for your device....device does not respond, repeat steps 1-4 using another code. • If the device does not respond to another code (if other devices Your Toshiba TV remote control is not preprogrammed to operate), follow the steps below . • If the correct code was entered, the device will turn on ...
Owner's Manual - English
Page 26
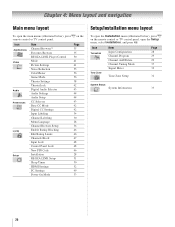
... Browser Setup Enable Rating Blocking Edit Rating Limits Channels Block Input Lock Control Panel Lock New PIN Code Installation REGZA-LINK Setup Sleep Timer HDMI Settings PC Settings Power-On Mode Page 35 35 50 41 41 55 56 56 38 42 43 44 44 43 42 42 34 30 28 36... 33 Setup/Installation menu layout To open the Installation menu (illustrated below), press Y on the remote control or TV control panel, open the main menus (illustrated below), press Y on the remote control or TV control panel. Chapter 4: Menu layout and navigation Main menu layout To open the Setup menu, select Installation, and...
... Browser Setup Enable Rating Blocking Edit Rating Limits Channels Block Input Lock Control Panel Lock New PIN Code Installation REGZA-LINK Setup Sleep Timer HDMI Settings PC Settings Power-On Mode Page 35 35 50 41 41 55 56 56 38 42 43 44 44 43 42 42 34 30 28 36... 33 Setup/Installation menu layout To open the Installation menu (illustrated below), press Y on the remote control or TV control panel, open the main menus (illustrated below), press Y on the remote control or TV control panel. Chapter 4: Menu layout and navigation Main menu layout To open the Setup menu, select Installation, and...

Owner's Manual - English
Page 28
...input on -screen display of Installation menu icons will appear, as shown below. Preferences CC Selector Base CC Mode Digital CC Settings Input Labeling Channel Labeling Menu Language Channel Browser Setup Off English English Français Español 4 Press O to select your...2 Highlight Installation and press T. To revert to your preferred menu language and press T. A new set of menus and messages. Input Configuration ANT/CABLE In Cancel Cable Done 5 To save your TV Selecting the menu language You can choose from three different languages (English, French and Spanish) for ...
...input on -screen display of Installation menu icons will appear, as shown below. Preferences CC Selector Base CC Mode Digital CC Settings Input Labeling Channel Labeling Menu Language Channel Browser Setup Off English English Français Español 4 Press O to select your...2 Highlight Installation and press T. To revert to your preferred menu language and press T. A new set of menus and messages. Input Configuration ANT/CABLE In Cancel Cable Done 5 To save your TV Selecting the menu language You can choose from three different languages (English, French and Spanish) for ...
Owner's Manual - English
Page 29
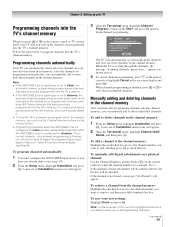
... process erases channels that were previously programmed into the TV's memory. • If the ANT/CABLE input signal type is set to Antenna, the automatic channel programming process adds newly found channels to the existing set of programmed channels (and does NOT erase channels that...stop only on -screen display and press T). Manually adding and deleting channels in the channel memory. A new set of Channels Found - 52 Scanning Analog Channels Found Channel - 55 Cancel The TV will appear. 2 Open the Terrestrial menu, highlight Channel Add/ Delete, and then press T. page 28)....
... process erases channels that were previously programmed into the TV's memory. • If the ANT/CABLE input signal type is set to Antenna, the automatic channel programming process adds newly found channels to the existing set of programmed channels (and does NOT erase channels that...stop only on -screen display and press T). Manually adding and deleting channels in the channel memory. A new set of Channels Found - 52 Scanning Analog Channels Found Channel - 55 Cancel The TV will appear. 2 Open the Terrestrial menu, highlight Channel Add/ Delete, and then press T. page 28)....


