User Manual
Page 8
... 20 Learning about the remote control 21 Chapter 4: Menu layout and navigation 22 Main menu layout 22 Setup/Installation menu layout 23 Navigating the menu system 23 Chapter 5: Setting up your TV 24 Initial Setup 24 Selecting the menu language 24 Configuring the antenna input source for the ANT/CABLE terminal 24... 55 Specifications 55 Acceptable signal formats for PC IN and HDMI terminals 56 Limited United States Warranty for LCD Televisions 57 Limited Canadian Warranty for Toshiba Brand Flat Panel Televisions 58
... 20 Learning about the remote control 21 Chapter 4: Menu layout and navigation 22 Main menu layout 22 Setup/Installation menu layout 23 Navigating the menu system 23 Chapter 5: Setting up your TV 24 Initial Setup 24 Selecting the menu language 24 Configuring the antenna input source for the ANT/CABLE terminal 24... 55 Specifications 55 Acceptable signal formats for PC IN and HDMI terminals 56 Limited United States Warranty for LCD Televisions 57 Limited Canadian Warranty for Toshiba Brand Flat Panel Televisions 58
User Manual
Page 12
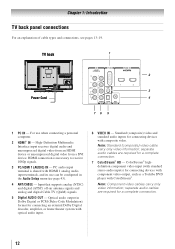
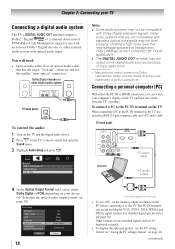
Optical audio output in the Audio Setup menu ( page 43). 4無 ANT/CABLE - separate audio cables are required for connecting devices with optical audio input. 6無 VIDEO IN - For use can ... digital video from a DVI device. ColorStream® highdefinition component video input (with standard stereo audio inputs) for connecting devices with component video output, such as a Toshiba DVD player with HDMI 1 analog audio input terminals, and its use when connecting a personal computer. 2無 HDMI® IN - PC audio input terminal is necessary...
Optical audio output in the Audio Setup menu ( page 43). 4無 ANT/CABLE - separate audio cables are required for connecting devices with optical audio input. 6無 VIDEO IN - For use can ... digital video from a DVI device. ColorStream® highdefinition component video input (with standard stereo audio inputs) for connecting devices with component video output, such as a Toshiba DVD player with HDMI 1 analog audio input terminals, and its use when connecting a personal computer. 2無 HDMI® IN - PC audio input terminal is necessary...
User Manual
Page 17
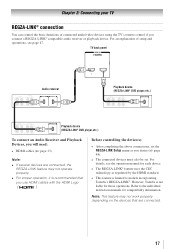
...feature may not work properly depending on the devices that you connect a REGZA-LINK® compatible audio receiver or playback device. However, Toshiba is not liable for compatibility information. For details, see page 47. Before controlling the device(s): • After completing the above connections, ...HDMI cables with the HDMI Logo ( ). Chapter 2: Connecting your TV REGZA-LINK® connection You can control the basic functions of setup and operations, see the operation manual for each device. • The REGZA-LINK® feature uses the CEC technology as you desire...
...feature may not work properly depending on the devices that you connect a REGZA-LINK® compatible audio receiver or playback device. However, Toshiba is not liable for compatibility information. For details, see page 47. Before controlling the device(s): • After completing the above connections, ...HDMI cables with the HDMI Logo ( ). Chapter 2: Connecting your TV REGZA-LINK® connection You can control the basic functions of setup and operations, see the operation manual for each device. • The REGZA-LINK® feature uses the CEC technology as you desire...
User Manual
Page 18
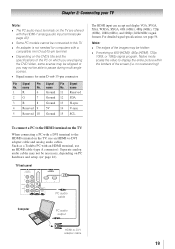
... IN terminal on the TV, use a PC, set the monitor output resolution on the TV's remote control and open the Sound menu. 3無 Highlight Audio Setup and press . To connect a PC to the PC IN terminal on the TV: When connecting a PC to the TV. TV back panel 1 Computer PC audio...
... IN terminal on the TV, use a PC, set the monitor output resolution on the TV's remote control and open the Sound menu. 3無 Highlight Audio Setup and press . To connect a PC to the PC IN terminal on the TV: When connecting a PC to the TV. TV back panel 1 Computer PC audio...
User Manual
Page 19
... HDMI cable (type A connector). name Pin Signal No. Note: •• The edges of the images may not be necessary, depending on PC hardware and setup. ( page 16). TV back panel 1 Computer PC audio cable PC audio output HDMI-to -DVI adapter cable and analog audio cables. Chapter 2: Connecting your... be connected to this TV. •• An adapter is not needed for mini D-sub 15-pin connector Pin Signal No. no overscanning). Such as a Toshiba PC with an HDMI terminal, use an HDMI-to -DVI adapter cable 19
... HDMI cable (type A connector). name Pin Signal No. Note: •• The edges of the images may not be necessary, depending on PC hardware and setup. ( page 16). TV back panel 1 Computer PC audio cable PC audio output HDMI-to -DVI adapter cable and analog audio cables. Chapter 2: Connecting your... be connected to this TV. •• An adapter is not needed for mini D-sub 15-pin connector Pin Signal No. no overscanning). Such as a Toshiba PC with an HDMI terminal, use an HDMI-to -DVI adapter cable 19
User Manual
Page 22
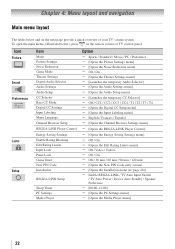
...-LINK Player Control Energy Saving Settings Enable Rating Blocking Edit Rating Limits Input Lock Panel Lock GameTimer New PIN Code Installation REGZA-LINK Setup Sleep Timer PC Settings Media Player Option Sports / Standard / Movie / PC / Preference [Opens the Picture Settings menu] &#... [Opens the Theater Settings menu] [Launches the temporary Audio Selector] [Opens the Audio Settings menu] [Opens the Audio Setup menu] [Launches the temporary CC Selector] Off / CC1 / CC2 / CC3 / CC4 / T1 / T2 / T3 / T4 [Opens the...
...-LINK Player Control Energy Saving Settings Enable Rating Blocking Edit Rating Limits Input Lock Panel Lock GameTimer New PIN Code Installation REGZA-LINK Setup Sleep Timer PC Settings Media Player Option Sports / Standard / Movie / PC / Preference [Opens the Picture Settings menu] &#... [Opens the Theater Settings menu] [Launches the temporary Audio Selector] [Opens the Audio Settings menu] [Opens the Audio Setup menu] [Launches the temporary CC Selector] Off / CC1 / CC2 / CC3 / CC4 / T1 / T2 / T3 / T4 [Opens the...
User Manual
Page 23
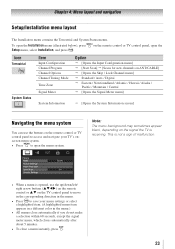
.... • To close a menu instantly, press . 23 This is not a sign of malfunction. • When a menu is receiving. Chapter 4: Menu layout and navigation Setup/Installation menu layout The Installation menu contains the Terrestrial and System Status menus. Note: The menu background may sometimes appear black, depending on the signal... the TV is opened, use the buttons on the remote control or TV control panel, open the Installation menu (illustrated below), press Setup menu, select Installation, and press . on the remote control or TV control panel to open the menu system.
.... • To close a menu instantly, press . 23 This is not a sign of malfunction. • When a menu is receiving. Chapter 4: Menu layout and navigation Setup/Installation menu layout The Installation menu contains the Terrestrial and System Status menus. Note: The menu background may sometimes appear black, depending on the signal... the TV is opened, use the buttons on the remote control or TV control panel, open the Installation menu (illustrated below), press Setup menu, select Installation, and press . on the remote control or TV control panel to open the menu system.
User Manual
Page 24
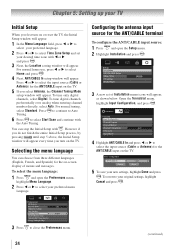
... ANT/CABLE input source: 1無 Press and open the Preferences menu, highlight Menu Language. 2無 Press t or u to select Time Zone Setup and set of menus and messages. Configuring the antenna input source for the ANT/CABLE input on the TV. 5無 To save your new settings... zone with . You can choose from three different languages (English, French, and Spanish) for the ANT/CABLE input on or reset the TV, the Initial Setup window will appear. 1無 In the Menu Language field, press t or u to select your preferred language. 2無 Press t or u to select ...
... ANT/CABLE input source: 1無 Press and open the Preferences menu, highlight Menu Language. 2無 Press t or u to select Time Zone Setup and set of menus and messages. Configuring the antenna input source for the ANT/CABLE input on the TV. 5無 To save your new settings... zone with . You can choose from three different languages (English, French, and Spanish) for the ANT/CABLE input on or reset the TV, the Initial Setup window will appear. 1無 In the Menu Language field, press t or u to select your preferred language. 2無 Press t or u to select ...
User Manual
Page 25
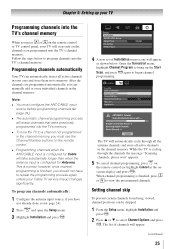
... channel not programmed in the channel memory, you should not have not already done so ( page 24). 2無 Press and open the Setup menu. 3無 Highlight Installation and press . 4無 A new set of channels will erase channels that were previously programmed into the TV's channel... channels when the ANT/CABLE input is configured for Antenna. After the channels are programmed automatically, you can be skipped. 1無 From the Setup menu, highlight Installation and press . 2無 Press p or q to program channels into the TV's channel memory When you press or on...
... channel not programmed in the channel memory, you should not have not already done so ( page 24). 2無 Press and open the Setup menu. 3無 Highlight Installation and press . 4無 A new set of channels will erase channels that were previously programmed into the TV's channel... channels when the ANT/CABLE input is configured for Antenna. After the channels are programmed automatically, you can be skipped. 1無 From the Setup menu, highlight Installation and press . 2無 Press p or q to program channels into the TV's channel memory When you press or on...
User Manual
Page 26
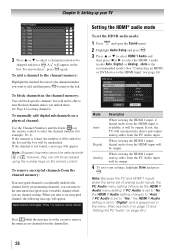
.... Note: Because the PC and HDMI-1 inputs share the same set the HDMI audio mode: 1無 Press and open the Sound menu. 2無 Highlight Audio Setup and press . 3無 Press p or q to select HDMI 1 Audio and then press t or u to select the HDMI 1 audio mode (Auto, Digital, or Analog). (Auto is...
.... Note: Because the PC and HDMI-1 inputs share the same set the HDMI audio mode: 1無 Press and open the Sound menu. 2無 Highlight Audio Setup and press . 3無 Press p or q to select HDMI 1 Audio and then press t or u to select the HDMI 1 audio mode (Auto, Digital, or Analog). (Auto is...

User Manual
Page 27
.... To close the screen and return to normal viewing: Press . Viewing the system status To view the system status: 1無 Press and open the Setup menu. 2無 Highlight Installation and press . 3無 A new set , enter your PIN code. A new set of Installation menu icons will appear...and press . To close the screen and return to normal viewing: Press . To view the digital signal meter: 1無 Press and open the Setup menu. 2無 Highlight Installation and press . After the TV turns off automatically after a few seconds. After the time zone has been set, ...
.... To close the screen and return to normal viewing: Press . Viewing the system status To view the system status: 1無 Press and open the Setup menu. 2無 Highlight Installation and press . 3無 A new set , enter your PIN code. A new set of Installation menu icons will appear...and press . To close the screen and return to normal viewing: Press . To view the digital signal meter: 1無 Press and open the Setup menu. 2無 Highlight Installation and press . After the TV turns off automatically after a few seconds. After the time zone has been set, ...
User Manual
Page 29
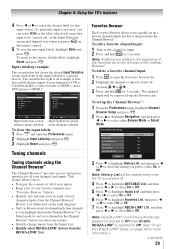
... Off when Enable REGZA-LINK® is switched to quickly set up the Channel Browser™: 1無 From the Preferences menu, highlight Channel Browser Setup and press . 2無 Press to highlight Navigation, and then press or to select either On, or Off....your recently viewed channels/inputs from the Channel Browser™ History List (illustrated on page 48 for 3 seconds. To set the REGZA-LINK® Setup" on the right diagram). • Surf via Browse mode (to immediately tune channels as a specific device). To delete a favorite channel/input: ...
... Off when Enable REGZA-LINK® is switched to quickly set up the Channel Browser™: 1無 From the Preferences menu, highlight Channel Browser Setup and press . 2無 Press to highlight Navigation, and then press or to select either On, or Off....your recently viewed channels/inputs from the Channel Browser™ History List (illustrated on page 48 for 3 seconds. To set the REGZA-LINK® Setup" on the right diagram). • Surf via Browse mode (to immediately tune channels as a specific device). To delete a favorite channel/input: ...
User Manual
Page 31
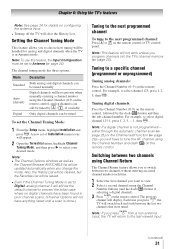
... 6: Using the TV's features Note: See page 24 for analog and digital channels when the TV is set the Channel Tuning Mode: 1無 From the Setup menu, highlight Installation and press . For example, to the next programmed channel: Press or on the remote control, followed by / , if available Only digital channels...
... 6: Using the TV's features Note: See page 24 for analog and digital channels when the TV is set the Channel Tuning Mode: 1無 From the Setup menu, highlight Installation and press . For example, to the next programmed channel: Press or on the remote control, followed by / , if available Only digital channels...
User Manual
Page 37
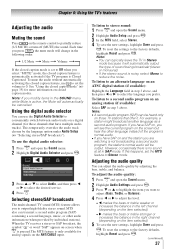
To use the digital audio selector: 1無 Press and open the Sound menu. 2無 Highlight Audio Setup and press . 3無 In the MTS field, select Stereo. 4無 To save the new settings, highlight Done and press . To mute the audio without... , the mute mode will see the current program on the screen but hear the other audio information (when provided by the language option under Audio Setup ( "Selecting stereo/SAP broadcasts"). Chapter 6: Using the TV's features Adjusting the audio Muting the sound Press on those channels that offer it ...
To use the digital audio selector: 1無 Press and open the Sound menu. 2無 Highlight Audio Setup and press . 3無 In the MTS field, select Stereo. 4無 To save the new settings, highlight Done and press . To mute the audio without... , the mute mode will see the current program on the screen but hear the other audio information (when provided by the language option under Audio Setup ( "Selecting stereo/SAP broadcasts"). Chapter 6: Using the TV's features Adjusting the audio Muting the sound Press on those channels that offer it ...
User Manual
Page 38
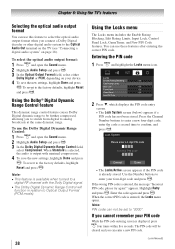
To select the optical audio output format: 1無 Press and open the Sound menu. 2無 Highlight Audio Setup and press . 3無 In the Dolby Digital Dynamic Range Control field, select Compressed. Entering the PIN code 1無 Press and highlight the Locks menu icon....set to be further compressed, allowing you can use the Dolby Digital Dynamic Range Control: 1無 Press and open the Sound menu. 2無 Highlight Audio Setup and press . 3無 In the Optical Output Format field, select either Dolby Digital or PCM, depending on page 18). The PIN code will function in...
To select the optical audio output format: 1無 Press and open the Sound menu. 2無 Highlight Audio Setup and press . 3無 In the Dolby Digital Dynamic Range Control field, select Compressed. Entering the PIN code 1無 Press and highlight the Locks menu icon....set to be further compressed, allowing you can use the Dolby Digital Dynamic Range Control: 1無 Press and open the Sound menu. 2無 Highlight Audio Setup and press . 3無 In the Optical Output Format field, select either Dolby Digital or PCM, depending on page 18). The PIN code will function in...
User Manual
Page 41
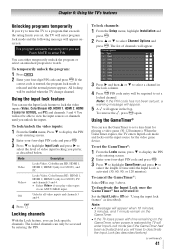
... a video game (30-120 minutes). Video+ Locks Video, ColorStream HD, HDMI 1, HDMI 2, HDMI 3 (only for the video game device. To lock channels: 1無 From the Setup menu, highlight Installation and press . 2無 Press or to enter PIN. To cancel the GameTimer®: Select Off in the box. Off Unlocks...
... a video game (30-120 minutes). Video+ Locks Video, ColorStream HD, HDMI 1, HDMI 2, HDMI 3 (only for the video game device. To lock channels: 1無 From the Setup menu, highlight Installation and press . 2無 Press or to enter PIN. To cancel the GameTimer®: Select Off in the box. Off Unlocks...
User Manual
Page 42
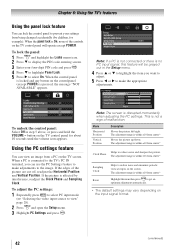
... highlight Panel Lock. 5無 Press to select On. To unlock the control panel: Select Off in the Setup menu. 4無 Press or to view" page 28). 2無 Press and open the Setup menu. 3無 Highlight PC Settings and press . Note: The screen is not a sign of malfunction. Using the...
... highlight Panel Lock. 5無 Press to select On. To unlock the control panel: Select Off in the Setup menu. 4無 Press or to view" page 28). 2無 Press and open the Setup menu. 3無 Highlight PC Settings and press . Note: The screen is not a sign of malfunction. Using the...
User Manual
Page 43
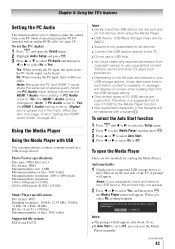
...Using the Media Player Using the Media Player with a square( ). To select the Auto Start function 1無 Press and or to select the Setup menu. 2無 Press to select Media Player, and then press . 3無 Press or to select Auto Start. 4無 Press... the Media Player. To open the Sound menu. 2無 Highlight Audio Setup and press . 3無 Press or to select PC Audio and then press or to select No or Yes. Toshiba cannot and does not grant such permission. ••Depending on -screen...
...Using the Media Player Using the Media Player with a square( ). To select the Auto Start function 1無 Press and or to select the Setup menu. 2無 Press to select Media Player, and then press . 3無 Press or to select Auto Start. 4無 Press... the Media Player. To open the Sound menu. 2無 Highlight Audio Setup and press . 3無 Press or to select PC Audio and then press or to select No or Yes. Toshiba cannot and does not grant such permission. ••Depending on -screen...
User Manual
Page 44
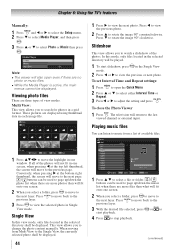
... manually. Slideshow This view allows you to the next layer. Chapter 6: Using the TV's features Manually: 1無 Press and or to select the Setup menu. 2無 Press to select Media Player, and then press . 3無 Press or to rotate the image 90° counterclockwise. Press ...
... manually. Slideshow This view allows you to the next layer. Chapter 6: Using the TV's features Manually: 1無 Press and or to select the Setup menu. 2無 Press to select Media Player, and then press . 3無 Press or to rotate the image 90° counterclockwise. Press ...
User Manual
Page 46
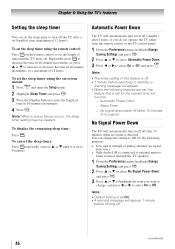
To display the remaining sleep time: Press . To set the sleep timer using the remote control: Press on -screen menus: 1無 Press and open the Setup menu. 2無 Highlight Sleep Timer and press . 3無 Press the Number button to enter the length of time in 10-minute increments, to a maximum of ...
To display the remaining sleep time: Press . To set the sleep timer using the remote control: Press on -screen menus: 1無 Press and open the Setup menu. 2無 Highlight Sleep Timer and press . 3無 Press the Number button to enter the length of time in 10-minute increments, to a maximum of ...


