

Owners Manual
Page 5
... ratings ...18 Blocking unrated movies or programs 21 Using the LOCK menu ...21 Locking channels ...21 Locking video input ...22 Setting the game timer ...22 Labeling channels ...23 Adjusting the picture ...24 Adjusting the picture quality ...24 Watching video... ...29 Limited United States Warranty ...30 Limited Canada Warranty ...31 5 Setting up your TV ...14 Changing the on-screen display language 14 Adding channels to Toshiba ...6 Exploring your new TV ...6 Selecting a location for the TV ...6 Connecting your TV ...7 Connecting a VCR ...7 Connecting a cable converter box ...8 Connecting...
... ratings ...18 Blocking unrated movies or programs 21 Using the LOCK menu ...21 Locking channels ...21 Locking video input ...22 Setting the game timer ...22 Labeling channels ...23 Adjusting the picture ...24 Adjusting the picture quality ...24 Watching video... ...29 Limited United States Warranty ...30 Limited Canada Warranty ...31 5 Setting up your TV ...14 Changing the on-screen display language 14 Adding channels to Toshiba ...6 Exploring your new TV ...6 Selecting a location for the TV ...6 Connecting your TV ...7 Connecting a VCR ...7 Connecting a cable converter box ...8 Connecting...
Owners Manual
Page 6
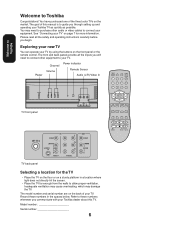
... to your TV. Record these numbers whenever you will need to purchase other equipment to Toshiba Congratulations! Exploring your new TV You can operate your equipment. The front and back panels provide all the safety and operating instructions carefully before you ... model number and serial number are on a sturdy platform in the spaces below. The goal of your Toshiba TV as quickly as possible. See "Connecting your Toshiba dealer about this TV. Please read all the inputs you communicate with your TV" on page 7 for the TV • Place the TV on the floor...
... to your TV. Record these numbers whenever you will need to purchase other equipment to Toshiba Congratulations! Exploring your new TV You can operate your equipment. The front and back panels provide all the safety and operating instructions carefully before you ... model number and serial number are on a sturdy platform in the spaces below. The goal of your Toshiba TV as quickly as possible. See "Connecting your Toshiba dealer about this TV. Please read all the inputs you communicate with your TV" on page 7 for the TV • Place the TV on the floor...
Owners Manual
Page 10
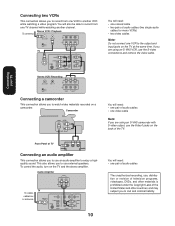
... are using an S-VHS VCR, use , distribution or revision of television programs, videotapes, DVDs, and other countries, and may subject you to the output and input jacks on the TV at the same time. Front Panel of the TV. Camcorder VIDEO AUDIO L R OUT You will need: • one pair of audio...
... are using an S-VHS VCR, use , distribution or revision of television programs, videotapes, DVDs, and other countries, and may subject you to the output and input jacks on the TV at the same time. Front Panel of the TV. Camcorder VIDEO AUDIO L R OUT You will need: • one pair of audio...
Owners Manual
Page 13
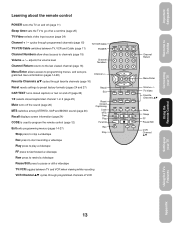
...captions or text on and off (page 11) Sleep timer sets the TV to go off at a set time (page 25) TV/Video selects video input source (page 24) Channel + / - TV/Video Favorite Channels vw Mute Sleep FF Pause/Still VCR Channel vw Using the Remote Control Setting up ...allow direct access to channels (page 15) TV/VCR/Cable POWER POWER TV 12 VCR CABLE CH RTN 3 ENT Volume + / - Important Safeguards Welcome to Toshiba Connecting your TV Using the TV's Features Appendix 13 adjusts the volume level Channel Return returns to the last viewed channel (page 16) Channel 4 Numbers...
...captions or text on and off (page 11) Sleep timer sets the TV to go off at a set time (page 25) TV/Video selects video input source (page 24) Channel + / - TV/Video Favorite Channels vw Mute Sleep FF Pause/Still VCR Channel vw Using the Remote Control Setting up ...allow direct access to channels (page 15) TV/VCR/Cable POWER POWER TV 12 VCR CABLE CH RTN 3 ENT Volume + / - Important Safeguards Welcome to Toshiba Connecting your TV Using the TV's Features Appendix 13 adjusts the volume level Channel Return returns to the last viewed channel (page 16) Channel 4 Numbers...
Owners Manual
Page 22
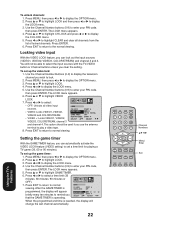
... ten minutes to set up the video lock: 1. To set up the game timer: 1. This option should be able to select the input sources with the TV/VIDEO button or Channel buttons unless you can automatically activate the VIDEO LOCK feature (VIDEO setting) to remind you can ...lock out the input sources (VIDEO1, VIDEO2, VIDEO3, COLORSTREAM) and channel 3 and 4. Press MENU, then press or to display the CH LOCK menu. 5. The LOCK menu appears....
... ten minutes to set up the video lock: 1. To set up the game timer: 1. This option should be able to select the input sources with the TV/VIDEO button or Channel buttons unless you can automatically activate the VIDEO LOCK feature (VIDEO setting) to remind you can ...lock out the input sources (VIDEO1, VIDEO2, VIDEO3, COLORSTREAM) and channel 3 and 4. Press MENU, then press or to display the CH LOCK menu. 5. The LOCK menu appears....
Owners Manual
Page 24
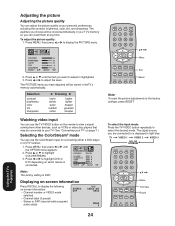
... from other devices, such as VCRs or video disc players that may be stored automatically in your TV's memory so you can use the ColorStream input for connecting either a DVD player or a DTV receiver. 1. Press v or w to the factory settings, press RESET. Displaying on-screen information Press ...MTS SLEEP MUTE CH PICTURE AUDIO SET UP OPTION CONTRAST BRIGHTNESS COLOR TINT SHARPNESS SELECT 64 32 32 0 32 ADJUST 2. To select the input mode: Press the TV/VIDEO button repeatedly to is DVD. Using the TV's Features Adjusting the picture Adjusting the picture quality You can adjust...
... from other devices, such as VCRs or video disc players that may be stored automatically in your TV's memory so you can use the ColorStream input for connecting either a DVD player or a DTV receiver. 1. Press v or w to the factory settings, press RESET. Displaying on-screen information Press ...MTS SLEEP MUTE CH PICTURE AUDIO SET UP OPTION CONTRAST BRIGHTNESS COLOR TINT SHARPNESS SELECT 64 32 32 0 32 ADJUST 2. To select the input mode: Press the TV/VIDEO button repeatedly to is DVD. Using the TV's Features Adjusting the picture Adjusting the picture quality You can adjust...
Owners Manual
Page 28
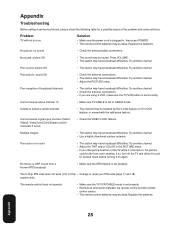
.... Try another channel. • Adjust the PICTURE menu. Unable to select a certain channel • The channel may be dead. Try another channel. Cannot access signal input sources (Video1, Video2, Video3 and ColorStream) and/or Channels 3 and 4 • Check the VIDEO LOCK feature. Try another channel. • Check the antenna connections. •...
.... Try another channel. • Adjust the PICTURE menu. Unable to select a certain channel • The channel may be dead. Try another channel. Cannot access signal input sources (Video1, Video2, Video3 and ColorStream) and/or Channels 3 and 4 • Check the VIDEO LOCK feature. Try another channel. • Check the antenna connections. •...
Owners Manual
Page 29
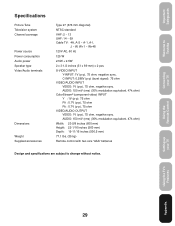
...2.5W 2 x 3-1/2 inches (51 x 89 mm) x 2 pcs. AUDIO: 150 mV (rms) (30% modulation equivalent, 47k ohm) ColorStream® (component video) INPUT Y : 1V (p-p), 75 ohm PR : 0.7V (p-p), 75 ohm PB : 0.7V (p-p), 75 ohm VIDEO/AUDIO OUTPUT VIDEO: 1V (p-p), 75 ohm, negative sync. AUDIO: ...Remote control with two size "AAA" batteries Design and specifications are subject to Toshiba Connecting your TV Using the TV's Features AAppppeennddiixx 29 C-INPUT: 0.286V (p-p) (burst signal), 75 ohm VIDEO/AUDIO INPUT VIDEO: 1V (p-p), 75 ohm, negative sync. Important Safeguards Welcome to change ...
...2.5W 2 x 3-1/2 inches (51 x 89 mm) x 2 pcs. AUDIO: 150 mV (rms) (30% modulation equivalent, 47k ohm) ColorStream® (component video) INPUT Y : 1V (p-p), 75 ohm PR : 0.7V (p-p), 75 ohm PB : 0.7V (p-p), 75 ohm VIDEO/AUDIO OUTPUT VIDEO: 1V (p-p), 75 ohm, negative sync. AUDIO: ...Remote control with two size "AAA" batteries Design and specifications are subject to Toshiba Connecting your TV Using the TV's Features AAppppeennddiixx 29 C-INPUT: 0.286V (p-p) (burst signal), 75 ohm VIDEO/AUDIO INPUT VIDEO: 1V (p-p), 75 ohm, negative sync. Important Safeguards Welcome to change ...


