User Guide
Page 3
... service supply(not for spectrum) Norway Implemented This subsection does not apply for outdoor use and public service France Outdoor use limited to only Mobile Configurations. Full implementation planned 2012 Italy None If used for indoor applications Note: Please don't use . CE Mark Warning This is applicable to 10 Military Radiolocation...
... service supply(not for spectrum) Norway Implemented This subsection does not apply for outdoor use and public service France Outdoor use limited to only Mobile Configurations. Full implementation planned 2012 Italy None If used for indoor applications Note: Please don't use . CE Mark Warning This is applicable to 10 Military Radiolocation...
User Guide
Page 5
......17 4.4 QSS...18 4.5 Network ...24 4.5.1 LAN...24 4.5.2 WAN...25 4.5.3 MAC Clone ...35 4.6 Wireless ...36 4.6.1 Wireless Settings 36 4.6.2 Wireless Security 39 4.6.3 Wireless MAC Filtering 42 4.6.4 Wireless Advanced 45 I Quick Installation Guide 8 3.1 TCP/IP Configuration ...8 3.2 Quick Installation Guide 10 Chapter 4. Connecting the Router ...6 2.1 System Requirements...6 2.2 Installation Environment Requirements 6 2.3 Connecting the Router ...6 Chapter 3. CONTENTS Package Contents...1 Chapter 1. Introduction...2 1.1 Overview of the...
......17 4.4 QSS...18 4.5 Network ...24 4.5.1 LAN...24 4.5.2 WAN...25 4.5.3 MAC Clone ...35 4.6 Wireless ...36 4.6.1 Wireless Settings 36 4.6.2 Wireless Security 39 4.6.3 Wireless MAC Filtering 42 4.6.4 Wireless Advanced 45 I Quick Installation Guide 8 3.1 TCP/IP Configuration ...8 3.2 Quick Installation Guide 10 Chapter 4. Connecting the Router ...6 2.1 System Requirements...6 2.2 Installation Environment Requirements 6 2.3 Connecting the Router ...6 Chapter 3. CONTENTS Package Contents...1 Chapter 1. Introduction...2 1.1 Overview of the...
User Guide
Page 7
4.15 Dynamic DNS...78 4.15.1 Comexe.cn DDNS 79 4.15.2 Dyndns.org DDNS 80 4.15.3 No-ip.com DDNS 80 4.16 System Tools...81 4.16.1 Time Settings...82 4.16.2 Diagnostic ...83 4.16.3 Firmware Upgrade 84 4.16.4 Factory Defaults 85 4.16.5 Backup & Restore 86 4.16.6 Reboot ...87 4.16.7 Password ...87 4.16.8 System log ...88 4.16.9 Statistics...90 Appendix A: FAQ ...92 Appendix B: Configuring the PC ...97 Appendix C: Specifications ...101 Appendix D: Glossary ...102 III
4.15 Dynamic DNS...78 4.15.1 Comexe.cn DDNS 79 4.15.2 Dyndns.org DDNS 80 4.15.3 No-ip.com DDNS 80 4.16 System Tools...81 4.16.1 Time Settings...82 4.16.2 Diagnostic ...83 4.16.3 Firmware Upgrade 84 4.16.4 Factory Defaults 85 4.16.5 Backup & Restore 86 4.16.6 Reboot ...87 4.16.7 Password ...87 4.16.8 System log ...88 4.16.9 Statistics...90 Appendix A: FAQ ...92 Appendix B: Configuring the PC ...97 Appendix C: Specifications ...101 Appendix D: Glossary ...102 III
User Guide
Page 15
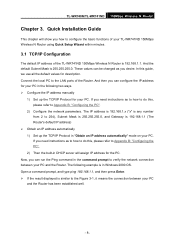
...this , please refer to Appendix B: "Configuring the PC". 2) Then the built-in DHCP server will show you can run the Ping command in the command prompt to the LAN ports of the TL-WR741ND 150Mbps Wireless N Router is 192.168.1.1 (The Router's default IP address) ¾ Obtain an... automatically" mode on your PC and the Router has been established well. - 8 - TL-WR740N/TL-WR741ND 150Mbps Wireless N Router Chapter 3. Connect the local PC to verify the network connection between your PC. If you desire. The following two ways. ¾ Configure the IP address manually 1) Set up the...
...this , please refer to Appendix B: "Configuring the PC". 2) Then the built-in DHCP server will show you can run the Ping command in the command prompt to the LAN ports of the TL-WR741ND 150Mbps Wireless N Router is 192.168.1.1 (The Router's default IP address) ¾ Obtain an... automatically" mode on your PC and the Router has been established well. - 8 - TL-WR740N/TL-WR741ND 150Mbps Wireless N Router Chapter 3. Connect the local PC to verify the network connection between your PC. If you desire. The following two ways. ¾ Configure the IP address manually 1) Set up the...
User Guide
Page 17
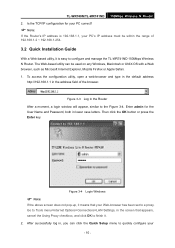
... Explorer, Mozilla Firefox or Apple Safari. 1. Go to Tools menu>Internet Options>Connections>LAN Settings, in the Router After a moment, a login window will appear, similar to quickly configure your - 10 - TL-WR740N/TL-WR741ND 150Mbps Wireless N Router 2. Is the TCP/IP configuration for the User Name and Password, both in , you can be within the range of the browser...
... Explorer, Mozilla Firefox or Apple Safari. 1. Go to Tools menu>Internet Options>Connections>LAN Settings, in the Router After a moment, a login window will appear, similar to quickly configure your - 10 - TL-WR740N/TL-WR741ND 150Mbps Wireless N Router 2. Is the TCP/IP configuration for the User Name and Password, both in , you can be within the range of the browser...
User Guide
Page 18
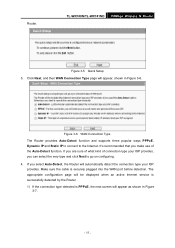
... will appear as shown in Figure 3-6. Router. Figure 3-6 WAN Connection Type The Router provides Auto-Detect function and supports three popular ways PPPoE, Dynamic IP and Static IP to connect to go on configuring. 4. If you are sure of what... kind of the Auto-Detect function. The appropriate configuration page will be displayed when an active Internet service is successfully detected by the Router. 1) If the connection type detected is securely plugged into the WAN port before detection. TL-WR740N/TL-WR741ND 150Mbps Wireless N Router...
... will appear as shown in Figure 3-6. Router. Figure 3-6 WAN Connection Type The Router provides Auto-Detect function and supports three popular ways PPPoE, Dynamic IP and Static IP to connect to go on configuring. 4. If you are sure of what... kind of the Auto-Detect function. The appropriate configuration page will be displayed when an active Internet service is successfully detected by the Router. 1) If the connection type detected is securely plugged into the WAN port before detection. TL-WR740N/TL-WR741ND 150Mbps Wireless N Router...
User Guide
Page 19
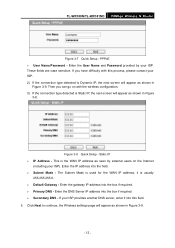
... users on with this field. 5. These fields are case sensitive. Then you have difficulty with the wireless configuration. 3) If the connection type detected is usually 255.255.255.0. ¾ Default Gateway - Click Next to continue, the Wireless settings page will appear as shown in Figure 3-8. Static IP ¾ IP Address - Enter the IP... your ISP. PPPoE ¾ User Name/Password - Figure 3-8 Quick Setup - The Subnet Mask is Dynamic IP, the next screen will appear as shown in Figure 3-9. TL-WR740N/TL-WR741ND 150Mbps Wireless N Router Figure 3-7 Quick Setup -
... users on with this field. 5. These fields are case sensitive. Then you have difficulty with the wireless configuration. 3) If the connection type detected is usually 255.255.255.0. ¾ Default Gateway - Click Next to continue, the Wireless settings page will appear as shown in Figure 3-8. Static IP ¾ IP Address - Enter the IP... your ISP. PPPoE ¾ User Name/Password - Figure 3-8 Quick Setup - The Subnet Mask is Dynamic IP, the next screen will appear as shown in Figure 3-9. TL-WR740N/TL-WR741ND 150Mbps Wireless N Router Figure 3-7 Quick Setup -

User Guide
Page 21
... be able to enable security. ¾ WPA-PSK/WPA2-PSK - If you will be a good idea to take effect and finish the Quick Setup. - 14 - TL-WR740N/TL-WR741ND 150Mbps Wireless N Router ¾ Max Tx Rate - If you don't make your wireless configuration to write down the key and all related wireless security settings. ¾ No Change -
... be able to enable security. ¾ WPA-PSK/WPA2-PSK - If you will be a good idea to take effect and finish the Quick Setup. - 14 - TL-WR740N/TL-WR741ND 150Mbps Wireless N Router ¾ Max Tx Rate - If you don't make your wireless configuration to write down the key and all related wireless security settings. ¾ No Change -
User Guide
Page 23
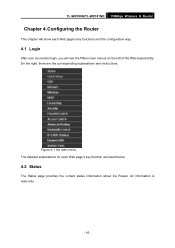
All information is read-only. - 16 - Figure 4-1 the main menu The detailed explanations for each Web page's key functions and the configuration way. 4.1 Login After your successful login, you will see the fifteen main menus on the left of the Web-based utility. On the right, there are listed below. 4.2 Status The Status page provides the current status information about the Router. TL-WR740N/TL-WR741ND 150Mbps Wireless N Router Chapter 4. Configuring the Router This chapter will show each Web page's key function are the corresponding explanations and instructions.
All information is read-only. - 16 - Figure 4-1 the main menu The detailed explanations for each Web page's key functions and the configuration way. 4.1 Login After your successful login, you will see the fifteen main menus on the left of the Web-based utility. On the right, there are listed below. 4.2 Status The Status page provides the current status information about the Router. TL-WR740N/TL-WR741ND 150Mbps Wireless N Router Chapter 4. Configuring the Router This chapter will show each Web page's key function are the corresponding explanations and instructions.
User Guide
Page 25
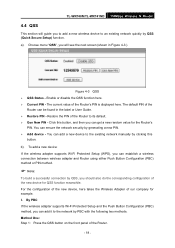
... PIN - The default PIN of our company for the Router's PIN. By PBC If the wireless adapter supports Wi-Fi Protected Setup and the Push Button Configuration (PBC) method, you should also do the corresponding configuration of the Router to the network by QSS (Quick Secure Setup) function....this button, and then you can be found in Figure 4-3 ). TL-WR740N/TL-WR741ND 150Mbps Wireless N Router 4.4 QSS This section will see the next screen (shown in the label or User Guide. ¾ Restore PIN - The current value of the Router. - 18 - a). You can add it to its default. &#...
... PIN - The default PIN of our company for the Router's PIN. By PBC If the wireless adapter supports Wi-Fi Protected Setup and the Push Button Configuration (PBC) method, you should also do the corresponding configuration of the Router to the network by QSS (Quick Secure Setup) function....this button, and then you can be found in Figure 4-3 ). TL-WR740N/TL-WR741ND 150Mbps Wireless N Router 4.4 QSS This section will see the next screen (shown in the label or User Guide. ¾ Restore PIN - The current value of the Router. - 18 - a). You can add it to its default. &#...

User Guide
Page 26
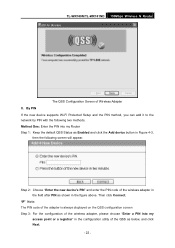
The QSS Configuration Screen of Wireless Adapter Method Two: Step 1: Press the QSS button on my access point" in the configuration utility of the Router. Click Finish to complete the QSS configuration. Step 3: Wait for 2 or 3 seconds. Step 2: For the configuration of the wireless adapter, please choose "Push the button on the front panel of the QSS as below, and click Next. - 19 - TL-WR740N/TL-WR741ND 150Mbps Wireless N Router Step 2: Press and hold the QSS button of the adapter directly for a while until the next screen appears.
The QSS Configuration Screen of Wireless Adapter Method Two: Step 1: Press the QSS button on my access point" in the configuration utility of the Router. Click Finish to complete the QSS configuration. Step 3: Wait for 2 or 3 seconds. Step 2: For the configuration of the wireless adapter, please choose "Push the button on the front panel of the QSS as below, and click Next. - 19 - TL-WR740N/TL-WR741ND 150Mbps Wireless N Router Step 2: Press and hold the QSS button of the adapter directly for a while until the next screen appears.

User Guide
Page 27
TL-WR740N/TL-WR741ND 150Mbps Wireless N Router The QSS Configuration Screen of Wireless Adapter Method Three: Step 1: Keep the default QSS Status as Enabled and click the Add device button in Figure 4-3, then the following screen will appear. - 20 - The QSS Configuration Screen of Wireless Adapter Step 3: Wait for a while until the next screen appears. Click Finish to complete the QSS configuration.
TL-WR740N/TL-WR741ND 150Mbps Wireless N Router The QSS Configuration Screen of Wireless Adapter Method Three: Step 1: Keep the default QSS Status as Enabled and click the Add device button in Figure 4-3, then the following screen will appear. - 20 - The QSS Configuration Screen of Wireless Adapter Step 3: Wait for a while until the next screen appears. Click Finish to complete the QSS configuration.
User Guide
Page 28
TL-WR740N/TL-WR741ND 150Mbps Wireless N Router Figure 4-4 Add A New Device Step 2: Choose "Press the button of the QSS as below, and click Next. Step 3: For the configuration of the wireless adapter, please choose "Push the button on my access point" in the configuration utility of the new device in two minutes" and click Connect. The QSS Configuration Screen of Wireless Adapter Step 4: Wait for a while until the next screen appears. Click Finish to complete the QSS configuration. - 21 -
TL-WR740N/TL-WR741ND 150Mbps Wireless N Router Figure 4-4 Add A New Device Step 2: Choose "Press the button of the QSS as below, and click Next. Step 3: For the configuration of the wireless adapter, please choose "Push the button on my access point" in the configuration utility of the new device in two minutes" and click Connect. The QSS Configuration Screen of Wireless Adapter Step 4: Wait for a while until the next screen appears. Click Finish to complete the QSS configuration. - 21 -
User Guide
Page 29
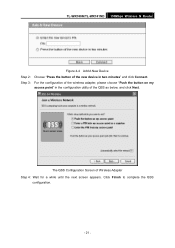
... please choose "Enter a PIN into my access point or a registrar" in Figure 4-3, then the following two methods. TL-WR740N/TL-WR741ND 150Mbps Wireless N Router The QSS Configuration Screen of the wireless adapter in the field after PIN as shown in the figure above. By PIN If the new device supports Wi-Fi ... with the following screen will appear. Then click Connect. ) Note: The PIN code of the adapter is always displayed on the QSS configuration screen Step 3: For the configuration of the QSS as below, and click Next. - 22 - Step 2: Choose "Enter the new device's PIN" and enter the ...
... please choose "Enter a PIN into my access point or a registrar" in Figure 4-3, then the following two methods. TL-WR740N/TL-WR741ND 150Mbps Wireless N Router The QSS Configuration Screen of the wireless adapter in the field after PIN as shown in the figure above. By PIN If the new device supports Wi-Fi ... with the following screen will appear. Then click Connect. ) Note: The PIN code of the adapter is always displayed on the QSS configuration screen Step 3: For the configuration of the QSS as below, and click Next. - 22 - Step 2: Choose "Enter the new device's PIN" and enter the ...

User Guide
Page 30
Step 2: For the configuration of the wireless adapter, please choose "Enter a PIN from my Router Step 1: Get the Current PIN code of the Router in the configuration utility of the QSS as the above figure shown. TL-WR740N/TL-WR741ND 150Mbps Wireless N Router ) Note: The QSS Configuration Screen of Wireless Adapter In this example, the default PIN code of this Router for example). Method Two...
Step 2: For the configuration of the wireless adapter, please choose "Enter a PIN from my Router Step 1: Get the Current PIN code of the Router in the configuration utility of the QSS as the above figure shown. TL-WR740N/TL-WR741ND 150Mbps Wireless N Router ) Note: The QSS Configuration Screen of Wireless Adapter In this example, the default PIN code of this Router for example). Method Two...

User Guide
Page 31
... light green for five minutes if the device has been successfully added to the network. ) Note: 1. TL-WR740N/TL-WR741ND 150Mbps Wireless N Router ) Note: The default PIN code of the Router can configure the IP parameters of the Router is enabled before configuring the QSS. 4.5 Network Figure 4-5 the Network menu There are three submenus under the Network menu (shown in...
... light green for five minutes if the device has been successfully added to the network. ) Note: 1. TL-WR740N/TL-WR741ND 150Mbps Wireless N Router ) Note: The default PIN code of the Router can configure the IP parameters of the Router is enabled before configuring the QSS. 4.5 Network Figure 4-5 the Network menu There are three submenus under the Network menu (shown in...

User Guide
Page 32
....168.1.1). ¾ Subnet Mask - Enter the IP address of the WAN on the screen below. 1. If the new LAN IP Address you can configure the IP parameters of your ISP. The value can see the page as the subnet mask. ) Note: 1. An address code that determines the size... 255.255.255.0 as follows (Figure 4-7): - 25 - You can 't be changed. ¾ IP Address - TL-WR740N/TL-WR741ND 150Mbps Wireless N Router Figure 4-6 LAN ¾ MAC Address - The physical address of the Router, as seen from your Router or reset it in the same subnet, the IP Address pool of the DHCP server will change the...
....168.1.1). ¾ Subnet Mask - Enter the IP address of the WAN on the screen below. 1. If the new LAN IP Address you can configure the IP parameters of your ISP. The value can see the page as the subnet mask. ) Note: 1. An address code that determines the size... 255.255.255.0 as follows (Figure 4-7): - 25 - You can 't be changed. ¾ IP Address - TL-WR740N/TL-WR741ND 150Mbps Wireless N Router Figure 4-6 LAN ¾ MAC Address - The physical address of the Router, as seen from your Router or reset it in the same subnet, the IP Address pool of the DHCP server will change the...
User Guide
Page 36
... to disconnect immediately. The connection will only be terminated although you attempt to Max Idle Time because some advanced configurations, please click the Advanced button, and the page shown in the background. Caution: Sometimes the connection cannot be...29 - Click the Disconnect button to connect immediately. The connection can take effect. ¾ Connect Manually - TL-WR740N/TL-WR741ND 150Mbps Wireless N Router to connect/disconnect immediately. The Internet connection can click the Connect/Disconnect button to have configured the system time on Demand mode.
... to disconnect immediately. The connection will only be terminated although you attempt to Max Idle Time because some advanced configurations, please click the Advanced button, and the page shown in the background. Caution: Sometimes the connection cannot be...29 - Click the Disconnect button to connect immediately. The connection can take effect. ¾ Connect Manually - TL-WR740N/TL-WR741ND 150Mbps Wireless N Router to connect/disconnect immediately. The Internet connection can click the Connect/Disconnect button to have configured the system time on Demand mode.
User Guide
Page 37
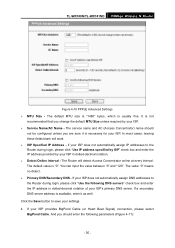
...-decimal notation. ¾ Detect Online Interval - If your ISP does not automatically assign IP addresses to the Router during login, please click "Use the following parameters (Figure 4-11): - 30 - If your ISP does...is necessary for your ISP. ¾ Service Name/AC Name - If a secondary DNS server address is usually fine. TL-WR740N/TL-WR741ND 150Mbps Wireless N Router Figure 4-10 PPPoE Advanced Settings ¾ MTU Size - The value "0" means no detect. ¾ Primary DNS/... is "0". It is not recommended that you should not be configured unless you are sure it as well.
...-decimal notation. ¾ Detect Online Interval - If your ISP does not automatically assign IP addresses to the Router during login, please click "Use the following parameters (Figure 4-11): - 30 - If your ISP does...is necessary for your ISP. ¾ Service Name/AC Name - If a secondary DNS server address is usually fine. TL-WR740N/TL-WR741ND 150Mbps Wireless N Router Figure 4-10 PPPoE Advanced Settings ¾ MTU Size - The value "0" means no detect. ¾ Primary DNS/... is "0". It is not recommended that you should not be configured unless you are sure it as well.
User Guide
Page 40
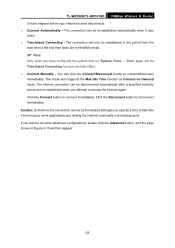
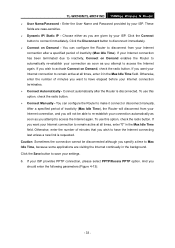
... connection as soon as you wish to have the Internet connecting last unless a new link is disconnected. To use this option, check the radio button. ¾ Connect Manually...configure the Router to disconnect from your Internet connection, and you want your Internet connection after the Router is requested. To use this option, check the radio button. Click the Connect button to re-establish your Internet connection terminates. ¾ Connect Automatically - Caution: Sometimes the connection cannot be able to connect immediately. TL-WR740N/TL-WR741ND 150Mbps Wireless N Router...
... connection as soon as you wish to have the Internet connecting last unless a new link is disconnected. To use this option, check the radio button. ¾ Connect Manually...configure the Router to disconnect from your Internet connection, and you want your Internet connection after the Router is requested. To use this option, check the radio button. Click the Connect button to re-establish your Internet connection terminates. ¾ Connect Automatically - Caution: Sometimes the connection cannot be able to connect immediately. TL-WR740N/TL-WR741ND 150Mbps Wireless N Router...


