User Guide
Page 6
... Defaults ...3 Chapter 2. More Configuration for the Print Server 39 4.1 Login...39 4.2 Status ...41 4.2.1 4.2.2 4.2.3 4.2.4 System ...41 Printer...42 Wireless...43 TCP/IP...43 4.3 Setup ...44 4.3.1 4.3.2 4.3.3 System Setup ...44 Wireless Setup ...46 TCP/IP Setup ...47 4.4 Misc ...48 I Hardware Installation 4 2.1 Preparation...4 2.2 Typology...4 2.3 Connection ...4 Chapter 3. How to Configure the Print Server 6 3.1 Using Utility in Windows XP/Vista...
... Defaults ...3 Chapter 2. More Configuration for the Print Server 39 4.1 Login...39 4.2 Status ...41 4.2.1 4.2.2 4.2.3 4.2.4 System ...41 Printer...42 Wireless...43 TCP/IP...43 4.3 Setup ...44 4.3.1 4.3.2 4.3.3 System Setup ...44 Wireless Setup ...46 TCP/IP Setup ...47 4.4 Misc ...48 I Hardware Installation 4 2.1 Preparation...4 2.2 Typology...4 2.3 Connection ...4 Chapter 3. How to Configure the Print Server 6 3.1 Using Utility in Windows XP/Vista...
User Guide
Page 13
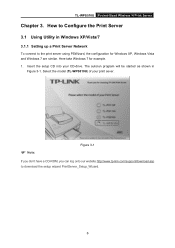
Insert the setup CD into your print sever. ) Note: Figure 3-1 If you don't have a CD-ROM, you can log onto our website http://www.tp-link.com/support/download.asp to the print server using PSWizard, the configuration for example. 1. TL-WPS510U Pocket-Sized Wireless N Print Server Chapter 3. Select the model (TL-WPS510U) of your CD-drive. Here...
Insert the setup CD into your print sever. ) Note: Figure 3-1 If you don't have a CD-ROM, you can log onto our website http://www.tp-link.com/support/download.asp to the print server using PSWizard, the configuration for example. 1. TL-WPS510U Pocket-Sized Wireless N Print Server Chapter 3. Select the model (TL-WPS510U) of your CD-drive. Here...
User Guide
Page 14
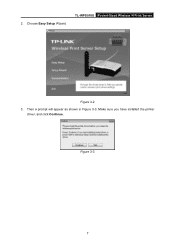
2. TL-WPS510U Pocket-Sized Wireless N Print Server Figure 3-2 3. Make sure you have installed the printer driver, and click Continue. Choose Easy Setup Wizard. Figure 3-3 7 Then a prompt will appear as shown in Figure 3-3.
2. TL-WPS510U Pocket-Sized Wireless N Print Server Figure 3-2 3. Make sure you have installed the printer driver, and click Continue. Choose Easy Setup Wizard. Figure 3-3 7 Then a prompt will appear as shown in Figure 3-3.
User Guide
Page 15
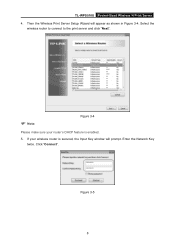
Then the Wireless Print Server Setup Wizard will prompt. Enter the Network Key twice. TL-WPS510U Pocket-Sized Wireless N Print Server 4. If your router's DHCP feature is secured, the Input Key window will appear as shown in Figure 3-4. Click "Connect". Select the wireless router to connect to the print server and click "Next". ) Note: Figure 3-4 Please make sure your wireless router is enabled. 5. Figure 3-5 8
Then the Wireless Print Server Setup Wizard will prompt. Enter the Network Key twice. TL-WPS510U Pocket-Sized Wireless N Print Server 4. If your router's DHCP feature is secured, the Input Key window will appear as shown in Figure 3-4. Click "Connect". Select the wireless router to connect to the print server and click "Next". ) Note: Figure 3-4 Please make sure your wireless router is enabled. 5. Figure 3-5 8
User Guide
Page 19
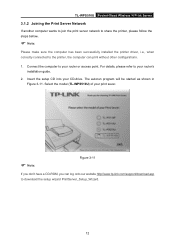
Insert the setup CD into your router or access point. Connect the computer to your CD-drive. The autorun program will be started as shown in Figure 3-11. TL-WPS510U Pocket-Sized Wireless N Print Server 3.1.2 Joining the Print Server Network If another computer wants to... our website http://www.tp-link.com/support/download.asp to download the setup wizard PrintServer_Setup_Wizard. 12 For details, please refer to your print sever. ) Note: Figure 3-11 If you don't have a CD-ROM, you can print without other configurations. 1. Select the model (TL-WPS510U) of your router's ...
Insert the setup CD into your router or access point. Connect the computer to your CD-drive. The autorun program will be started as shown in Figure 3-11. TL-WPS510U Pocket-Sized Wireless N Print Server 3.1.2 Joining the Print Server Network If another computer wants to... our website http://www.tp-link.com/support/download.asp to download the setup wizard PrintServer_Setup_Wizard. 12 For details, please refer to your print sever. ) Note: Figure 3-11 If you don't have a CD-ROM, you can print without other configurations. 1. Select the model (TL-WPS510U) of your router's ...
User Guide
Page 20
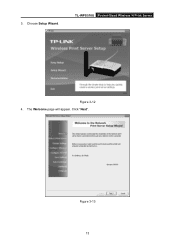
TL-WPS510U Pocket-Sized Wireless N Print Server Figure 3-12 4. Choose Setup Wizard. Click "Next". 3. Figure 3-13 13 The Welcome page will appear.
TL-WPS510U Pocket-Sized Wireless N Print Server Figure 3-12 4. Choose Setup Wizard. Click "Next". 3. Figure 3-13 13 The Welcome page will appear.
User Guide
Page 28
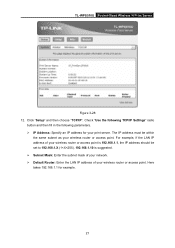
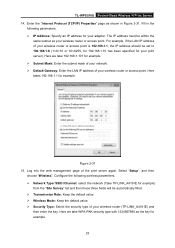
For example, if the LAN IP address of your wireless router or access point is 192.168.1.1, the IP address should be within the same subnet as your print server. Click "Setup" and then choose "TCP/IP". The IP address must be set to 192.168.1.X (1 TL-WPS510U Pocket-Sized Wireless N Print Server Figure 3-28 12. Check "Use the following TCP/IP Settings" radio button and then fill in the following parameters. ¾ IP Address: Specify an IP address for your wireless router or access point.
For example, if the LAN IP address of your wireless router or access point is 192.168.1.1, the IP address should be within the same subnet as your print server. Click "Setup" and then choose "TCP/IP". The IP address must be set to 192.168.1.X (1 TL-WPS510U Pocket-Sized Wireless N Print Server Figure 3-28 12. Check "Use the following TCP/IP Settings" radio button and then fill in the following parameters. ¾ IP Address: Specify an IP address for your wireless router or access point.
User Guide
Page 30
TL-WPS510U Pocket-Sized Wireless N Print Server 14. Fill in Figure 3-31. For example, if the LAN IP address of your wireless router or access point is 192.168.1.1, the IP address should be within the same subnet as shown in the following parameters. ¾ IP Address: Specify an IP address for your wireless router or access point. The IP address must be set to 192.168.1.X (1 Enter the "Internet Protocol (TCP/IP) Properties" page as your adapter.
TL-WPS510U Pocket-Sized Wireless N Print Server 14. Fill in Figure 3-31. For example, if the LAN IP address of your wireless router or access point is 192.168.1.1, the IP address should be within the same subnet as shown in the following parameters. ¾ IP Address: Specify an IP address for your wireless router or access point. The IP address must be set to 192.168.1.X (1 Enter the "Internet Protocol (TCP/IP) Properties" page as your adapter.
User Guide
Page 37
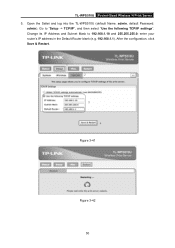
After the configuration, click Save & Restart. 1 2 3 4 Figure 3-41 Figure 3-42 30 Change its IP Address and Subnet Mask to "Setup -> TCP/IP", and then select "Use the following TCP/IP settings". enter your router's IP address in the Default Router blank (e.g. 192.168.1.1). Go to 192.168.1.10 and 255.255.255.0; TL-WPS510U Pocket-Sized Wireless N Print Server 5. Open the Safari and log into the TL-WPS510U (default Name: admin, default Password: admin).
After the configuration, click Save & Restart. 1 2 3 4 Figure 3-41 Figure 3-42 30 Change its IP Address and Subnet Mask to "Setup -> TCP/IP", and then select "Use the following TCP/IP settings". enter your router's IP address in the Default Router blank (e.g. 192.168.1.1). Go to 192.168.1.10 and 255.255.255.0; TL-WPS510U Pocket-Sized Wireless N Print Server 5. Open the Safari and log into the TL-WPS510U (default Name: admin, default Password: admin).
User Guide
Page 38
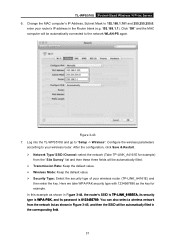
...¾ Wireless Mode: Keep the default value. ¾ Security Type: Select the security type of your wireless router (TP-LINK_A4161E) and then enter the key. Log into the TL-WPS510U and go to 192.168.1.101 and 255.255.255.0; After the configuration, click Save & Restart. ¾ Network... Type/ SSID /Channel: select the network (Take TP-LINK_A4161E for example. Change the MAC computer's IP Address, Subnet Mask to "Setup -> Wireless". Figure 3-43 ...
...¾ Wireless Mode: Keep the default value. ¾ Security Type: Select the security type of your wireless router (TP-LINK_A4161E) and then enter the key. Log into the TL-WPS510U and go to 192.168.1.101 and 255.255.255.0; After the configuration, click Save & Restart. ¾ Network... Type/ SSID /Channel: select the network (Take TP-LINK_A4161E for example. Change the MAC computer's IP Address, Subnet Mask to "Setup -> Wireless". Figure 3-43 ...
User Guide
Page 51
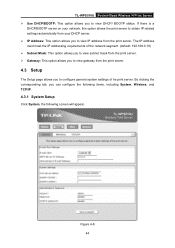
...; Gateway: This option allows you to view gateway from the print server. 4.3 Setup The Setup page allows you can configure the following items, including System, Wireless, and TCP/IP. 4.3.1 System Setup Click System, the following screen will appear. Figure 4-8 44 TL-WPS510U Pocket-Sized Wireless N Print Server ¾ Use DHCP/BOOTP: This option allows you...
...; Gateway: This option allows you to view gateway from the print server. 4.3 Setup The Setup page allows you can configure the following items, including System, Wireless, and TCP/IP. 4.3.1 System Setup Click System, the following screen will appear. Figure 4-8 44 TL-WPS510U Pocket-Sized Wireless N Print Server ¾ Use DHCP/BOOTP: This option allows you...

User Guide
Page 53
TL-WPS510U Pocket-Sized Wireless N Print Server 4.3.2 Wireless Setup Click Wireless, the following screen will appear. Figure 4-9 46
TL-WPS510U Pocket-Sized Wireless N Print Server 4.3.2 Wireless Setup Click Wireless, the following screen will appear. Figure 4-9 46
User Guide
Page 54
...Security Type: To change the wireless security settings based on your network. This option allows the print server to join in. 4.3.3 TCP/IP Setup Click TCP/IP, the following site survey table will appear. Figure 4-10 ¾ Use DHCP/BOOTP: This option allows you to connect ... Indicates the channel setting for this print server. ¾ Transmission Rate: Select the basic transfer rates based on the speed of existing wireless network. TL-WPS510U Pocket-Sized Wireless N Print Server Basic Settings: ¾ Network Type: To change the WLAN type to Ad-Hoc (default) or Infrastructure. ¾...
...Security Type: To change the wireless security settings based on your network. This option allows the print server to join in. 4.3.3 TCP/IP Setup Click TCP/IP, the following site survey table will appear. Figure 4-10 ¾ Use DHCP/BOOTP: This option allows you to connect ... Indicates the channel setting for this print server. ¾ Transmission Rate: Select the basic transfer rates based on the speed of existing wireless network. TL-WPS510U Pocket-Sized Wireless N Print Server Basic Settings: ¾ Network Type: To change the WLAN type to Ad-Hoc (default) or Infrastructure. ¾...
User Guide
Page 55
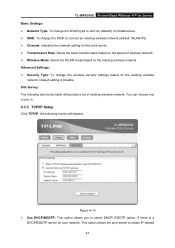
Figure 4-11 48 TL-WPS510U Pocket-Sized Wireless N Print Server settings automatically from your DHCP server. ¾ IP Address: This option allows you to input IP address from the print ... to input gateway from the print server. The IP address must meet the IP addressing requirements of the network segment. )Note: On the TCP/IP Setup screen, specify a fixed IP address is highly recommended. ¾ Subnet Mask: This option allows you to its Factory Default settings.
Figure 4-11 48 TL-WPS510U Pocket-Sized Wireless N Print Server settings automatically from your DHCP server. ¾ IP Address: This option allows you to input IP address from the print ... to input gateway from the print server. The IP address must meet the IP addressing requirements of the network segment. )Note: On the TCP/IP Setup screen, specify a fixed IP address is highly recommended. ¾ Subnet Mask: This option allows you to its Factory Default settings.
User Guide
Page 59
... power adapter included with the print server matches the AC voltage in order for the printer can 't find print server. The setup Wizard can cause printing errors. Check to lower. 5. TL-WPS510U Pocket-Sized Wireless N Print Server Appendix B: Frequently Asked Questions 1. The upgrading process indication bar stops and does not seem to proceed...
... power adapter included with the print server matches the AC voltage in order for the printer can 't find print server. The setup Wizard can cause printing errors. Check to lower. 5. TL-WPS510U Pocket-Sized Wireless N Print Server Appendix B: Frequently Asked Questions 1. The upgrading process indication bar stops and does not seem to proceed...