User Guide
Page 3
... harmful interference. 2) This device must accept any other antenna or transmitter. FCC RF Radiation Exposure Statement This equipment complies with FCC RF radiation exposure limits set forth for a Class B digital device, pursuant to part 15 of the FCC Rules. This device and its antenna must not be co-located or operating...
... harmful interference. 2) This device must accept any other antenna or transmitter. FCC RF Radiation Exposure Statement This equipment complies with FCC RF radiation exposure limits set forth for a Class B digital device, pursuant to part 15 of the FCC Rules. This device and its antenna must not be co-located or operating...
User Guide
Page 6
...How to Configure the Print Server 6 3.1 Using Utility in Windows XP/Vista/7 6 3.1.1 Setting up a Print Server Network 6 3.1.2 Joining the Print Server Network 12 3.2 Using Web Management Page in Windows XP/Vista/7 16 3.2.1 Setting up a Print Server Network 16 3.2.2 Joining the Print Server Network 26 3.3 Using Web ...Management Page in MAC OS 27 3.3.1 3.3.2 3.3.3 Setting up a Print Server Network 27 Printer Installation in MAC OS 35 Joining the Print Server Network 38 Chapter 4. More Configuration...
...How to Configure the Print Server 6 3.1 Using Utility in Windows XP/Vista/7 6 3.1.1 Setting up a Print Server Network 6 3.1.2 Joining the Print Server Network 12 3.2 Using Web Management Page in Windows XP/Vista/7 16 3.2.1 Setting up a Print Server Network 16 3.2.2 Joining the Print Server Network 26 3.3 Using Web ...Management Page in MAC OS 27 3.3.1 3.3.2 3.3.3 Setting up a Print Server Network 27 Printer Installation in MAC OS 35 Joining the Print Server Network 38 Chapter 4. More Configuration...
User Guide
Page 13
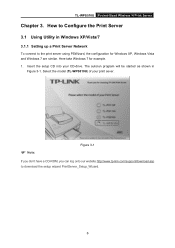
...Windows XP/Vista/7 3.1.1 Setting up a Print Server Network To connect to download the setup wizard PrintServer_Setup_Wizard. 6 Insert the setup CD into your print sever. ) Note: Figure 3-1 If you don't have a CD-ROM, you can log onto our website http://www.tp-link.com/support/download.asp ...to the print server using PSWizard, the configuration for example. 1. Select the model (TL-WPS510U) of your CD-drive. Here take Windows 7 for Windows XP, Windows Vista and Windows 7...
...Windows XP/Vista/7 3.1.1 Setting up a Print Server Network To connect to download the setup wizard PrintServer_Setup_Wizard. 6 Insert the setup CD into your print sever. ) Note: Figure 3-1 If you don't have a CD-ROM, you can log onto our website http://www.tp-link.com/support/download.asp ...to the print server using PSWizard, the configuration for example. 1. Select the model (TL-WPS510U) of your CD-drive. Here take Windows 7 for Windows XP, Windows Vista and Windows 7...
User Guide
Page 17
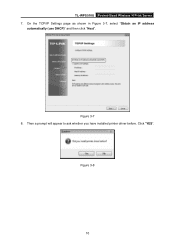
Click "YES". Figure 3-7 8. Then a prompt will appear to ask whether you have installed printer driver before. Figure 3-8 10 On the TCP/IP Settings page as shown in Figure 3-7, select "Obtain an IP address automatically (use DHCP)" and then click "Next". TL-WPS510U Pocket-Sized Wireless N Print Server 7.
Click "YES". Figure 3-7 8. Then a prompt will appear to ask whether you have installed printer driver before. Figure 3-8 10 On the TCP/IP Settings page as shown in Figure 3-7, select "Obtain an IP address automatically (use DHCP)" and then click "Next". TL-WPS510U Pocket-Sized Wireless N Print Server 7.
User Guide
Page 21
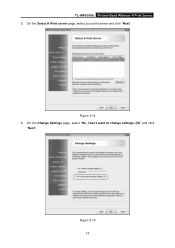
Figure 3-15 14 On the Select A Print server page, select your print server and click "Next". On the Change Settings page, select "No, I don't want to change settings. (O)" and click "Next". Figure 3-14 6. TL-WPS510U Pocket-Sized Wireless N Print Server 5.
Figure 3-15 14 On the Select A Print server page, select your print server and click "Next". On the Change Settings page, select "No, I don't want to change settings. (O)" and click "Next". Figure 3-14 6. TL-WPS510U Pocket-Sized Wireless N Print Server 5.
User Guide
Page 23
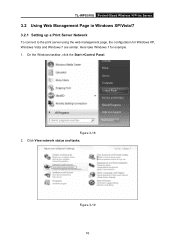
TL-WPS510U Pocket-Sized Wireless N Print Server 3.2 Using Web Management Page in Windows XP/Vista/7 3.2.1 Setting up a Print Server Network To connect to the print server using the web management page, the configuration for example. 1. Figure 3-18 2. Figure 3-19 16 Click View network status and tasks. Here take Windows 7 for Windows XP, Windows Vista and Windows 7 are similar. On the Windows taskbar, click the Start->Control Panel.
TL-WPS510U Pocket-Sized Wireless N Print Server 3.2 Using Web Management Page in Windows XP/Vista/7 3.2.1 Setting up a Print Server Network To connect to the print server using the web management page, the configuration for example. 1. Figure 3-18 2. Figure 3-19 16 Click View network status and tasks. Here take Windows 7 for Windows XP, Windows Vista and Windows 7 are similar. On the Windows taskbar, click the Start->Control Panel.
User Guide
Page 24
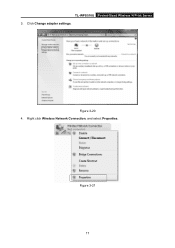
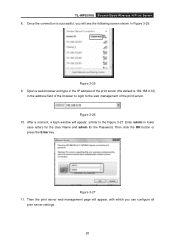
Click Change adapter settings. Figure 3-21 17 Right click Wireless Network Connection, and select Properties. Figure 3-20 4. TL-WPS510U Pocket-Sized Wireless N Print Server 3.
Click Change adapter settings. Figure 3-21 17 Right click Wireless Network Connection, and select Properties. Figure 3-20 4. TL-WPS510U Pocket-Sized Wireless N Print Server 3.
User Guide
Page 27
... all print server settings. 20 Figure 3-27 11. Figure 3-25 9. After a moment, a login window will see the following screen shown in the address field of the browser to login to the Figure 3-27. Enter admin in lower case letters for the User Name and admin for the Password. TL-WPS510U Pocket-Sized Wireless...
... all print server settings. 20 Figure 3-27 11. Figure 3-25 9. After a moment, a login window will see the following screen shown in the address field of the browser to login to the Figure 3-27. Enter admin in lower case letters for the User Name and admin for the Password. TL-WPS510U Pocket-Sized Wireless...
User Guide
Page 28
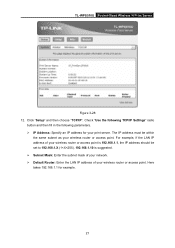
Click "Setup" and then choose "TCP/IP". The IP address must be set to 192.168.1.X (1 For example, if the LAN IP address of your wireless router or access point is 192.168.1.1, the IP address should be within the same subnet as your print server. TL-WPS510U Pocket-Sized Wireless N Print Server Figure 3-28 12. Check "Use the following TCP/IP Settings" radio button and then fill in the following parameters. ¾ IP Address: Specify an IP address for your wireless router or access point.
Click "Setup" and then choose "TCP/IP". The IP address must be set to 192.168.1.X (1 For example, if the LAN IP address of your wireless router or access point is 192.168.1.1, the IP address should be within the same subnet as your print server. TL-WPS510U Pocket-Sized Wireless N Print Server Figure 3-28 12. Check "Use the following TCP/IP Settings" radio button and then fill in the following parameters. ¾ IP Address: Specify an IP address for your wireless router or access point.
User Guide
Page 30
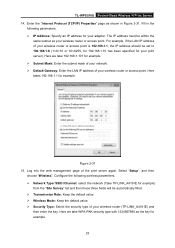
For example, if the LAN IP address of your adapter. TL-WPS510U Pocket-Sized Wireless N Print Server 14. Fill in the following parameters. ¾ IP Address: Specify an IP address for your wireless router or access point is 192.168.1.1, the IP address should be within the same subnet as shown in Figure 3-31. The IP address must be set to 192.168.1.X (1 Enter the "Internet Protocol (TCP/IP) Properties" page as your wireless router or access point.
For example, if the LAN IP address of your adapter. TL-WPS510U Pocket-Sized Wireless N Print Server 14. Fill in the following parameters. ¾ IP Address: Specify an IP address for your wireless router or access point is 192.168.1.1, the IP address should be within the same subnet as shown in Figure 3-31. The IP address must be set to 192.168.1.X (1 Enter the "Internet Protocol (TCP/IP) Properties" page as your wireless router or access point.
User Guide
Page 34
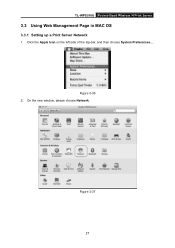
Figure 3-37 27 TL-WPS510U Pocket-Sized Wireless N Print Server 3.3 Using Web Management Page in MAC OS 3.3.1 Setting up a Print Server Network 1. Figure 3-36 2. Click the Apple Icon on the left side of the top-bar, and then choose System Preferences.... On the new window, please choose Network.
Figure 3-37 27 TL-WPS510U Pocket-Sized Wireless N Print Server 3.3 Using Web Management Page in MAC OS 3.3.1 Setting up a Print Server Network 1. Figure 3-36 2. Click the Apple Icon on the left side of the top-bar, and then choose System Preferences.... On the new window, please choose Network.

User Guide
Page 35
Follow the steps as shown in Figure 3-38 and Figure 3-39 to set the IP address. 1 2 Figure 3-38 3 4 5 Figure 3-39 28 TL-WPS510U Pocket-Sized Wireless N Print Server 3.
Follow the steps as shown in Figure 3-38 and Figure 3-39 to set the IP address. 1 2 Figure 3-38 3 4 5 Figure 3-39 28 TL-WPS510U Pocket-Sized Wireless N Print Server 3.
User Guide
Page 37
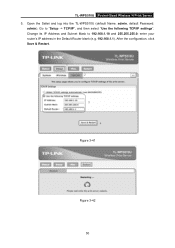
enter your router's IP address in the Default Router blank (e.g. 192.168.1.1). Open the Safari and log into the TL-WPS510U (default Name: admin, default Password: admin). Change its IP Address and Subnet Mask to "Setup -> TCP/IP", and then select "Use the following TCP/IP settings". After the configuration, click Save & Restart. 1 2 3 4 Figure 3-41 Figure 3-42 30 Go to 192.168.1.10 and 255.255.255.0; TL-WPS510U Pocket-Sized Wireless N Print Server 5.
enter your router's IP address in the Default Router blank (e.g. 192.168.1.1). Open the Safari and log into the TL-WPS510U (default Name: admin, default Password: admin). Change its IP Address and Subnet Mask to "Setup -> TCP/IP", and then select "Use the following TCP/IP settings". After the configuration, click Save & Restart. 1 2 3 4 Figure 3-41 Figure 3-42 30 Go to 192.168.1.10 and 255.255.255.0; TL-WPS510U Pocket-Sized Wireless N Print Server 5.
User Guide
Page 46
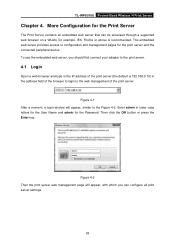
... that can configure all print server settings. 39 Figure 4-1 After a moment, a login window will appear, with which you should first connect your adapter to the web management of the print server (the default is recommended. More Configuration for the print server and the connected peripheral device. TL-WPS510U Pocket-Sized Wireless N Print Server...
... that can configure all print server settings. 39 Figure 4-1 After a moment, a login window will appear, with which you should first connect your adapter to the web management of the print server (the default is recommended. More Configuration for the print server and the connected peripheral device. TL-WPS510U Pocket-Sized Wireless N Print Server...

User Guide
Page 49
... connected with the print server, it will be show in the manufacture box. ¾ Model Number: This option allows you to set the printer. For Example: Waiting for job. 4.2.2 Printer TL-WPS510U Pocket-Sized Wireless N Print Server Figure 4-5 ¾ Manufacturer: This option allows you to view status of the printer. It is means...
... connected with the print server, it will be show in the manufacture box. ¾ Model Number: This option allows you to set the printer. For Example: Waiting for job. 4.2.2 Printer TL-WPS510U Pocket-Sized Wireless N Print Server Figure 4-5 ¾ Manufacturer: This option allows you to view status of the printer. It is means...

User Guide
Page 50
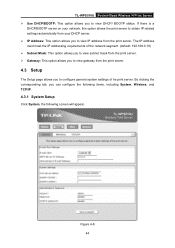
TL-WPS510U Pocket-Sized Wireless N Print Server 4.2.3 Wireless The Wireless Status page shows the current wireless information of the print server. 4.2.4 TCP/IP Figure 4-6 The TCP/IP Status page shows the current TCP/IP settings of the print server. Figure 4-7 43
TL-WPS510U Pocket-Sized Wireless N Print Server 4.2.3 Wireless The Wireless Status page shows the current wireless information of the print server. 4.2.4 TCP/IP Figure 4-6 The TCP/IP Status page shows the current TCP/IP settings of the print server. Figure 4-7 43
User Guide
Page 51
By clicking the corresponding tab, you to view DHCP/ BOOTP status. TL-WPS510U Pocket-Sized Wireless N Print Server ¾ Use DHCP/BOOTP: This option allows you to configure general system settings of he print server. The IP address must meet the IP addressing requirements of the network segment. (default: 192....print server. Figure 4-8 44 If there is a DHCP/BOOTP server on your network, this option allows the print server to obtain IP-related settings automatically from your DHCP server. ¾ IP Address: This option allows you to view IP address from the print server. 4.3 Setup The ...
By clicking the corresponding tab, you to view DHCP/ BOOTP status. TL-WPS510U Pocket-Sized Wireless N Print Server ¾ Use DHCP/BOOTP: This option allows you to configure general system settings of he print server. The IP address must meet the IP addressing requirements of the network segment. (default: 192....print server. Figure 4-8 44 If there is a DHCP/BOOTP server on your network, this option allows the print server to obtain IP-related settings automatically from your DHCP server. ¾ IP Address: This option allows you to view IP address from the print server. 4.3 Setup The ...
User Guide
Page 54
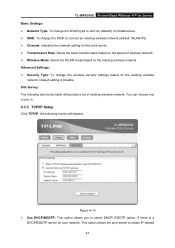
... Security Type: To change the SSID to connect an existing wireless network.(default: WLAN-PS) ¾ Channel: Indicates the channel setting for this print server. ¾ Transmission Rate: Select the basic transfer rates based on the speed of existing wireless network. If... to obtain IP-related 47 This option allows the print server to select DHCP/ BOOTP option. Default setting is a DHCP/BOOTP server on the existing wireless network. TL-WPS510U Pocket-Sized Wireless N Print Server Basic Settings: ¾ Network Type: To change the WLAN type to Ad-Hoc (default) or Infrastructure. ...
... Security Type: To change the SSID to connect an existing wireless network.(default: WLAN-PS) ¾ Channel: Indicates the channel setting for this print server. ¾ Transmission Rate: Select the basic transfer rates based on the speed of existing wireless network. If... to obtain IP-related 47 This option allows the print server to select DHCP/ BOOTP option. Default setting is a DHCP/BOOTP server on the existing wireless network. TL-WPS510U Pocket-Sized Wireless N Print Server Basic Settings: ¾ Network Type: To change the WLAN type to Ad-Hoc (default) or Infrastructure. ...
User Guide
Page 55
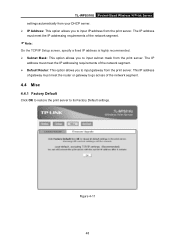
Figure 4-11 48 TL-WPS510U Pocket-Sized Wireless N Print Server settings automatically from your DHCP server. ¾ IP Address: This option allows you to input gateway from the print server. The IP address must meet the .... )Note: On the TCP/IP Setup screen, specify a fixed IP address is highly recommended. ¾ Subnet Mask: This option allows you to its Factory Default settings. The IP address must meet the IP addressing requirements of the network segment. 4.4 Misc 4.4.1 Factory Default Click OK to restore the print server to input...
Figure 4-11 48 TL-WPS510U Pocket-Sized Wireless N Print Server settings automatically from your DHCP server. ¾ IP Address: This option allows you to input gateway from the print server. The IP address must meet the .... )Note: On the TCP/IP Setup screen, specify a fixed IP address is highly recommended. ¾ Subnet Mask: This option allows you to its Factory Default settings. The IP address must meet the IP addressing requirements of the network segment. 4.4 Misc 4.4.1 Factory Default Click OK to restore the print server to input...
User Guide
Page 59
...server unit. 2) Upgrade the print server again by a loose connection of the print server to function. In addition, check the cable connection. TL-WPS510U Pocket-Sized Wireless N Print Server Appendix B: Frequently Asked Questions 1. The setup Wizard can cause printing errors. Using an incorrect AC adapter will ... included with that if the power adapters are damaged. Power Related Problems The print server requires an external AC power adapter in print port setting. 2. If the pins are not available to you have a power problem, check to be caused by PSAdmin or WEB browser. 4. ...
...server unit. 2) Upgrade the print server again by a loose connection of the print server to function. In addition, check the cable connection. TL-WPS510U Pocket-Sized Wireless N Print Server Appendix B: Frequently Asked Questions 1. The setup Wizard can cause printing errors. Using an incorrect AC adapter will ... included with that if the power adapters are damaged. Power Related Problems The print server requires an external AC power adapter in print port setting. 2. If the pins are not available to you have a power problem, check to be caused by PSAdmin or WEB browser. 4. ...