
User Guide
Page 3
...device must not be co-located or operating in which the receiver is no guarantee that interference will not occur in a residential installation. "To comply with FCC RF exposure compliance requirements, this equipment does cause harmful interference to radio or television reception, which can... radiate radio frequency energy and, if not installed and used for an uncontrolled environment. CE Mark Warning This is applicable to only Mobile Configurations. Any changes or modifications not...
...device must not be co-located or operating in which the receiver is no guarantee that interference will not occur in a residential installation. "To comply with FCC RF exposure compliance requirements, this equipment does cause harmful interference to radio or television reception, which can... radiate radio frequency energy and, if not installed and used for an uncontrolled environment. CE Mark Warning This is applicable to only Mobile Configurations. Any changes or modifications not...

User Guide
Page 6
CONTENTS Package Contents ...1 Chapter 1 Introduction 2 1.1 Overview of the Product 2 1.2 Features ...2 Chapter 2 Installation Guide 3 2.1 Software Installation 3 2.1.1 Overview ...3 2.1.2 Software Installation for Windows XP 3 2.1.3 Software Installation for Windows Vista 8 Chapter 3 Configuration 13 3.1 Current Status ...13 3.2 Profile Management 15 3.2.1 Add or Modify a Configuration Profile 15 3.2.2 Remove a profile 20 3.2.3 Switch another Profile 21 3.2.4 ...
CONTENTS Package Contents ...1 Chapter 1 Introduction 2 1.1 Overview of the Product 2 1.2 Features ...2 Chapter 2 Installation Guide 3 2.1 Software Installation 3 2.1.1 Overview ...3 2.1.2 Software Installation for Windows XP 3 2.1.3 Software Installation for Windows Vista 8 Chapter 3 Configuration 13 3.1 Current Status ...13 3.2 Profile Management 15 3.2.1 Add or Modify a Configuration Profile 15 3.2.2 Remove a profile 20 3.2.3 Switch another Profile 21 3.2.4 ...
User Guide
Page 8
... is designed to provide a high-speed and unrivaled wireless performance for your notebook. the TP-LINK Wireless Client Utility helps you step-by-step through the installation process; TL-WN861N Wireless N Mini PCI Adapter Chapter 1 Introduction Thank you for choosing the TL-WN861N Wireless N Mini PCI Adapter! 1.1 Overview of up to 300Mbps for maximum throughput, supports automatically...
... is designed to provide a high-speed and unrivaled wireless performance for your notebook. the TP-LINK Wireless Client Utility helps you step-by-step through the installation process; TL-WN861N Wireless N Mini PCI Adapter Chapter 1 Introduction Thank you for choosing the TL-WN861N Wireless N Mini PCI Adapter! 1.1 Overview of up to 300Mbps for maximum throughput, supports automatically...
User Guide
Page 9
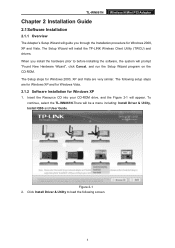
... the Figure 2-1 will install the TP-LINK Wireless Client Utility (TWCU) and drivers. Figure 2-1 2. The Setup steps for Windows 2000, XP and Vista are for Windows XP and for Windows Vista. 2.1.2 Software Installation for Windows 2000, XP and Vista. To continue, select the TL-WN861N.There will be a menu including: Install Driver & Utility, Install QSS and User Guide...
... the Figure 2-1 will install the TP-LINK Wireless Client Utility (TWCU) and drivers. Figure 2-1 2. The Setup steps for Windows 2000, XP and Vista are for Windows XP and for Windows Vista. 2.1.2 Software Installation for Windows 2000, XP and Vista. To continue, select the TL-WN861N.There will be a menu including: Install Driver & Utility, Install QSS and User Guide...
User Guide
Page 10
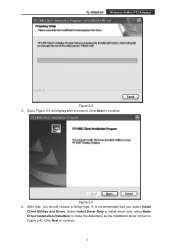
Soon, Figure 2-3 will display after a moment. TL-WN861N Wireless N Mini PCI Adapter Figure 2-2 3. Select Install Driver Only to install driver only, select Make Driver Installation Diskette(s) to continue. 4 Click Next to make the diskette(s) as the installation driver (shown in Figure 2-4). Click Next to continue. It is recommended that , you select Install Client Utilities and Driver. After that you should choose a Setup type. Figure 2-3 4.
Soon, Figure 2-3 will display after a moment. TL-WN861N Wireless N Mini PCI Adapter Figure 2-2 3. Select Install Driver Only to install driver only, select Make Driver Installation Diskette(s) to continue. 4 Click Next to make the diskette(s) as the installation driver (shown in Figure 2-4). Click Next to continue. It is recommended that , you select Install Client Utilities and Driver. After that you should choose a Setup type. Figure 2-3 4.

User Guide
Page 11
Click Browse to continue the installation. 5 Click Next to change the destination location for the software, then click Next in the screen below (shown in Figure 2-5). After that you should create a new folder name or select one from the Existing Folders list. TL-WN861N Wireless N Mini PCI Adapter Figure 2-4 5. It is recommended that , select the program folder, you keep the default setting. Figure 2-5 6.
Click Browse to continue the installation. 5 Click Next to change the destination location for the software, then click Next in the screen below (shown in Figure 2-5). After that you should create a new folder name or select one from the Existing Folders list. TL-WN861N Wireless N Mini PCI Adapter Figure 2-4 5. It is recommended that , select the program folder, you keep the default setting. Figure 2-5 6.
User Guide
Page 13
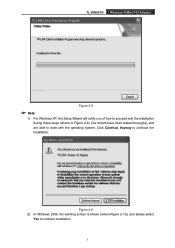
Figure 2-9 2) In Windows 2000, the warning screen is shown below (Figure 2-10), and please select Yes to continue the Installation. Click Continue Anyway to continue installation. 7 TL-WN861N Wireless N Mini PCI Adapter Figure 2-8 ) Note: 1) For Windows XP, the Setup Wizard will notify you of how to proceed with the operating system. Our drivers have been tested thoroughly, and are able to work with the installation during these steps (shown in Figure 2-9).
Figure 2-9 2) In Windows 2000, the warning screen is shown below (Figure 2-10), and please select Yes to continue the Installation. Click Continue Anyway to continue installation. 7 TL-WN861N Wireless N Mini PCI Adapter Figure 2-8 ) Note: 1) For Windows XP, the Setup Wizard will notify you of how to proceed with the operating system. Our drivers have been tested thoroughly, and are able to work with the installation during these steps (shown in Figure 2-9).
User Guide
Page 14
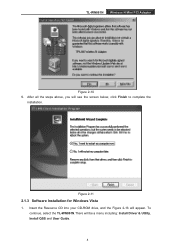
Insert the Resource CD into your CD-ROM drive, and the Figure 2-13 will be a menu including: Install Driver & Utility, Install QSS and User Guide. 8 To continue, select the TL-WN861N.There will appear. TL-WN861N Wireless N Mini PCI Adapter Figure 2-10 9. After all the steps above, you will see the screen below, click Finish to complete the installation. Figure 2-11 2.1.3 Software Installation for Windows Vista 1.
Insert the Resource CD into your CD-ROM drive, and the Figure 2-13 will be a menu including: Install Driver & Utility, Install QSS and User Guide. 8 To continue, select the TL-WN861N.There will appear. TL-WN861N Wireless N Mini PCI Adapter Figure 2-10 9. After all the steps above, you will see the screen below, click Finish to complete the installation. Figure 2-11 2.1.3 Software Installation for Windows Vista 1.
User Guide
Page 15
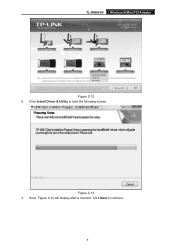
Figure 2-13 3. Soon, Figure 2-14 will display after a moment. Click Next to load the following screen. TL-WN861N Wireless N Mini PCI Adapter Figure 2-12 2. Click Install Driver & Utility to continue. 9
Figure 2-13 3. Soon, Figure 2-14 will display after a moment. Click Next to load the following screen. TL-WN861N Wireless N Mini PCI Adapter Figure 2-12 2. Click Install Driver & Utility to continue. 9
User Guide
Page 17
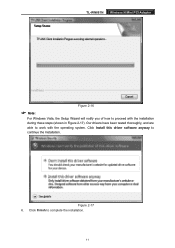
Figure 2-17 6. Click Install this driver software anyway to proceed with the operating system. TL-WN861N Wireless N Mini PCI Adapter Figure 2-16 ) Note: For Windows Vista, the Setup Wizard will notify you of how to continue the Installation. Our drivers have been tested thoroughly, and are able to complete the installation. 11 Click Finish to work with the installation during these steps (shown in Figure 2-17).
Figure 2-17 6. Click Install this driver software anyway to proceed with the operating system. TL-WN861N Wireless N Mini PCI Adapter Figure 2-16 ) Note: For Windows Vista, the Setup Wizard will notify you of how to continue the Installation. Our drivers have been tested thoroughly, and are able to complete the installation. 11 Click Finish to work with the installation during these steps (shown in Figure 2-17).
User Guide
Page 19
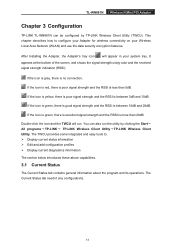
... If the icon is yellow, there is poor signal strength and the RSSI is more than 5dB. After Installing the Adapter, the Adapter's tray icon will run the utility by TP-LINK Wireless Client Utility (TWCU). The Current Status tab needn't any configurations. 13 The TWCU provides some integrated ... system tray. If the icon is green, there is excellent signal strength and the RSSI is between 10dB and 20dB. TL-WN861N Wireless N Mini PCI Adapter Chapter 3 Configuration TP-LINK TL-WN861N can also run . If the icon is green, there is good signal strength and the RSSI is no connection. You...
... If the icon is yellow, there is poor signal strength and the RSSI is more than 5dB. After Installing the Adapter, the Adapter's tray icon will run the utility by TP-LINK Wireless Client Utility (TWCU). The Current Status tab needn't any configurations. 13 The TWCU provides some integrated ... system tray. If the icon is green, there is excellent signal strength and the RSSI is between 10dB and 20dB. TL-WN861N Wireless N Mini PCI Adapter Chapter 3 Configuration TP-LINK TL-WN861N can also run . If the icon is green, there is good signal strength and the RSSI is no connection. You...
User Guide
Page 31
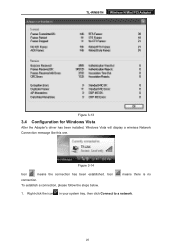
Icon connection. To establish a connection, please follow the steps below. means there is no 1. Right-click the icon in your system tray, then click Connect to a network. 25 TL-WN861N Wireless N Mini PCI Adapter Figure 3-13 3.4 Configuration for Windows Vista After the Adapter's driver has been installed, Windows Vista will display a wireless Network Connection message like this one. Figure 3-14 Icon means the connection has been established.
Icon connection. To establish a connection, please follow the steps below. means there is no 1. Right-click the icon in your system tray, then click Connect to a network. 25 TL-WN861N Wireless N Mini PCI Adapter Figure 3-13 3.4 Configuration for Windows Vista After the Adapter's driver has been installed, Windows Vista will display a wireless Network Connection message like this one. Figure 3-14 Icon means the connection has been established.
User Guide
Page 34
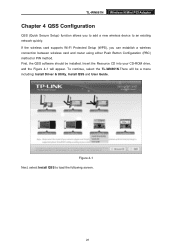
... PIN method. Insert the Resource CD into your CD-ROM drive, and the Figure 4-1 will be installed. To continue, select the TL-WN861N.There will appear. First, the QSS software should be a menu including: Install Driver & Utility, Install QSS and User Guide. If the wireless card supports Wi-Fi Protected Setup (WPS), you to add...
... PIN method. Insert the Resource CD into your CD-ROM drive, and the Figure 4-1 will be installed. To continue, select the TL-WN861N.There will appear. First, the QSS software should be a menu including: Install Driver & Utility, Install QSS and User Guide. If the wireless card supports Wi-Fi Protected Setup (WPS), you to add...

User Guide
Page 35
... to complete the QSS installation. After that, QSS function can see the welcome screen shown as Figure 4-4. Figure 4-3 2. Firstly, Press the QSS button directly on the desktop to continue. Double click the icon on the front panel of our company for example). 4.1 PBC (Push Button Configuration) method 1. TL-WN861N Wireless N Mini PCI Adapter...
... to complete the QSS installation. After that, QSS function can see the welcome screen shown as Figure 4-4. Figure 4-3 2. Firstly, Press the QSS button directly on the desktop to continue. Double click the icon on the front panel of our company for example). 4.1 PBC (Push Button Configuration) method 1. TL-WN861N Wireless N Mini PCI Adapter...

