

User Guide
Page 3
...protection against harmful interference in conjunction with any interference received, including interference that interference will not occur in a particular installation. This device complies with part 15 of the following two conditions: 1) This device may not cause harmful interference. 2) This device ...device, pursuant to part 15 of at least 20 cm from that to which can radiate radio frequency energy and, if not installed and used for any radio or tv interference caused by unauthorized modifications to this transmitter must accept any other antenna or transmitter." ...
...protection against harmful interference in conjunction with any interference received, including interference that interference will not occur in a particular installation. This device complies with part 15 of the following two conditions: 1) This device may not cause harmful interference. 2) This device ...device, pursuant to part 15 of at least 20 cm from that to which can radiate radio frequency energy and, if not installed and used for any radio or tv interference caused by unauthorized modifications to this transmitter must accept any other antenna or transmitter." ...

User Guide
Page 6
CONTENTS Package Contents ...1 Chapter 1 Introduction 2 1.1 Overview of the Product 2 1.2 Features ...2 1.3 LED Status ...3 Chapter 2 Installation Guide 4 2.1 Hardware Installation 4 2.2 Software Installation 4 2.2.1 Overview ...4 2.2.2 For Windows XP 4 2.2.3 For Windows Vista 9 2.2.4 For Windows 7 13 Chapter 3 Configuration Guide 17 3.1 For Windows XP 17 3.1.1 Current Status 17 3.1.2 Profile Management 19 3.1.3 Diagnostics ...
CONTENTS Package Contents ...1 Chapter 1 Introduction 2 1.1 Overview of the Product 2 1.2 Features ...2 1.3 LED Status ...3 Chapter 2 Installation Guide 4 2.1 Hardware Installation 4 2.2 Software Installation 4 2.2.1 Overview ...4 2.2.2 For Windows XP 4 2.2.3 For Windows Vista 9 2.2.4 For Windows 7 13 Chapter 3 Configuration Guide 17 3.1 For Windows XP 17 3.1.1 Current Status 17 3.1.2 Profile Management 19 3.1.3 Diagnostics ...
User Guide
Page 7
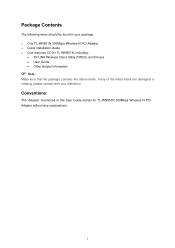
... for TL-WN851N, including: • TP-LINK Wireless Client Utility (TWCU) and Drivers • User Guide • Other Helpful Information ) Note: Make sure that the package contains the above items. If any explanations. 1 Conventions: The 'Adapter' mentioned in your package: ¾ One TL-WN851N 300Mbps Wireless N PCI Adapter ¾ Quick Installation Guide ¾ One resource CD for TL-WN851N...
... for TL-WN851N, including: • TP-LINK Wireless Client Utility (TWCU) and Drivers • User Guide • Other Helpful Information ) Note: Make sure that the package contains the above items. If any explanations. 1 Conventions: The 'Adapter' mentioned in your package: ¾ One TL-WN851N 300Mbps Wireless N PCI Adapter ¾ Quick Installation Guide ¾ One resource CD for TL-WN851N...

User Guide
Page 8
...high rate of up to 300Mbps for maximum throughput. the TP-LINK Wireless Client Utility helps you step-by-step through the installation process; TL-WN851N 300Mbps Wireless N PCI Adapter Chapter 1 Introduction Thank you for choosing the TL-WN851N 300Mbps Wireless N PCI Adapter! 1.1 Overview of the ...Product The adapter is easy to install and manage. it can get a better ...
...high rate of up to 300Mbps for maximum throughput. the TP-LINK Wireless Client Utility helps you step-by-step through the installation process; TL-WN851N 300Mbps Wireless N PCI Adapter Chapter 1 Introduction Thank you for choosing the TL-WN851N 300Mbps Wireless N PCI Adapter! 1.1 Overview of the ...Product The adapter is easy to install and manage. it can get a better ...
User Guide
Page 10
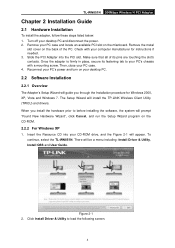
... To continue, select the TL-WN851N. Click Install Driver & Utility to your PC's chassis with your PC's power and turn on the mianboard. Check with a mounting screw. Figure 2-1 2. TL-WN851N 300Mbps Wireless N PCI Adapter Chapter 2 Installation Guide 2.1 Hardware Installation To install the adapter, follow these ...you install the hardware prior to before installing the software, the system will guide you through the Installation procedure for instructions if needed. 3. Remove the metal slot cover on the CD-ROM. 2.2.2 For Windows XP 1. There will install the TP-LINK Wireless ...
... To continue, select the TL-WN851N. Click Install Driver & Utility to your PC's chassis with your PC's power and turn on the mianboard. Check with a mounting screw. Figure 2-1 2. TL-WN851N 300Mbps Wireless N PCI Adapter Chapter 2 Installation Guide 2.1 Hardware Installation To install the adapter, follow these ...you install the hardware prior to before installing the software, the system will guide you through the Installation procedure for instructions if needed. 3. Remove the metal slot cover on the CD-ROM. 2.2.2 For Windows XP 1. There will install the TP-LINK Wireless ...
User Guide
Page 11
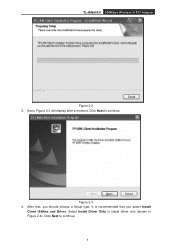
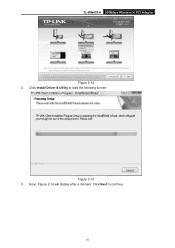
Figure 2-3 4. Click Next to install driver only (shown in Figure 2-4). After that you should choose a Setup type. Select Install Driver Only to continue. It is recommended that , you select Install Client Utilities and Driver. Click Next to continue. 5 TL-WN851N 300Mbps Wireless N PCI Adapter Figure 2-2 3. Soon, Figure 2-3 will display after a moment.
Figure 2-3 4. Click Next to install driver only (shown in Figure 2-4). After that you should choose a Setup type. Select Install Driver Only to continue. It is recommended that , you select Install Client Utilities and Driver. Click Next to continue. 5 TL-WN851N 300Mbps Wireless N PCI Adapter Figure 2-2 3. Soon, Figure 2-3 will display after a moment.
User Guide
Page 12
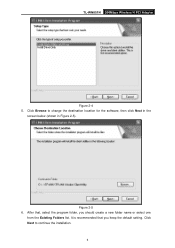
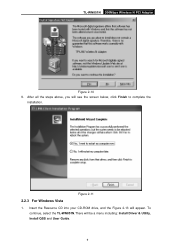
After that you should create a new folder name or select one from the Existing Folders list. It is recommended that , select the program folder, you keep the default setting. Click Browse to continue the installation. 6 Figure 2-5 6. Click Next to change the destination location for the software, then click Next in the screen below (shown in Figure 2-5). TL-WN851N 300Mbps Wireless N PCI Adapter Figure 2-4 5.
After that you should create a new folder name or select one from the Existing Folders list. It is recommended that , select the program folder, you keep the default setting. Click Browse to continue the installation. 6 Figure 2-5 6. Click Next to change the destination location for the software, then click Next in the screen below (shown in Figure 2-5). TL-WN851N 300Mbps Wireless N PCI Adapter Figure 2-4 5.
User Guide
Page 14
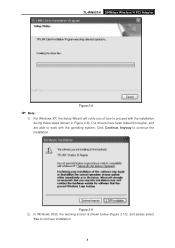
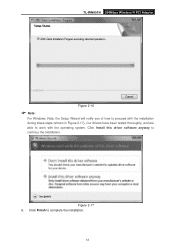
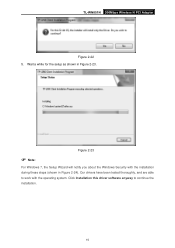
TL-WN851N 300Mbps Wireless N PCI Adapter Figure 2-8 ) Note: 1) For Windows XP, the Setup Wizard will notify you of how to proceed with the operating system. Our drivers have been tested thoroughly, and are able to work with the installation during these steps (shown in Figure 2-9). Figure 2-9 2) In Windows 2000, the warning screen is shown below (Figure 2-10), and please select Yes to continue the Installation. Click Continue Anyway to continue installation. 8
TL-WN851N 300Mbps Wireless N PCI Adapter Figure 2-8 ) Note: 1) For Windows XP, the Setup Wizard will notify you of how to proceed with the operating system. Our drivers have been tested thoroughly, and are able to work with the installation during these steps (shown in Figure 2-9). Figure 2-9 2) In Windows 2000, the warning screen is shown below (Figure 2-10), and please select Yes to continue the Installation. Click Continue Anyway to continue installation. 8
User Guide
Page 15
Figure 2-11 2.2.3 For Windows Vista 1. To continue, select the TL-WN851N.There will appear. Insert the Resource CD into your CD-ROM drive, and the Figure 2-13 will be a menu including: Install Driver & Utility, Install QSS and User Guide. 9 TL-WN851N 300Mbps Wireless N PCI Adapter Figure 2-10 9. After all the steps above, you will see the screen below, click Finish to complete the installation.
Figure 2-11 2.2.3 For Windows Vista 1. To continue, select the TL-WN851N.There will appear. Insert the Resource CD into your CD-ROM drive, and the Figure 2-13 will be a menu including: Install Driver & Utility, Install QSS and User Guide. 9 TL-WN851N 300Mbps Wireless N PCI Adapter Figure 2-10 9. After all the steps above, you will see the screen below, click Finish to complete the installation.
User Guide
Page 16
Soon, Figure 2-14 will display after a moment. Click Install Driver & Utility to continue. 10 Click Next to load the following screen. TL-WN851N 300Mbps Wireless N PCI Adapter Figure 2-12 2. Figure 2-13 3.
Soon, Figure 2-14 will display after a moment. Click Install Driver & Utility to continue. 10 Click Next to load the following screen. TL-WN851N 300Mbps Wireless N PCI Adapter Figure 2-12 2. Figure 2-13 3.
User Guide
Page 18
TL-WN851N 300Mbps Wireless N PCI Adapter Figure 2-16 ) Note: For Windows Vista, the Setup Wizard will notify you of how to complete the installation. 12 Click Finish to proceed with the operating system. Click Install this driver software anyway to work with the installation during these steps (shown in Figure 2-17). Figure 2-17 6. Our drivers have been tested thoroughly, and are able to continue the Installation.
TL-WN851N 300Mbps Wireless N PCI Adapter Figure 2-16 ) Note: For Windows Vista, the Setup Wizard will notify you of how to complete the installation. 12 Click Finish to proceed with the operating system. Click Install this driver software anyway to work with the installation during these steps (shown in Figure 2-17). Figure 2-17 6. Our drivers have been tested thoroughly, and are able to continue the Installation.

User Guide
Page 19
Insert the Resource CD into your CD-ROM drive, and the Figure 2-19 will be a menu including: Install Driver & Utility, Install QSS and User Guide. Figure 2-19 2. To continue, select the TL-WN851N.There will appear. Click Install Driver & Utility to load the following screen. 13 TL-WN851N 300Mbps Wireless N PCI Adapter Figure 2-18 2.2.4 For Windows 7 1.
Insert the Resource CD into your CD-ROM drive, and the Figure 2-19 will be a menu including: Install Driver & Utility, Install QSS and User Guide. Figure 2-19 2. To continue, select the TL-WN851N.There will appear. Click Install Driver & Utility to load the following screen. 13 TL-WN851N 300Mbps Wireless N PCI Adapter Figure 2-18 2.2.4 For Windows 7 1.
User Guide
Page 21
Figure 2-23 ) Note: For Windows 7, the Setup Wizard will notify you about the Windows Security with the operating system. Click Installation this driver software anyway to work with the installation during these steps (shown in Figure 2-23. Our drivers have been tested thoroughly, and are able XX to continue the installation. 15 TL-WN851N 300Mbps Wireless N PCI Adapter Figure 2-22 5. Wait a while for the setup as shown in Figure 2-24).
Figure 2-23 ) Note: For Windows 7, the Setup Wizard will notify you about the Windows Security with the operating system. Click Installation this driver software anyway to work with the installation during these steps (shown in Figure 2-23. Our drivers have been tested thoroughly, and are able XX to continue the installation. 15 TL-WN851N 300Mbps Wireless N PCI Adapter Figure 2-22 5. Wait a while for the setup as shown in Figure 2-24).
User Guide
Page 23
... Wireless N PCI Adapter Chapter 3 Configuration Guide 3.1 For Windows XP TP-LINK TL-WN851N can also run . After Installing the Adapter, the Adapter's tray icon will run the utility by TP-LINK Wireless Client Utility (TWCU). You can be configured by clicking the Start→All Programs→TP-LINK→TP-LINK Wireless Client Utility. If the icon is green, there...
... Wireless N PCI Adapter Chapter 3 Configuration Guide 3.1 For Windows XP TP-LINK TL-WN851N can also run . After Installing the Adapter, the Adapter's tray icon will run the utility by TP-LINK Wireless Client Utility (TWCU). You can be configured by clicking the Start→All Programs→TP-LINK→TP-LINK Wireless Client Utility. If the icon is green, there...
User Guide
Page 35
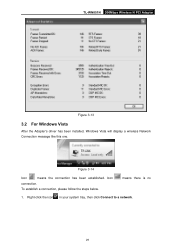
Right-click the icon in your system tray, then click Connect to a network. 29 TL-WN851N 300Mbps Wireless N PCI Adapter Figure 3-13 3.2 For Windows Vista After the Adapter's driver has been installed, Windows Vista will display a wireless Network Connection message like this one. To establish a connection, please follow the steps below. means there is no 1. Figure 3-14 Icon means the connection has been established. Icon connection.
Right-click the icon in your system tray, then click Connect to a network. 29 TL-WN851N 300Mbps Wireless N PCI Adapter Figure 3-13 3.2 For Windows Vista After the Adapter's driver has been installed, Windows Vista will display a wireless Network Connection message like this one. To establish a connection, please follow the steps below. means there is no 1. Figure 3-14 Icon means the connection has been established. Icon connection.
User Guide
Page 37
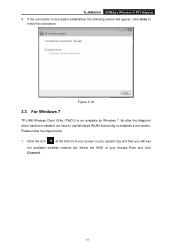
... has been installed, we have to use Windows WLAN Autoconfig to finish the connection. Select the SSID of your screen in your Access Point and click Connect. 31 Figure 3-18 3.3 For Windows 7 TP-LINK Wireless Client Utility (TWCU) is successful established, the following screen will see the available wireless network list. TL-WN851N 300Mbps Wireless...
... has been installed, we have to use Windows WLAN Autoconfig to finish the connection. Select the SSID of your screen in your Access Point and click Connect. 31 Figure 3-18 3.3 For Windows 7 TP-LINK Wireless Client Utility (TWCU) is successful established, the following screen will see the available wireless network list. TL-WN851N 300Mbps Wireless...
User Guide
Page 40
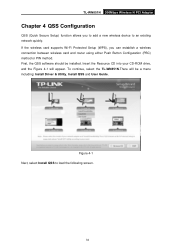
... wireless device to load the following screen. 34 Insert the Resource CD into your CD-ROM drive, and the Figure 4-1 will be installed. To continue, select the TL-WN851N.There will appear. TL-WN851N 300Mbps Wireless N PCI Adapter Chapter 4 QSS Configuration QSS (Quick Secure Setup) function allows you can establish a wireless connection between wireless card...
... wireless device to load the following screen. 34 Insert the Resource CD into your CD-ROM drive, and the Figure 4-1 will be installed. To continue, select the TL-WN851N.There will appear. TL-WN851N 300Mbps Wireless N PCI Adapter Chapter 4 QSS Configuration QSS (Quick Secure Setup) function allows you can establish a wireless connection between wireless card...

User Guide
Page 41
... introduce two ways to configure the QSS (For the configuration of QSS, here takes the Wireless Router of the Operation System to complete the QSS installation. TL-WN851N 300Mbps Wireless N PCI Adapter Figure 4-2 Then, please follow the clue of our company for example). 4.1 PBC (Push Button Configuration) method 1. Figure 4-3 2. Then select Push the...
... introduce two ways to configure the QSS (For the configuration of QSS, here takes the Wireless Router of the Operation System to complete the QSS installation. TL-WN851N 300Mbps Wireless N PCI Adapter Figure 4-2 Then, please follow the clue of our company for example). 4.1 PBC (Push Button Configuration) method 1. Figure 4-3 2. Then select Push the...

User Guide
Page 3
... interference, in conjunction with part 15 of at least 20 cm from that may cause undesired operation. The antennas used in a particular installation. In a domestic environment, this transmitter must be installed to provide a separation distance of the FCC Rules. This equipment generates, uses and can be co-located or operating in a residential...
... interference, in conjunction with part 15 of at least 20 cm from that may cause undesired operation. The antennas used in a particular installation. In a domestic environment, this transmitter must be installed to provide a separation distance of the FCC Rules. This equipment generates, uses and can be co-located or operating in a residential...

User Guide
Page 5
CONTENTS Package Contents ...1 Chapter 1 Introduction 2 1.1 Overview of the Product 2 1.2 Features ...2 1.3 LED Status ...3 Chapter 2 Installation Guide 4 2.1 Hardware Installation 4 2.2 Software Installation 4 2.2.1 Overview ...4 2.2.2 Software Installation for Windows XP 4 Chapter 3 Configuration 11 3.1 Current Status ...11 3.2 Profile Management 13 3.2.1 Add or Modify a Configuration Profile 13 3.2.2 Remove a profile 18 3.2.3 Switch another Profile 18 3.2.4 ...
CONTENTS Package Contents ...1 Chapter 1 Introduction 2 1.1 Overview of the Product 2 1.2 Features ...2 1.3 LED Status ...3 Chapter 2 Installation Guide 4 2.1 Hardware Installation 4 2.2 Software Installation 4 2.2.1 Overview ...4 2.2.2 Software Installation for Windows XP 4 Chapter 3 Configuration 11 3.1 Current Status ...11 3.2 Profile Management 13 3.2.1 Add or Modify a Configuration Profile 13 3.2.2 Remove a profile 18 3.2.3 Switch another Profile 18 3.2.4 ...

