
User Guide
Page 6
... ...4 2.2.1 Overview...4 2.2.2 Software Installation for Windows XP 4 2.2.3 Software Installation for Windows Vista 9 Chapter 3 Configuration for Windows XP 14 3.1 Current Status ...14 3.2 ...Profile Management ...16 3.2.1 Add or Modify a Configuration Profile 16 3.2.2 Remove a profile...21 3.2.3 Switch another Profile...21 3.2.4 Export a Profile ...21 3.2.5 Import a Profile ...21 3.2.6 Scan Available Networks 22 3.2.7 Auto Profile Selection Management 23 3.3 Diagnostics...24 3.3.1 Check Driver...
... ...4 2.2.1 Overview...4 2.2.2 Software Installation for Windows XP 4 2.2.3 Software Installation for Windows Vista 9 Chapter 3 Configuration for Windows XP 14 3.1 Current Status ...14 3.2 ...Profile Management ...16 3.2.1 Add or Modify a Configuration Profile 16 3.2.2 Remove a profile...21 3.2.3 Switch another Profile...21 3.2.4 Export a Profile ...21 3.2.5 Import a Profile ...21 3.2.6 Scan Available Networks 22 3.2.7 Auto Profile Selection Management 23 3.3 Diagnostics...24 3.3.1 Check Driver...

User Guide
Page 11
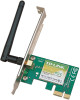
... your desktop PC and disconnect the power. 2. To continue, select the TL-WN781N.There will install the TP-LINK Wireless Client Utility (TWCU) and drivers. The Setup Wizard will be a menu including: Install Driver&Utility, Install QSS and User Guide. 4 Remove your computer manufacturer for Windows 2000 and XP are touching the slot's contacts. Make sure that...
... your desktop PC and disconnect the power. 2. To continue, select the TL-WN781N.There will install the TP-LINK Wireless Client Utility (TWCU) and drivers. The Setup Wizard will be a menu including: Install Driver&Utility, Install QSS and User Guide. 4 Remove your computer manufacturer for Windows 2000 and XP are touching the slot's contacts. Make sure that...

User Guide
Page 16
Our drivers have been tested thoroughly, and are able to continue the Installation. Click Continue Anyway to work with the operating system. After all the steps above, you will appear. Insert the Resource CD into your CD-ROM drive, and the Figure 2-11 will see the screen below, click Finish to reboot the system. Figure 2-9 9. To continue, select the TL-WN781N.There will be a menu including: Install Driver&Utility, 9 TL-WN781N 150Mbps Wireless Lite N PCI-E Adapter these steps (shown in Figure 2-9). Figure 2-10 2.2.3 Software Installation for Windows Vista 1.
Our drivers have been tested thoroughly, and are able to continue the Installation. Click Continue Anyway to work with the operating system. After all the steps above, you will appear. Insert the Resource CD into your CD-ROM drive, and the Figure 2-11 will see the screen below, click Finish to reboot the system. Figure 2-9 9. To continue, select the TL-WN781N.There will be a menu including: Install Driver&Utility, 9 TL-WN781N 150Mbps Wireless Lite N PCI-E Adapter these steps (shown in Figure 2-9). Figure 2-10 2.2.3 Software Installation for Windows Vista 1.
User Guide
Page 19
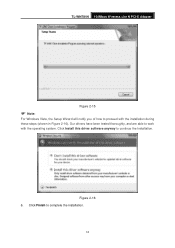
Click Finish to continue the Installation. Click Install this driver software anyway to complete the installation. 12 Our drivers have been tested thoroughly, and are able to work with the installation during these steps (shown in Figure 2-16). TL-WN781N 150Mbps Wireless Lite N PCI-E Adapter Figure 2-15 ) Note: For Windows Vista, the Setup Wizard will notify you of how to proceed with the operating system. Figure 2-16 6.
Click Finish to continue the Installation. Click Install this driver software anyway to complete the installation. 12 Our drivers have been tested thoroughly, and are able to work with the installation during these steps (shown in Figure 2-16). TL-WN781N 150Mbps Wireless Lite N PCI-E Adapter Figure 2-15 ) Note: For Windows Vista, the Setup Wizard will notify you of how to proceed with the operating system. Figure 2-16 6.


