
Quick Installation Guide
Page 1
The direction of the camera's installation can access the Internet. Also confirm that you connect the Ethernet cable and power adapter cord to the camera first before mounting. TL-SC4171G Resource CD QIG (*The pictures are for reference only.) System Requirement The following operating systems are supported: • Windows XP • Windows 98 • Windows Me • Windows Vista • Windows 2000 • Mac • Windows 7 • Windows 2003 • Linux The following browsers...
The direction of the camera's installation can access the Internet. Also confirm that you connect the Ethernet cable and power adapter cord to the camera first before mounting. TL-SC4171G Resource CD QIG (*The pictures are for reference only.) System Requirement The following operating systems are supported: • Windows XP • Windows 98 • Windows Me • Windows Vista • Windows 2000 • Mac • Windows 7 • Windows 2003 • Linux The following browsers...

Quick Installation Guide
Page 2
... Windows Vista/Windows 7. 1 3 The Intelligent IP Installer window will guide you want to be able to 3 2 4 as to help , go to www.tp-link.com/support/faq.asp To download the latest Firmware, Driver, Utility and User Guide, go to www.tp-link.com/support/download.asp For all other technical support, please contact us by using the following details: Global Australia & New Zealand Service Language: English Tel: +86 755 26504400 E-mail : support@tp-link.com Service time...
... Windows Vista/Windows 7. 1 3 The Intelligent IP Installer window will guide you want to be able to 3 2 4 as to help , go to www.tp-link.com/support/faq.asp To download the latest Firmware, Driver, Utility and User Guide, go to www.tp-link.com/support/download.asp For all other technical support, please contact us by using the following details: Global Australia & New Zealand Service Language: English Tel: +86 755 26504400 E-mail : support@tp-link.com Service time...

User Guide
Page 3
If you to use IP cameras with Microsoft web browsers, please check the camera user manuals. 1 The IP cameras can be used with Microsoft web browsers and Intelligent IP Installer in Windows operating systems. This document focuses on introducing you want to know how to Intelligent IP Installer. How to Use Intelligent IP Installer This chapter introduces how to monitor the image from the camera using Intelligent IP Installer.
If you to use IP cameras with Microsoft web browsers, please check the camera user manuals. 1 The IP cameras can be used with Microsoft web browsers and Intelligent IP Installer in Windows operating systems. This document focuses on introducing you want to know how to Intelligent IP Installer. How to Use Intelligent IP Installer This chapter introduces how to monitor the image from the camera using Intelligent IP Installer.
User Guide
Page 4
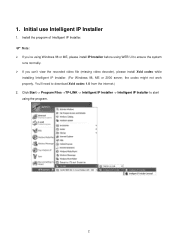
... use Intelligent IP Installer 1. Click Start -> Program Files ->TP-LINK -> Intelligent IP Installer -> Intelligent IP Installer to start using WEB UI to download Xvid codec 1.0 from the internet.) 2. You'll need to ensure the system runs normally. ¾ If you can't view the recorded video file (missing video decoder), please install Xvid codec while installing Intelligent IP Installer. (For Windows 98, ME or 2000 server, the codec might not work...
... use Intelligent IP Installer 1. Click Start -> Program Files ->TP-LINK -> Intelligent IP Installer -> Intelligent IP Installer to start using WEB UI to download Xvid codec 1.0 from the internet.) 2. You'll need to ensure the system runs normally. ¾ If you can't view the recorded video file (missing video decoder), please install Xvid codec while installing Intelligent IP Installer. (For Windows 98, ME or 2000 server, the codec might not work...

User Guide
Page 5
... of Main Menu Main Menu Main Menu Camera Click this button to the Settings. You can connect the specific Network Cameras to optimize video setting. You can connect the specific Network Cameras to get live video and to get the information of all Network Cameras in network. This section includes Info, User, Date Time, TCP/IP, PPPoE and DDNS. ) Note: Only the administrator has access to get and set basic values...
... of Main Menu Main Menu Main Menu Camera Click this button to the Settings. You can connect the specific Network Cameras to optimize video setting. You can connect the specific Network Cameras to get live video and to get the information of all Network Cameras in network. This section includes Info, User, Date Time, TCP/IP, PPPoE and DDNS. ) Note: Only the administrator has access to get and set basic values...

User Guide
Page 2
...15 2.4.4. Filter Setting...19 3.7 Save Video ...19 3.8 Save Image ...20 3.9 Print ...20 3.10 Backup ...20 3.11 Log Viewer...22 3.11.1. CONTENTS 1.1 System Requirement 1 1.2 Installation ...1 1.3 Quick Start...5 2.1 Start ...11 2.2 Information Window 13 2.3 PTZ Camera Control 13 2.3.1. Focus: ...13 2.3.4. Snapshot:...15 2.4.5. Manual Record 15 2.4.6. Unusual Event 22 3.11.2. Enable Talk:...14 2.4.2. Connect/ Disconnect 14 2.4.3. Toggle Full Screen 15 3.1 Information Window 18 3.2 Audio Volume Control 18 3.3 Screen Division:...18 3.4 Browse Mode: ...18 3.5 Open Record: ...18...
...15 2.4.4. Filter Setting...19 3.7 Save Video ...19 3.8 Save Image ...20 3.9 Print ...20 3.10 Backup ...20 3.11 Log Viewer...22 3.11.1. CONTENTS 1.1 System Requirement 1 1.2 Installation ...1 1.3 Quick Start...5 2.1 Start ...11 2.2 Information Window 13 2.3 PTZ Camera Control 13 2.3.1. Focus: ...13 2.3.4. Snapshot:...15 2.4.5. Manual Record 15 2.4.6. Unusual Event 22 3.11.2. Enable Talk:...14 2.4.2. Connect/ Disconnect 14 2.4.3. Toggle Full Screen 15 3.1 Information Window 18 3.2 Audio Volume Control 18 3.3 Screen Division:...18 3.4 Browse Mode: ...18 3.5 Open Record: ...18...

User Guide
Page 3
...39 6.2.4. Unusual Event 44 6.8.2. Pre-record/ Post-record Time 28 5.1 Event ...29 5.1.1. User Account 42 6.6 Setting - Record on Motion 28 4.7.3. Action - Camera ...37 6.2.1. Camera Parameter 39 6.2.3. Log Viewer - PTZ Config 41 6.5 Setting - Monitor Display 42 6.7 Save/ Load Configuration 43 6.8 Log Viewer...44 6.8.1. Startup ...35 6.1.2. Action Type 33 6.1 Setting - 4.2 Load Preset Modes 24 4.3 Insert a New Schedule Manually 25 4.4 Copy Schedule ...26 4.5 Week Mode ...26 4.5.1. Assign a Camera Event 30 5.1.2. Event - I/O Device 40 6.4 Setting -
...39 6.2.4. Unusual Event 44 6.8.2. Pre-record/ Post-record Time 28 5.1 Event ...29 5.1.1. User Account 42 6.6 Setting - Record on Motion 28 4.7.3. Action - Camera ...37 6.2.1. Camera Parameter 39 6.2.3. Log Viewer - PTZ Config 41 6.5 Setting - Monitor Display 42 6.7 Save/ Load Configuration 43 6.8 Log Viewer...44 6.8.1. Startup ...35 6.1.2. Action Type 33 6.1 Setting - 4.2 Load Preset Modes 24 4.3 Insert a New Schedule Manually 25 4.4 Copy Schedule ...26 4.5 Week Mode ...26 4.5.1. Assign a Camera Event 30 5.1.2. Event - I/O Device 40 6.4 Setting -

User Guide
Page 16
.... CONFIG: Select from the drop down menu to events. Information Window PTZ Camera Control 12 See Playback on page 20 for detail. setup reaction(s) responding to modify general setting, save video/ pictures, print images, check log information and event records, and set up recording function configuration. Guard Schedule Playback Config PLAYBACK: Click on the icon to detect; SCHEDULE: Organize recording time schedule and setup recorder configuration. See Config on page 30 for...
.... CONFIG: Select from the drop down menu to events. Information Window PTZ Camera Control 12 See Playback on page 20 for detail. setup reaction(s) responding to modify general setting, save video/ pictures, print images, check log information and event records, and set up recording function configuration. Guard Schedule Playback Config PLAYBACK: Click on the icon to detect; SCHEDULE: Organize recording time schedule and setup recorder configuration. See Config on page 30 for...
User Guide
Page 22
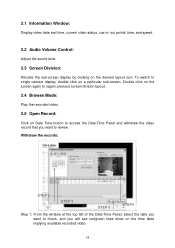
... on Date Time button to access the Date-Time Panel and withdraw the video record that you want to check, and you want to review. 3.1 Information Window: Display video date and time, current video status, cue in/ out points' time, and speed. 3.2 Audio Volume Control: Adjust the sound level 3.3 Screen Division: Allocate the sub-screen display by clicking on a particular sub-screen. Double click on the screen again to regain previous screen division layout. 3.4 Browse Mode: Play the recorded video. 3.5 Open Record: Click on the time table...
... on Date Time button to access the Date-Time Panel and withdraw the video record that you want to check, and you want to review. 3.1 Information Window: Display video date and time, current video status, cue in/ out points' time, and speed. 3.2 Audio Volume Control: Adjust the sound level 3.3 Screen Division: Allocate the sub-screen display by clicking on a particular sub-screen. Double click on the screen again to regain previous screen division layout. 3.4 Browse Mode: Play the recorded video. 3.5 Open Record: Click on the time table...
User Guide
Page 26
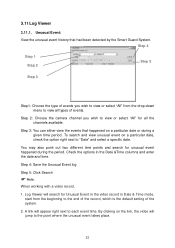
... end of the record, which is the default setting of events. 3.11Log Viewer 3.11.1. Step 4: Save the Unusual Event log Step 5: Click Search Note: When working with a video record, 1. A link will jump to "Date" and select a specific date. To search and view unusual event on a particular date or during the period. You may also point out two different time points and search...
... end of the record, which is the default setting of events. 3.11Log Viewer 3.11.1. Step 4: Save the Unusual Event log Step 5: Click Search Note: When working with a video record, 1. A link will jump to "Date" and select a specific date. To search and view unusual event on a particular date or during the period. You may also point out two different time points and search...
User Guide
Page 32
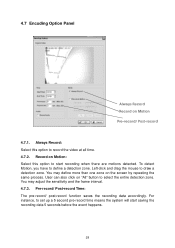
... detect Motion, you have to set up a 5 second pre-record time means the system will start recording when there are motions detected. Left-click and drag the mouse to record the video at all time. 4.7.2. Pre-record/ Post-record Time: The pre-record/ post-record function saves the recording data accordingly. Always Record: Select this option to select the entire detection zone. 4.7 Encoding Option Panel Always Record Record on the screen by...
... detect Motion, you have to set up a 5 second pre-record time means the system will start recording when there are motions detected. Left-click and drag the mouse to record the video at all time. 4.7.2. Pre-record/ Post-record Time: The pre-record/ post-record function saves the recording data accordingly. Always Record: Select this option to select the entire detection zone. 4.7 Encoding Option Panel Always Record Record on the screen by...
User Guide
Page 40
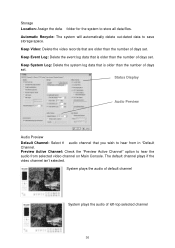
... the number of days set. System plays the audio of default channel System plays the audio of days set . The default channel plays if the video channel isn't selected. Storage Location: Assign the default folder for the system to save storage space. Automatic Recycle: The system will automatically delete out-dated data to store all data files. Status Display Audio Preview Audio Preview Default Channel: Select the audio channel...
... the number of days set. System plays the audio of default channel System plays the audio of days set . The default channel plays if the video channel isn't selected. Storage Location: Assign the default folder for the system to save storage space. Automatic Recycle: The system will automatically delete out-dated data to store all data files. Status Display Audio Preview Audio Preview Default Channel: Select the audio channel...
User Guide
Page 45
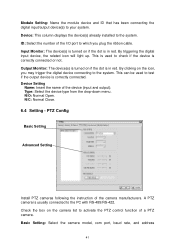
... in red. Type: Select the device type from the drop-down menu. ID: Select the number of the I/O port to which you may trigger the digital device connecting to the system. Output Monitor: The device(s) is turned on the camera list to your system. N/O: Normal Open. Device: This column displays the device(s) already installed to the system. By triggering the digital input device, the related icon will light up. Basic Setting: Select the camera model...
... in red. Type: Select the device type from the drop-down menu. ID: Select the number of the I/O port to which you may trigger the digital device connecting to the system. Output Monitor: The device(s) is turned on the camera list to your system. N/O: Normal Open. Device: This column displays the device(s) already installed to the system. By triggering the digital input device, the related icon will light up. Basic Setting: Select the camera model...

User Guide
Page 50
... see color lines appear in the Date Time Period section. Backup The backup function saves video record and other log information. Red, green, and blue stands for record always, record on motion, and record on it. User may also set up start time and end time in the time table implying available data recorded. Step 2 Step 3: Select the data you may open backup files on any PC with Windows Operation System and operate the full function Playback...
... see color lines appear in the Date Time Period section. Backup The backup function saves video record and other log information. Red, green, and blue stands for record always, record on motion, and record on it. User may also set up start time and end time in the time table implying available data recorded. Step 2 Step 3: Select the data you may open backup files on any PC with Windows Operation System and operate the full function Playback...
User Guide
Page 55
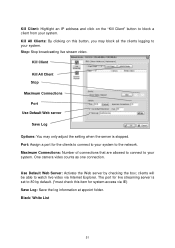
... connect to your system. Black/ White List 51 Use Default Web Server: Activate the Web server by default. (*must check this button, you may only adjust the setting when the server is set to block a client from your system. Kill Client: Highlight an IP address and click on this item for system access via Internet Explorer. Stop: Stop broadcasting live video via IE) Save...
... connect to your system. Black/ White List 51 Use Default Web Server: Activate the Web server by default. (*must check this button, you may only adjust the setting when the server is set to block a client from your system. Kill Client: Highlight an IP address and click on this item for system access via Internet Explorer. Stop: Stop broadcasting live video via IE) Save...
User Guide
Page 8
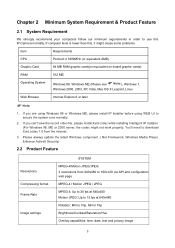
... capabilities: time, date, text and privacy image 3 If you can't view the record video file, please install Xvid codec while installing Intelligent IP Installer. (For Windows 98, ME or 2000 server, the codec might cause some problems. Item Requirements CPU Pentium 4 1600MHz (or equivalent AMD) Graphic Card 64 MB RAM graphic cards(or equivalent on-board graphic cards) RAM 512 MB Operating System ) Windows 98, Windows ME (Please...
... capabilities: time, date, text and privacy image 3 If you can't view the record video file, please install Xvid codec while installing Intelligent IP Installer. (For Windows 98, ME or 2000 server, the codec might cause some problems. Item Requirements CPU Pentium 4 1600MHz (or equivalent AMD) Graphic Card 64 MB RAM graphic cards(or equivalent on-board graphic cards) RAM 512 MB Operating System ) Windows 98, Windows ME (Please...

User Guide
Page 9
Shutter Time 1/7.5 ~ 1/120 sec. Image snapshot Yes Video Recording Yes Full Screen Viewing Yes Digital Zoom 10x digital Audio Two-way (full/half duplex) with built-in microphone Audio compression: G.711 PCM, 8kHz, 64kbit/s Instant Messenger Support MSN Live View Mobile Phone Live View Through 2.5 WAP, 3GPP, 3G Streaming, and 3G Browser Alarm Sending FTP Client/SMTP/HTTP Event Security Password Protection/HTTPS encryption/WEP64/128 bit, WPA...
Shutter Time 1/7.5 ~ 1/120 sec. Image snapshot Yes Video Recording Yes Full Screen Viewing Yes Digital Zoom 10x digital Audio Two-way (full/half duplex) with built-in microphone Audio compression: G.711 PCM, 8kHz, 64kbit/s Instant Messenger Support MSN Live View Mobile Phone Live View Through 2.5 WAP, 3GPP, 3G Streaming, and 3G Browser Alarm Sending FTP Client/SMTP/HTTP Event Security Password Protection/HTTPS encryption/WEP64/128 bit, WPA...

User Guide
Page 14
and find Download signed ActiveX controls to view the video without setting page. 2. For detailed information, please refer to the Quick Installation Guide. 2) If you only want to prompt it. For more details, you can change them in the Account Menu (Please check "Setting → Basic → Security → Account") 3. Please go to view the video without setting page, enter "http:///index2.htm" as your web...
and find Download signed ActiveX controls to view the video without setting page. 2. For detailed information, please refer to the Quick Installation Guide. 2) If you only want to prompt it. For more details, you can change them in the Account Menu (Please check "Setting → Basic → Security → Account") 3. Please go to view the video without setting page, enter "http:///index2.htm" as your web...

User Guide
Page 35
... Setting: Download the saved setting data of this IP Camera into a file. The upgrade is "English". 30 Click "OK" and this IP Camera is completed. ) Note: After upgrading new firmware, please execute "Factory Default" first to the loaded data; Otherwise problems may occur. Click "Browse" and select the file for upgrading. Don't turn off this IP Camera until the upgrading is adjusted according to make it work. ¾ Upload Language Pack: Upgrade the device language pack. the camera...
... Setting: Download the saved setting data of this IP Camera into a file. The upgrade is "English". 30 Click "OK" and this IP Camera is completed. ) Note: After upgrading new firmware, please execute "Factory Default" first to the loaded data; Otherwise problems may occur. Click "Browse" and select the file for upgrading. Don't turn off this IP Camera until the upgrading is adjusted according to make it work. ¾ Upload Language Pack: Upgrade the device language pack. the camera...

User Guide
Page 55
.... ¾ Password: password for this port range for video transmission. ¾ Video Mode: You can access the camera. 50 z Mobile View: If Messenger function doesn't work due to login MSN server. When privacy turns on, only those users in allow list can access the camera. ¾ User: Input to this blank to edit allow list. ¾ Allow list: When privacy turns on, only those users in red frame. ¾...
.... ¾ Password: password for this port range for video transmission. ¾ Video Mode: You can access the camera. 50 z Mobile View: If Messenger function doesn't work due to login MSN server. When privacy turns on, only those users in allow list can access the camera. ¾ User: Input to this blank to edit allow list. ¾ Allow list: When privacy turns on, only those users in red frame. ¾...


