
Quick Installation Guide
Page 1
Turn off the USB device's power. 2. When the Link LED lights up, the TL-PS310U is correctly connected to the TL-PS310U. 3. Connect the TL-PS310U to the TL-PS310U. Connect your USB device to the network. Connect the power adapter to the router or switch/HUB with USB port Hardware Installation 1. Before you start, you should prepare the following items... setup CD ¾ One USB device with the Ethernet cable. 4. Factory Default Settings ¾ IP address: 192.168.0.10/255.255.255.0 ¾ Password: the TL-PS310U does not come with a default password. 1
Turn off the USB device's power. 2. When the Link LED lights up, the TL-PS310U is correctly connected to the TL-PS310U. 3. Connect the TL-PS310U to the TL-PS310U. Connect your USB device to the network. Connect the power adapter to the router or switch/HUB with USB port Hardware Installation 1. Before you start, you should prepare the following items... setup CD ¾ One USB device with the Ethernet cable. 4. Factory Default Settings ¾ IP address: 192.168.0.10/255.255.255.0 ¾ Password: the TL-PS310U does not come with a default password. 1
User Guide
Page 5
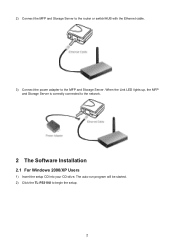
The auto-run program will be started. 2) Click the TL-PS310U to the MFP and Storage Server. 2) Connect the MFP and Storage Server to the router or switch/HUB with the Ethernet cable. 3) Connect the power adapter to begin the setup. 2 When the Link LED lights up, the MFP and Storage Server is correctly connected to the network. 2 The Software Installation 2.1 For Windows 2000/XP Users 1) Insert the setup CD into your CD-drive.
The auto-run program will be started. 2) Click the TL-PS310U to the MFP and Storage Server. 2) Connect the MFP and Storage Server to the router or switch/HUB with the Ethernet cable. 3) Connect the power adapter to begin the setup. 2 When the Link LED lights up, the MFP and Storage Server is correctly connected to the network. 2 The Software Installation 2.1 For Windows 2000/XP Users 1) Insert the setup CD into your CD-drive.
Instruction Manual
Page 6
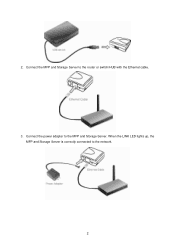
When the LINK LED lights up, the MFP and Storage Server is correctly connected to the MFP and Storage Server. Connect the power adapter to the network. 2 2. Connect the MFP and Storage Server to the router or switch/HUB with the Ethernet cable. 3.
When the LINK LED lights up, the MFP and Storage Server is correctly connected to the MFP and Storage Server. Connect the power adapter to the network. 2 2. Connect the MFP and Storage Server to the router or switch/HUB with the Ethernet cable. 3.
