
Quick Installation Guide
Page 1
.../255.255.255.0 ¾ Password: the TL-PS310U does not come with the Ethernet cable. 4. Connect your USB device to the TL-PS310U. Connect the power adapter to the TL-PS310U. 3. When the Link LED lights up, the TL-PS310U is correctly connected to the router or switch.../HUB with a default password. 1 Before you start, you should prepare the following items ¾ Windows 2000/XP/Vista/7 computer with print server setup CD ¾ One USB device with USB port Hardware Installation...
.../255.255.255.0 ¾ Password: the TL-PS310U does not come with the Ethernet cable. 4. Connect your USB device to the TL-PS310U. Connect the power adapter to the TL-PS310U. 3. When the Link LED lights up, the TL-PS310U is correctly connected to the router or switch.../HUB with a default password. 1 Before you start, you should prepare the following items ¾ Windows 2000/XP/Vista/7 computer with print server setup CD ¾ One USB device with USB port Hardware Installation...
Quick Installation Guide
Page 2
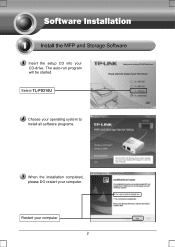
Select TL-PS310U Choose your operating system to install all software programs. When the installation completed, please DO restart your CD-drive. Insert the setup CD into your computer. Restart your computer 2 The auto-run program will be started.
Select TL-PS310U Choose your operating system to install all software programs. When the installation completed, please DO restart your CD-drive. Insert the setup CD into your computer. Restart your computer 2 The auto-run program will be started.

Quick Installation Guide
Page 5
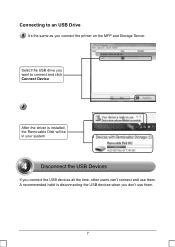
Just click OK You can disable the "Disconnect Printer when Idle" in the Option menu. The windows will auto-detect the USB device connecting to connect and click Connect Device Because the "Disconnect Printer when Idle" option is enabled by default, the server will tell you this. The MFP and Storage Server will detect the printer and install its driver automatically 5 Connecting to an USB Printer Select the USB printer you want to the USB port of the TL-PS310U.
Just click OK You can disable the "Disconnect Printer when Idle" in the Option menu. The windows will auto-detect the USB device connecting to connect and click Connect Device Because the "Disconnect Printer when Idle" option is enabled by default, the server will tell you this. The MFP and Storage Server will detect the printer and install its driver automatically 5 Connecting to an USB Printer Select the USB printer you want to the USB port of the TL-PS310U.

Quick Installation Guide
Page 6
Enable the "Connect Automatically for printing. You're highly recommended to use the "Connect Automatically for Printing" function. After the driver is installed, the printer will be in your system After finish installing the printer driver, please disconnect the printer manually. And then right-click the printer icon, you can use this function for Printing" function 6
Enable the "Connect Automatically for printing. You're highly recommended to use the "Connect Automatically for Printing" function. After the driver is installed, the printer will be in your system After finish installing the printer driver, please disconnect the printer manually. And then right-click the printer icon, you can use this function for Printing" function 6
Quick Installation Guide
Page 7
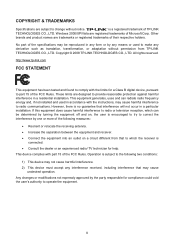
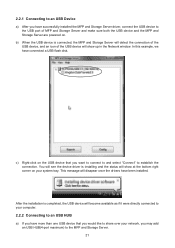
Select the USB drive you want to an USB Drive It's the same as you connect the printer on the MFP and Storage Server. Connecting to connect and click Connect Device After the driver is disconnecting the USB devices when you don't use them . 7 A recommended habit is installed, the Removable Disk will be in your system If you connect the USB devices all the time, other users can't connect and use them .
Select the USB drive you want to an USB Drive It's the same as you connect the printer on the MFP and Storage Server. Connecting to connect and click Connect Device After the driver is disconnecting the USB devices when you don't use them . 7 A recommended habit is installed, the Removable Disk will be in your system If you connect the USB devices all the time, other users can't connect and use them .
User Guide
Page 2
...digital device, pursuant to part 15 of TP-LINK TECHNOLOGIES CO., LTD. All rights reserved. If this equipment does cause harmful interference to radio or television reception, which can radiate radio frequency energy and, if not installed and used to make any form or... on a circuit different from TP-LINK TECHNOLOGIES CO., LTD. COPYRIGHT & TRADEMARKS Specifications are subject to change without permission from that to which the receiver is encouraged to try to provide reasonable protection against harmful interference in a particular installation. Operation is subject to the...
...digital device, pursuant to part 15 of TP-LINK TECHNOLOGIES CO., LTD. All rights reserved. If this equipment does cause harmful interference to radio or television reception, which can radiate radio frequency energy and, if not installed and used to make any form or... on a circuit different from TP-LINK TECHNOLOGIES CO., LTD. COPYRIGHT & TRADEMARKS Specifications are subject to change without permission from that to which the receiver is encouraged to try to provide reasonable protection against harmful interference in a particular installation. Operation is subject to the...
User Guide
Page 3
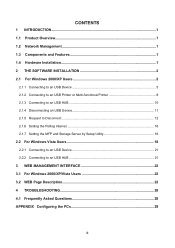
CONTENTS 1 INTRODUCTION...1 1.1 Product Overview...1 1.2 Network Management 1 1.3 Components and Features 1 1.4 Hardware Installation 1 2 THE SOFTWARE INSTALLATION 2 2.1 For Windows 2000/XP Users 2 2.1.1 Connecting to an USB Device 5 2.1.2 Connecting to an USB Printer or Multi-functional Printer 8 2.1.3 Connecting to an USB HUB 10 2.1.4 ...
CONTENTS 1 INTRODUCTION...1 1.1 Product Overview...1 1.2 Network Management 1 1.3 Components and Features 1 1.4 Hardware Installation 1 2 THE SOFTWARE INSTALLATION 2 2.1 For Windows 2000/XP Users 2 2.1.1 Connecting to an USB Device 5 2.1.2 Connecting to an USB Printer or Multi-functional Printer 8 2.1.3 Connecting to an USB HUB 10 2.1.4 ...
User Guide
Page 4
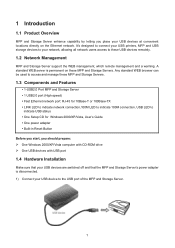
... Components and Features y 1-USB2.0 Port MFP and Storage Server y 1 USB2.0 port (High-speed) y Fast Ethernet network port: RJ-45 for 10Base-T or 100Base-TX y LINK LED to indicate network connection,100M LED to indicate 100M connection, USB LED to indicate USB status y One Setup CD for Windows 2000/XP/Vista...letting you should prepare: ¾ One Windows 2000/XP/Vista computer with CD-ROM drive ¾ One USB devices with USB port 1.4 Hardware Installation Make sure that your USB devices are switched off and that the MFP and Storage Server's power adapter is permanent on the Ethernet network.
... Components and Features y 1-USB2.0 Port MFP and Storage Server y 1 USB2.0 port (High-speed) y Fast Ethernet network port: RJ-45 for 10Base-T or 100Base-TX y LINK LED to indicate network connection,100M LED to indicate 100M connection, USB LED to indicate USB status y One Setup CD for Windows 2000/XP/Vista...letting you should prepare: ¾ One Windows 2000/XP/Vista computer with CD-ROM drive ¾ One USB devices with USB port 1.4 Hardware Installation Make sure that your USB devices are switched off and that the MFP and Storage Server's power adapter is permanent on the Ethernet network.
User Guide
Page 5
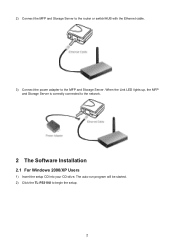
The auto-run program will be started. 2) Click the TL-PS310U to the MFP and Storage Server. 2) Connect the MFP and Storage Server to the router or switch/HUB with the Ethernet cable. 3) Connect the power adapter to begin the setup. 2 When the Link LED lights up, the MFP and Storage Server is correctly connected to the network. 2 The Software Installation 2.1 For Windows 2000/XP Users 1) Insert the setup CD into your CD-drive.
The auto-run program will be started. 2) Click the TL-PS310U to the MFP and Storage Server. 2) Connect the MFP and Storage Server to the router or switch/HUB with the Ethernet cable. 3) Connect the power adapter to begin the setup. 2 When the Link LED lights up, the MFP and Storage Server is correctly connected to the network. 2 The Software Installation 2.1 For Windows 2000/XP Users 1) Insert the setup CD into your CD-drive.
User Guide
Page 6
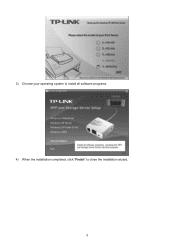
3) Choose your operating system to install all software programs. 4) When the installation completed, click "Finish" to close the installation wizard. 3
3) Choose your operating system to install all software programs. 4) When the installation completed, click "Finish" to close the installation wizard. 3
User Guide
Page 12
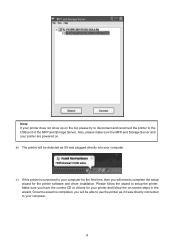
... if it was plugged directly into your printer are powered on. Once the wizard is connected to your computer for the printer software and driver installation. Note: If your printer and follow the wizard to setup the printer. Please follow the on the list, please try to disconnect and reconnect the...
... if it was plugged directly into your printer are powered on. Once the wizard is connected to your computer for the printer software and driver installation. Note: If your printer and follow the wizard to setup the printer. Please follow the on the list, please try to disconnect and reconnect the...
User Guide
Page 21
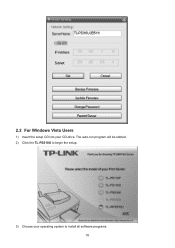
2.2 For Windows Vista Users 1) Insert the setup CD into your operating system to install all software programs. 18 The auto-run program will be started. 2) Click the TL-PS310U to begin the setup. 3) Choose your CD-drive.
2.2 For Windows Vista Users 1) Insert the setup CD into your operating system to install all software programs. 18 The auto-run program will be started. 2) Click the TL-PS310U to begin the setup. 3) Choose your CD-drive.
User Guide
Page 22
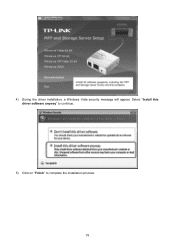
Select "Install this driver software anyway" to continue. 5) Click on "Finish" to complete the installation process. 19 4) During the driver installation, a Windows Vista security message will appear.
Select "Install this driver software anyway" to continue. 5) Click on "Finish" to complete the installation process. 19 4) During the driver installation, a Windows Vista security message will appear.
User Guide
Page 23
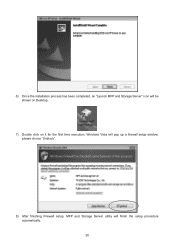
6) Once the installation process has been completed, an "Launch MFP and Storage Server" icon will finish the setup procedure automatically. 20 Windows Vista will pop up a firewall setup window, please choice "Unblock". 8) After finishing Firewall setup, MFP and Storage Server utility will be shown on Desktop. 7) Double click on it for the first time execution.
6) Once the installation process has been completed, an "Launch MFP and Storage Server" icon will finish the setup procedure automatically. 20 Windows Vista will pop up a firewall setup window, please choice "Unblock". 8) After finishing Firewall setup, MFP and Storage Server utility will be shown on Desktop. 7) Double click on it for the first time execution.
User Guide
Page 24
... that you want to connect to and select "Connect" to the MFP and Storage Server. 21 2.2.1 Connecting to an USB Device a) After you have successfully installed the MFP and Storage Server driver, connect the USB device to the USB port of the USB device will become available as if it were... directly connected to your system tray. c) Right-click on . b) When the USB device is installing and the status will disapear once the drivers have connected a USB flash disk. You will see the device driver is connected, the MFP and Storage...
... that you want to connect to and select "Connect" to the MFP and Storage Server. 21 2.2.1 Connecting to an USB Device a) After you have successfully installed the MFP and Storage Server driver, connect the USB device to the USB port of the USB device will become available as if it were... directly connected to your system tray. c) Right-click on . b) When the USB device is installing and the status will disapear once the drivers have connected a USB flash disk. You will see the device driver is connected, the MFP and Storage...
User Guide
Page 31
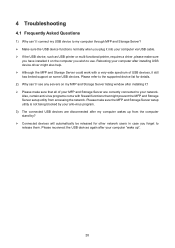
...computer through MFP and Storage Server? ¾ Make sure the USB device functions normally when you plug it into your network. Rebooting your computer after installing it on some USB devices. Please refer to the supported device list for details. 2) Why can 't I see any servers on my MFP and... the MFP and Storage Server could work with firewall functions that all of USB devices, it still has limited support on the computer you have installed it ? ¾ Please make sure that might prevent the MFP and Storage Server setup utility from the computer stand-by? ¾ Connected devices...
...computer through MFP and Storage Server? ¾ Make sure the USB device functions normally when you plug it into your network. Rebooting your computer after installing it on some USB devices. Please refer to the supported device list for details. 2) Why can 't I see any servers on my MFP and... the MFP and Storage Server could work with firewall functions that all of USB devices, it still has limited support on the computer you have installed it ? ¾ Please make sure that might prevent the MFP and Storage Server setup utility from the computer stand-by? ¾ Connected devices...
Instruction Manual
Page 2
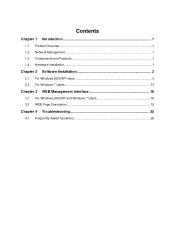
Contents Chapter 1 Introduction 1 1.1 Product Overview ...1 1.2 Network Management ...1 1.3 Components and Features 1 1.4 Hardware Installation...1 Chapter 2 Software Installation 3 2.1 For Windows 2000/XP Users 3 2.2 For Windows 7 Users 13 Chapter 3 WEB Management Interface 18 3.1 For Windows 2000/XP and Windows 7 Users 18 3.2 WEB Page Description 19 Chapter 4 Troubleshooting 25 4.1 Frequently Asked Questions 25
Contents Chapter 1 Introduction 1 1.1 Product Overview ...1 1.2 Network Management ...1 1.3 Components and Features 1 1.4 Hardware Installation...1 Chapter 2 Software Installation 3 2.1 For Windows 2000/XP Users 3 2.2 For Windows 7 Users 13 Chapter 3 WEB Management Interface 18 3.1 For Windows 2000/XP and Windows 7 Users 18 3.2 WEB Page Description 19 Chapter 4 Troubleshooting 25 4.1 Frequently Asked Questions 25

Instruction Manual
Page 4
... found to comply with the limits for a Class B digital device, pursuant to provide reasonable protection against harmful interference in a residential installation. These limits are designed to part 15 of the FCC Rules. Operation is subject to the following measures: ¾ Reorient or ...interference that may be determined by turning the equipment off and on a circuit different from that interference will not occur in a particular installation. If this product may cause radio interference, in which case the user may cause undesired operation. CE Mark Warning This is connected....
... found to comply with the limits for a Class B digital device, pursuant to provide reasonable protection against harmful interference in a residential installation. These limits are designed to part 15 of the FCC Rules. Operation is subject to the following measures: ¾ Reorient or ...interference that may be determined by turning the equipment off and on a circuit different from that interference will not occur in a particular installation. If this product may cause radio interference, in which case the user may cause undesired operation. CE Mark Warning This is connected....
Instruction Manual
Page 5
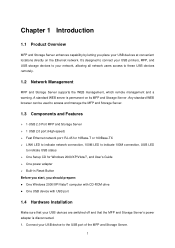
...1-USB 2.0 Port MFP and Storage Server ¾ 1 USB 2.0 port (High-speed) ¾ Fast Ethernet network port: RJ-45 for 10Base-T or 100Base-TX ¾ LINK LED to indicate network connection, 100M LED to indicate 100M connection, USB LED to indicate USB status ¾ One Setup CD for Windows 2000/XP... capability by letting you should prepare: z One Windows 2000/XP/Vista/7 computer with CD-ROM drive z One USB device with USB port 1.4 Hardware Installation Make sure that your USB devices are switched off and that the MFP and Storage Server's power adapter is permanent on the Ethernet network.
...1-USB 2.0 Port MFP and Storage Server ¾ 1 USB 2.0 port (High-speed) ¾ Fast Ethernet network port: RJ-45 for 10Base-T or 100Base-TX ¾ LINK LED to indicate network connection, 100M LED to indicate 100M connection, USB LED to indicate USB status ¾ One Setup CD for Windows 2000/XP... capability by letting you should prepare: z One Windows 2000/XP/Vista/7 computer with CD-ROM drive z One USB device with USB port 1.4 Hardware Installation Make sure that your USB devices are switched off and that the MFP and Storage Server's power adapter is permanent on the Ethernet network.
Instruction Manual
Page 7
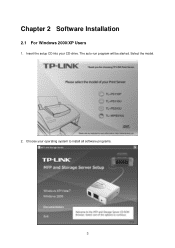
Choose your CD-drive. Insert the setup CD into your operating system to install all software programs. 3 Select the model. 2. The auto-run program will be started. Chapter 2 Software Installation 2.1 For Windows 2000/XP Users 1.
Choose your CD-drive. Insert the setup CD into your operating system to install all software programs. 3 Select the model. 2. The auto-run program will be started. Chapter 2 Software Installation 2.1 For Windows 2000/XP Users 1.

