User Guide
Page 9
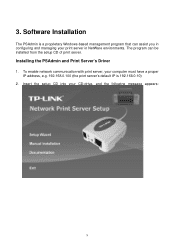
To enable network communication with print server, your CD-drive, and the following message appears: 9 The program can assist you in configuring and managing your print server in NetWare environments. Installing the PSAdmin and Print Server's Driver 1. 3. Insert the setup CD into your computer must have a proper IP address, e.g. 192.168.0.100 (the print server's default IP is a proprietary Windows-based management program that can be installed from the setup CD of print server. Software Installation The PSAdmin is 192.168.0.10) 2.
To enable network communication with print server, your CD-drive, and the following message appears: 9 The program can assist you in configuring and managing your print server in NetWare environments. Installing the PSAdmin and Print Server's Driver 1. 3. Insert the setup CD into your computer must have a proper IP address, e.g. 192.168.0.100 (the print server's default IP is a proprietary Windows-based management program that can be installed from the setup CD of print server. Software Installation The PSAdmin is 192.168.0.10) 2.
User Guide
Page 12
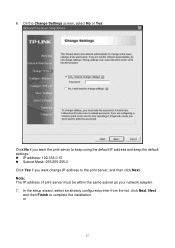
On the Change Settings screen, select No or Yes: Click No if you want the print server to keep using the default IP address and keep the default settings: z IP address: 192.168.0.10 z Subnet Mask: 255.255.255.0 Click Yes if you want change IP address to complete the installation. or 12 Note: The IP address of print server must be within the same subnet as your network adapter. 7. 6. In the setup wizard, select an already configured printer from the list, click Next, Next and then Finish to the print server, and then click Next.
On the Change Settings screen, select No or Yes: Click No if you want the print server to keep using the default IP address and keep the default settings: z IP address: 192.168.0.10 z Subnet Mask: 255.255.255.0 Click Yes if you want change IP address to complete the installation. or 12 Note: The IP address of print server must be within the same subnet as your network adapter. 7. 6. In the setup wizard, select an already configured printer from the list, click Next, Next and then Finish to the print server, and then click Next.
User Guide
Page 19
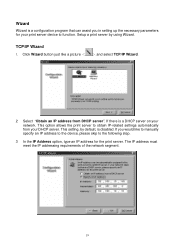
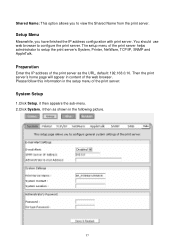
...65310;.and select TCP/IP Wizard. 2 Select "Obtain an IP address from your network. If there is disabled. Setup a print server by default, is a DHCP server on your DHCP server. This option allows the print server to function. The IP address must meet the IP addressing requirements of the... network segment. 19 TCP/IP Wizard 1. This setting, by using Wizard. Click...
...65310;.and select TCP/IP Wizard. 2 Select "Obtain an IP address from your network. If there is disabled. Setup a print server by default, is a DHCP server on your DHCP server. This option allows the print server to function. The IP address must meet the IP addressing requirements of the... network segment. 19 TCP/IP Wizard 1. This setting, by using Wizard. Click...
User Guide
Page 22
... allow you to the print server, if DHCP option is disabled. The default value is optional 22 This value is "Disable". This option also lets you to manually specify an IP address to the print server. Subnet Mask: This option shows the print server's current subnet mask ...option also allows you manually specify a subnet mask to modify the print server's TCP/IP settings. This value is detailed as follows. Specify an IP address: IP Address: This option shows the print server's current IP address maybe obtained from a DHCP server: This option enables or disables the DHCP feature ...
... allow you to the print server, if DHCP option is disabled. The default value is optional 22 This value is "Disable". This option also lets you to manually specify an IP address to the print server. Subnet Mask: This option shows the print server's current subnet mask ...option also allows you manually specify a subnet mask to modify the print server's TCP/IP settings. This value is detailed as follows. Specify an IP address: IP Address: This option shows the print server's current IP address maybe obtained from a DHCP server: This option enables or disables the DHCP feature ...

User Guide
Page 33
...Netware it then appears the sub-menu. 2. Gateway's IP: This option allows you to view DHCP/ BOOTP status. Click Status, it then as shown in the following picture. 33 Rendezvous Settings: The Rendezvous settings of the network segment. (default: 192.168.0.10) Subnet Mask: This option allows... you to view IP address from the print server. Use DHCP/BOOTP: This option allows you to view gateway from the print...
...Netware it then appears the sub-menu. 2. Gateway's IP: This option allows you to view DHCP/ BOOTP status. Click Status, it then as shown in the following picture. 33 Rendezvous Settings: The Rendezvous settings of the network segment. (default: 192.168.0.10) Subnet Mask: This option allows... you to view IP address from the print server. Use DHCP/BOOTP: This option allows you to view gateway from the print...
User Guide
Page 37
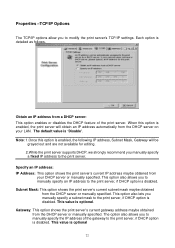
... the print server's System, Printer, NetWare, TCP/IP, SNMP and AppleTalk. Please follow this information in the setup menu of the print server: System Setup 1.Click Setup, it then appears the sub-menu. 2.Click System, it then as the URL, default: 192.168.0.10. Shared Name: This option allows... you have finished the IP address configuration with print server. Preparation Enter the IP address of the print server as shown in content of the print server helps administrator...
... the print server's System, Printer, NetWare, TCP/IP, SNMP and AppleTalk. Please follow this information in the setup menu of the print server: System Setup 1.Click Setup, it then appears the sub-menu. 2.Click System, it then as the URL, default: 192.168.0.10. Shared Name: This option allows... you have finished the IP address configuration with print server. Preparation Enter the IP address of the print server as shown in content of the print server helps administrator...
User Guide
Page 38
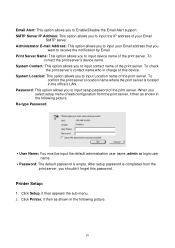
... is completed from the print server, it then as login user name. ․Password: The default password is empty. Re-type Password. ․User Name: You must be input the default administration user name, admin as shown in the following picture. Print Server Name: This option allows... you shouldn't forget this device. SMTP Server IP Address: This option allows you select setup menu of your Email address ...
... is completed from the print server, it then as login user name. ․Password: The default password is empty. Re-type Password. ․User Name: You must be input the default administration user name, admin as shown in the following picture. Print Server Name: This option allows... you shouldn't forget this device. SMTP Server IP Address: This option allows you select setup menu of your Email address ...
User Guide
Page 45
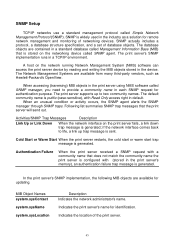
... in the device. Activities/SNMP Trap Messages Description Link Up or Link Down When the network interface on the print server fails, a link down trap message is generated. Indicates the print server's name for identification. The default community name is public (case-sensitive), with ...(stored in the print server's memory), an authentication failure trap message is sent. SNMP Setup TCP/IP networks use a ...
... in the device. Activities/SNMP Trap Messages Description Link Up or Link Down When the network interface on the print server fails, a link down trap message is generated. Indicates the print server's name for identification. The default community name is public (case-sensitive), with ...(stored in the print server's memory), an authentication failure trap message is sent. SNMP Setup TCP/IP networks use a ...

User Guide
Page 51
... 6 digits of the Node ID, located on the back of the print server unit). Select one of the print server unit). Then please select TCP/IP or NetBEUI alternatively. 51 15. Select the Network Print Port and click OK. 16. The Add Port box will be displayed along with its Node... ID, as shown in the following picture. „ By default, the computer will first search for the print server(s) on the network by using the IPX/SPX protocol. „ If the IPX/SPX protocol is...
... 6 digits of the Node ID, located on the back of the print server unit). Select one of the print server unit). Then please select TCP/IP or NetBEUI alternatively. 51 15. Select the Network Print Port and click OK. 16. The Add Port box will be displayed along with its Node... ID, as shown in the following picture. „ By default, the computer will first search for the print server(s) on the network by using the IPX/SPX protocol. „ If the IPX/SPX protocol is...
User Guide
Page 53
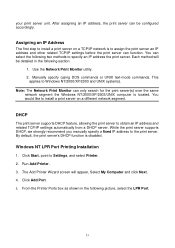
... server to Windows NT/2000/XP/2003 and UNIX systems). By default, the print server's DHCP function is located. You can function. The Add Printer Wizard screen will be configured accordingly. Click Add Port. 5. your print server unit. Assigning an IP Address The first step to install a print server on a different network...
... server to Windows NT/2000/XP/2003 and UNIX systems). By default, the print server's DHCP function is located. You can function. The Add Printer Wizard screen will be configured accordingly. Click Add Port. 5. your print server unit. Assigning an IP Address The first step to install a print server on a different network...

User Guide
Page 54
Type in the IP address assigned to the print server in a printer name, for example, lp1. Click Next. 10. 6. In the Name of server providing... in a new Share Name or leave it in the following picture. Done. The Add LPR compatible printers box will then appear as shown in default and click Next. 12. Select Shared. A message reading, "After your printer is installed, Windows can print a test page so you can ...Click OK. 8. Select the appropriate printer manufacturer and printer type list and click Next. 11. Windows 2000/XP/2003 Standard TCP/IP Port Printing Installation 54
Type in the IP address assigned to the print server in a printer name, for example, lp1. Click Next. 10. 6. In the Name of server providing... in a new Share Name or leave it in the following picture. Done. The Add LPR compatible printers box will then appear as shown in default and click Next. 12. Select Shared. A message reading, "After your printer is installed, Windows can print a test page so you can ...Click OK. 8. Select the appropriate printer manufacturer and printer type list and click Next. 11. Windows 2000/XP/2003 Standard TCP/IP Port Printing Installation 54
User Guide
Page 58
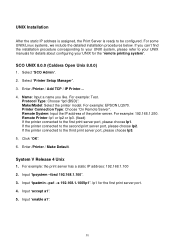
...: Test. Make/Model: Select the printer model. For example: 192.168.1.250. Enter /Printer / Make Default. Select "SCO Admin". 2. For example: EPSON LQ570. Remote System: Input the IP address of the printer server. Input "accept a1". 5. Name: Input a name you can't find the ... choose lp2. Click "OK". 6. Printer Connection Type: Choose "On Remote Server". System V Release 4 Unix 1. For example: the print server has a static IP address: 192.168.1.100 2. Select "Printer Setup Manager". 3. Input "lpsystem -tbsd 192.168.1.100". 3. Input "lpadmin -pa1 -s 192.168.1.100!lp1". ...
...: Test. Make/Model: Select the printer model. For example: 192.168.1.250. Enter /Printer / Make Default. Select "SCO Admin". 2. For example: EPSON LQ570. Remote System: Input the IP address of the printer server. Input "accept a1". 5. Name: Input a name you can't find the ... choose lp2. Click "OK". 6. Printer Connection Type: Choose "On Remote Server". System V Release 4 Unix 1. For example: the print server has a static IP address: 192.168.1.100 2. Select "Printer Setup Manager". 3. Input "lpsystem -tbsd 192.168.1.100". 3. Input "lpadmin -pa1 -s 192.168.1.100!lp1". ...

User Guide
Page 71
Type, for example, "tftp 192.72.214.68 put config.txt" to save this example, rather than 192.72.214.68. 7. Leave other options as 192.72.214.100 in this new file and quit from "0.0.0.0" to print server. 8. When done, save this new configuration back to "192.72.214.100". In your editor, modify "BoxIPAddress" field from your editor. Please note, in this step you must specify an IP address which is valid on Segment B, such as default and do not change their values. Done! 71 6. Move the print server back to the Segment B. 9.
Type, for example, "tftp 192.72.214.68 put config.txt" to save this example, rather than 192.72.214.68. 7. Leave other options as 192.72.214.100 in this new file and quit from "0.0.0.0" to print server. 8. When done, save this new configuration back to "192.72.214.100". In your editor, modify "BoxIPAddress" field from your editor. Please note, in this step you must specify an IP address which is valid on Segment B, such as default and do not change their values. Done! 71 6. Move the print server back to the Segment B. 9.
User Guide
Page 79
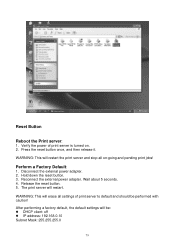
... about 5 seconds. 4. After performing a factory default, the default settings will erase all on . 2. WARNING: This will restart. Reset Button Reboot the Print server: 1. Press the reset button once, and then release it. Disconnect ... print jobs! WARNING: This will be performed with caution! Reconnect the external power adapter. Release the reset button. 5. Verify the power of print server to default and should be : z DHCP client: off z IP address: 192.168.0.10 Subnet Mask: 255.255.255.0 79
... about 5 seconds. 4. After performing a factory default, the default settings will erase all on . 2. WARNING: This will restart. Reset Button Reboot the Print server: 1. Press the reset button once, and then release it. Disconnect ... print jobs! WARNING: This will be performed with caution! Reconnect the external power adapter. Release the reset button. 5. Verify the power of print server to default and should be : z DHCP client: off z IP address: 192.168.0.10 Subnet Mask: 255.255.255.0 79
Installation Instructions
Page 1
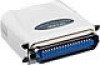
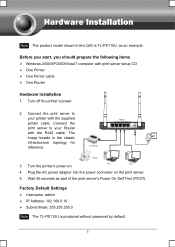
... Printer cable ¾ One Router Hardware Installation 1. Turn the printer's power on the print server. 5. Factory Default Settings ¾ Username: admin ¾ IP Address: 192.168.0.10 ¾ Subnet Mask: 255.255.255.0 Note The TL-PS110U is the classic infrastructure topology for reference: 3. Turn off the printer's power. 2. The image beside is...
... Printer cable ¾ One Router Hardware Installation 1. Turn the printer's power on the print server. 5. Factory Default Settings ¾ Username: admin ¾ IP Address: 192.168.0.10 ¾ Subnet Mask: 255.255.255.0 Note The TL-PS110U is the classic infrastructure topology for reference: 3. Turn off the printer's power. 2. The image beside is...
