
User Guide
Page 6
... compliant - TD-8811 External ADSL2+ ROUTER Chapter 1. The TD-8811 is a complete plug-and-play solution. G.992.2 (G.lite) - G.992.3 (ADSL2) - ANSI T1.413 - ADSL dual latency (fast path and interleaved path) - With standard Ethernet interface, it can download it from our website (http://www.tp-link.com). 1.1...Product Overview With the excellent circuit design and high quality production, we guarantee its high performance, great stability and easy to configure the router but also uses external utility software, too. You can be directly connected to SOHO users ¾ Advanced DMT...
... compliant - TD-8811 External ADSL2+ ROUTER Chapter 1. The TD-8811 is a complete plug-and-play solution. G.992.2 (G.lite) - G.992.3 (ADSL2) - ANSI T1.413 - ADSL dual latency (fast path and interleaved path) - With standard Ethernet interface, it can download it from our website (http://www.tp-link.com). 1.1...Product Overview With the excellent circuit design and high quality production, we guarantee its high performance, great stability and easy to configure the router but also uses external utility software, too. You can be directly connected to SOHO users ¾ Advanced DMT...
User Guide
Page 9
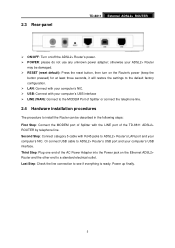
... end of the TD-8811 ADSL2+ ROUTER by telephone line. otherwise your ADSL2+ Router may be damaged. ¾ RESET (reset default): Press the reset button, then turn on the Router's power (keep the button pressed) for at least three seconds, it will restore the settings to the default factory configuration. ¾ LAN: Connect...
... end of the TD-8811 ADSL2+ ROUTER by telephone line. otherwise your ADSL2+ Router may be damaged. ¾ RESET (reset default): Press the reset button, then turn on the Router's power (keep the button pressed) for at least three seconds, it will restore the settings to the default factory configuration. ¾ LAN: Connect...
User Guide
Page 11
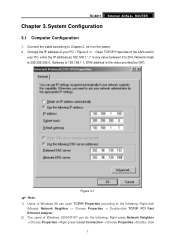
...(Figure 3-1): Open TCP/IP Properties of Windows 2000/NT/XP can open TCP/IP Properties according to Chapter 2, turn on the power. 2. System Configuration 3.1 Computer Configuration 1. click 7 Change the IP address of your PC, enter the IP address as 192.168.1.* (* is any value between 2 to 254, Network mask is... the value provided by ISP). Connect the cable according to the following : Right-press Network Neighbor ->Choose Properties->Right-press Local Connection ->Choose Properties->Double- TD-8811 External ADSL2+ ROUTER Chapter 3.
...(Figure 3-1): Open TCP/IP Properties of Windows 2000/NT/XP can open TCP/IP Properties according to Chapter 2, turn on the power. 2. System Configuration 3.1 Computer Configuration 1. click 7 Change the IP address of your PC, enter the IP address as 192.168.1.* (* is any value between 2 to 254, Network mask is... the value provided by ISP). Connect the cable according to the following : Right-press Network Neighbor ->Choose Properties->Right-press Local Connection ->Choose Properties->Double- TD-8811 External ADSL2+ ROUTER Chapter 3.
User Guide
Page 12
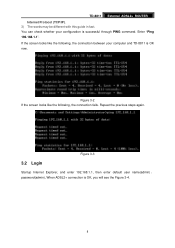
... ADSL2+ connection is OK now. If the screen looks like the following , the connection between your configuration is successful through PING command. You can check whether your computer and TD-8811 is OK, you will see the Figure 3-4. 8 TD-8811 External ADSL2+ ROUTER Internet Protocol (TCP/IP). 3) The words may be different with this guide...
... ADSL2+ connection is OK now. If the screen looks like the following , the connection between your configuration is successful through PING command. You can check whether your computer and TD-8811 is OK, you will see the Figure 3-4. 8 TD-8811 External ADSL2+ ROUTER Internet Protocol (TCP/IP). 3) The words may be different with this guide...
User Guide
Page 17
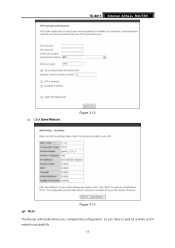
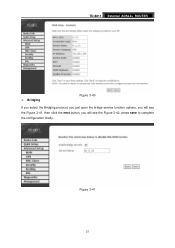
Figure 3-12 ) Note: Figure 3-13 The Router will restart when you complete the configuration, so you have to wait for a while until it restarts successfully. 13 TD-8811 External ADSL2+ ROUTER c) Click Save/Reboot.
Figure 3-12 ) Note: Figure 3-13 The Router will restart when you complete the configuration, so you have to wait for a while until it restarts successfully. 13 TD-8811 External ADSL2+ ROUTER c) Click Save/Reboot.
User Guide
Page 22
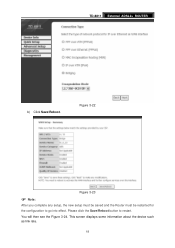
Figure 3-22 Figure 3-23 ) Note: After you complete any setup, the new setup must be saved and the Router must be restarted for the configuration to restart. Please click the Save/Reboot button to go into effect. You will then see the Figure 3-24. This screen displays some information about the device such as link rate. 18 TD-8811 External ADSL2+ ROUTER b) Click Save/Reboot.
Figure 3-22 Figure 3-23 ) Note: After you complete any setup, the new setup must be saved and the Router must be restarted for the configuration to restart. Please click the Save/Reboot button to go into effect. You will then see the Figure 3-24. This screen displays some information about the device such as link rate. 18 TD-8811 External ADSL2+ ROUTER b) Click Save/Reboot.
User Guide
Page 24
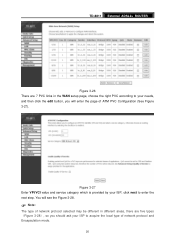
.... 20 Figure 3-27 Enter VPI/VCI value and service category which is provided by your ISP to enter the next step. TD-8811 External ADSL2+ ROUTER Figure 3-26 There are 7 PVC links in different areas, there are five types (Figure 3-28), so you will see the Figure 3-28. ) Note: The type... according to your needs, and then click the edit button, you should ask your ISP, click next to acquire the local type of ATM PVC Configuration (See Figure 3-27).
.... 20 Figure 3-27 Enter VPI/VCI value and service category which is provided by your ISP to enter the next step. TD-8811 External ADSL2+ ROUTER Figure 3-26 There are 7 PVC links in different areas, there are five types (Figure 3-28), so you will see the Figure 3-28. ) Note: The type... according to your needs, and then click the edit button, you should ask your ISP, click next to acquire the local type of ATM PVC Configuration (See Figure 3-27).

User Guide
Page 25
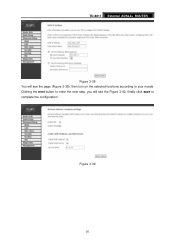
Enable the configurations, then you can surf on the selected functions according to enter the next step, you will see the Figure 3-31, finally click save to 21 ... is provided by your ISP. After selecting other functions (often using the default setup), click the next button. Clicking the next button to your demands. TD-8811 External ADSL2+ ROUTER Figure 3-28 After choosing the proper protocol, enter the correct parameters supported by your ISP.
Enable the configurations, then you can surf on the selected functions according to enter the next step, you will see the Figure 3-31, finally click save to 21 ... is provided by your ISP. After selecting other functions (often using the default setup), click the next button. Clicking the next button to your demands. TD-8811 External ADSL2+ ROUTER Figure 3-28 After choosing the proper protocol, enter the correct parameters supported by your ISP.

User Guide
Page 26
TD-8811 External ADSL2+ ROUTER Figure 3-30 Figure 3-31 ¾ PPP over Ethernet (PPPoE) If you select the protocol of PPP over Ethernet (PPPoE), you will see the Figure 3-32, enter the value of user name and password which is provided by your ISP, after selecting other functions (often using the default setup), click the next button. 22 complete the configuration.
TD-8811 External ADSL2+ ROUTER Figure 3-30 Figure 3-31 ¾ PPP over Ethernet (PPPoE) If you select the protocol of PPP over Ethernet (PPPoE), you will see the Figure 3-32, enter the value of user name and password which is provided by your ISP, after selecting other functions (often using the default setup), click the next button. 22 complete the configuration.

User Guide
Page 27
TD-8811 External ADSL2+ ROUTER Figure 3-32 You will see the Figure 3-33. Figure 3-33 23 Then turn on the selected functions according to complete the configuration. Clicking the next button to enter the next step, you will see the Figure 3-34, finally click save to your needs.
TD-8811 External ADSL2+ ROUTER Figure 3-32 You will see the Figure 3-33. Figure 3-33 23 Then turn on the selected functions according to complete the configuration. Clicking the next button to enter the next step, you will see the Figure 3-34, finally click save to your needs.

User Guide
Page 28
Enter the parameter and the way which is provided by your needs. Clicking the next button to enter the next step, you will see the Figure 3-37, finally click save to your ISP, then click the next button. You can select the functions according to complete the configuration. 24 TD-8811 External ADSL2+ ROUTER Figure 3-34 ¾ MAC Encapsulation Routing (MER) If you select the protocol of MAC Encapsulation Routing (MER), you will see the page (Figure 3-35). Figure 3-35 After that, Figure 3-36 will be available.
Enter the parameter and the way which is provided by your needs. Clicking the next button to enter the next step, you will see the Figure 3-37, finally click save to your ISP, then click the next button. You can select the functions according to complete the configuration. 24 TD-8811 External ADSL2+ ROUTER Figure 3-34 ¾ MAC Encapsulation Routing (MER) If you select the protocol of MAC Encapsulation Routing (MER), you will see the page (Figure 3-35). Figure 3-35 After that, Figure 3-36 will be available.
User Guide
Page 30
Figure 3-39 26 Clicking the next button to enter the next step, you will see the Figure 3-40, finally click save to your needs. TD-8811 External ADSL2+ ROUTER Figure 3-38 You will see the page (Figure 3-39), then turn on the selected functions according to complete the configuration.
Figure 3-39 26 Clicking the next button to enter the next step, you will see the Figure 3-40, finally click save to your needs. TD-8811 External ADSL2+ ROUTER Figure 3-38 You will see the page (Figure 3-39), then turn on the selected functions according to complete the configuration.
User Guide
Page 31
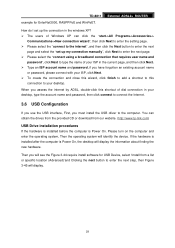
TD-8811 External ADSL2+ ROUTER ¾ Bridging Figure 3-40 If you select the Bridging protocol, you just open the bridge service function options, you will see the Figure 3-41, then click the next button, you will see the Figure 3-42, press save to complete the configuration finally. Figure 3-41 27
TD-8811 External ADSL2+ ROUTER ¾ Bridging Figure 3-40 If you select the Bridging protocol, you just open the bridge service function options, you will see the Figure 3-41, then click the next button, you will see the Figure 3-42, press save to complete the configuration finally. Figure 3-41 27
User Guide
Page 33
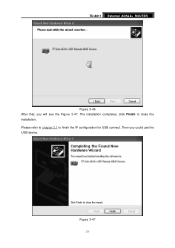
...ADSL, double-click this connection to your desktop, type the account name and password, then click connect to connect the Internet. 3.6 USB Configuration If you use the USB interface, First, you must install the USB driver to this shortcut of dial connection in the current page,...Then the operating system will see the Figure 3-44 require install software for EnterNet3000, RASPPPoE and WinPeET. TD-8811 example for USB Device, select 'Install from our website. (http://www.tp-link.com) USB Drive installation procedures If the hardware is installed before the computer is Power On, the ...
...ADSL, double-click this connection to your desktop, type the account name and password, then click connect to connect the Internet. 3.6 USB Configuration If you use the USB interface, First, you must install the USB driver to this shortcut of dial connection in the current page,...Then the operating system will see the Figure 3-44 require install software for EnterNet3000, RASPPPoE and WinPeET. TD-8811 example for USB Device, select 'Install from our website. (http://www.tp-link.com) USB Drive installation procedures If the hardware is installed before the computer is Power On, the ...
User Guide
Page 35
Then you will see the Figure 3-47. Figure 3-47 31 The installation completes, click Finish to finish the IP configuration for USB connect. Please refer to chapter 3.1 to close the installation. TD-8811 External ADSL2+ ROUTER Figure 3-46 After that, you could use the USB device.
Then you will see the Figure 3-47. Figure 3-47 31 The installation completes, click Finish to finish the IP configuration for USB connect. Please refer to chapter 3.1 to close the installation. TD-8811 External ADSL2+ ROUTER Figure 3-46 After that, you could use the USB device.
User Guide
Page 37
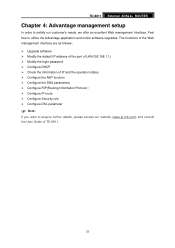
... of IP and the operation status ¾ Configure the NAT function ¾ Configure the DNS parameters ¾ Configure RIP(Routing Information Protocol) ¾ Configure IP route ¾ Configure Security rule ¾ Configure DSL parameter ) Note: If you want to acquire further details, please access our website (www.tp-link.com) and consult the User Guide of TD-8811. 33
... of IP and the operation status ¾ Configure the NAT function ¾ Configure the DNS parameters ¾ Configure RIP(Routing Information Protocol) ¾ Configure IP route ¾ Configure Security rule ¾ Configure DSL parameter ) Note: If you want to acquire further details, please access our website (www.tp-link.com) and consult the User Guide of TD-8811. 33
User Guide
Page 38
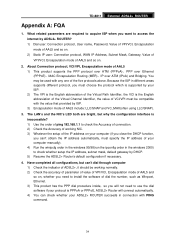
... 2. You may be used with the value that provided by DHCP. 5) Resume the ADSL2+ Router's default configuration if necessary. 4. Have completed all configurations, but why the configuration interface is inaccessible? 1) Use the order of ping 192.168.1.1 to check the Accuracy of connection. 2) Check... over ATM (PPPoA) 、 PPP over Ethernet (PPPoE)、MAC Encapsulation Routing (MER)、IP over ATM (IPoA) and Bridging. TD-8811 External ADSL2+ ROUTER Appendix A: FQA 1. What related parameters are bright, but can't dial through computer 1) Check the indicator of ADSL2+,...
... 2. You may be used with the value that provided by DHCP. 5) Resume the ADSL2+ Router's default configuration if necessary. 4. Have completed all configurations, but why the configuration interface is inaccessible? 1) Use the order of ping 192.168.1.1 to check the Accuracy of connection. 2) Check... over ATM (PPPoA) 、 PPP over Ethernet (PPPoE)、MAC Encapsulation Routing (MER)、IP over ATM (IPoA) and Bridging. TD-8811 External ADSL2+ ROUTER Appendix A: FQA 1. What related parameters are bright, but can't dial through computer 1) Check the indicator of ADSL2+,...


