
Startup Guide
Page 4
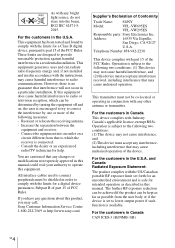
... Trade Name: SONY Model: VPL-VW695ES VPL-VW295ES Responsible party: Sony Electronics Inc. If this equipment. Consult the dealer or an experienced radio/TV technician for a Class B digital device, pursuant to comply with part 15 of the FCC Rules. Sony Customer Information Service Center 1-800-222-7669 or http://www.sony.com/ Supplier's Declaration of the device. Telephone Number:858-942-2230...
... Trade Name: SONY Model: VPL-VW695ES VPL-VW295ES Responsible party: Sony Electronics Inc. If this equipment. Consult the dealer or an experienced radio/TV technician for a Class B digital device, pursuant to comply with part 15 of the FCC Rules. Sony Customer Information Service Center 1-800-222-7669 or http://www.sony.com/ Supplier's Declaration of the device. Telephone Number:858-942-2230...

Startup Guide
Page 6
... DEVICES, UNAVOIDABLE DATA LEAKS RESULTING FROM TRANSMISSION SPECIFICATIONS, OR SECURITY PROBLEMS OF ANY KIND. • Depending on the operating environment, unauthorized third parties on the network may be careful in adjusting temperature settings of the air conditioner. SONY WILL NOT BE LIABLE FOR DAMAGES OF ANY KIND RESULTING FROM THE USE OF THIS UNIT FOR PURPOSES OTHER THAN GENERAL HOME USE, EITHER DURING...
... DEVICES, UNAVOIDABLE DATA LEAKS RESULTING FROM TRANSMISSION SPECIFICATIONS, OR SECURITY PROBLEMS OF ANY KIND. • Depending on the operating environment, unauthorized third parties on the network may be careful in adjusting temperature settings of the air conditioner. SONY WILL NOT BE LIABLE FOR DAMAGES OF ANY KIND RESULTING FROM THE USE OF THIS UNIT FOR PURPOSES OTHER THAN GENERAL HOME USE, EITHER DURING...
Startup Guide
Page 9
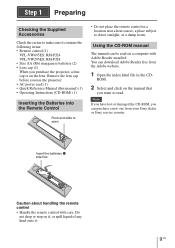
... remote control with Adobe Reader installed. Using the CD-ROM manual The manual can download Adobe Reader free from your Sony dealer or Sony service counter. Insert the batteries E side first. You can be read . ROM. 2 Select and click on a computer with care. Remove the lens cap before you want to read on the manual that you use the projector. • AC power cord (1) • Quick Reference Manual (this manual) (1) • Operating Instructions...
... remote control with Adobe Reader installed. Using the CD-ROM manual The manual can download Adobe Reader free from your Sony dealer or Sony service counter. Insert the batteries E side first. You can be read . ROM. 2 Select and click on a computer with care. Remove the lens cap before you want to read on the manual that you use the projector. • AC power cord (1) • Quick Reference Manual (this manual) (1) • Operating Instructions...
Startup Guide
Page 10
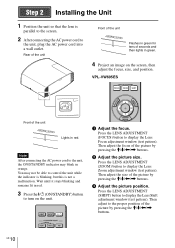
... the screen. 2 After connecting the AC power cord to turn on the screen, then adjust the focus, size, and position. Note After connecting the AC power cord to display the Lens Focus adjustment window (test pattern). VPL-VW695ES Front of seconds and then lights in red. 3 Press the ?/1 (ON/STANDBY) button to the unit, plug the AC power cord into a wall outlet. Wait until it stops blinking and remains lit in green. 4 Project an image on the unit. a Adjust the focus...
... the screen. 2 After connecting the AC power cord to turn on the screen, then adjust the focus, size, and position. Note After connecting the AC power cord to display the Lens Focus adjustment window (test pattern). VPL-VW695ES Front of seconds and then lights in red. 3 Press the ?/1 (ON/STANDBY) button to the unit, plug the AC power cord into a wall outlet. Wait until it stops blinking and remains lit in green. 4 Project an image on the unit. a Adjust the focus...
Startup Guide
Page 11
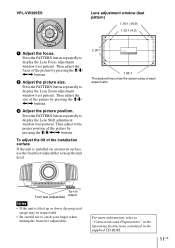
VPL-VW295ES Lens adjustment window (test pattern) 1.78:1 (16:9) 1.33:1 (4:3) a Adjust the focus. Press the PATTERN button repeatedly to display the Lens Focus adjustment window (test pattern). Then adjust the focus of the picture by pressing the M/m/
VPL-VW295ES Lens adjustment window (test pattern) 1.78:1 (16:9) 1.33:1 (4:3) a Adjust the focus. Press the PATTERN button repeatedly to display the Lens Focus adjustment window (test pattern). Then adjust the focus of the picture by pressing the M/m/

Startup Guide
Page 14
... ON/STANDBY indicator changes from which you can disconnect the AC power cord. GB 14 For more information, refer to display the input palette on the screen. Step 5 Projecting Projecting the Picture 1 Turn on both the unit and the equipment connected to the unit. 2 Press INPUT to "Projecting" in the Operating Instructions contained in green and the fan continues to run to project. appears on the screen. 2 Press the ?/1 (ON/STANDBY) button again...
... ON/STANDBY indicator changes from which you can disconnect the AC power cord. GB 14 For more information, refer to display the input palette on the screen. Step 5 Projecting Projecting the Picture 1 Turn on both the unit and the equipment connected to the unit. 2 Press INPUT to "Projecting" in the Operating Instructions contained in green and the fan continues to run to project. appears on the screen. 2 Press the ?/1 (ON/STANDBY) button again...
Startup Guide
Page 16
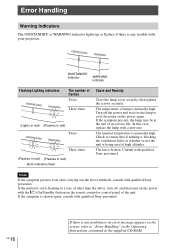
... is any trouble with the [/1 (On/Standby) button on the remote control or control panel of other than the above methods, consult with qualified Sony personnel. If the indicator starts flashing in a way of the unit. Error Handling Warning Indicators The ON/STANDBY or WARNING indicator lights up or flashes if there is any problem or an error message appears on the screen, refer to "Error Handling" in the Operating Instructions contained in the supplied CD-ROM...
... is any trouble with the [/1 (On/Standby) button on the remote control or control panel of other than the above methods, consult with qualified Sony personnel. If the indicator starts flashing in a way of the unit. Error Handling Warning Indicators The ON/STANDBY or WARNING indicator lights up or flashes if there is any problem or an error message appears on the screen, refer to "Error Handling" in the Operating Instructions contained in the supplied CD-ROM...
Startup Guide
Page 17
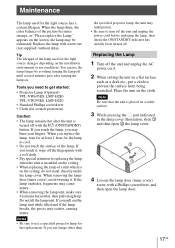
... touch the lamp, you need to replacing the lamp when the unit is installed on the ceiling. • When replacing the lamp of the lamp used for the light source has a certain lifespan. Replacing the Lamp 1 Turn off the fingerprints with a Phillips screwdriver, and then open 2 the lamp cover. 4 Loosen the lamp door (inner cover) screw with a soft cloth. • Pay special attention to get started: • Projector Lamp (Optional) VPL-VW695ES: LMP-H280 VPL-VW295ES...
... touch the lamp, you need to replacing the lamp when the unit is installed on the ceiling. • When replacing the lamp of the lamp used for the light source has a certain lifespan. Replacing the Lamp 1 Turn off the fingerprints with a Phillips screwdriver, and then open 2 the lamp cover. 4 Loosen the lamp door (inner cover) screw with a soft cloth. • Pay special attention to get started: • Projector Lamp (Optional) VPL-VW695ES: LMP-H280 VPL-VW295ES...

Operating Instructions
Page 2
... Picture Menu 24 Advanced Picture Menu 30 Screen Menu 31 Setup Menu 33 Function Menu 35 Items Locked by Settings Lock 37 Installation Menu 38 Information Menu 41 About the Preset Memory .......... 41 Using Network Features Displaying the Control Window of the Unit with a Web Browser ........ 42 Operating the Control Window ........ 43 Switching the Page 43 Setting the Access Limitation ....43 Confirming the Information Regarding the Unit 44 Error Handling Troubleshooting 45 Warning Indicators 48 Message Lists 49 Others Updating the Software...
... Picture Menu 24 Advanced Picture Menu 30 Screen Menu 31 Setup Menu 33 Function Menu 35 Items Locked by Settings Lock 37 Installation Menu 38 Information Menu 41 About the Preset Memory .......... 41 Using Network Features Displaying the Control Window of the Unit with a Web Browser ........ 42 Operating the Control Window ........ 43 Switching the Page 43 Setting the Access Limitation ....43 Confirming the Information Regarding the Unit 44 Error Handling Troubleshooting 45 Warning Indicators 48 Message Lists 49 Others Updating the Software...

Operating Instructions
Page 14
... ON/STANDBY indicator changes from flashing green to "Off" on the Setup menu, the input palette does not appear. Projecting Projecting the Picture 1 Turn on both the unit and the equipment connected to the unit. 2 Press INPUT to switch between input terminals in green and the fan continues to run to project. Press the INPUT button to display the input palette on the screen. 2 Press the ?/1 (ON/STANDBY) button again before the message disappears. Turning Off the Power 1 Press...
... ON/STANDBY indicator changes from flashing green to "Off" on the Setup menu, the input palette does not appear. Projecting Projecting the Picture 1 Turn on both the unit and the equipment connected to the unit. 2 Press INPUT to switch between input terminals in green and the fan continues to run to project. Press the INPUT button to display the input palette on the screen. 2 Press the ?/1 (ON/STANDBY) button again before the message disappears. Turning Off the Power 1 Press...

Operating Instructions
Page 15
... glasses. 3 Turn toward the screen. is too far from the projector • There are other communication devices, such as from a distance greater than the communication range or install the unit outside the communication range, the 3D glasses may not be able to display the images properly. Adjusting/Setting the 3D functions You can enjoy powerful 3D video images, such as a wireless LAN (IEEE802.11...
... glasses. 3 Turn toward the screen. is too far from the projector • There are other communication devices, such as from a distance greater than the communication range or install the unit outside the communication range, the 3D glasses may not be able to display the images properly. Adjusting/Setting the 3D functions You can enjoy powerful 3D video images, such as a wireless LAN (IEEE802.11...

Operating Instructions
Page 33
... from a PC or a terminal which is connected to a network. Off: Use this item is set to "On," the fan noise becomes slightly louder since the fan speed increases. When Network Management is set to "On," the Remote Start setting is set to display the menu on -screen displays. On: You can change the position to "On" automatically, and you cannot change the factory preset settings, etc. Off: Turns off the power, and warning messages.
... from a PC or a terminal which is connected to a network. Off: Use this item is set to "On," the fan noise becomes slightly louder since the fan speed increases. When Network Management is set to "On," the Remote Start setting is set to display the menu on -screen displays. On: You can change the position to "On" automatically, and you cannot change the factory preset settings, etc. Off: Turns off the power, and warning messages.

Operating Instructions
Page 37
... Mode Gamma Correction Color Correction Clear White x.v.Color HDR Color Space Input Lag Reduction Advanced Picture menu Auto Calibration Group 2 Setup menu Status Language Menu Position High Altitude Mode Remote Start Network Management Power Saving Lamp Setting Function menu Dynamic Range Test Pattern Installation menu Image Flip Lens Control Anamorphic Lens Trigger Select IR Receiver Panel Alignment Network Setting 37 Items Locked by Settings Lock Group 1 Picture menu Reset Reality Creation Advanced Iris Contrast Enhancer Lamp Control Motionflow Contrast Brightness Color Hue Color Temp...
... Mode Gamma Correction Color Correction Clear White x.v.Color HDR Color Space Input Lag Reduction Advanced Picture menu Auto Calibration Group 2 Setup menu Status Language Menu Position High Altitude Mode Remote Start Network Management Power Saving Lamp Setting Function menu Dynamic Range Test Pattern Installation menu Image Flip Lens Control Anamorphic Lens Trigger Select IR Receiver Panel Alignment Network Setting 37 Items Locked by Settings Lock Group 1 Picture menu Reset Reality Creation Advanced Iris Contrast Enhancer Lamp Control Motionflow Contrast Brightness Color Hue Color Temp...

Operating Instructions
Page 41
... Software Version Lamp Timer Description Displays the model name Displays the serial number. About the Preset Memory This unit has default image data to adjust preset data for the signal from the preset memory to adjust it to the signals shown in the Information menu. When input signals with HDR, "HDR10" or "HLG" is input, the unit automatically detects the signal type and recalls the data for input signals appropriately according to an optimum picture. Displays...
... Software Version Lamp Timer Description Displays the model name Displays the serial number. About the Preset Memory This unit has default image data to adjust preset data for the signal from the preset memory to adjust it to the signals shown in the Information menu. When input signals with HDR, "HDR10" or "HLG" is input, the unit automatically detects the signal type and recalls the data for input signals appropriately according to an optimum picture. Displays...
Operating Instructions
Page 45
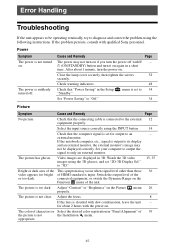
... desired color registration in a short time. Select the input source correctly using the following instructions. Watch the 3D video images using the 3D glasses, and set for about 1 minute, turn it on . Error Handling Troubleshooting If the unit appears to be displayed correctly. Check warning indicators. 48 Check that the connecting cable is output to "Off." 34 Picture Symptom Cause and Remedy Page No picture. Video images are displayed in the Setup "Standby." The picture is not turned on...
... desired color registration in a short time. Select the input source correctly using the following instructions. Watch the 3D video images using the 3D glasses, and set for about 1 minute, turn it on . Error Handling Troubleshooting If the unit appears to be displayed correctly. Check warning indicators. 48 Check that the connecting cable is output to "Off." 34 Picture Symptom Cause and Remedy Page No picture. Video images are displayed in the Setup "Standby." The picture is not turned on...
Operating Instructions
Page 46
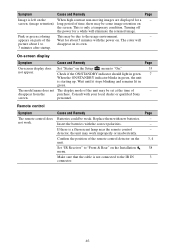
Pink or green coloring This may work . On-screen display Symptom Cause and Remedy Page On-screen display does Set "Status" on the Setup menu to "Front & Rear" on the Installation menu. Check if the ON/STANDBY indicator should light in green. 7 When the ON/STANDBY indicator blinks in green. Wait until it stops blinking and remains lit in green, the unit is starting up. personnel. Remote control Symptom The remote control does not work improperly or inadvertently. Cause and Remedy...
Pink or green coloring This may work . On-screen display Symptom Cause and Remedy Page On-screen display does Set "Status" on the Setup menu to "Front & Rear" on the Installation menu. Check if the ON/STANDBY indicator should light in green. 7 When the ON/STANDBY indicator blinks in green. Wait until it stops blinking and remains lit in green, the unit is starting up. personnel. Remote control Symptom The remote control does not work improperly or inadvertently. Cause and Remedy...

Operating Instructions
Page 50
About HDR (high dynamic range) HDR is used for profit or for use the features updated, insert a USB memory device into account that the picture will provide a different look from the following Sony website: https://esupport.sony.com/ The website also explains how to install the update. To use . Note Some USB memories may not be supported for public viewing, displaying 2D video images as 3D video images by converting...
About HDR (high dynamic range) HDR is used for profit or for use the features updated, insert a USB memory device into account that the picture will provide a different look from the following Sony website: https://esupport.sony.com/ The website also explains how to install the update. To use . Note Some USB memories may not be supported for public viewing, displaying 2D video images as 3D video images by converting...

Operating Instructions
Page 51
... of the lamp used for the light source has a certain lifespan. Replacing the Lamp The lamp used for the light source changes depending on the installation environment or use the lamp longer by avoiding turning the lamp off until several minutes pass after the unit is placed on a stable surface. 3 While pressing the part indicated in the lamp cover illustration, slide 1 and then open 2 the lamp cover. 4 Loosen the lamp door (inner cover) screw with a Phillips...
... of the lamp used for the light source has a certain lifespan. Replacing the Lamp The lamp used for the light source changes depending on the installation environment or use the lamp longer by avoiding turning the lamp off until several minutes pass after the unit is placed on a stable surface. 3 While pressing the part indicated in the lamp cover illustration, slide 1 and then open 2 the lamp cover. 4 Loosen the lamp door (inner cover) screw with a Phillips...

Operating Instructions
Page 55
...Light source Screen size Accepted digital signals HDMI (2 inputs), HDCP compliant Other inputs/ outputs TRIGGER (2 connectors) REMOTE LAN IR IN USB Outside dimensions (w/h/d) Mass Power requirements Power consumption Power consumption Standby Networked Standby Operating temperature Operating humidity Storage temperature Storage humidity Supplied accessories Optional accessories Description SXRD panel, projection system 0.74-inch (18.8 mm) SXRD 26,542,080 pixels (8,847,360 pixels × 3) 2.06 times zoom lens (motorized) f = 21.7 mm to 44.7 mm F3.0 to F4.0 Ultra High Pressure Lamp...
...Light source Screen size Accepted digital signals HDMI (2 inputs), HDCP compliant Other inputs/ outputs TRIGGER (2 connectors) REMOTE LAN IR IN USB Outside dimensions (w/h/d) Mass Power requirements Power consumption Power consumption Standby Networked Standby Operating temperature Operating humidity Storage temperature Storage humidity Supplied accessories Optional accessories Description SXRD panel, projection system 0.74-inch (18.8 mm) SXRD 26,542,080 pixels (8,847,360 pixels × 3) 2.06 times zoom lens (motorized) f = 21.7 mm to 44.7 mm F3.0 to F4.0 Ultra High Pressure Lamp...
Operating Instructions
Page 73
... 21 USER 21 Preset signals 56 Projecting the Picture 14 Projection distance 65, 66, 67 Projection distance and lens shift range 64 R Reality Creation 25 Remote control 5 Remote control detector 3, 4 Remote Start 33 Replacing the lamp 51 Reset 24 Resetting the items 23 S Settings Lock 36 Sharpness 27 Signal type 41 Smooth Gradation 27 Software Version 41 Specifications 55 Status 33 T Test Pattern 36 Trigger Select 38 Troubleshooting 45 Turning off 14 Turning on 7 U Updating the software 50 W Warning indicators 3, 48 X x.v.Color 28...
... 21 USER 21 Preset signals 56 Projecting the Picture 14 Projection distance 65, 66, 67 Projection distance and lens shift range 64 R Reality Creation 25 Remote control 5 Remote control detector 3, 4 Remote Start 33 Replacing the lamp 51 Reset 24 Resetting the items 23 S Settings Lock 36 Sharpness 27 Signal type 41 Smooth Gradation 27 Software Version 41 Specifications 55 Status 33 T Test Pattern 36 Trigger Select 38 Troubleshooting 45 Turning off 14 Turning on 7 U Updating the software 50 W Warning indicators 3, 48 X x.v.Color 28...


