

Operating Instructions
Page 2
... Picture Menu 29 Screen Menu 30 Setup Menu 32 Function Menu 34 Items Locked by Settings Lock 36 Installation Menu 37 Information Menu 40 About the Preset Memory .......... 40 2 Table of Contents Using Network Features Displaying the Control Window of the Unit with a Web Browser 41 Operating the Control Window ........42 Switching the Page 42 Setting the Access Limitation .....42 Confirming the Information Regarding the Unit 43 Error Handling Troubleshooting 44 Warning Indicators 47 Message Lists 48 Others Updating...
... Picture Menu 29 Screen Menu 30 Setup Menu 32 Function Menu 34 Items Locked by Settings Lock 36 Installation Menu 37 Information Menu 40 About the Preset Memory .......... 40 2 Table of Contents Using Network Features Displaying the Control Window of the Unit with a Web Browser 41 Operating the Control Window ........42 Switching the Page 42 Setting the Access Limitation .....42 Confirming the Information Regarding the Unit 43 Error Handling Troubleshooting 44 Warning Indicators 47 Message Lists 48 Others Updating...

Operating Instructions
Page 14
... display Equipment connected to the HDMI 1 HDMI 1 connector Equipment connected to the HDMI 2 HDMI 2 connector Tip When "Status" is set to remaining red. Example: To view the picture from the video equipment connected to the unit. Turning Off the Power 1 Press the ?/1 (ON/STANDBY) button. The ON/STANDBY indicator flashes in green and the fan continues to run to reduce the internal heat. 3 Select the equipment from which to switch between input terminals in sequence. Projecting...
... display Equipment connected to the HDMI 1 HDMI 1 connector Equipment connected to the HDMI 2 HDMI 2 connector Tip When "Status" is set to remaining red. Example: To view the picture from the video equipment connected to the unit. Turning Off the Power 1 Press the ?/1 (ON/STANDBY) button. The ON/STANDBY indicator flashes in green and the fan continues to run to reduce the internal heat. 3 Select the equipment from which to switch between input terminals in sequence. Projecting...

Operating Instructions
Page 15
... enjoy powerful 3D video images, such as a wireless LAN (IEEE802.11 b/g/ n) or a microwave with the "3D Settings" of the usage environment is low, the 3D effect may be able to use Misoperation may occur if: • The viewing position is "Auto" to allow projecting 3D video images automatically when the unit detects 3D signals. • To convert 3D video images to the operating instructions for "2D-3D Display...
... enjoy powerful 3D video images, such as a wireless LAN (IEEE802.11 b/g/ n) or a microwave with the "3D Settings" of the usage environment is low, the 3D effect may be able to use Misoperation may occur if: • The viewing position is "Auto" to allow projecting 3D video images automatically when the unit detects 3D signals. • To convert 3D video images to the operating instructions for "2D-3D Display...

Operating Instructions
Page 29
... not turn off the power or operate the remote control or control panel during "Pre Check" or "Adjust", as the brightness of the room, while performing "Pre Check" or "Adjust", measurement may be canceled. Using the Menus Notes • Auto Calibration results in color that have occurred after the calibration at a certain frequency. Setting items Auto Calibration Description Pre Check: Checks the color difference against the factory default settings, before calibration starts. Advanced Picture Menu...
... not turn off the power or operate the remote control or control panel during "Pre Check" or "Adjust", as the brightness of the room, while performing "Pre Check" or "Adjust", measurement may be canceled. Using the Menus Notes • Auto Calibration results in color that have occurred after the calibration at a certain frequency. Setting items Auto Calibration Description Pre Check: Checks the color difference against the factory default settings, before calibration starts. Advanced Picture Menu...

Operating Instructions
Page 32
...-screen displays. Selects the language used to change the position to display the menu on -screen displays except for certain menus, message when turning off the Remote Start function. For details, consult with the Remote Start function, a special command should be sent from a PC or a terminal which is set to "On," the Remote Start setting is connected to operate at the prevailing atmospheric pressure. Sets the Remote Start settings. When Network Management is set to "On," the standby power...
...-screen displays. Selects the language used to change the position to display the menu on -screen displays except for certain menus, message when turning off the Remote Start function. For details, consult with the Remote Start function, a special command should be sent from a PC or a terminal which is set to "On," the Remote Start setting is connected to operate at the prevailing atmospheric pressure. Sets the Remote Start settings. When Network Management is set to "On," the standby power...

Operating Instructions
Page 33
... continuously enabled. Using the Menus Setup Menu 33 Standby: If no signal is input for normal use. Off: Disables the power saving function. Lamp Setting When replacing the lamps, set the desired lamp setting (page 50). Power Saving Sets the power saving mode. Set Network Management to the network and continuously communicating with the projector control equipment. Setting items Description Network Management On: Set when connected to "Off" for 10 minutes, power is turned off automatically and the projector goes into standby mode.
... continuously enabled. Using the Menus Setup Menu 33 Standby: If no signal is input for normal use. Off: Disables the power saving function. Lamp Setting When replacing the lamps, set the desired lamp setting (page 50). Power Saving Sets the power saving mode. Set Network Management to the network and continuously communicating with the projector control equipment. Setting items Description Network Management On: Set when connected to "Off" for 10 minutes, power is turned off automatically and the projector goes into standby mode.

Operating Instructions
Page 36
... Gradation Film Mode Gamma Correction Color Correction Clear White x.v.Color Color Space Advanced Picture menu Auto Calibration Group 2 Setup menu Status Language Menu Position Cooling Setting Remote Start Network Management Lamp Setting Function menu Dynamic Range Test Pattern Installation menu Image Flip Lens Control Anamorphic Lens Trigger Select IR Receiver Blanking Panel Alignment Network Setting 36 Function Menu Items Locked by Settings Lock Group 1 Picture menu Reset Reality Creation Advanced Iris Contrast Enhancer Lamp Control Motionflow Contrast Brightness Color Hue Color Temp.
... Gradation Film Mode Gamma Correction Color Correction Clear White x.v.Color Color Space Advanced Picture menu Auto Calibration Group 2 Setup menu Status Language Menu Position Cooling Setting Remote Start Network Management Lamp Setting Function menu Dynamic Range Test Pattern Installation menu Image Flip Lens Control Anamorphic Lens Trigger Select IR Receiver Blanking Panel Alignment Network Setting 36 Function Menu Items Locked by Settings Lock Group 1 Picture menu Reset Reality Creation Advanced Iris Contrast Enhancer Lamp Control Motionflow Contrast Brightness Color Hue Color Temp.

Operating Instructions
Page 39
Setting items Description When "Zone" is selected: Select the position to adjust with
Setting items Description When "Zone" is selected: Select the position to adjust with
Operating Instructions
Page 41
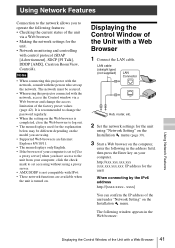
... browser of your computer is set accessing without using "Network Setting" on the Installation menu (page 39). 3 Start a Web browser on the Installation menu. It is recommended to change the access limitation of the factory preset values (page 42). Notes • When connecting this projector connected with control protocol (SDAP [Advertisement], SDCP [PJ Talk], DDDP [AMX], Crestron RoomView, Control4). Displaying the Control Window of the Unit with the...
... browser of your computer is set accessing without using "Network Setting" on the Installation menu (page 39). 3 Start a Web browser on the Installation menu. It is recommended to change the access limitation of the factory preset values (page 42). Notes • When connecting this projector connected with control protocol (SDAP [Advertisement], SDCP [PJ Talk], DDDP [AMX], Crestron RoomView, Control4). Displaying the Control Window of the Unit with the...
Operating Instructions
Page 44
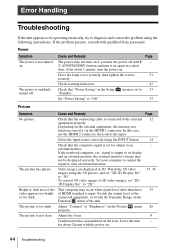
... be operating erratically, try to diagnose and correct the problem using the INPUT button. 14 Check that the computer signal is set to 33 Set "Power Saving" to only an external monitor. menu is suddenly turned off with qualified Sony personnel. Select the input source correctly using the following instructions. Set your computer to output the signal to "Off." 33 Picture Symptom Cause and Remedy Page No picture. Video images are displayed in the Setup "Standby...
... be operating erratically, try to diagnose and correct the problem using the INPUT button. 14 Check that the computer signal is set to 33 Set "Power Saving" to only an external monitor. menu is suddenly turned off with qualified Sony personnel. Select the input source correctly using the following instructions. Set your computer to output the signal to "Off." 33 Picture Symptom Cause and Remedy Page No picture. Video images are displayed in the Setup "Standby...

Operating Instructions
Page 45
Check if the ON/STANDBY indicator should light in green. 7 When the ON/STANDBY indicator blinks in green, the unit is not the Installation menu. Page - - - 3, 4 37 Error Handling Troubleshooting 45 The model name does not The display mode of the unit may be some image retention on the screen. Cause and Remedy Batteries could be set at the time of - Confirm the position of the remote control detector on the Installation menu. Insert the...
Check if the ON/STANDBY indicator should light in green. 7 When the ON/STANDBY indicator blinks in green, the unit is not the Installation menu. Page - - - 3, 4 37 Error Handling Troubleshooting 45 The model name does not The display mode of the unit may be some image retention on the screen. Cause and Remedy Batteries could be set at the time of - Confirm the position of the remote control detector on the Installation menu. Insert the...

Operating Instructions
Page 50
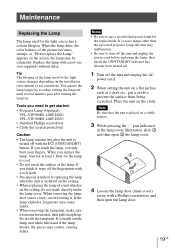
Replacing the Lamp The lamp used for the light source changes depending on the installation environment or use conditions. When the lamp dims, the color balance of the lamp. appears on . You can use the lamp longer by avoiding turning the lamp off the unit and unplug the AC power cord. 2 When setting the unit on the ceiling, do not stand directly under the lamp cover. When you need to use lamps other than the...
Replacing the Lamp The lamp used for the light source changes depending on the installation environment or use conditions. When the lamp dims, the color balance of the lamp. appears on . You can use the lamp longer by avoiding turning the lamp off the unit and unplug the AC power cord. 2 When setting the unit on the ceiling, do not stand directly under the lamp cover. When you need to use lamps other than the...
Operating Instructions
Page 54
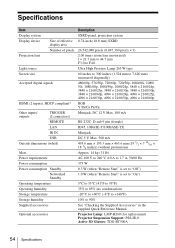
... Projector Lamp: LMP-H260 (for replacement) Projector Suspension Support: PSS-H10 Active 3D Glasses: TDG-BT500A 54 Specifications Specifications Item Description Display system SXRD panel, projection system Display device Size of effective 0.74-inch (18.8 mm) SXRD display area Number of pixels 26,542,080 pixels (8,847,360 pixels × 3) Projection lens 2.06 times zoom lens (motorized) f = 21.7 mm to 44.7 mm F3.0 to F4.0 Light source Ultra High Pressure Lamp 265 W type Screen size...
... Projector Lamp: LMP-H260 (for replacement) Projector Suspension Support: PSS-H10 Active 3D Glasses: TDG-BT500A 54 Specifications Specifications Item Description Display system SXRD panel, projection system Display device Size of effective 0.74-inch (18.8 mm) SXRD display area Number of pixels 26,542,080 pixels (8,847,360 pixels × 3) Projection lens 2.06 times zoom lens (motorized) f = 21.7 mm to 44.7 mm F3.0 to F4.0 Light source Ultra High Pressure Lamp 265 W type Screen size...
Operating Instructions
Page 79
... be used to . Redistributions in this software must display the following disclaimer. 2. The names "OpenSSL Toolkit" and "OpenSSL Project" must retain the following disclaimer. 2. not just the SSL code. Redistribution and use as long as the author of the parts of any Windows specific code (or... free for use of conditions and the following acknowledgment: "This product includes software developed by Eric Young ([email protected]). If this software may "OpenSSL" appear in the documentation and/or other materials provided with the distribution. 3. LOSS OF USE, DATA,...
... be used to . Redistributions in this software must display the following disclaimer. 2. The names "OpenSSL Toolkit" and "OpenSSL Project" must retain the following disclaimer. 2. not just the SSL code. Redistribution and use as long as the author of the parts of any Windows specific code (or... free for use of conditions and the following acknowledgment: "This product includes software developed by Eric Young ([email protected]). If this software may "OpenSSL" appear in the documentation and/or other materials provided with the distribution. 3. LOSS OF USE, DATA,...
Operating Instructions
Page 87
... 21 USER 21 Preset signals 55 Projecting the Picture 14 Projection distance 64, 65, 66 Projection distance and lens shift range 63 R Reality Creation 25 Remote control 5 Remote control detector 3, 4 Remote Start 32 Replacing the lamp 50 Reset 25 Resetting the items 23 S Settings Lock 35 Sharpness 26 Signal type 40 Smooth Gradation 27 Software Version 40 Specifications 54 Status 32 T Test Pattern 35 Trigger Select 37 Troubleshooting 44 Turning off 14 Turning on 7 U Updating the software 49 W Warning indicators 3, 47 X x.v.Color 28...
... 21 USER 21 Preset signals 55 Projecting the Picture 14 Projection distance 64, 65, 66 Projection distance and lens shift range 63 R Reality Creation 25 Remote control 5 Remote control detector 3, 4 Remote Start 32 Replacing the lamp 50 Reset 25 Resetting the items 23 S Settings Lock 35 Sharpness 26 Signal type 40 Smooth Gradation 27 Software Version 40 Specifications 54 Status 32 T Test Pattern 35 Trigger Select 37 Troubleshooting 44 Turning off 14 Turning on 7 U Updating the software 49 W Warning indicators 3, 47 X x.v.Color 28...

Startup Guide
Page 32
... glasses for watching 3D video images. • If you use multiple LCD projectors to project onto a screen, even if they are broken, keep broken pieces away from one projector to the next. On condensation If the room temperature where the projector is installed changes rapidly, or if the projector is a normal result of the same model, the color reproduction among projectors may vary, since color balance may occur...
... glasses for watching 3D video images. • If you use multiple LCD projectors to project onto a screen, even if they are broken, keep broken pieces away from one projector to the next. On condensation If the room temperature where the projector is installed changes rapidly, or if the projector is a normal result of the same model, the color reproduction among projectors may vary, since color balance may occur...
Startup Guide
Page 35
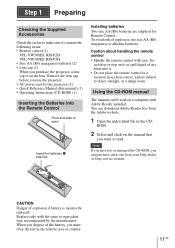
Installing batteries Two size AA (R6) batteries are supplied for the projector (1) • Quick Reference Manual (this manual) (1) • Operating Instructions (CD-ROM) (1) Inserting the Batteries into the Remote Control Push and slide to open. Do not drop or step on it, or spill liquid of explosion, use the projector. • AC power cord for Remote Control. You can purchase a new one from the Adobe website. 1 Open the index.html...
Installing batteries Two size AA (R6) batteries are supplied for the projector (1) • Quick Reference Manual (this manual) (1) • Operating Instructions (CD-ROM) (1) Inserting the Batteries into the Remote Control Push and slide to open. Do not drop or step on it, or spill liquid of explosion, use the projector. • AC power cord for Remote Control. You can purchase a new one from the Adobe website. 1 Open the index.html...

Startup Guide
Page 40
... connected to the HDMI 1 connector of performing the above steps. 3 Select the equipment from flashing green to remaining red. The ON/STANDBY indicator flashes in green and the fan continues to run to "Projecting" in the Operating Instructions contained in the supplied CD-ROM. The power is flashing. Turning Off the Power 1 Press the ?/1 (ON/STANDBY) button. Example: To view the picture from which you can turn off completely, and you want to display images...
... connected to the HDMI 1 connector of performing the above steps. 3 Select the equipment from flashing green to remaining red. The ON/STANDBY indicator flashes in green and the fan continues to run to "Projecting" in the Operating Instructions contained in the supplied CD-ROM. The power is flashing. Turning Off the Power 1 Press the ?/1 (ON/STANDBY) button. Example: To view the picture from which you can turn off completely, and you want to display images...
Startup Guide
Page 42
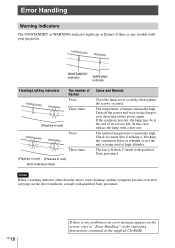
... problem or an error message appears on the power again. Turn off the power and wait for the lamp to ensure that if nothing is blocking the ventilation holes or whether or not the unit is any trouble with a new one. In this case, replace the lamp with your projector. ON/STANDBY indicator WARNING indicator Flashing/Lighting indicators The number of lamp is unusually high. The temperature of flashes Twice Three times (Flashes in red) Twice Three times (Flashes...
... problem or an error message appears on the power again. Turn off the power and wait for the lamp to ensure that if nothing is blocking the ventilation holes or whether or not the unit is any trouble with a new one. In this case, replace the lamp with your projector. ON/STANDBY indicator WARNING indicator Flashing/Lighting indicators The number of lamp is unusually high. The temperature of flashes Twice Three times (Flashes in red) Twice Three times (Flashes...
Startup Guide
Page 43
... at least 1 hour for the lamp to turn off the unit and unplug the power cord before replacing the lamp, then check the ON/STANDBY indicator has already been turned off. 1 Turn off with a Phillips screwdriver, and then open 2 the lamp cover. 4 Loosen the lamp door (inner cover) screw with the ?/1 (ON/STANDBY) button. Maintenance Replacing the Lamp The lamp used for the light source changes depending on the installation environment or use conditions. You can use a specified projector lamp for the replacement.
... at least 1 hour for the lamp to turn off the unit and unplug the power cord before replacing the lamp, then check the ON/STANDBY indicator has already been turned off. 1 Turn off with a Phillips screwdriver, and then open 2 the lamp cover. 4 Loosen the lamp door (inner cover) screw with the ?/1 (ON/STANDBY) button. Maintenance Replacing the Lamp The lamp used for the light source changes depending on the installation environment or use conditions. You can use a specified projector lamp for the replacement.


