

Operating Instructions
Page 2
... .......... 20 Picture Menu 22 Screen Menu 28 Setup Menu 30 Function Menu 32 Items Locked by Settings Lock 34 Installation Menu 35 Information Menu 38 About the Preset Memory .......... 38 Using Network Features Displaying the Control Window of the Unit with a Web Browser 39 Operating the Control Window ........ 40 Switching the Page 40 Setting the Access Limitation .... 40 Confirming the Information Regarding the Unit 41 Error Handling Troubleshooting 42 Warning Indicators 45 Message Lists 46 Others Updating the Software 47...
... .......... 20 Picture Menu 22 Screen Menu 28 Setup Menu 30 Function Menu 32 Items Locked by Settings Lock 34 Installation Menu 35 Information Menu 38 About the Preset Memory .......... 38 Using Network Features Displaying the Control Window of the Unit with a Web Browser 39 Operating the Control Window ........ 40 Switching the Page 40 Setting the Access Limitation .... 40 Confirming the Information Regarding the Unit 41 Error Handling Troubleshooting 42 Warning Indicators 45 Message Lists 46 Others Updating the Software 47...
Operating Instructions
Page 12
... a notebook type, to output the signal to only the external monitor. When you set at the same position. • If the picture from equipment connected to the computer's operating instructions supplied with an HDMI cable is not correct, check the settings of the connected equipment. • If you monitor and control the projector via the network, access the Setup page of the projector (page 39) via a Web...
... a notebook type, to output the signal to only the external monitor. When you set at the same position. • If the picture from equipment connected to the computer's operating instructions supplied with an HDMI cable is not correct, check the settings of the connected equipment. • If you monitor and control the projector via the network, access the Setup page of the projector (page 39) via a Web...

Operating Instructions
Page 13
... INPUT to display the input palette on the screen. 2 Press the ?/1 (ON/STANDBY) button again before the message disappears. Tip You can disconnect the AC power cord. A message "POWER OFF?" The ON/STANDBY indicator flashes in green and the fan continues to run to switch between input terminals in sequence. Example: To view the picture from flashing green to remaining red. The fan stops and the ON/STANDBY indicator changes from the video equipment connected to display images. The power is turned off...
... INPUT to display the input palette on the screen. 2 Press the ?/1 (ON/STANDBY) button again before the message disappears. Tip You can disconnect the AC power cord. A message "POWER OFF?" The ON/STANDBY indicator flashes in green and the fan continues to run to switch between input terminals in sequence. Example: To view the picture from flashing green to remaining red. The fan stops and the ON/STANDBY indicator changes from the video equipment connected to display images. The power is turned off...

Operating Instructions
Page 14
... them on the type of signal. Using the 3D Glasses 1 Turn on the 3D glasses, and register them on the unit and project the 3D video image onto the screen. Also, the distance varies depending on the remote control or with the "3D Settings" of the Function menu. Adjusting/Setting the 3D functions You can enjoy powerful 3D video images, such as a wireless LAN (IEEE802.11 b/g/ n) or a microwave with...
... them on the type of signal. Using the 3D Glasses 1 Turn on the 3D glasses, and register them on the unit and project the 3D video image onto the screen. Also, the distance varies depending on the remote control or with the "3D Settings" of the Function menu. Adjusting/Setting the 3D functions You can enjoy powerful 3D video images, such as a wireless LAN (IEEE802.11 b/g/ n) or a microwave with...

Operating Instructions
Page 22
... other video images. Tip Reset does not affect settings saved for projecting still images taken with well-modulated colors and fast response. For details, see "Input Signals and Adjustable/Setting Items" (page 55). Bright TV: Picture quality suited for 2D/3D/HDR respectively. Note These items may not be adjustable or configurable, depending on the type of a movie theater, based on the remote control. Picture Menu The Picture menu...
... other video images. Tip Reset does not affect settings saved for projecting still images taken with well-modulated colors and fast response. For details, see "Input Signals and Adjustable/Setting Items" (page 55). Bright TV: Picture quality suited for 2D/3D/HDR respectively. Note These items may not be adjustable or configurable, depending on the type of a movie theater, based on the remote control. Picture Menu The Picture menu...

Operating Instructions
Page 30
... cannot change the factory preset settings, etc. Sets the Remote Start settings. Setup Menu The Setup menu is used in advance (page 37). • To turn off the on-screen displays except for certain menus, message when turning off the Remote Start function. Setting items Status Language Menu Position High Altitude Mode Remote Start Description Sets whether or not the on the center of 1,500 m (approx. 4,900 ft) or higher. Off: Use this item is set to "On," the standby power...
... cannot change the factory preset settings, etc. Sets the Remote Start settings. Setup Menu The Setup menu is used in advance (page 37). • To turn off the on-screen displays except for certain menus, message when turning off the Remote Start function. Setting items Status Language Menu Position High Altitude Mode Remote Start Description Sets whether or not the on the center of 1,500 m (approx. 4,900 ft) or higher. Off: Use this item is set to "On," the standby power...

Operating Instructions
Page 31
When replacing the lamps, set to "On," the power consumption increases. If you set the desired lamp setting (page 48). Standby: If no signal is input for 10 minutes, power is not reset. 31 The "Lamp Timer" in the Information menu is turned off automatically and the projector goes into standby mode. Sets the power saving mode. All settings are initialized to the network and continuously communicating with the projector control equipment. Set Network Management to the network. Off: Disables...
When replacing the lamps, set to "On," the power consumption increases. If you set the desired lamp setting (page 48). Standby: If no signal is input for 10 minutes, power is not reset. 31 The "Lamp Timer" in the Information menu is turned off automatically and the projector goes into standby mode. Sets the power saving mode. All settings are initialized to the network and continuously communicating with the projector control equipment. Set Network Management to the network. Off: Disables...

Operating Instructions
Page 34
Sharpness NR MPEG NR Smooth Gradation Film Mode Gamma Correction Color Correction Clear White x.v.Color HDR Color Space Input Lag Reduction Group 2 Setup menu Status Language Menu Position High Altitude Mode Remote Start Network Management Power Saving Lamp Setting Function menu Dynamic Range Test Pattern Installation menu Image Flip Lens Control Anamorphic Lens Trigger Select IR Receiver Panel Alignment Network Setting 34 Items Locked by Settings Lock Group 1 Picture menu Reset Reality Creation Dynamic HDR Enhancer Lamp Control Motionflow Contrast Brightness Color Hue Color Temp.
Sharpness NR MPEG NR Smooth Gradation Film Mode Gamma Correction Color Correction Clear White x.v.Color HDR Color Space Input Lag Reduction Group 2 Setup menu Status Language Menu Position High Altitude Mode Remote Start Network Management Power Saving Lamp Setting Function menu Dynamic Range Test Pattern Installation menu Image Flip Lens Control Anamorphic Lens Trigger Select IR Receiver Panel Alignment Network Setting 34 Items Locked by Settings Lock Group 1 Picture menu Reset Reality Creation Dynamic HDR Enhancer Lamp Control Motionflow Contrast Brightness Color Hue Color Temp.

Operating Instructions
Page 38
... Lamp Timer Description Displays the model name Displays the serial number. About the Preset Memory This unit has default image data to adjust preset data for the signal from the preset memory to adjust it to the signals shown in the Information menu. Displays the color format of the input signal which you are selecting ("BT.601," "BT.709," or "BT.2020"). Indicates how long the lamp has been turned on the computer input signal, parts...
... Lamp Timer Description Displays the model name Displays the serial number. About the Preset Memory This unit has default image data to adjust preset data for the signal from the preset memory to adjust it to the signals shown in the Information menu. Displays the color format of the input signal which you are selecting ("BT.601," "BT.709," or "BT.2020"). Indicates how long the lamp has been turned on the computer input signal, parts...
Operating Instructions
Page 39
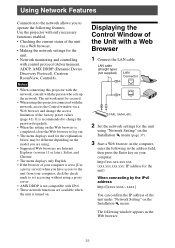
... the model you are using "Network Setting" on the Installation menu (page 37). 3 Start a Web browser on the computer, enter the following window appears in the address field, then press the Enter key on the Installation menu. http://xxx.xxx.xxx.xxx (xxx.xxx.xxx.xxx: IP address for the unit. • Network monitoring and controlling with a Web Browser 1 Connect the LAN cable. Using Network Features Connection to the network allows...
... the model you are using "Network Setting" on the Installation menu (page 37). 3 Start a Web browser on the computer, enter the following window appears in the address field, then press the Enter key on the Installation menu. http://xxx.xxx.xxx.xxx (xxx.xxx.xxx.xxx: IP address for the unit. • Network monitoring and controlling with a Web Browser 1 Connect the LAN cable. Using Network Features Connection to the network allows...
Operating Instructions
Page 42
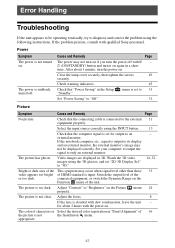
... about 2 hours with dew condensation, leave the unit - Video images are displayed in "Panel Alignment" of 36 the picture is not turned on the Function menu of HDMI standard is suddenly turned off with qualified Sony personnel. appropriate. 42 If the problem persists, consult with ?/ - 1 (ON/STANDBY) button and turn the power on . Power Symptom The power is not the Installation menu. Adjust the focus. 8 If the lens is set for about 1 minute, turn it...
... about 2 hours with dew condensation, leave the unit - Video images are displayed in "Panel Alignment" of 36 the picture is not turned on the Function menu of HDMI standard is suddenly turned off with qualified Sony personnel. appropriate. 42 If the problem persists, consult with ?/ - 1 (ON/STANDBY) button and turn the power on . Power Symptom The power is not the Installation menu. Adjust the focus. 8 If the lens is set for about 1 minute, turn it...

Operating Instructions
Page 43
...-screen display does Set "Status" on the Setup menu to "Front & Rear" on the Installation menu. Wait until it stops blinking and remains lit in green, the unit is not connected to the IR IN connector. Wait for a long period of time, there may be some image retention on the screen. Page - - Confirm the position of the remote control detector on the unit. Check if the ON/STANDBY indicator...
...-screen display does Set "Status" on the Setup menu to "Front & Rear" on the Installation menu. Wait until it stops blinking and remains lit in green, the unit is not connected to the IR IN connector. Wait for a long period of time, there may be some image retention on the screen. Page - - Confirm the position of the remote control detector on the unit. Check if the ON/STANDBY indicator...

Operating Instructions
Page 47
... function converts the video images. • Note that the picture will provide a different look from the following Sony website: https://www.pro.sony.eu/ The website also explains how to install the update. Others Updating the Software You can download files to update the software of the unit, then perform the update. To use . Copy the downloaded files to your USB memory, insert the USB memory to the...
... function converts the video images. • Note that the picture will provide a different look from the following Sony website: https://www.pro.sony.eu/ The website also explains how to install the update. Others Updating the Software You can download files to update the software of the unit, then perform the update. To use . Copy the downloaded files to your USB memory, insert the USB memory to the...

Operating Instructions
Page 48
... Projector Lamp for replacement. If the lamp explodes, fragments may scatter, causing injury. Do not tilt the lamp unit. Replacing the Lamp The lamp used for the light source changes depending on the installation environment or use lamps other than the LMP-H220, the unit may malfunction. • Be sure to turn off the unit and unplug the power cord before replacing the lamp, then check the ON/STANDBY indicator has already been turned...
... Projector Lamp for replacement. If the lamp explodes, fragments may scatter, causing injury. Do not tilt the lamp unit. Replacing the Lamp The lamp used for the light source changes depending on the installation environment or use lamps other than the LMP-H220, the unit may malfunction. • Be sure to turn off the unit and unplug the power cord before replacing the lamp, then check the ON/STANDBY indicator has already been turned...
Operating Instructions
Page 52
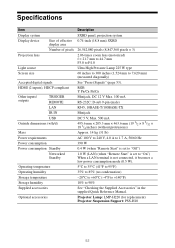
... pixels Light source Screen size Accepted digital signals HDMI (2 inputs), HDCP compliant Other inputs/ outputs TRIGGER REMOTE LAN IR IN USB Outside dimensions (w/h/d) Mass Power requirements Power consumption Power consumption Standby Networked Standby Operating temperature Operating humidity Storage temperature Storage humidity Supplied accessories Optional accessories Description SXRD panel, projection system 0.74-inch (18.8 mm) SXRD 26,542,080 pixels (8,847,360 pixels × 3) 2.06 times zoom lens (motorized) f = 21.7 mm to 44.7 mm F3.0 to F4.0 Ultra High Pressure Lamp...
... pixels Light source Screen size Accepted digital signals HDMI (2 inputs), HDCP compliant Other inputs/ outputs TRIGGER REMOTE LAN IR IN USB Outside dimensions (w/h/d) Mass Power requirements Power consumption Power consumption Standby Networked Standby Operating temperature Operating humidity Storage temperature Storage humidity Supplied accessories Optional accessories Description SXRD panel, projection system 0.74-inch (18.8 mm) SXRD 26,542,080 pixels (8,847,360 pixels × 3) 2.06 times zoom lens (motorized) f = 21.7 mm to 44.7 mm F3.0 to F4.0 Ultra High Pressure Lamp...
Operating Instructions
Page 79
... FROM, OUT OF OR IN CONNECTION WITH THE SOFTWARE OR THE USE OR OTHER DEALINGS IN THE SOFTWARE. If you must display the following conditions: The above copyright notice and this permission notice appear in part of the work of the FreeType Team Notification of MIT EXPAT Copyright (c) 1998, 1999, 2000 Thai Open Source Software Center Ltd and Clark Cooper...
... FROM, OUT OF OR IN CONNECTION WITH THE SOFTWARE OR THE USE OR OTHER DEALINGS IN THE SOFTWARE. If you must display the following conditions: The above copyright notice and this permission notice appear in part of the work of the FreeType Team Notification of MIT EXPAT Copyright (c) 1998, 1999, 2000 Thai Open Source Software Center Ltd and Clark Cooper...
Startup Guide
Page 2
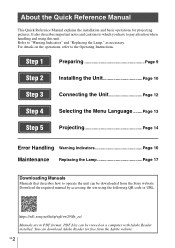
... projecting pictures. Download the required manual by accessing the site using this unit. https://rd1.sony.net/help/vpl/vw290/h_zz/ Manuals are in PDF format. Step 1 Preparing Page 9 Step 2 Installing the Unit Page 10 Step 3 Connecting the Unit Page 12 Step 4 Selecting the Menu Language ........Page 13 Step 5 Projecting Page 14 Error Handling Warning Indicators Page 16 Maintenance Replacing the Lamp Page 17 Downloading Manuals Manuals that describes how to the Operating Instructions...
... projecting pictures. Download the required manual by accessing the site using this unit. https://rd1.sony.net/help/vpl/vw290/h_zz/ Manuals are in PDF format. Step 1 Preparing Page 9 Step 2 Installing the Unit Page 10 Step 3 Connecting the Unit Page 12 Step 4 Selecting the Menu Language ........Page 13 Step 5 Projecting Page 14 Error Handling Warning Indicators Page 16 Maintenance Replacing the Lamp Page 17 Downloading Manuals Manuals that describes how to the Operating Instructions...
Startup Guide
Page 6
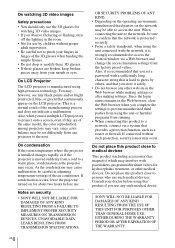
... • SONY WILL NOT BE LIABLE FOR DAMAGES OF ANY KIND RESULTING FROM A FAILURE TO IMPLEMENT PROPER SECURITY MEASURES ON TRANSMISSION DEVICES, UNAVOIDABLE DATA LEAKS RESULTING FROM TRANSMISSION SPECIFICATIONS, OR SECURITY PROBLEMS OF ANY KIND. • Depending on the operating environment, unauthorized third parties on the network may be careful in adjusting temperature settings of the air conditioner. If connected without proper...
... • SONY WILL NOT BE LIABLE FOR DAMAGES OF ANY KIND RESULTING FROM A FAILURE TO IMPLEMENT PROPER SECURITY MEASURES ON TRANSMISSION DEVICES, UNAVOIDABLE DATA LEAKS RESULTING FROM TRANSMISSION SPECIFICATIONS, OR SECURITY PROBLEMS OF ANY KIND. • Depending on the operating environment, unauthorized third parties on the network may be careful in adjusting temperature settings of the air conditioner. If connected without proper...
Startup Guide
Page 16
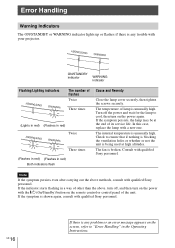
Error Handling Warning Indicators The ON/STANDBY or WARNING indicator lights up or flashes if there is any problem or an error message appears on the screen, refer to "Error Handling" in the Operating Instructions. Turn off , and then turn on the remote control or control panel of flashes Twice Three times (Lights in red) (Flashes in red) Twice Three times (Flashes in red) (Flashes in a way of other than the above methods, consult with the [/1 (On/Standby) button on the power again. Check to cool...
Error Handling Warning Indicators The ON/STANDBY or WARNING indicator lights up or flashes if there is any problem or an error message appears on the screen, refer to "Error Handling" in the Operating Instructions. Turn off , and then turn on the remote control or control panel of flashes Twice Three times (Lights in red) (Flashes in red) Twice Three times (Flashes in red) (Flashes in a way of other than the above methods, consult with the [/1 (On/Standby) button on the power again. Check to cool...

Startup Guide
Page 17
... lamp cover. 4 Loosen the lamp door (inner cover) screw with a Phillips screwdriver, and then open the lamp door. 17 GB Notes • Be sure to use the lamp longer by avoiding turning the lamp off the unit and unplug the AC power cord. 2 When setting the unit on a flat surface such as a desk etc., put a cloth to replacing the lamp when the unit is installed on the ceiling...
... lamp cover. 4 Loosen the lamp door (inner cover) screw with a Phillips screwdriver, and then open the lamp door. 17 GB Notes • Be sure to use the lamp longer by avoiding turning the lamp off the unit and unplug the AC power cord. 2 When setting the unit on a flat surface such as a desk etc., put a cloth to replacing the lamp when the unit is installed on the ceiling...


