Operating Instructions
Page 2
... .......... 20 Picture Menu 22 Screen Menu 27 Setup Menu 29 Function Menu 31 Items Locked by Settings Lock 33 Installation Menu 34 Information Menu 37 About the Preset Memory .......... 37 Using Network Features Displaying the Control Window of the Unit with a Web Browser 38 Operating the Control Window ........ 39 Switching the Page 39 Setting the Access Limitation ....39 Confirming the Information Regarding the Unit 40 Error Handling Troubleshooting 41 Warning Indicators 44 Message Lists 45 Others Updating the Software 46...
... .......... 20 Picture Menu 22 Screen Menu 27 Setup Menu 29 Function Menu 31 Items Locked by Settings Lock 33 Installation Menu 34 Information Menu 37 About the Preset Memory .......... 37 Using Network Features Displaying the Control Window of the Unit with a Web Browser 38 Operating the Control Window ........ 39 Switching the Page 39 Setting the Access Limitation ....39 Confirming the Information Regarding the Unit 40 Error Handling Troubleshooting 41 Warning Indicators 44 Message Lists 45 Others Updating the Software 46...

Operating Instructions
Page 13
... project. A message "POWER OFF?" appears on the Setup menu, the input palette does not appear. The fan stops and the ON/STANDBY indicator changes from which to display images. Example: To view the picture from the video equipment connected to the HDMI 1 connector of performing the above steps. 3 Select the equipment from flashing green to display the input palette on the screen. The ON/STANDBY indicator flashes in sequence. Press the INPUT button to switch between input terminals in green...
... project. A message "POWER OFF?" appears on the Setup menu, the input palette does not appear. The fan stops and the ON/STANDBY indicator changes from which to display images. Example: To view the picture from the video equipment connected to the HDMI 1 connector of performing the above steps. 3 Select the equipment from flashing green to display the input palette on the screen. The ON/STANDBY indicator flashes in sequence. Press the INPUT button to switch between input terminals in green...

Operating Instructions
Page 14
... pressing the 3D button on the unit and project the 3D video image onto the screen. Tips • The factory default setting for the connected equipment. 2 Turn on the remote control or with the "3D Settings" of the Function menu. For details, see "Using the 3D Glasses" (page 14). Notes • It may not be able to project the image, see "Projecting the Picture" (page 13). 3 Turn on the 3D...
... pressing the 3D button on the unit and project the 3D video image onto the screen. Tips • The factory default setting for the connected equipment. 2 Turn on the remote control or with the "3D Settings" of the Function menu. For details, see "Using the 3D Glasses" (page 14). Notes • It may not be able to project the image, see "Projecting the Picture" (page 13). 3 Turn on the 3D...

Operating Instructions
Page 22
... the remote control. Setting items Calib. Preset [CALIBRATED PRESET] Description You can save the setting. You can select the picture viewing mode that best suits the type of a movie theater, based on the type of "Color Temp." 22 Cinema Film 2: Picture quality suited to gaming, with a digital camera. The factory default setting is used for items of input signal. Tip Reset does not affect settings saved for adjusting the picture. Resets all...
... the remote control. Setting items Calib. Preset [CALIBRATED PRESET] Description You can save the setting. You can select the picture viewing mode that best suits the type of a movie theater, based on the type of "Color Temp." 22 Cinema Film 2: Picture quality suited to gaming, with a digital camera. The factory default setting is used for items of input signal. Tip Reset does not affect settings saved for adjusting the picture. Resets all...

Operating Instructions
Page 29
... power, and warning messages. You can turn on -screen display is displayed. Sets the unit to change the position to "On," the fan noise becomes slightly louder since the fan speed increases. Center: Displays the menu on the screen. For details, consult with the Remote Start function, a special command should be sent from a PC or a terminal which is connected to the network in the menu and on-screen displays. Sets the Remote Start settings. Bottom Left: Displays...
... power, and warning messages. You can turn on -screen display is displayed. Sets the unit to change the position to "On," the fan noise becomes slightly louder since the fan speed increases. Center: Displays the menu on the screen. For details, consult with the Remote Start function, a special command should be sent from a PC or a terminal which is connected to the network in the menu and on-screen displays. Sets the Remote Start settings. Bottom Left: Displays...

Operating Instructions
Page 30
When replacing the lamps, set to "On," the power consumption increases. If you set the desired lamp setting (page 47). Sets the power saving mode. The "Lamp Timer" in the Information menu is continuously enabled. Standby: If no signal is turned off automatically and the projector goes into standby mode. Setting items Network Management Power Saving Lamp Setting All Reset Description On: Set when connected to their factory preset values. Set Network Management to "On," the network function is not reset. 30 Off...
When replacing the lamps, set to "On," the power consumption increases. If you set the desired lamp setting (page 47). Sets the power saving mode. The "Lamp Timer" in the Information menu is continuously enabled. Standby: If no signal is turned off automatically and the projector goes into standby mode. Setting items Network Management Power Saving Lamp Setting All Reset Description On: Set when connected to their factory preset values. Set Network Management to "On," the network function is not reset. 30 Off...

Operating Instructions
Page 33
Items Locked by Settings Lock Group 1 Picture menu Reset Reality Creation Contrast Enhancer Lamp Control Motionflow Contrast Brightness Color Hue Color Temp. Sharpness NR MPEG NR Smooth Gradation Film Mode Gamma Correction Color Correction Clear White x.v.Color HDR Color Space Input Lag Reduction Group 2 Setup menu Status Language Menu Position High Altitude Mode Remote Start Network Management Power Saving Lamp Setting Function menu Dynamic Range Test Pattern Installation menu Image Flip Lens Control Anamorphic Lens Trigger Select IR Receiver Panel Alignment Network Setting 33
Items Locked by Settings Lock Group 1 Picture menu Reset Reality Creation Contrast Enhancer Lamp Control Motionflow Contrast Brightness Color Hue Color Temp. Sharpness NR MPEG NR Smooth Gradation Film Mode Gamma Correction Color Correction Clear White x.v.Color HDR Color Space Input Lag Reduction Group 2 Setup menu Status Language Menu Position High Altitude Mode Remote Start Network Management Power Saving Lamp Setting Function menu Dynamic Range Test Pattern Installation menu Image Flip Lens Control Anamorphic Lens Trigger Select IR Receiver Panel Alignment Network Setting 33

Operating Instructions
Page 37
... to an optimum picture. Note Depending on (total usage). When input signals with HDR, "HDR(HDR10)" or "HDR(HLG)" is displayed in "Preset Signals" (page 52) (the preset memory). Displays the software version. Indicates how long the lamp has been turned on the computer input signal, parts of the lamp. Signal type Items Model Name Serial No. Signal type Color Format Color Space HDR Format Software Version Lamp Timer Description Displays the model name Displays the serial number.
... to an optimum picture. Note Depending on (total usage). When input signals with HDR, "HDR(HDR10)" or "HDR(HLG)" is displayed in "Preset Signals" (page 52) (the preset memory). Displays the software version. Indicates how long the lamp has been turned on the computer input signal, parts of the lamp. Signal type Items Model Name Serial No. Signal type Color Format Color Space HDR Format Software Version Lamp Timer Description Displays the model name Displays the serial number.

Operating Instructions
Page 38
... unit using "Network Setting" on the Installation menu (page 36). 3 Start a Web browser on the computer, enter the following in the Web browser: 38 LAN cable (straight type) (not supplied) LAN Connector Hub, router, etc. 2 Set the network settings for the unit) When connecting by the IPv6 address http://[xxxx:xxxx:- Notes • When connecting this projector connected with the network, access the Control window via a Web browser. • Making the network settings...
... unit using "Network Setting" on the Installation menu (page 36). 3 Start a Web browser on the computer, enter the following in the Web browser: 38 LAN cable (straight type) (not supplied) LAN Connector Hub, router, etc. 2 Set the network settings for the unit) When connecting by the IPv6 address http://[xxxx:xxxx:- Notes • When connecting this projector connected with the network, access the Control window via a Web browser. • Making the network settings...
Operating Instructions
Page 41
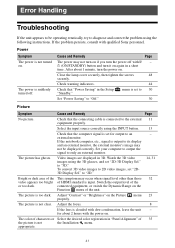
... video images, set "2D-3D Display Sel." Check that "Power Saving" in "Panel Alignment" of HDMI standard is too dark. The picture has ghosts. Adjust "Contrast" or "Brightness" on . Adjust the focus. 8 If the lens is not turned on. Cause and Remedy Page The power may occur when signal level other than those 32 video appears too bright of 35 the picture is not the Installation menu. Video images are displayed in a short time. Switch...
... video images, set "2D-3D Display Sel." Check that "Power Saving" in "Panel Alignment" of HDMI standard is too dark. The picture has ghosts. Adjust "Contrast" or "Brightness" on . Adjust the focus. 8 If the lens is not turned on. Cause and Remedy Page The power may occur when signal level other than those 32 video appears too bright of 35 the picture is not the Installation menu. Video images are displayed in a short time. Switch...
Operating Instructions
Page 42
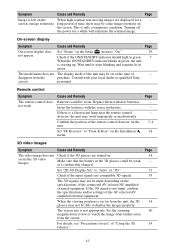
.... screen. (image retention) long period of the AV selector/AV amplifier/external equipment. This is left on the Installation menu. Check if the ON/STANDBY indicator should light in green. 7 When the ON/STANDBY indicator blinks in the 3D glasses could be weak or is starting up. personnel. If the 3D signal is a fluorescent lamp near the remote control detector, the unit may be set at the time of...
.... screen. (image retention) long period of the AV selector/AV amplifier/external equipment. This is left on the Installation menu. Check if the ON/STANDBY indicator should light in green. 7 When the ON/STANDBY indicator blinks in the 3D glasses could be weak or is starting up. personnel. If the 3D signal is a fluorescent lamp near the remote control detector, the unit may be set at the time of...
Operating Instructions
Page 46
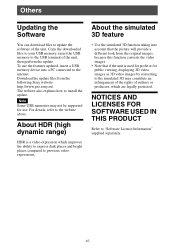
... SOFTWARE USED IN THIS PRODUCT Refer to install the update. Download the update files from the original images, because this function converts the video images. • Note that the picture will provide a different look from the following Sony website: http://www.pro.sony.eu/ The website also explains how to "Software License Information" supplied separately. 46 Note Some USB memories may not be supported for public viewing, displaying 2D video images...
... SOFTWARE USED IN THIS PRODUCT Refer to install the update. Download the update files from the original images, because this function converts the video images. • Note that the picture will provide a different look from the following Sony website: http://www.pro.sony.eu/ The website also explains how to "Software License Information" supplied separately. 46 Note Some USB memories may not be supported for public viewing, displaying 2D video images...

Operating Instructions
Page 47
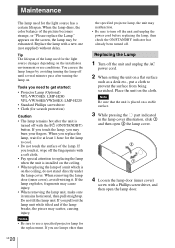
... the lamp cover. Tools you replace the lamp, wait for at least 1 hour for the lamp to replacing the lamp when the unit is turned off until several minutes pass after the unit is installed on the ceiling. • When replacing the lamp of the lamp used for scratch protection) Caution • The lamp remains hot after turning the lamp on. If you use an LMP-H220 Projector Lamp for the light source changes...
... the lamp cover. Tools you replace the lamp, wait for at least 1 hour for the lamp to replacing the lamp when the unit is turned off until several minutes pass after the unit is installed on the ceiling. • When replacing the lamp of the lamp used for scratch protection) Caution • The lamp remains hot after turning the lamp on. If you use an LMP-H220 Projector Lamp for the light source changes...
Operating Instructions
Page 51
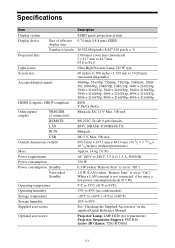
...Light source Screen size Accepted digital signals HDMI (2 inputs), HDCP compliant Other inputs/ outputs TRIGGER (2 connectors) REMOTE LAN IR IN USB Outside dimensions (w/h/d) Mass Power requirements Power consumption Power consumption Standby Networked Standby Operating temperature Operating humidity Storage temperature Storage humidity Supplied accessories Optional accessories Description SXRD panel, projection system 0.74-inch (18.8 mm) SXRD 26,542,080 pixels (8,847,360 pixels × 3) 2.06 times zoom lens (motorized) f = 21.7 mm to 44.7 mm F3.0 to F4.0 Ultra High Pressure Lamp...
...Light source Screen size Accepted digital signals HDMI (2 inputs), HDCP compliant Other inputs/ outputs TRIGGER (2 connectors) REMOTE LAN IR IN USB Outside dimensions (w/h/d) Mass Power requirements Power consumption Power consumption Standby Networked Standby Operating temperature Operating humidity Storage temperature Storage humidity Supplied accessories Optional accessories Description SXRD panel, projection system 0.74-inch (18.8 mm) SXRD 26,542,080 pixels (8,847,360 pixels × 3) 2.06 times zoom lens (motorized) f = 21.7 mm to 44.7 mm F3.0 to F4.0 Ultra High Pressure Lamp...
Operating Instructions
Page 69
... 19 USER 19 Preset signals 52 Projecting the Picture 13 Projection distance 61, 62, 63 Projection distance and lens shift range 60 R Reality Creation 23 Remote control 5 Remote control detector 3, 4 Remote Start 29 Replacing the lamp 47 Reset 22 Resetting the items 21 S Settings Lock 32 Sharpness 24 Signal type 37 Smooth Gradation 25 Software Version 37 Specifications 51 Status 29 T Test Pattern 32 Trigger Select 34 Troubleshooting 41 Turning off 13 Turning on 7 U Updating the software 46 W Warning indicators 3, 44 X x.v.Color 26...
... 19 USER 19 Preset signals 52 Projecting the Picture 13 Projection distance 61, 62, 63 Projection distance and lens shift range 60 R Reality Creation 23 Remote control 5 Remote control detector 3, 4 Remote Start 29 Replacing the lamp 47 Reset 22 Resetting the items 21 S Settings Lock 32 Sharpness 24 Signal type 37 Smooth Gradation 25 Software Version 37 Specifications 51 Status 29 T Test Pattern 32 Trigger Select 34 Troubleshooting 41 Turning off 13 Turning on 7 U Updating the software 46 W Warning indicators 3, 44 X x.v.Color 26...
Startup Guide
Page 8
... heat build-up may be used for about two hours before operating it further. • Unplug the unit from a cold to a warm place, condensation in adjusting temperature settings of the air conditioner. The air coming out is still running. On preventing internal heat buildup After you observe flickering or flashing, turn off the power with the ?/1 (ON/STANDBY) button, do not disconnect the unit...
... heat build-up may be used for about two hours before operating it further. • Unplug the unit from a cold to a warm place, condensation in adjusting temperature settings of the air conditioner. The air coming out is still running. On preventing internal heat buildup After you observe flickering or flashing, turn off the power with the ?/1 (ON/STANDBY) button, do not disconnect the unit...
Startup Guide
Page 12
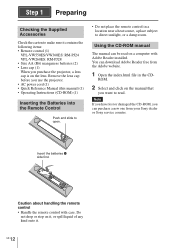
... batteries (2) • Lens cap (1) When you use the projector. • AC power cord (1) • Quick Reference Manual (this manual) (1) • Operating Instructions (CD-ROM) (1) Inserting the Batteries into the Remote Control Push and slide to open. • Do not place the remote control in the CD- Do not drop or step on the manual that you can download Adobe Reader free from your Sony dealer or Sony service counter. Insert the...
... batteries (2) • Lens cap (1) When you use the projector. • AC power cord (1) • Quick Reference Manual (this manual) (1) • Operating Instructions (CD-ROM) (1) Inserting the Batteries into the Remote Control Push and slide to open. • Do not place the remote control in the CD- Do not drop or step on the manual that you can download Adobe Reader free from your Sony dealer or Sony service counter. Insert the...
Startup Guide
Page 13
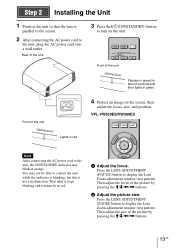
... in green. 4 Project an image on the unit. Press the LENS ADJUSTMENT (FOCUS) button to turn on the screen, then adjust the focus, size, and position. Front of the unit Front of the unit Flashes in green for tens of seconds and then lights in red. Note After connecting the AC power cord to the unit, the ON/STANDBY indicator may not be able to control the unit while the indicator is blinking, but...
... in green. 4 Project an image on the unit. Press the LENS ADJUSTMENT (FOCUS) button to turn on the screen, then adjust the focus, size, and position. Front of the unit Front of the unit Flashes in green for tens of seconds and then lights in red. Note After connecting the AC power cord to the unit, the ON/STANDBY indicator may not be able to control the unit while the indicator is blinking, but...
Startup Guide
Page 19
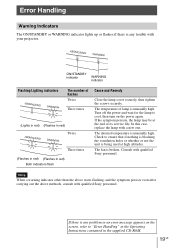
... power and wait for the lamp to "Error Handling" in the Operating Instructions contained in red) Both indicators flash Cause and Remedy Close the lamp cover securely, then tighten the screws securely. Consult with a new one. The temperature of lamp is unusually high. The internal temperature is unusually high. The fan is broken. If there is any trouble with qualified Sony personnel. ON/STANDBY indicator WARNING indicator Flashing/Lighting indicators The number of its service life. In this case, replace the lamp...
... power and wait for the lamp to "Error Handling" in the Operating Instructions contained in red) Both indicators flash Cause and Remedy Close the lamp cover securely, then tighten the screws securely. Consult with a new one. The temperature of lamp is unusually high. The internal temperature is unusually high. The fan is broken. If there is any trouble with qualified Sony personnel. ON/STANDBY indicator WARNING indicator Flashing/Lighting indicators The number of its service life. In this case, replace the lamp...
Startup Guide
Page 20
... lamp dims, the color balance of a unit which is turned off with a Phillips screwdriver, and then open 2 the lamp cover. 4 Loosen the lamp door (inner cover) screw with the ?/1 (ON/STANDBY) button. appears on the screen, the lamp may cause injury. • When removing the lamp unit, make sure it . Maintenance The lamp used for the light source changes depending on the installation environment or use lamps other than GB 20 the specified projector lamp...
... lamp dims, the color balance of a unit which is turned off with a Phillips screwdriver, and then open 2 the lamp cover. 4 Loosen the lamp door (inner cover) screw with the ?/1 (ON/STANDBY) button. appears on the screen, the lamp may cause injury. • When removing the lamp unit, make sure it . Maintenance The lamp used for the light source changes depending on the installation environment or use lamps other than GB 20 the specified projector lamp...


