
Operating Instructions
Page 5
... Color Processing 32 Signal Menu 40 Function menu 41 Installation Menu 42 Setup Menu 43 Information Menu 44 About the Preset Memory No. ... 44 Adjusting Picture Quality of a Signal from the Computer 45 Others Troubleshooting 46 Warning Indicators 47 Message Lists 48 Replacing the Lamp 49 Replacing the Air Filter 50 Specifications 52 Input Signals and Adjustable/setting Items 54 Preset Signals 56 Ceiling Installation 58 Location of Controls 61 Front 61 Rear 62 Bottom 63 Remote Control 64 Index 65 Using the Menus Operation...
... Color Processing 32 Signal Menu 40 Function menu 41 Installation Menu 42 Setup Menu 43 Information Menu 44 About the Preset Memory No. ... 44 Adjusting Picture Quality of a Signal from the Computer 45 Others Troubleshooting 46 Warning Indicators 47 Message Lists 48 Replacing the Lamp 49 Replacing the Air Filter 50 Specifications 52 Input Signals and Adjustable/setting Items 54 Preset Signals 56 Ceiling Installation 58 Location of Controls 61 Front 61 Rear 62 Bottom 63 Remote Control 64 Index 65 Using the Menus Operation...

Operating Instructions
Page 18
... the operating instructions of the signal input is set to adjust the picture position. ON/ STANDBY 3 Turn on the projector. 2 Press the I/1 (on/standby) switch to turn on the equipment connected to the projector. The ON/STANDBY indicator lights in the Function of the connected equipment. 4 Press INPUT to project the picture on the screen. menu, the channel 5 Move both LENS SHIFT dials to "On" in green. Each time you press the button, the input indication changes. (1 page 24) Video INPUT Tip When "Auto Input...
... the operating instructions of the signal input is set to adjust the picture position. ON/ STANDBY 3 Turn on the projector. 2 Press the I/1 (on/standby) switch to turn on the equipment connected to the projector. The ON/STANDBY indicator lights in the Function of the connected equipment. 4 Press INPUT to project the picture on the screen. menu, the channel 5 Move both LENS SHIFT dials to "On" in green. Each time you press the button, the input indication changes. (1 page 24) Video INPUT Tip When "Auto Input...

Operating Instructions
Page 21
Connections and Preparations Step 4: Selecting the Menu Language You can operate the menu using the M/m/ The factory default setting is English. LIGHT INPUT 2 DYNAMIC STANDARD CINEMA PICTURE MODE USER 1 USER 2 USER 3 ENTER 4-6 APA ADJ PIC MENU 3 WIDE MODE RCP RESET REAL COLOR PROCESSING Tip You can select one of fifteen languages for displaying the menu and other onscreen displays.
Connections and Preparations Step 4: Selecting the Menu Language You can operate the menu using the M/m/ The factory default setting is English. LIGHT INPUT 2 DYNAMIC STANDARD CINEMA PICTURE MODE USER 1 USER 2 USER 3 ENTER 4-6 APA ADJ PIC MENU 3 WIDE MODE RCP RESET REAL COLOR PROCESSING Tip You can select one of fifteen languages for displaying the menu and other onscreen displays.

Operating Instructions
Page 22
... Status : Language : Input-A Signal Sel. Color System : On English Center White Installation Setup Information Sel : Set : Exit : 6 Press M or m to the selected language. The menu changes to select a language, and press ENTER. ENTER To clear the menu Press MENU. 22 Step 4: Selecting the Menu Language 4 Press M or m to select "Language," and press , or ENTER. or ENTER Picture Signal Function Status : Language : Input-A Signal Sel. : Color System : On English Computer Auto Installation Setup...
... Status : Language : Input-A Signal Sel. Color System : On English Center White Installation Setup Information Sel : Set : Exit : 6 Press M or m to the selected language. The menu changes to select a language, and press ENTER. ENTER To clear the menu Press MENU. 22 Step 4: Selecting the Menu Language 4 Press M or m to select "Language," and press , or ENTER. or ENTER Picture Signal Function Status : Language : Input-A Signal Sel. : Color System : On English Computer Auto Installation Setup...
Operating Instructions
Page 23
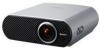
... outlet. Projecting the Picture on the Screen VPL-HS50 LIGHT INPUT DYNAMIC STANDARD CINEMA PICTURE MODE USER 1 USER 2 USER 3 Focus ring Zoom ring Remote control detector VPL-HS51 Remote control detector ENTER Zoom ring Focus ring 1 Plug the AC power cord into standby mode. Projecting Projecting This section describes how to operate the projector to view the picture from the equipment connected to adjust the quality of the connected equipment. Projecting the Picture on the Screen 23 ON/ STANDBY 2 Press the I/1 (on/standby) switch to turn on the equipment connected to...
... outlet. Projecting the Picture on the Screen VPL-HS50 LIGHT INPUT DYNAMIC STANDARD CINEMA PICTURE MODE USER 1 USER 2 USER 3 Focus ring Zoom ring Remote control detector VPL-HS51 Remote control detector ENTER Zoom ring Focus ring 1 Plug the AC power cord into standby mode. Projecting Projecting This section describes how to operate the projector to view the picture from the equipment connected to adjust the quality of the connected equipment. Projecting the Picture on the Screen 23 ON/ STANDBY 2 Press the I/1 (on/standby) switch to turn on the equipment connected to...

Operating Instructions
Page 32
... will be displayed in the RCP window also shows the adjustable colors. LIGHT INPUT DYNAMIC STANDARD CINEMA PICTURE MODE USER 1 USER 2 USER 3 ENTER 2 - 4 APA ADJ PIC MENU WIDE MODE RCP RESET REAL COLOR PROCESSING 1 BRIGHT CONTRAST Tip Freeze the scene of the projected picture you specify independently. The RCP (Real Color Processing) window appears. 3 Select the target color you want to your taste. Adjusting the Picture Using Real Color Processing The Real Color Processing (RCP...
... will be displayed in the RCP window also shows the adjustable colors. LIGHT INPUT DYNAMIC STANDARD CINEMA PICTURE MODE USER 1 USER 2 USER 3 ENTER 2 - 4 APA ADJ PIC MENU WIDE MODE RCP RESET REAL COLOR PROCESSING 1 BRIGHT CONTRAST Tip Freeze the scene of the projected picture you specify independently. The RCP (Real Color Processing) window appears. 3 Select the target color you want to your taste. Adjusting the Picture Using Real Color Processing The Real Color Processing (RCP...

Operating Instructions
Page 34
.... MENU Picture Signal Picture Mode : Adjust Picture RCP : Function Installation Setup Information Sel: Set: Cinema Off Back: Exit: 34 Operation through the Menus The projector is equipped with setting items appears. To change the on -screen menu for making various adjustments and settings. If you select an item name followed by an arrow (B), the next menu window with an on -screen menu language, see "Selecting the Menu Language." (1 page 21) LIGHT INPUT DYNAMIC STANDARD CINEMA PICTURE MODE USER 1 USER 2 USER...
.... MENU Picture Signal Picture Mode : Adjust Picture RCP : Function Installation Setup Information Sel: Set: Cinema Off Back: Exit: 34 Operation through the Menus The projector is equipped with setting items appears. To change the on -screen menu for making various adjustments and settings. If you select an item name followed by an arrow (B), the next menu window with an on -screen menu language, see "Selecting the Menu Language." (1 page 21) LIGHT INPUT DYNAMIC STANDARD CINEMA PICTURE MODE USER 1 USER 2 USER...

Operating Instructions
Page 35
... ENTER. Color System : On English Center White Installation Setup Information Sel: Set: Exit: Setting menu Picture Mode Dynamic Standard Cinema User1 User2 User3 Sel : Set : Adjustment menu Contrast Operation through the Menus 35 The setting items are displayed in a pop-up menu Setting items or ENTER Picture Signal Function Status : Language : Input-A Signal Sel. Using the Menus 2 Press M or m to set or adjusted with the selected menu appear. The item presently selected is shown as a yellow button. The...
... ENTER. Color System : On English Center White Installation Setup Information Sel: Set: Exit: Setting menu Picture Mode Dynamic Standard Cinema User1 User2 User3 Sel : Set : Adjustment menu Contrast Operation through the Menus 35 The setting items are displayed in a pop-up menu Setting items or ENTER Picture Signal Function Status : Language : Input-A Signal Sel. Using the Menus 2 Press M or m to set or adjusted with the selected menu appear. The item presently selected is shown as a yellow button. The...

Operating Instructions
Page 37
... picture. Picture Signal Picture Mode : Adjust Picture RCP : Function Installation Setup Information Sel: Set: Cinema Off Back: Exit: Adjust Picture menu Picture Signal Function Installation Setup Information Adjust Picture Contrast : 80 Brightness : 50 Color : 50 Hue : 50 Sharpness : 50 Black Level Adj. : Off Gamma Correction : Off Color Temp : Low DDE : Film Cinema Black Pro Sel: Set: Back: Cinema Exit: Item Picture Mode Adjust Picture Contrast Brightness Color Hue Sharpness Description You can select picture viewing mode that can also adjust the picture...
... picture. Picture Signal Picture Mode : Adjust Picture RCP : Function Installation Setup Information Sel: Set: Cinema Off Back: Exit: Adjust Picture menu Picture Signal Function Installation Setup Information Adjust Picture Contrast : 80 Brightness : 50 Color : 50 Hue : 50 Sharpness : 50 Black Level Adj. : Off Gamma Correction : Off Color Temp : Low DDE : Film Cinema Black Pro Sel: Set: Back: Cinema Exit: Item Picture Mode Adjust Picture Contrast Brightness Color Hue Sharpness Description You can select picture viewing mode that can also adjust the picture...

Operating Instructions
Page 41
... INPUT button is pressed. Picture Signal Function Smart APA : Auto Input Search : Standby Mode : Power Saving: On Off Standard Off Installation Setup Information Sel: Set: Back: Exit: Item Smart APA Auto Input Search Standby Mode Power Saving Description With this item set to power saving mode, select Off. Then the detected input channel is automatically displayed. The projector goes into power saving mode if no button functions for changing the settings of the function of the projector. Function menu 41 Using...
... INPUT button is pressed. Picture Signal Function Smart APA : Auto Input Search : Standby Mode : Power Saving: On Off Standard Off Installation Setup Information Sel: Set: Back: Exit: Item Smart APA Auto Input Search Standby Mode Power Saving Description With this item set to power saving mode, select Off. Then the detected input channel is automatically displayed. The projector goes into power saving mode if no button functions for changing the settings of the function of the projector. Function menu 41 Using...
Operating Instructions
Page 42
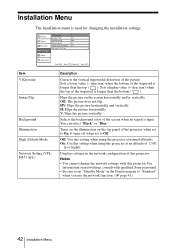
... of the screen when no signal is longer than the bottom ( ). H: Flips the picture horizontally. On: Use this projector. Sets a higher value (+ direction) when the top of 1,500 m or higher. Displays settings in the Function menu to On. HV: Flips the picture horizontally and vertically. Picture Signal Function Installation V Keystone : 0 Image Flip : Off Background : Blue Illumination : On High Altitude Mode : Off Network Setting Setup Information Sel: Set: Back: Exit: Item V Keystone Image Flip Background Illumination High Altitude Mode Network Setting (VPLHS51 only...
... of the screen when no signal is longer than the bottom ( ). H: Flips the picture horizontally. On: Use this projector. Sets a higher value (+ direction) when the top of 1,500 m or higher. Displays settings in the Function menu to On. HV: Flips the picture horizontally and vertically. Picture Signal Function Installation V Keystone : 0 Image Flip : Off Background : Blue Illumination : On High Altitude Mode : Off Network Setting Setup Information Sel: Set: Back: Exit: Item V Keystone Image Flip Background Illumination High Altitude Mode Network Setting (VPLHS51 only...

Operating Instructions
Page 43
Using the Menus Setup Menu The Setup menu is not displayed correctly with the INPUT button. Selects the language used to the input signal. Auto: Selects the input signal type automatically. Note When the input signal is used in the menu and on -screen displays except for the menus, message when turning off the power, and warning messages. Available languages are: English, Dutch, French, Italian, German, Spanish, Portuguese, Russian, Swedish, Norwegian, Japanese, Chinese (Simplified Chinese), Chinese...
Using the Menus Setup Menu The Setup menu is not displayed correctly with the INPUT button. Selects the language used to the input signal. Auto: Selects the input signal type automatically. Note When the input signal is used in the menu and on -screen displays except for the menus, message when turning off the power, and warning messages. Available languages are: English, Dutch, French, Italian, German, Spanish, Portuguese, Russian, Swedish, Norwegian, Japanese, Chinese (Simplified Chinese), Chinese...
Operating Instructions
Page 44
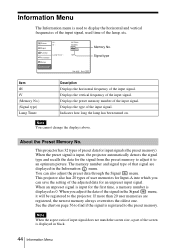
... save the setting of the screen is displayed as 0. Note You cannot change the displays above. The memory number and signal type of the signal in black. 44 Information Menu This projector also has 20 types of user memories for input signals (the preset memory). Information Menu The Information menu is used to display the horizontal and vertical frequencies of the input signal, used time of the input signal. Picture fH : fV : Signal Function Installation Lamp Timer : Setup Information...
... save the setting of the screen is displayed as 0. Note You cannot change the displays above. The memory number and signal type of the signal in black. 44 Information Menu This projector also has 20 types of user memories for input signals (the preset memory). Information Menu The Information menu is used to display the horizontal and vertical frequencies of the input signal, used time of the input signal. Picture fH : fV : Signal Function Installation Lamp Timer : Setup Information...

Operating Instructions
Page 46
... two hours with the power on . c Wait for "Input-A Signal Sel." The picture from the INPUT A connector is not clear. c Select "Computer," "Component" or "Video GBR" for about one minute before turning on the lens. c Set the computer signal to output only to replace a lamp and air filter, etc. Leave the projector for "Input-A Signal Sel." c Adjust "Dot Phase" for "Adjust Signal" in the "Adjust Picture" of the Picture menu (1 page 37) c Set "Color System" in the Setup menu to...
... two hours with the power on . c Wait for "Input-A Signal Sel." The picture from the INPUT A connector is not clear. c Select "Computer," "Component" or "Video GBR" for about one minute before turning on the lens. c Set the computer signal to output only to replace a lamp and air filter, etc. Leave the projector for "Input-A Signal Sel." c Adjust "Dot Phase" for "Adjust Signal" in the "Adjust Picture" of the Picture menu (1 page 37) c Set "Color System" in the Setup menu to...
Operating Instructions
Page 47
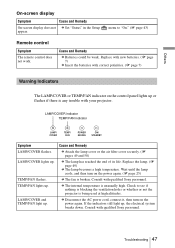
... trouble with correct polarities. (1 page 7) Warning Indicators The LAMP/COVER or TEMP/FAN indicator on the power again. If the indicators still light up . Troubleshooting 47 LAMP/COVER lights up . Cause and Remedy c Attach the lamp cover or the air filter cover securely. (1 pages 49 and 50) c The lamp has reached the end of its life. Consult with qualified Sony personnel. Others On-screen display Symptom Cause and Remedy On-screen display does not c Set "Status" in the Setup appear. menu...
... trouble with correct polarities. (1 page 7) Warning Indicators The LAMP/COVER or TEMP/FAN indicator on the power again. If the indicators still light up . Troubleshooting 47 LAMP/COVER lights up . Cause and Remedy c Attach the lamp cover or the air filter cover securely. (1 pages 49 and 50) c The lamp has reached the end of its life. Consult with qualified Sony personnel. Others On-screen display Symptom Cause and Remedy On-screen display does not c Set "Status" in the Setup appear. menu...

Operating Instructions
Page 48
... air filter. (1 page 50) High temp.! Check connections. (1 page 13) c Press the appropriate button. 48 Troubleshooting c Set "Input-A Signal Sel." Switch to high altitude mode on an external monitor of less than 1,500 m: check to see if nothing is blocking the ventilation holes. Lamp off in the Setup menu to "Computer" when RGB signal is time to SVGA. in 1 c Turn off the power. Replace the lamp. (1 page 49) Please replace the filter. Yes: O/ No: o c When using the projector...
... air filter. (1 page 50) High temp.! Check connections. (1 page 13) c Press the appropriate button. 48 Troubleshooting c Set "Input-A Signal Sel." Switch to high altitude mode on an external monitor of less than 1,500 m: check to see if nothing is blocking the ventilation holes. Lamp off in the Setup menu to "Computer" when RGB signal is time to SVGA. in 1 c Turn off the power. Replace the lamp. (1 page 49) Please replace the filter. Yes: O/ No: o c When using the projector...

Operating Instructions
Page 49
... power cord. Others Replacing the Lamp The lamp used for the lamp to cool. Pull out the lamp unit by the handle 2. 5 Insert the new lamp all the way in until it is stable after using the projector Turn off the projector with a new one (not supplied). When replacing the lamp after turning it remains horizontal, then pull straight up. Wait for at least an hour for the light source has a certain life...
... power cord. Others Replacing the Lamp The lamp used for the lamp to cool. Pull out the lamp unit by the handle 2. 5 Insert the new lamp all the way in until it is stable after using the projector Turn off the projector with a new one (not supplied). When replacing the lamp after turning it remains horizontal, then pull straight up. Wait for at least an hour for the light source has a certain life...

Operating Instructions
Page 50
9 Press the following buttons on the remote control in the following order for less than five seconds each: RESET,
9 Press the following buttons on the remote control in the following order for less than five seconds each: RESET,

Operating Instructions
Page 53
...% Supplied accessories Remote control RM-PJHS50 (1) Size AA (R6) batteries (2) AC power cord (1) Air filter (for replacement) Projector Suspension Support PSS-610 Specifications 53 Safe regulations VPL-HS50: UL60950, CSA No. 950, FCC class B, IC class B, EN60950 (NEMKO), CE, C-Tick VPL-HS51: UL60950, FCC class B Optional accessories Projector Lamp LMP-H130 (for replacement) Air filter PK-HS10FL (for replacement) (1) Operating Instructions (1) CD-ROM (Application software and Operating Instructions) (VPL-HS51 only) Design and specifications are subject to change...
...% Supplied accessories Remote control RM-PJHS50 (1) Size AA (R6) batteries (2) AC power cord (1) Air filter (for replacement) Projector Suspension Support PSS-610 Specifications 53 Safe regulations VPL-HS50: UL60950, CSA No. 950, FCC class B, IC class B, EN60950 (NEMKO), CE, C-Tick VPL-HS51: UL60950, FCC class B Optional accessories Projector Lamp LMP-H130 (for replacement) Air filter PK-HS10FL (for replacement) (1) Operating Instructions (1) CD-ROM (Application software and Operating Instructions) (VPL-HS51 only) Design and specifications are subject to change...
Operating Instructions
Page 59
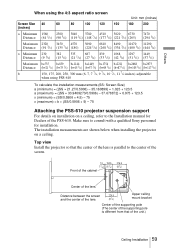
... cabinet Center of the lens Distance between the screen 224.5 and the center of the lens (8 7/8) Upper ceiling mount bracket Center of the supporting pole (The center of the supporting pole is different from that the center of the lens is parallel to consult with a qualified Sony personnel for Dealers of the unit.) Ceiling Installation 59 Top view Install the projector so that of the...
... cabinet Center of the lens Distance between the screen 224.5 and the center of the lens (8 7/8) Upper ceiling mount bracket Center of the supporting pole (The center of the supporting pole is different from that the center of the lens is parallel to consult with a qualified Sony personnel for Dealers of the unit.) Ceiling Installation 59 Top view Install the projector so that of the...


