Startup Guide
Page 27
... which case the user will be required to radio communications. Sony Customer Information Service Center 1-800222-7669 or http://www.sony.com/ Supplier's Declaration of Conformity Trade Name Model Responsible party Address Telephone Number : SONY : VPL-FHZ120L/FHZ90L : Sony Electronics Inc. 16535 Via Esprillo, San Diego, CA 92127 U.S.A. : 858-942-2230 This device complies with the instruction manual, may call; Operation is likely to...
... which case the user will be required to radio communications. Sony Customer Information Service Center 1-800222-7669 or http://www.sony.com/ Supplier's Declaration of Conformity Trade Name Model Responsible party Address Telephone Number : SONY : VPL-FHZ120L/FHZ90L : Sony Electronics Inc. 16535 Via Esprillo, San Diego, CA 92127 U.S.A. : 858-942-2230 This device complies with the instruction manual, may call; Operation is likely to...

Startup Guide
Page 40
... hours before use multiple LCD projectors to prevent internal temperature from the structure of the air conditioner. Stubborn stains may be removed with a soft cloth lightly dampened with a fan inside to project onto a screen, even if they are not malfunctions. On Screen When using a screen with qualified Sony personnel. If, however, in adjusting temperature settings of the projector and are of the manufacturing process and does not indicate a malfunction. About Lens Replacement...
... hours before use multiple LCD projectors to prevent internal temperature from the structure of the air conditioner. Stubborn stains may be removed with a soft cloth lightly dampened with a fan inside to project onto a screen, even if they are not malfunctions. On Screen When using a screen with qualified Sony personnel. If, however, in adjusting temperature settings of the projector and are of the manufacturing process and does not indicate a malfunction. About Lens Replacement...

Startup Guide
Page 42
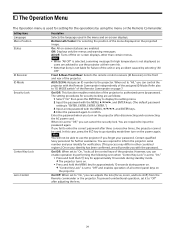
... 1 Preparing Checking the Supplied Accessories RM-PJ30 Remote Commander (1) Size AA (R6) batteries (2) AC power cord (1) Plug holder (1) Terminal cover (1) Quick Reference Manual (this manual) (1) Operating Instructions (CD-ROM) (1) Connecting the AC Power Cord 1 Plug the AC power cord into your dealer or Sony service representative. Note If you damage or lose the CD-ROM, you want to install the battery from your eyes. Before replacing the lens, turn off the projector, then unplug...
... 1 Preparing Checking the Supplied Accessories RM-PJ30 Remote Commander (1) Size AA (R6) batteries (2) AC power cord (1) Plug holder (1) Terminal cover (1) Quick Reference Manual (this manual) (1) Operating Instructions (CD-ROM) (1) Connecting the AC Power Cord 1 Plug the AC power cord into your dealer or Sony service representative. Note If you damage or lose the CD-ROM, you want to install the battery from your eyes. Before replacing the lens, turn off the projector, then unplug...

Startup Guide
Page 43
... power cord. 3 Remove the lens cover. 4 While pressing the slide switch, move the lever up to the limit, and pull the lens straight out. 5 Attach the lens cover. Then, while sliding the LENS COVER RELEASE buttons inward, insert the lens cover. While the projector is attached, you can attach/ remove the lens cover in the same way. 19 Preparing GB Before replacing the lens, turn off the projector, then unplug the AC power cord...
... power cord. 3 Remove the lens cover. 4 While pressing the slide switch, move the lever up to the limit, and pull the lens straight out. 5 Attach the lens cover. Then, while sliding the LENS COVER RELEASE buttons inward, insert the lens cover. While the projector is attached, you can attach/ remove the lens cover in the same way. 19 Preparing GB Before replacing the lens, turn off the projector, then unplug the AC power cord...
Startup Guide
Page 46
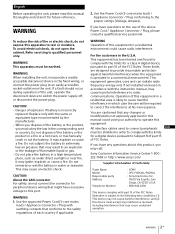
... the Remote Commander. 4 Turn on the Remote Commander. *1: When INPUT F is input.*1 Also, you can select an input signal on the connected device. 5 Select the input source. Press the INPUT key on the projector or on the Remote Commander. 3 Press the MENU key to display the menu. For details on projection distances and projected image sizes, see "Projection Distance and Lens Shift Range" on the Operating Instructions. 1 Plug the AC power cord into a wall outlet. 2 Turn on the projector. If the display cannot be projected...
... the Remote Commander. 4 Turn on the Remote Commander. *1: When INPUT F is input.*1 Also, you can select an input signal on the connected device. 5 Select the input source. Press the INPUT key on the projector or on the Remote Commander. 3 Press the MENU key to display the menu. For details on projection distances and projected image sizes, see "Projection Distance and Lens Shift Range" on the Operating Instructions. 1 Plug the AC power cord into a wall outlet. 2 Turn on the projector. If the display cannot be projected...

Startup Guide
Page 48
.../STANDBY WARNING indicator indicator Status indication Indicator status Operating status Standby (Lights (Off) in red) Warm-up after it is turned on the front. The projector is ready for projection. (Lights (Off) in green) (Lights in (Off) orange) Other standby status The projector is in accordance with "Warning indication and remedies" (Page 25). The projector warms up (Flashes (Off) in green) Ready Description The power is supplied to the projector and the projector is in a standby mode according to the setting. If the indicators flash in red, address the problem...
.../STANDBY WARNING indicator indicator Status indication Indicator status Operating status Standby (Lights (Off) in red) Warm-up after it is turned on the front. The projector is ready for projection. (Lights (Off) in green) (Lights in (Off) orange) Other standby status The projector is in accordance with "Warning indication and remedies" (Page 25). The projector warms up (Flashes (Off) in green) Ready Description The power is supplied to the projector and the projector is in a standby mode according to the setting. If the indicators flash in red, address the problem...

Startup Guide
Page 49
... air filter is any problem or an error message appears on the projector. If the problem still persists, consult with qualified Sony personnel. If there is clogged, then clean or replace it securely (Page 18). Check the USB or LAN connection before plugging the AC power cord into the wall outlet and turn on the projector. The light source does not light properly. Unplug the AC power cord and make sure the ON/STANDBY indicator turns...
... air filter is any problem or an error message appears on the projector. If the problem still persists, consult with qualified Sony personnel. If there is clogged, then clean or replace it securely (Page 18). Check the USB or LAN connection before plugging the AC power cord into the wall outlet and turn on the projector. The light source does not light properly. Unplug the AC power cord and make sure the ON/STANDBY indicator turns...

Operating Instructions
Page 2
...; Projectors on a Screen 20 Using Convenient Functions 21 Selecting the Stored Picture Settings (Picture Position Function) (Specified Lens Only 21 Enlarging a Part of the Image (Digital Zoom Function 22 Projecting Images with Two Pictures Simultaneously (Two-Picture Display Function 22 Adjustments and Settings Using a Menu Using a Menu 23 The Picture Menu 24 The Screen Menu 26 The Function Menu 28 The Operation Menu 29 The Connection/Power Menu 30 The Installation Menu 32 The Information Menu 35 Network Features Using Network Features 36 Displaying the Control Window...
...; Projectors on a Screen 20 Using Convenient Functions 21 Selecting the Stored Picture Settings (Picture Position Function) (Specified Lens Only 21 Enlarging a Part of the Image (Digital Zoom Function 22 Projecting Images with Two Pictures Simultaneously (Two-Picture Display Function 22 Adjustments and Settings Using a Menu Using a Menu 23 The Picture Menu 24 The Screen Menu 26 The Function Menu 28 The Operation Menu 29 The Connection/Power Menu 30 The Installation Menu 32 The Information Menu 35 Network Features Using Network Features 36 Displaying the Control Window...

Operating Instructions
Page 13
Before replacing the lens, turn off the projector and then unplug the AC power cord. 2 Remove the lens cover. Lever Slide switch 5 Attach the lens cover. Then, while sliding the LENS COVER RELEASE buttons inward, insert the lens cover. Even when the lens is turned on, press the LENS SHIFT key on the Remote Commander, then press the RESET key on the top cover of the projector and press it until it . The projection lens returns to the...
Before replacing the lens, turn off the projector and then unplug the AC power cord. 2 Remove the lens cover. Lever Slide switch 5 Attach the lens cover. Then, while sliding the LENS COVER RELEASE buttons inward, insert the lens cover. Even when the lens is turned on, press the LENS SHIFT key on the Remote Commander, then press the RESET key on the top cover of the projector and press it until it . The projection lens returns to the...

Operating Instructions
Page 16
... display the input select window. Place the projector so that the projected image fits the screen size. For details on projection distances and projected image sizes, see "Projection Distance and Lens Shift Range" (page 57). 1 Plug the AC power cord into a wall outlet. 2 Connect all necessary devices to the projector (page 8). 3 Turn on the Remote Commander. *1: When INPUT F is started and the projector enters the standby mode. 2 Unplug the AC power cord from the wall outlet. 7 Adjust the projected image (page 17). 16 Projecting/Adjusting...
... display the input select window. Place the projector so that the projected image fits the screen size. For details on projection distances and projected image sizes, see "Projection Distance and Lens Shift Range" (page 57). 1 Plug the AC power cord into a wall outlet. 2 Connect all necessary devices to the projector (page 8). 3 Turn on the Remote Commander. *1: When INPUT F is started and the projector enters the standby mode. 2 Unplug the AC power cord from the wall outlet. 7 Adjust the projected image (page 17). 16 Projecting/Adjusting...

Operating Instructions
Page 20
... Installation menu, set "Edge Blending" to exhaust vent proximity, and an error indication may result. In this case, reset all of the Screen Fitting setting items. Blending Projections from multiple projectors. 2 Set the ID mode. R/G/B can separately adjust the top/bottom side. In "Blend Settings" of deflection, use / . When overlaying multiple projections, the Edge Blending setting is for each tone as necessary. 5 Adjust the color matching setting...
... Installation menu, set "Edge Blending" to exhaust vent proximity, and an error indication may result. In this case, reset all of the Screen Fitting setting items. Blending Projections from multiple projectors. 2 Set the ID mode. R/G/B can separately adjust the top/bottom side. In "Blend Settings" of deflection, use / . When overlaying multiple projections, the Edge Blending setting is for each tone as necessary. 5 Adjust the color matching setting...
Operating Instructions
Page 29
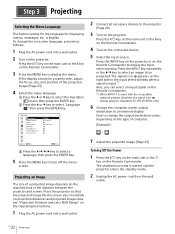
... set to go standby mode then turn on -screen statuses are advised to use the projector if you can cancel the security lock. The setting procedures for security locking are required to inform the projector serial number and your identity for high temperature is not displayed, so users are enabled. Contact qualified Sony personnel for the operations by password. Setting items Language Menu Position Status IR Receiver ID Mode Security Lock Control Key Lock Lens Control Description Selects the language used...
... set to go standby mode then turn on -screen statuses are advised to use the projector if you can cancel the security lock. The setting procedures for security locking are required to inform the projector serial number and your identity for high temperature is not displayed, so users are enabled. Contact qualified Sony personnel for the operations by password. Setting items Language Menu Position Status IR Receiver ID Mode Security Lock Control Key Lock Lens Control Description Selects the language used...

Operating Instructions
Page 30
... or via the network connection with no signal is input for a quick start to 15% *10) from that set to input signal. For details, see "Power consumption (Networked Standby Mode)" in standby mode (page 45). 30 The ON/STANDBY indicator lights in orange when the projector is in "Specifications" (page 53). HDBaseT Settings LAN Setting via HDBaseT/LAN Port: You can select either via the LAN of the INPUT C/D/E/F terminal. Sel. USB/Network: Sets the content for "IP Address Setup," select the...
... or via the network connection with no signal is input for a quick start to 15% *10) from that set to input signal. For details, see "Power consumption (Networked Standby Mode)" in standby mode (page 45). 30 The ON/STANDBY indicator lights in orange when the projector is in "Specifications" (page 53). HDBaseT Settings LAN Setting via HDBaseT/LAN Port: You can select either via the LAN of the INPUT C/D/E/F terminal. Sel. USB/Network: Sets the content for "IP Address Setup," select the...

Operating Instructions
Page 31
... the projector, the projection starts without going into standby mode. *1: Set the IP address of the HDMI connection device is no input signal. *8: A change in standby mode. 31 You can be selected. Set manually according to the connected device. *6: The "Auto Power Saving" function is not enabled for connection. You may not be used for INPUT G. *7: Select "Off" to "Low," the network and network control function cannot be operated while the projector is not enabled. *2: When connecting via...
... the projector, the projection starts without going into standby mode. *1: Set the IP address of the HDMI connection device is no input signal. *8: A change in standby mode. 31 You can be selected. Set manually according to the connected device. *6: The "Auto Power Saving" function is not enabled for connection. You may not be used for INPUT G. *7: Select "Off" to "Low," the network and network control function cannot be operated while the projector is not enabled. *2: When connecting via...

Operating Instructions
Page 33
... is displayed. Adjust Item: Selects how to their factory preset values. 33 Reset: Resets all colors) when the "Adjust Color" is performed periodically and automatically when turning off the projector and cleans the air filter in color. On/Auto: Set to "On" (page 31). However, it is not performed when "Direct Power On" is displayed smaller than the entire projection surface using the / keys. When the projected image is set the adjustment...
... is displayed. Adjust Item: Selects how to their factory preset values. 33 Reset: Resets all colors) when the "Adjust Color" is performed periodically and automatically when turning off the projector and cleans the air filter in color. On/Auto: Set to "On" (page 31). However, it is not performed when "Direct Power On" is displayed smaller than the entire projection surface using the / keys. When the projected image is set the adjustment...
Operating Instructions
Page 36
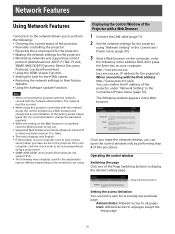
...; Restoring the network settings to their factory defaults. Using the Software Update Function. Displaying the Control Window of the Projector with a Web Browser 1 Connect the LAN cable (page 11). 2 Set the network settings for the projector) When connecting with the network administrator. http://xxx.xxx.xxx.xxx (xxx.xxx.xxx.xxx: IP address for the projector using . Operating the control window Switching the page Click one of the Page Switching buttons to all pages except the Setup page 36...
...; Restoring the network settings to their factory defaults. Using the Software Update Function. Displaying the Control Window of the Projector with a Web Browser 1 Connect the LAN cable (page 11). 2 Set the network settings for the projector) When connecting with the network administrator. http://xxx.xxx.xxx.xxx (xxx.xxx.xxx.xxx: IP address for the projector using . Operating the control window Switching the page Click one of the Page Switching buttons to all pages except the Setup page 36...
Operating Instructions
Page 42
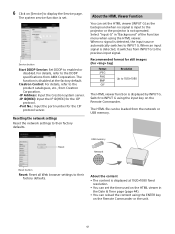
... signal is disabled at the factory default. Crestron Control: For details, refer to enabled or disabled. Reset USB memory Network Reset button Reset: Reset all Web browser settings to the projector or the projector is not operated. For details, refer to their factory defaults. When no signal is input to their factory defaults. . The function is detected, the input source automatically switches to display the Service page. Switch to INPUT G using the input key on [Service] to INPUT G. Select "Input-G" in the Date & Time...
... signal is disabled at the factory default. Crestron Control: For details, refer to enabled or disabled. Reset USB memory Network Reset button Reset: Reset all Web browser settings to the projector or the projector is not operated. For details, refer to their factory defaults. When no signal is input to their factory defaults. . The function is detected, the input source automatically switches to display the Service page. Switch to INPUT G using the input key on [Service] to INPUT G. Select "Input-G" in the Date & Time...
Operating Instructions
Page 44
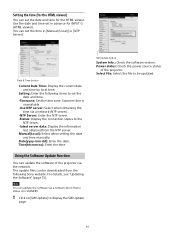
... following Sony website. Manual(Local): Select when setting the date and time manually. Date & Time button Current Date Time: Display the current date and time by local time. For details, see "Updating the Software" (page 51). The update files can be updated. 44 Use the date and time set in [Manual (Local)] or [NTP Server]. Power status: Check the power source status of the projector via a network (NTP server). -NTP Server: Enter the NTP server. -Status: Display the connection status to display...
... following Sony website. Manual(Local): Select when setting the date and time manually. Date & Time button Current Date Time: Display the current date and time by local time. For details, see "Updating the Software" (page 51). The update files can be updated. 44 Use the date and time set in [Manual (Local)] or [NTP Server]. Power status: Check the power source status of the projector via a network (NTP server). -NTP Server: Enter the NTP server. -Status: Display the connection status to display...
Operating Instructions
Page 48
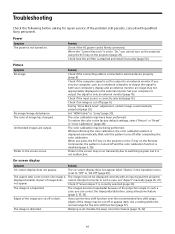
... image has changed. Unintended images are cut off and the color calibration function is distorted. To restore the color or the factory default settings, select "Return" or "Reset" in the Operation menu is not turned on the projector using a Keystone feature (page 6, 18, 32). not appear. The image is disabled (page 6, 28). Troubleshooting Check the following before asking for the lens shift function (page 57). Power Symptom The power is set "Aspect" manually...
... image has changed. Unintended images are cut off and the color calibration function is distorted. To restore the color or the factory default settings, select "Return" or "Reset" in the Operation menu is not turned on the projector using a Keystone feature (page 6, 18, 32). not appear. The image is disabled (page 6, 28). Troubleshooting Check the following before asking for the lens shift function (page 57). Power Symptom The power is set "Aspect" manually...
Operating Instructions
Page 49
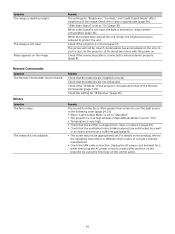
The picture will not be appropriately set. Remote Commander Symptom The Remote Commander does not work. The network is in at high altitude ("High Altitude Mode" is set to external device properly (page 8). Check that the batteries are installed correctly. Check if the projector is not available. For details on the control panel. 49 Others Symptom The fan is dimmed to the operating instructions or Website of the image. Remedy Check that the ventilation...
The picture will not be appropriately set. Remote Commander Symptom The Remote Commander does not work. The network is in at high altitude ("High Altitude Mode" is set to external device properly (page 8). Check that the batteries are installed correctly. Check if the projector is not available. For details on the control panel. 49 Others Symptom The fan is dimmed to the operating instructions or Website of the image. Remedy Check that the ventilation...


