
Operating Instructions
Page 2
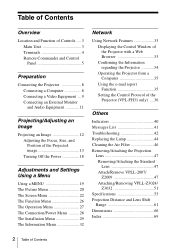
... Operation Menu 27 The Connection/Power Menu .......... 28 The Installation Menu 29 The Information Menu 32 Network Using Network Features 33 Displaying the Control Window of the Projector with a Web Browser 33 Confirming the Information regarding the Projector 34 Operating the Projector from a Computer 35 Using the e-mail report Function 35 Setting the Control Protocol of the Projector (VPL-FH31 only) ....36 Others Indicators 40 Messages List 41 Troubleshooting 42 Replacing the Lamp 44 Cleaning the Air Filter 46 Removing/Attaching the Projection Lens 47 Removing...
... Operation Menu 27 The Connection/Power Menu .......... 28 The Installation Menu 29 The Information Menu 32 Network Using Network Features 33 Displaying the Control Window of the Projector with a Web Browser 33 Confirming the Information regarding the Projector 34 Operating the Projector from a Computer 35 Using the e-mail report Function 35 Setting the Control Protocol of the Projector (VPL-FH31 only) ....36 Others Indicators 40 Messages List 41 Troubleshooting 42 Replacing the Lamp 44 Cleaning the Air Filter 46 Removing/Attaching the Projection Lens 47 Removing...

Operating Instructions
Page 6
... image. AUDIO: Mutes the audio output. f Setting the energy-saving mode easily ECO MODE key "Lamp Mode," "Power Saving Mode," and "Standby Mode" for one and two pictures, press the TWIN key on the screen as two pictures. ECO Mode Menu ECO Mode ECO User Sel Back key For adjusting the volume output from two input signals on the Remote Commander. Press again to restore the previous image. key*1 Enlarges a portion of Controls Notes • When displaying...
... image. AUDIO: Mutes the audio output. f Setting the energy-saving mode easily ECO MODE key "Lamp Mode," "Power Saving Mode," and "Standby Mode" for one and two pictures, press the TWIN key on the screen as two pictures. ECO Mode Menu ECO Mode ECO User Sel Back key For adjusting the volume output from two input signals on the Remote Commander. Press again to restore the previous image. key*1 Enlarges a portion of Controls Notes • When displaying...

Operating Instructions
Page 7
... image. ECO: Sets each item of the Remote Commander. i CONTROL S output terminal Connects to step 3). 3 Select "User" then press the b key. Location and Function of the Remote Commander. Lamp Mode: Standard Power Saving Mode: Standby Standby Mode: Low (go to the CONTROL S input terminal on the Connection/Power menu. Note If you set "Standby Mode" (in "User") to "Low," the network control function will be able to "Low." You do not set "ECO Mode" to "ECO," or "Standby Mode" (in "User") to receive signals...
... image. ECO: Sets each item of the Remote Commander. i CONTROL S output terminal Connects to step 3). 3 Select "User" then press the b key. Location and Function of the Remote Commander. Lamp Mode: Standard Power Saving Mode: Standby Standby Mode: Low (go to the CONTROL S input terminal on the Connection/Power menu. Note If you set "Standby Mode" (in "User") to "Low," the network control function will be able to "Low." You do not set "ECO Mode" to "ECO," or "Standby Mode" (in "User") to receive signals...
Operating Instructions
Page 26
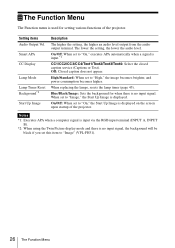
... Picture display mode and there is no input signal. The lower the setting, the lower the audio level. High/Standard: When set to "High," the image becomes brighter, and power consumption becomes higher. When replacing the lamps, resets the lamp timer (page 45). The Function Menu The Function menu is no input signal, the background will be black if you set to "Image," the Start Up Image is displayed on the screen upon startup of the projector. Setting items Audio...
... Picture display mode and there is no input signal. The lower the setting, the lower the audio level. High/Standard: When set to "High," the image becomes brighter, and power consumption becomes higher. When replacing the lamps, resets the lamp timer (page 45). The Function Menu The Function menu is no input signal, the background will be black if you set to "Image," the Start Up Image is displayed on the screen upon startup of the projector. Setting items Audio...
Operating Instructions
Page 27
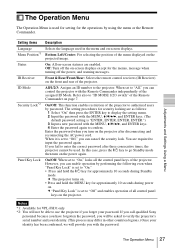
... projected image. ID Mode Security Lock*2 All/1/2/3: Assigns an ID number to "Off" and enables operation of all the control panel keys of the menu displayed on the projector. You are enabled. Notes *1: Available for VPL-FH31 only *2: You will provide you fail to confirm. Menu Position*1 Bottom Left/Center: For selecting the position of the projector. Adjustments and Settings Using a Menu The Operation Menu The Operation Menu is used for setting for the operations by password...
... projected image. ID Mode Security Lock*2 All/1/2/3: Assigns an ID number to "Off" and enables operation of all the control panel keys of the menu displayed on the projector. You are enabled. Notes *1: Available for VPL-FH31 only *2: You will provide you fail to confirm. Menu Position*1 Bottom Left/Center: For selecting the position of the projector. Adjustments and Settings Using a Menu The Operation Menu The Operation Menu is used for setting for the operations by password...

Operating Instructions
Page 28
... network and network control function cannot be operated while the projector is used for setting for about 10 minutes. The Connection/Power Menu The Connection/Power menu is in standby mode. 28 The Connection/Power Menu Manual: To specify the IP Address manually. In such a case, adjust it manually to suit to the connected equipment. *2: When "Standby Mode" is set to "On," you turn the power on the type of video signal input automatically when "Input-A" is selected with the INPUT key.*1 Color System Standby Mode*2 Auto/NTSC3...
... network and network control function cannot be operated while the projector is used for setting for about 10 minutes. The Connection/Power Menu The Connection/Power menu is in standby mode. 28 The Connection/Power Menu Manual: To specify the IP Address manually. In such a case, adjust it manually to suit to the connected equipment. *2: When "Standby Mode" is set to "On," you turn the power on the type of video signal input automatically when "Input-A" is selected with the INPUT key.*1 Color System Standby Mode*2 Auto/NTSC3...

Operating Instructions
Page 31
... the picture. Adjustments and Settings Using a Menu The Installation Menu 31 Setting items Panel Alignment*6 Color Matching*7 Description This feature allows you to adjust the gaps in "Adjust Color" can be changed. *7: The brightness and color of the projected image may not match completely, even after you adjust "Brightness" and "Color." Reset: The panel alignment settings are initialized to "On," "Screen Fitting" (HV Keystone/Warping) is not displayed. *4: Depending on the position adjusted with the lens shift...
... the picture. Adjustments and Settings Using a Menu The Installation Menu 31 Setting items Panel Alignment*6 Color Matching*7 Description This feature allows you to adjust the gaps in "Adjust Color" can be changed. *7: The brightness and color of the projected image may not match completely, even after you adjust "Brightness" and "Color." Reset: The panel alignment settings are initialized to "On," "Screen Fitting" (HV Keystone/Warping) is not displayed. *4: Depending on the position adjusted with the lens shift...

Operating Instructions
Page 40
... a case, replace the lamp with qualified Sony personnel. The projector's power is in abnormal status. Address the problem in accordance with the following . Symptoms are indicated by number of lamp is correctly selected. After checking that the ON/STANDBY indicator goes out, plug the power cord to cool then turn on . Flashes three times The temperature of flashes. B Others Indicators The indicators allow checking the status and notify you of abnormal operation of flashes. LAMP/COVER indicator Status Meaning/Remedies Flashes in...
... a case, replace the lamp with qualified Sony personnel. The projector's power is in abnormal status. Address the problem in accordance with the following . Symptoms are indicated by number of lamp is correctly selected. After checking that the ON/STANDBY indicator goes out, plug the power cord to cool then turn on . Flashes three times The temperature of flashes. B Others Indicators The indicators allow checking the status and notify you of abnormal operation of flashes. LAMP/COVER indicator Status Meaning/Remedies Flashes in...

Operating Instructions
Page 41
... 3, 29, 46 5 27 5, 14, 15, 17, 30, 30 Others Messages List 41 High Altitude Mode should be "On" if the projector is locked by the projector. Change the output setting of the connected equipment to the input signal. Message Meaning/Remedy High temp.! Messages List When any of the messages listed below appears on the projected image, address the problem in 1 min. Lamp off in accordance with a new one for signals supported by external control.
... 3, 29, 46 5 27 5, 14, 15, 17, 30, 30 Others Messages List 41 High Altitude Mode should be "On" if the projector is locked by the projector. Change the output setting of the connected equipment to the input signal. Message Meaning/Remedy High temp.! Messages List When any of the messages listed below appears on the projected image, address the problem in 1 min. Lamp off in accordance with a new one for signals supported by external control.
Operating Instructions
Page 42
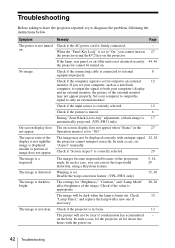
.... Operation menu is set to external 8 equipment properly. on . Symptom Remedy Page The power is not turned Check if the AC power cord is set for about two hours with the power on . on the lens. When the "Panel Key Lock" is firmly connected. - Check if the connecting cable is 17 automatically projected. (VPL-FH31 only) On-screen display does The on the projector. adjustment, a black image is connected to "On," you can correct the trapezoidal distortion, using...
.... Operation menu is set to external 8 equipment properly. on . Symptom Remedy Page The power is not turned Check if the AC power cord is set for about two hours with the power on . on the lens. When the "Panel Key Lock" is firmly connected. - Check if the connecting cable is 17 automatically projected. (VPL-FH31 only) On-screen display does The on the projector. adjustment, a black image is connected to "On," you can correct the trapezoidal distortion, using...
Operating Instructions
Page 44
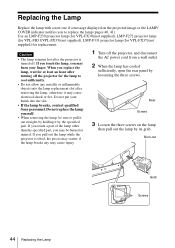
... hour after removing the lamp, otherwise it by the specified part. Replacing the Lamp Replace the lamp with a new one if a message displayed on the lamp then pull out the lamp by its grab. Use an LMP-F230 projector lamp (for VPL-FX30)(not supplied), LMP-F272 projector lamp (for VPL-FH31/VPL-FX35)(not supplied), LMP-F331 projector lamp (for VPL-FX37)(not supplied) for the lamp to pull it out straight, by holding it may cause injury. 1 Turn...
... hour after removing the lamp, otherwise it by the specified part. Replacing the Lamp Replace the lamp with a new one if a message displayed on the lamp then pull out the lamp by its grab. Use an LMP-F230 projector lamp (for VPL-FX30)(not supplied), LMP-F272 projector lamp (for VPL-FH31/VPL-FX35)(not supplied), LMP-F331 projector lamp (for VPL-FX37)(not supplied) for the lamp to pull it out straight, by holding it may cause injury. 1 Turn...

Operating Instructions
Page 45
....sony.com/ mercury 5 Close the rear panel and tighten the three screws. Note Be sure to applicable local, state/province and federal laws. New lamp grab Screws Disposal of the next replacement time. If not, the projector cannot be turned on. 6 Connect the AC power cord to reset the lamp timer. Select "Lamp Timer Reset" on the projector. 7 Reset the lamp timer for notification of the used lamp For the customers in place. Others Replacing the Lamp...
....sony.com/ mercury 5 Close the rear panel and tighten the three screws. Note Be sure to applicable local, state/province and federal laws. New lamp grab Screws Disposal of the next replacement time. If not, the projector cannot be turned on. 6 Connect the AC power cord to reset the lamp timer. Select "Lamp Timer Reset" on the projector. 7 Reset the lamp timer for notification of the used lamp For the customers in place. Others Replacing the Lamp...
Operating Instructions
Page 56
... oz) Projection Lens VPLL-Z3032*5: Manual focus/zoom (when attaching to this manual is required. Item Optional accessories*3 *4 Description VPL-FX37: Projector Lamp LMP-F331 (for replacement) VPL-FH31/VPL-FX35: Projection Lam LMP-F272 (for replacement) VPL-FX30: Projector Lamp LMP-F230 (for replacement) Projector Suspension Support PSS-610 Projection Lens VPLL-2007: Manual focus, Projected image size: 60" to 300" (1.52 m to the projector, the PK-F30LA1 projection lens adapter is current as of July 2015. *5: To attach the projection lens to...
... oz) Projection Lens VPLL-Z3032*5: Manual focus/zoom (when attaching to this manual is required. Item Optional accessories*3 *4 Description VPL-FX37: Projector Lamp LMP-F331 (for replacement) VPL-FH31/VPL-FX35: Projection Lam LMP-F272 (for replacement) VPL-FX30: Projector Lamp LMP-F230 (for replacement) Projector Suspension Support PSS-610 Projection Lens VPLL-2007: Manual focus, Projected image size: 60" to 300" (1.52 m to the projector, the PK-F30LA1 projection lens adapter is current as of July 2015. *5: To attach the projection lens to...

Operating Instructions
Page 69
... Focus ring 3 Freeze 6 Front feet (adjustable 3, 13 Front panel 3 Function menu 26 fV 32 G Gamma Mode 20 H H Keystone 30 High Altitude Mode 29, 30 Hue 20 I ID Mode 27 ID MODE 1/2/3 switch 7 Image Flip 29, 30 Information menu 32 Input 4 Input-A Signal Sel 28 Installation menu 29 IP Address 28 IP Address Setup 28 IR Receiver 27 K Keystone adjustment 14 L Lamp Mode 26 Lamp Timer 32 Lamp Timer Reset 26 LAMP/COVER indicator 3, 40 LAN terminal 4, 33 Language 27 Lens shift dial 3 Lens shift range 62, 64 Location...
... Focus ring 3 Freeze 6 Front feet (adjustable 3, 13 Front panel 3 Function menu 26 fV 32 G Gamma Mode 20 H H Keystone 30 High Altitude Mode 29, 30 Hue 20 I ID Mode 27 ID MODE 1/2/3 switch 7 Image Flip 29, 30 Information menu 32 Input 4 Input-A Signal Sel 28 Installation menu 29 IP Address 28 IP Address Setup 28 IR Receiver 27 K Keystone adjustment 14 L Lamp Mode 26 Lamp Timer 32 Lamp Timer Reset 26 LAMP/COVER indicator 3, 40 LAN terminal 4, 33 Language 27 Lens shift dial 3 Lens shift range 62, 64 Location...

Startup Guide - Multilingual
Page 27
... cloth. Failing to set "High Altitude Mode" to prevent internal temperature from the AC outlet before cleaning. • If you rub on the distance between the screen and the unit or the zooming magnifications. Never use solvent such as the elapse of time used as reducing the reliability of the screen should not be some noise. Otherwise, the air filter will be scratched. •...
... cloth. Failing to set "High Altitude Mode" to prevent internal temperature from the AC outlet before cleaning. • If you rub on the distance between the screen and the unit or the zooming magnifications. Never use solvent such as the elapse of time used as reducing the reliability of the screen should not be some noise. Otherwise, the air filter will be scratched. •...

Startup Guide - Multilingual
Page 28
... not light even before the specified replacement time. • It may occur. Since the login status remains in the Web browser, close the Web browser when you use multiple LCD projectors to project onto a screen, even if they are of the air conditioner. On LCD Projector The LCD projector is also recommended. • Do not browse any other website in adjusting temperature settings of the same model, the color...
... not light even before the specified replacement time. • It may occur. Since the login status remains in the Web browser, close the Web browser when you use multiple LCD projectors to project onto a screen, even if they are of the air conditioner. On LCD Projector The LCD projector is also recommended. • Do not browse any other website in adjusting temperature settings of the same model, the color...

Startup Guide - Multilingual
Page 35
... turned on the projector. Check the items below . Consult with a new one. Unplug the AC power cord from a wall outlet. In such a case, replace the lamp with qualified Sony personnel. LAMP/COVER indicator Status Meaning/Remedies Flashes in abnormal status. Indicators The indicators allow checking the status and notify you of abnormal operation of flashes. Symptoms are not attached securely. Address the problem in accordance with qualified Sony personnel. Flashes three times The temperature of flashes. Indicators 15 GB Address...
... turned on the projector. Check the items below . Consult with a new one. Unplug the AC power cord from a wall outlet. In such a case, replace the lamp with qualified Sony personnel. LAMP/COVER indicator Status Meaning/Remedies Flashes in abnormal status. Indicators The indicators allow checking the status and notify you of abnormal operation of flashes. Symptoms are not attached securely. Address the problem in accordance with qualified Sony personnel. Flashes three times The temperature of flashes. Indicators 15 GB Address...
Startup Guide - Multilingual
Page 36
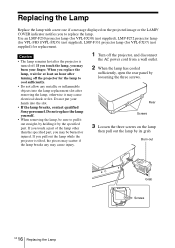
When you replace the lamp, wait for at least an hour after turning off the projector for replacement. Burn-out Grab Screws GB 16 Replacing the Lamp Rear Screws 3 Loosen the three screws on the projected image or the LAMP/ COVER indicator notifies you pull out the lamp while the projector is turned off the projector, and disconnect the AC power cord from a wall outlet. 2 When the lamp has cooled sufficiently, open the rear panel by...
When you replace the lamp, wait for at least an hour after turning off the projector for replacement. Burn-out Grab Screws GB 16 Replacing the Lamp Rear Screws 3 Loosen the three screws on the projected image or the LAMP/ COVER indicator notifies you pull out the lamp while the projector is turned off the projector, and disconnect the AC power cord from a wall outlet. 2 When the lamp has cooled sufficiently, open the rear panel by...

Startup Guide - Multilingual
Page 37
... turned on. 6 Connect the AC power cord to install the lamp and rear panel securely as it is securely in the U.S.A. 4 Insert the new lamp all the way in until it was. Tighten the three screws. New lamp grab Screws Disposal of the next replacement time. Note Be sure to a wall outlet and turn on the Function menu then press the ENTER key. Select "Lamp Timer Reset" on the projector. 7 Reset the lamp timer...
... turned on. 6 Connect the AC power cord to install the lamp and rear panel securely as it is securely in the U.S.A. 4 Insert the new lamp all the way in until it was. Tighten the three screws. New lamp grab Screws Disposal of the next replacement time. Note Be sure to a wall outlet and turn on the Function menu then press the ENTER key. Select "Lamp Timer Reset" on the projector. 7 Reset the lamp timer...

Users Guide
Page 4
..., USB cable (when using a USB to RS-232C conversion cable to connect the projectors) • RS-232C serial interface, 9-pin D-Sub cross (reverse) cable (when using an RS-232C cable to connect the projectors) • Network/LAN connector, LAN cable (when using a LAN cable to the overlapping areas between the images (i.e., blend areas). This software is not guaranteed on your computer beforehand as follows. The [Start] menu appears. 2 Click [Control Panel] in the installer screen. Computer A computer that support...
..., USB cable (when using a USB to RS-232C conversion cable to connect the projectors) • RS-232C serial interface, 9-pin D-Sub cross (reverse) cable (when using an RS-232C cable to connect the projectors) • Network/LAN connector, LAN cable (when using a LAN cable to the overlapping areas between the images (i.e., blend areas). This software is not guaranteed on your computer beforehand as follows. The [Start] menu appears. 2 Click [Control Panel] in the installer screen. Computer A computer that support...


