Operating Instructions
Page 2
... Projected Image 17 Turning Off the Power 22 Adjustments and Settings Using a Menu Using a MENU 23 The Picture Menu 24 The Screen Menu 25 The Function Menu 29 The Operation Menu 30 The Connection/Power Menu ...........31 The Installation Menu 34 The Information Menu 35 Network Using Network Features 36 Displaying the Control Window of the Projector with a Web Browser 36 Confirming the Information regarding the Projector 37 Operating the Projector from a Computer 38 Using the e-mail report Function 38 Setting the LAN Network of the projector 39 Setting...
... Projected Image 17 Turning Off the Power 22 Adjustments and Settings Using a Menu Using a MENU 23 The Picture Menu 24 The Screen Menu 25 The Function Menu 29 The Operation Menu 30 The Connection/Power Menu ...........31 The Installation Menu 34 The Information Menu 35 Network Using Network Features 36 Displaying the Control Window of the Projector with a Web Browser 36 Confirming the Information regarding the Projector 37 Operating the Projector from a Computer 38 Using the e-mail report Function 38 Setting the LAN Network of the projector 39 Setting...
Operating Instructions
Page 8
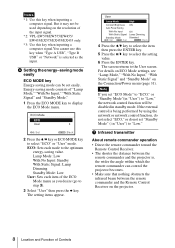
... on ECO Mode settings, see "Lamp Mode," "With No Input," "With Static Signal" and "Standby Mode" on the projector. 8 Location and Function of the input signal. *2: VPL-EW578/EW575/EW455/ EW435/EX575/EX455/EX435 only. *3: Use this key when inputting a computer signal.You cannot use this key when inputting a computer signal. The screen returns to select the setting value. 6 Press the ENTER key. g Infrared transmitter About remote commander operation • Direct the remote commander toward the Remote Control Receiver...
... on ECO Mode settings, see "Lamp Mode," "With No Input," "With Static Signal" and "Standby Mode" on the projector. 8 Location and Function of the input signal. *2: VPL-EW578/EW575/EW455/ EW435/EX575/EX455/EX435 only. *3: Use this key when inputting a computer signal.You cannot use this key when inputting a computer signal. The screen returns to select the setting value. 6 Press the ENTER key. g Infrared transmitter About remote commander operation • Direct the remote commander toward the Remote Control Receiver...
Operating Instructions
Page 19
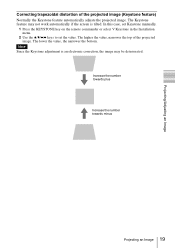
In this case, set Keystone manually. 1 Press the KEYSTONE key on the remote commander or select V Keystone in the Installation menu. 2 Use the V/v/B/b keys to set the value. Note Since the Keystone adjustment is tilted. Increase the number towards plus Increase the number towards minus Projecting an Image 19 The higher the value, narrower the top of the projected image (Keystone feature) Normally the Keystone feature automatically adjusts the projected image. The lower the value...
In this case, set Keystone manually. 1 Press the KEYSTONE key on the remote commander or select V Keystone in the Installation menu. 2 Use the V/v/B/b keys to set the value. Note Since the Keystone adjustment is tilted. Increase the number towards plus Increase the number towards minus Projecting an Image 19 The higher the value, narrower the top of the projected image (Keystone feature) Normally the Keystone feature automatically adjusts the projected image. The lower the value...
Operating Instructions
Page 31
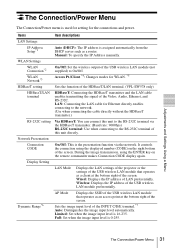
... Changes modes for the connections and power. Adjustments and Settings Using a Menu The Connection/Power Menu The Connection/Power menu is 16-235. Manual: To specify the IP Address manually. WLAN Settings WLAN Connection*2 WLAN Network*3 On/Off: Set the wireless output of the USB wireless LAN module preferentially. Wireless: Displays the IP address of the USB wireless LAN module (not supplied) to the RS-232C terminal of the screen. Sets the image input level of LAN preferentially. During the image transmission, using the displayed number (CODE) on the remote commander...
... Changes modes for the connections and power. Adjustments and Settings Using a Menu The Connection/Power Menu The Connection/Power menu is 16-235. Manual: To specify the IP Address manually. WLAN Settings WLAN Connection*2 WLAN Network*3 On/Off: Set the wireless output of the USB wireless LAN module preferentially. Wireless: Displays the IP address of the USB wireless LAN module (not supplied) to the RS-232C terminal of the screen. Sets the image input level of LAN preferentially. During the image transmission, using the displayed number (CODE) on the remote commander...
Operating Instructions
Page 32
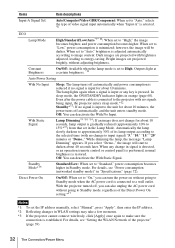
... set to High. Bright images are projected with brightness adjusted, leading to "Auto," selects the type of the projector" (page 39). 32 The Connection/Power Menu The lamp lights again when a signal is input or any change in WLAN settings may take a few moments. *3: If the projector cannot connect wirelessly, click [Apply] once again to "On," you can also unplug the AC power cord without adjusting brightness. In sleep mode, the ON/STANDBY indicator lights in Standby mode...
... set to High. Bright images are projected with brightness adjusted, leading to "Auto," selects the type of the projector" (page 39). 32 The Connection/Power Menu The lamp lights again when a signal is input or any change in WLAN settings may take a few moments. *3: If the projector cannot connect wirelessly, click [Apply] once again to "On," you can also unplug the AC power cord without adjusting brightness. In sleep mode, the ON/STANDBY indicator lights in Standby mode...
Operating Instructions
Page 33
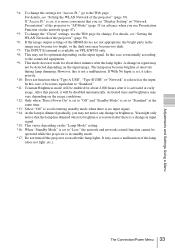
... projector" (page 39). Adjustments and Settings Using a Menu *4: To change . In this period, it is in the image may become too bright, or the dark ones may become brighter at early usage. It may vary depending on the "Lamp Mode" setting. *16: When "Standby Mode" is set "Display Setting" in "Network Presentation" of the HDMI device are not appropriate, the bright parts in standby mode. *17: Do not turn off the projector...
... projector" (page 39). Adjustments and Settings Using a Menu *4: To change . In this period, it is in the image may become too bright, or the dark ones may become brighter at early usage. It may vary depending on the "Lamp Mode" setting. *16: When "Standby Mode" is set "Display Setting" in "Network Presentation" of the HDMI device are not appropriate, the bright parts in standby mode. *17: Do not turn off the projector...

Operating Instructions
Page 42
... Setup page. Advanced Menu button 2 Click on the [Input Label] and open the Setup page. You can input up page. Input Terminal Label Display Screen Setting the Control Protocol of the Projector Change the settings for the input terminals that you click on [Apply]. 1 Click on the Set up to change and input the label name. Clear the check box for the input terminal Use the factory default setting 3 Click the [Apply] button to open the Input label setting window...
... Setup page. Advanced Menu button 2 Click on the [Input Label] and open the Setup page. You can input up page. Input Terminal Label Display Screen Setting the Control Protocol of the Projector Change the settings for the input terminals that you click on [Apply]. 1 Click on the Set up to change and input the label name. Clear the check box for the input terminal Use the factory default setting 3 Click the [Apply] button to open the Input label setting window...

Operating Instructions
Page 47
...." For a wired connection, connect the projector by a LAN cable, then make the network settings. Also check "WLAN Settings" (page 31). 2 Turn on -screen instructions to install the software. B Presentation Function via Network Using Presentation Function via Network The Presentation Function via Network enables you do the following: • Connect a maximum of eight computers to the projector. • Project images from a maximum of four computers simultaneously. • Connecting a USB wireless LAN module (not supplied) to the projector as an...
...." For a wired connection, connect the projector by a LAN cable, then make the network settings. Also check "WLAN Settings" (page 31). 2 Turn on -screen instructions to install the software. B Presentation Function via Network Using Presentation Function via Network The Presentation Function via Network enables you do the following: • Connect a maximum of eight computers to the projector. • Project images from a maximum of four computers simultaneously. • Connecting a USB wireless LAN module (not supplied) to the projector as an...
Operating Instructions
Page 48
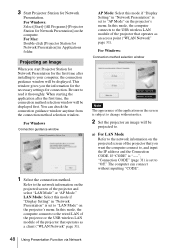
... set to "LAN Mode" on the screen is subject to change without inputting "CODE". 48 Using Presentation Function via Network The computer can check the connection guidance window anytime from the connection method selection window. 3 Start Projector Station for Network Presentation] in Applications folder. Projecting an Image When you the information for the necessary settings for connection. For Windows: Connection method selection window Note The appearance of the application on the projector's menu. This window gives you start Projector...
... set to "LAN Mode" on the screen is subject to change without inputting "CODE". 48 Using Presentation Function via Network The computer can check the connection guidance window anytime from the connection method selection window. 3 Start Projector Station for Network Presentation] in Applications folder. Projecting an Image When you the information for the necessary settings for connection. For Windows: Connection method selection window Note The appearance of the application on the projector's menu. This window gives you start Projector...
Operating Instructions
Page 49
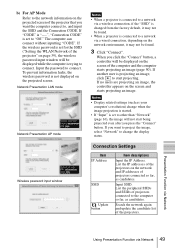
... want the computer connect to change when the image projection is started. • If "Input" is set to "Off." Connection Settings Item IP Address SSID Update button Item descriptions Input the IP Address. To prevent information leaks, the wireless password is trying to connect. Notes • Display related settings (such as candidates. Network Presentation LAN mode Network Presentation AP mode Wireless password input window Notes • When a projector is connected to a network via a wireless connection, if the "SSID" is changed from the factory default, it may...
... want the computer connect to change when the image projection is started. • If "Input" is set to "Off." Connection Settings Item IP Address SSID Update button Item descriptions Input the IP Address. To prevent information leaks, the wireless password is trying to connect. Notes • Display related settings (such as candidates. Network Presentation LAN mode Network Presentation AP mode Wireless password input window Notes • When a projector is connected to a network via a wireless connection, if the "SSID" is changed from the factory default, it may...

Operating Instructions
Page 50
... projecting an image. Project in the lower left half of users connected to create a shortcut that is unnecessary. Change the application settings. Items Projection method CODE Functions Not projecting an image. For Windows Create a shortcut to "Plain Text." 50 Using Presentation Function via Network Project in the left quadrant of the screen. Display the Connection CODE of the screen. Input the Connection CODE displayed on the screen of the wireless signal. Display the strength of the projector. For Mac Create...
... projecting an image. Project in the lower left half of users connected to create a shortcut that is unnecessary. Change the application settings. Items Projection method CODE Functions Not projecting an image. For Windows Create a shortcut to "Plain Text." 50 Using Presentation Function via Network Project in the left quadrant of the screen. Display the Connection CODE of the screen. Input the Connection CODE displayed on the screen of the wireless signal. Display the strength of the projector. For Mac Create...

Operating Instructions
Page 51
... up menu. You need to start projecting an image with the controller. 1:Displays an image when the computer starts projecting an image. *1: "Access Pt. (Auto)" can be selected on : Displays the dialogues for the settings of the projector that you want the computer to connect to . For Mac Input the settings of the projector. connect [IP address]:[CODE]:[Display Setting] For AP Mode - wifi [SSID]:[Wireless password]: [CODE]:[Display Setting] Item Description IP address Assign the IP address of "Access Pt. (Auto)." For Windows...
... up menu. You need to start projecting an image with the controller. 1:Displays an image when the computer starts projecting an image. *1: "Access Pt. (Auto)" can be selected on : Displays the dialogues for the settings of the projector that you want the computer to connect to . For Mac Input the settings of the projector. connect [IP address]:[CODE]:[Display Setting] For AP Mode - wifi [SSID]:[Wireless password]: [CODE]:[Display Setting] Item Description IP address Assign the IP address of "Access Pt. (Auto)." For Windows...
Operating Instructions
Page 61
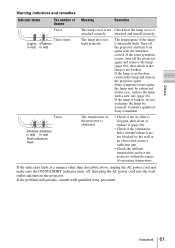
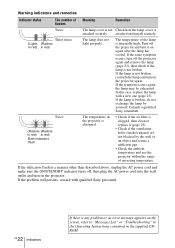
..., replace the lamp with qualified Sony personnel. If the lamp is attached securely. Others Warning indicators and remedies Indicator status The number of Meaning flashes Remedies Twice Three times (Lights (Flashes in red) in red) Twice (Flashes (Flashes in red) in red) Both indicators flash The lamp cover is not Check how the lamp cover is broken, do not exchange the lamp by the wall or an object and secure a sufficient gap. • Check the ambient temperature and use the projector...
..., replace the lamp with qualified Sony personnel. If the lamp is attached securely. Others Warning indicators and remedies Indicator status The number of Meaning flashes Remedies Twice Three times (Lights (Flashes in red) in red) Twice (Flashes (Flashes in red) in red) Both indicators flash The lamp cover is not Check how the lamp cover is broken, do not exchange the lamp by the wall or an object and secure a sufficient gap. • Check the ambient temperature and use the projector...

Operating Instructions
Page 62
.../LAN connector" depending on the power until you turn on the HDBaseT/ 31 Settings. (VPL-EW578 LAN connection. Please clean the filter. Change the output setting of 1,500 m or higher, check the items below . message appears whenever you replace the lamp and reset the lamp timer. 66, 68 Projector temperature is set . Invalid key was pressed and the projector lamp will return to the on the projected image, address the problem in signal is detected, or an operation (remote control or control panel...
.../LAN connector" depending on the power until you turn on the HDBaseT/ 31 Settings. (VPL-EW578 LAN connection. Please clean the filter. Change the output setting of 1,500 m or higher, check the items below . message appears whenever you replace the lamp and reset the lamp timer. 66, 68 Projector temperature is set . Invalid key was pressed and the projector lamp will return to the on the projected image, address the problem in signal is detected, or an operation (remote control or control panel...

Operating Instructions
Page 63
... "Manual" to only an external monitor. In this case, set "V Keystone" manually. Set "V Keystone" to "Auto" or "Manual" to set your computer to output to 34 set "Aspect" manually. 27 The image is running. on the projector. Check if the USB memory device connected to "Off." No image. Operation menu is set to the projector is displayed smaller /a portion of image does not appear. When the "Control Key Lock" is set to diagnose the problem, following the instructions...
... "Manual" to only an external monitor. In this case, set "V Keystone" manually. Set "V Keystone" to "Auto" or "Manual" to set your computer to output to 34 set "Aspect" manually. 27 The image is running. on the projector. Check if the USB memory device connected to "Off." No image. Operation menu is set to the projector is displayed smaller /a portion of image does not appear. When the "Control Key Lock" is set to diagnose the problem, following the instructions...

Operating Instructions
Page 64
... audio equipment are installed correctly. - "With Static Signal" is dimmed to reduce power 32 consumption. The image is noisy. If the ventilation holes are blocked, the internal temperature of the 31 lamp changes according to minimum. 7, 29 The remote commander Check if the batteries are securely connected. Remedy The settings for a long time, brightness may - Check "Lamp Timer," and replace the lamp with the power on the lens. When video signal is not input...
... audio equipment are installed correctly. - "With Static Signal" is dimmed to reduce power 32 consumption. The image is noisy. If the ventilation holes are blocked, the internal temperature of the 31 lamp changes according to minimum. 7, 29 The remote commander Check if the batteries are securely connected. Remedy The settings for a long time, brightness may - Check "Lamp Timer," and replace the lamp with the power on the lens. When video signal is not input...
Quick Reference Manual
Page 29
... replaced. To avoid electrical shock, do not connect the connector for a Class A digital device, pursuant to rain or moisture. Operation is supplied for ceiling mount installation. Installing batteries One lithium battery (CR2025) is subject to the following two conditions: (1) This device may cause harmful interference to cause harmful interference in accordance with Sony qualified personnel for the RM-PJ8 Remote Commander. Before operating...
... replaced. To avoid electrical shock, do not connect the connector for a Class A digital device, pursuant to rain or moisture. Operation is supplied for ceiling mount installation. Installing batteries One lithium battery (CR2025) is subject to the following two conditions: (1) This device may cause harmful interference to cause harmful interference in accordance with Sony qualified personnel for the RM-PJ8 Remote Commander. Before operating...

Quick Reference Manual
Page 34
... mode when using a screen with water. A high-pressure mercury lamp has the following characteristics: • Brightness of the lamp will become unlit and may break with a loud noise as reducing the reliability of certain components. • Set "Installation Attitude" on the distance between the screen and the unit or the zooming magnifications. Never use ; On Fan Since the projector is not a malfunction. Otherwise, the air filter...
... mode when using a screen with water. A high-pressure mercury lamp has the following characteristics: • Brightness of the lamp will become unlit and may break with a loud noise as reducing the reliability of certain components. • Set "Installation Attitude" on the distance between the screen and the unit or the zooming magnifications. Never use ; On Fan Since the projector is not a malfunction. Otherwise, the air filter...
Quick Reference Manual
Page 35
... Control window via a Web browser and change the access limitation settings from a cold to shocks, or fall. On Condensation If the room temperature where the projector is installed changes rapidly, or if the projector is moved suddenly from the factory preset values. When connecting the unit to the network, be sure to confirm that continuously appear on the projected image, even if the lamp normally lights...
... Control window via a Web browser and change the access limitation settings from a cold to shocks, or fall. On Condensation If the room temperature where the projector is installed changes rapidly, or if the projector is moved suddenly from the factory preset values. When connecting the unit to the network, be sure to confirm that continuously appear on the projected image, even if the lamp normally lights...
Quick Reference Manual
Page 48
... "Troubleshooting" in the Operating Instructions contained in the supplied CDROM. In this case, replace the lamp with qualified Sony personnel. Consult a qualified Sony consultant. If the same symptom occurs, turn off , then plug the AC power cord into the wall outlet and turn on the projector. If the problem still persists, consult with a new one (page 23). If the indicators flash in red) Both indicators flash Meaning Remedies The lamp cover is...
... "Troubleshooting" in the Operating Instructions contained in the supplied CDROM. In this case, replace the lamp with qualified Sony personnel. Consult a qualified Sony consultant. If the same symptom occurs, turn off , then plug the AC power cord into the wall outlet and turn on the projector. If the problem still persists, consult with a new one (page 23). If the indicators flash in red) Both indicators flash Meaning Remedies The lamp cover is...


