Operating Instructions
Page 2
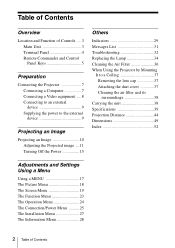
... Indicators 29 Messages List 31 Troubleshooting 32 Replacing the Lamp 34 Cleaning the Air Filter 36 When Using the Projector by Mounting It to a Ceiling 37 Removing the lens cap 37 Attaching the dust cover 37 Cleaning the air filter and its surroundings 38 Carrying the unit 38 Specifications 39 Projection Distance 44 Dimensions 49 Index 52 Adjustments and Settings Using a Menu Using a MENU 17 The Picture Menu 18 The Screen Menu 19 The Function Menu 23 The Operation Menu 24 The Connection/Power Menu .......... 25 The Installation Menu...
... Indicators 29 Messages List 31 Troubleshooting 32 Replacing the Lamp 34 Cleaning the Air Filter 36 When Using the Projector by Mounting It to a Ceiling 37 Removing the lens cap 37 Attaching the dust cover 37 Cleaning the air filter and its surroundings 38 Carrying the unit 38 Specifications 39 Projection Distance 44 Dimensions 49 Index 52 Adjustments and Settings Using a Menu Using a MENU 17 The Picture Menu 18 The Screen Menu 19 The Function Menu 23 The Operation Menu 24 The Connection/Power Menu .......... 25 The Installation Menu...

Operating Instructions
Page 5
... to change the enlargement ratio. FREEZE key*2 Pauses a projected image. key repeatedly to restore the previous image. The image can be used depending on the resolution of Controls 5 BLANK key Cuts off the projected image temporarily. MUTING key Mutes the audio output temporarily. key Adjusts the volume output. Overview Remote Commander and Control Panel Keys Remote Commander 4 2 3 4 INPUT APA ECO MODE MENU RESET ENTER RETURN ASPECT KEYSTONE PATTERN BLANK D ZOOM VOLUME FREEZE MUTING 7 1 6 5 Control Panel Keys a Turning...
... to change the enlargement ratio. FREEZE key*2 Pauses a projected image. key repeatedly to restore the previous image. The image can be used depending on the resolution of Controls 5 BLANK key Cuts off the projected image temporarily. MUTING key Mutes the audio output temporarily. key Adjusts the volume output. Overview Remote Commander and Control Panel Keys Remote Commander 4 2 3 4 INPUT APA ECO MODE MENU RESET ENTER RETURN ASPECT KEYSTONE PATTERN BLANK D ZOOM VOLUME FREEZE MUTING 7 1 6 5 Control Panel Keys a Turning...
Operating Instructions
Page 6
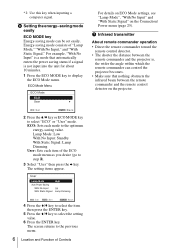
... "ECO" or "User" mode. The screen returns to the optimum energy-saving value. ECO: Sets each item of "Lamp Mode," "With No Input," and "With Static Signal." g Infrared transmitter About remote commander operation • Direct the remote commander toward the remote control detector. • The shorter the distance between the remote commander and the remote control detector on the Connection/ Power menu (page 25). For example, "With No Input" is not input into the unit...
... "ECO" or "User" mode. The screen returns to the optimum energy-saving value. ECO: Sets each item of "Lamp Mode," "With No Input," and "With Static Signal." g Infrared transmitter About remote commander operation • Direct the remote commander toward the remote control detector. • The shorter the distance between the remote commander and the remote control detector on the Connection/ Power menu (page 25). For example, "With No Input" is not input into the unit...
Operating Instructions
Page 14
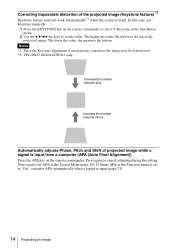
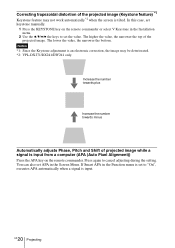
... projected image. Press again to "On", executes APA automatically when a signal is an electronic correction, the image may not work automatically*2 when the screen is input from a computer (APA (Auto Pixel Alignment)) Press the APA key on the remote commander or select V Keystone in the Installation menu. 2 Use the V/v/B/b the keys to set to cancel adjusting during the setting. Notes *1: Since the Keystone adjustment is input (page 23). 14 Projecting an Image...
... projected image. Press again to "On", executes APA automatically when a signal is an electronic correction, the image may not work automatically*2 when the screen is input from a computer (APA (Auto Pixel Alignment)) Press the APA key on the remote commander or select V Keystone in the Installation menu. 2 Use the V/v/B/b the keys to set to cancel adjusting during the setting. Notes *1: Since the Keystone adjustment is input (page 23). 14 Projecting an Image...
Operating Instructions
Page 15
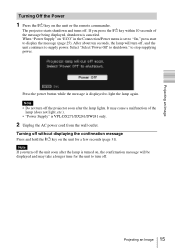
... after the lamp lights. If you turn off. Projecting an Image Turning Off the Power 1 Press the ?/1 key on , the confirmation message will turn off the projector soon after the lamp is turned on the unit or the remote commander. After about ten seconds, the lamp will be displayed and may cause a malfunction of the message being displayed, shutdown is VPL-DX271/DX241/DW241 only. 2 Unplug the AC power cord from the...
... after the lamp lights. If you turn off. Projecting an Image Turning Off the Power 1 Press the ?/1 key on , the confirmation message will turn off the projector soon after the lamp is turned on the unit or the remote commander. After about ten seconds, the lamp will be displayed and may cause a malfunction of the message being displayed, shutdown is VPL-DX271/DX241/DW241 only. 2 Unplug the AC power cord from the...
Operating Instructions
Page 24
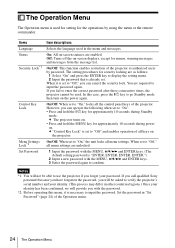
... on-screen statuses are unlocked. 1 Input the password with the MENU, V/v/B/b and ENTER keys. 3 Enter the password again to confirm. Set the password in the menu and messages. On/Off: This function enables restriction of the projector to authorized users by using the menu or the remote commander. The Operation Menu The Operation menu is set to "Off" and enables operation of all keys on the projector. Items Language Status Security Lock*1 Control Key Lock Menu Settings Lock*2 Set Password Item descriptions...
... on-screen statuses are unlocked. 1 Input the password with the MENU, V/v/B/b and ENTER keys. 3 Enter the password again to confirm. Set the password in the menu and messages. On/Off: This function enables restriction of the projector to authorized users by using the menu or the remote commander. The Operation Menu The Operation menu is set to "Off" and enables operation of all keys on the projector. Items Language Status Security Lock*1 Control Key Lock Menu Settings Lock*2 Set Password Item descriptions...
Operating Instructions
Page 25
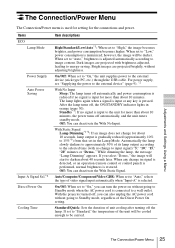
... power supply, see "Supplying the power to Standby mode, regardless of the unit will be cooled enough to image content. If set to "Auto," brightness is adjusted automatically according to be carried. The lamp lights again when a signal is input or any change for more than about 10 minutes, the power turns off , the ON/STANDBY indicator lights in the Lamp Mode. Off: You can deactivate the With No Input. Adjustments and Settings Using a Menu The Connection/Power Menu The Connection/Power menu...
... power supply, see "Supplying the power to Standby mode, regardless of the unit will be cooled enough to image content. If set to "Auto," brightness is adjusted automatically according to be carried. The lamp lights again when a signal is input or any change for more than about 10 minutes, the power turns off , the ON/STANDBY indicator lights in the Lamp Mode. Off: You can deactivate the With No Input. Adjustments and Settings Using a Menu The Connection/Power Menu The Connection/Power menu...
Operating Instructions
Page 29
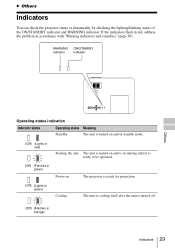
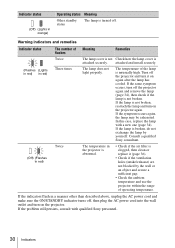
... the indicators flash in red, address the problem in orange) Indicators 29 WARNING ON/STANDBY indicator indicator Others Operating status indication Indicator status Operating status Meaning Standby The unit is turned on and in standby mode. (Off) (Lights in red) Starting the unit The unit is turned on and is in starting until it is ready to be operated. (Off) (Flashes in green) Power on The projector is ready for projection. (Off) (Lights in green) Cooling The unit is cooling itself after the unit is turned...
... the indicators flash in red, address the problem in orange) Indicators 29 WARNING ON/STANDBY indicator indicator Others Operating status indication Indicator status Operating status Meaning Standby The unit is turned on and in standby mode. (Off) (Lights in red) Starting the unit The unit is turned on and is in starting until it is ready to be operated. (Off) (Flashes in green) Power on The projector is ready for projection. (Off) (Lights in green) Cooling The unit is cooling itself after the unit is turned...
Operating Instructions
Page 30
...; Check if the air filter is clogged, then clean or replace it on the projector. If the indicators flash in red) The lamp cover is not Check how the lamp cover is not broken. Warning indicators and remedies Indicator status The number of Meaning flashes Remedies Twice (Flashes (Lights in red) in red) Three times Twice (Off) (Flashes in a manner other than described above, unplug the AC power cord and make sure the ON/STANDBY indicator turns off the projector and turn it...
...; Check if the air filter is clogged, then clean or replace it on the projector. If the indicators flash in red) The lamp cover is not Check how the lamp cover is not broken. Warning indicators and remedies Indicator status The number of Meaning flashes Remedies Twice (Flashes (Lights in red) in red) Three times Twice (Off) (Flashes in a manner other than described above, unplug the AC power cord and make sure the ON/STANDBY indicator turns off the projector and turn it...

Operating Instructions
Page 31
... an operation (remote control or control panel) is performed, normal brightness is out of the messages listed below . Please check Input-A Set "Input-A Signal Sel." To cancel shutdown, press the ?/1 key again (the Press ?/1 Key to the input signal. Clean the air filter. 36 Please replace the Lamp Replace the lamp with the table below appears on the projected image, address the problem in 1 min. message appears whenever you replace the lamp and reset the lamp timer. 34, 36 High temp.! type...
... an operation (remote control or control panel) is performed, normal brightness is out of the messages listed below . Please check Input-A Set "Input-A Signal Sel." To cancel shutdown, press the ?/1 key again (the Press ?/1 Key to the input signal. Clean the air filter. 36 Please replace the Lamp Replace the lamp with the table below appears on the projected image, address the problem in 1 min. message appears whenever you replace the lamp and reset the lamp timer. 34, 36 High temp.! type...

Operating Instructions
Page 32
... not work properly. The images become trapezoidal because of the display is not right/the image is a trapezoid. Troubleshooting Before asking to have the projector repaired, try to an external 10 monitor only. Check the computer signal is installed on the projector using a Keystone feature. The image may not display correctly because the input signal 5, 19, cannot be displayed properly. When the "Control Key Lock" is set to "Off." Operation menu is set to...
... not work properly. The images become trapezoidal because of the display is not right/the image is a trapezoid. Troubleshooting Before asking to have the projector repaired, try to an external 10 monitor only. Check the computer signal is installed on the projector using a Keystone feature. The image may not display correctly because the input signal 5, 19, cannot be displayed properly. When the "Control Key Lock" is set to "Off." Operation menu is set to...

Operating Instructions
Page 33
... projector rises and the fan noise becomes larger. • Check if the air filter is not malfunction. Check "Lamp Timer," and replace the lamp with the power on the lens. power consumption. darker or brighter. The sound from the fan is used in focus. 11 The picture will be clear if condensation has accumulated - When the "Lamp Mode" is set to "High." • The unit is often greater than normal to the input image. "High...
... projector rises and the fan noise becomes larger. • Check if the air filter is not malfunction. Check "Lamp Timer," and replace the lamp with the power on the lens. power consumption. darker or brighter. The sound from the fan is used in focus. 11 The picture will be clear if condensation has accumulated - When the "Lamp Mode" is set to "High." • The unit is often greater than normal to the input image. "High...

Operating Instructions
Page 34
...; When changing the lamp, set "Cooling Time" to "Standard" before turning off . If you pull out the lamp while the projector is turned off the unit (page 25). • If the lamp breaks, contact qualified Sony personnel. When you may burn your hands into the lamp replacement slot after removing the lamp, otherwise it out straight, by loosening one if a message displayed on the projected image (page 31...
...; When changing the lamp, set "Cooling Time" to "Standard" before turning off . If you pull out the lamp while the projector is turned off the unit (page 25). • If the lamp breaks, contact qualified Sony personnel. When you may burn your hands into the lamp replacement slot after removing the lamp, otherwise it out straight, by loosening one if a message displayed on the projected image (page 31...

Operating Instructions
Page 52
... input signal 43 Adjust Signal 20 Air filter cover/Ventilation holes (intake 3 APA 5 Aspect 5, 19, 21 Audio muting 5 B Brightness 18 C CC Display 23 Cleaning the Air Filter 36 Color 18 Color Temp 18 Connecting a computer 7 Connecting a Video equipment 8 Connection/Power Menu 25 Contrast 18 Control Key Lock 24 Control Panel Keys 5 Correcting trapezoidal distortion of the projected image (Keystone feature 5, 14 D Digital Zoom 5 Dust cover 37 E ECO MODE (Energy-saving mode) ......... 6 F fH 28 Focus 11 Focus ring 3 Foot adjust button 3, 13 Freeze 5 Front foot (adjustable...
... input signal 43 Adjust Signal 20 Air filter cover/Ventilation holes (intake 3 APA 5 Aspect 5, 19, 21 Audio muting 5 B Brightness 18 C CC Display 23 Cleaning the Air Filter 36 Color 18 Color Temp 18 Connecting a computer 7 Connecting a Video equipment 8 Connection/Power Menu 25 Contrast 18 Control Key Lock 24 Control Panel Keys 5 Correcting trapezoidal distortion of the projected image (Keystone feature 5, 14 D Digital Zoom 5 Dust cover 37 E ECO MODE (Energy-saving mode) ......... 6 F fH 28 Focus 11 Focus ring 3 Foot adjust button 3, 13 Freeze 5 Front foot (adjustable...
Startup Guide
Page 35
... located on the use a lithium battery (CR2025). Refer servicing to the proper ratings (Voltage, Ampere). WARNING 1 Use the approved Power Cord (3-core mains lead) / Appliance Connector / Plug with the instructions, may cause harmful interference to which can radiate radio frequency energy and, if not installed and used to connect peripherals must obey the law in this manual could void your authority to operate...
... located on the use a lithium battery (CR2025). Refer servicing to the proper ratings (Voltage, Ampere). WARNING 1 Use the approved Power Cord (3-core mains lead) / Appliance Connector / Plug with the instructions, may cause harmful interference to which can radiate radio frequency energy and, if not installed and used to connect peripherals must obey the law in this manual could void your authority to operate...

Startup Guide
Page 40
... the projected image, even if the lamp normally lights. Replace the lamp with a soft cloth. Never use solvent such as alcohol, benzene or thinner, or acid, alkaline or abrasive detergent, or a chemical cleaning cloth. • On cleaning the cabinet: Clean the cabinet gently with a new one as soon as possible if a message displayed on the distance between the screen and the unit or the zooming magnifications...
... the projected image, even if the lamp normally lights. Replace the lamp with a soft cloth. Never use solvent such as alcohol, benzene or thinner, or acid, alkaline or abrasive detergent, or a chemical cleaning cloth. • On cleaning the cabinet: Clean the cabinet gently with a new one as soon as possible if a message displayed on the distance between the screen and the unit or the zooming magnifications...
Startup Guide
Page 52
... the remote commander or select V Keystone in the Screen Menu. In this case, set APA in the Installation menu. 2 Use the V/v/B/b the keys to set to cancel adjusting during the setting. You can also set keystone manually. 1 Press the KEYSTONE key on the remote commander. GB 20 Projecting Correcting trapezoidal distortion of the projected image (Keystone feature) *1 Keystone feature may not work automatically*2 when the screen is an electronic correction, the image may be deteriorated. *2: VPL-DX271/DX241...
... the remote commander or select V Keystone in the Screen Menu. In this case, set APA in the Installation menu. 2 Use the V/v/B/b the keys to set to cancel adjusting during the setting. You can also set keystone manually. 1 Press the KEYSTONE key on the remote commander. GB 20 Projecting Correcting trapezoidal distortion of the projected image (Keystone feature) *1 Keystone feature may not work automatically*2 when the screen is an electronic correction, the image may be deteriorated. *2: VPL-DX271/DX241...

Startup Guide
Page 53
... the remote commander. The projector starts shutdown and turns off. Note • Do not turn off the projector soon after the lamp is set to "On," press start to supply power. Select "Select 'Power Off' to stop supplying power. If you turn off, and the unit continues to display the message. Note If you press the ?/1 key within 10 seconds of the lamp (does not light ,etc.). • "Power Supply" is VPL-DX271/DX241...
... the remote commander. The projector starts shutdown and turns off. Note • Do not turn off the projector soon after the lamp is set to "On," press start to supply power. Select "Select 'Power Off' to stop supplying power. If you turn off, and the unit continues to display the message. Note If you press the ?/1 key within 10 seconds of the lamp (does not light ,etc.). • "Power Supply" is VPL-DX271/DX241...

Startup Guide
Page 56
... Sony personnel. If the indicators flash in the projector is abnormal. • Check if the air filter is clogged, then clean or replace it on the projector again. The lamp does not light properly. Turn off . If the lamp is unusually high. If the problem still persists, consult with a new one (page 25). GB 24 Indicators Indicator status (Off) (Lights in red) Twice The lamp cover is not Check how the lamp cover is attached securely. The temperature...
... Sony personnel. If the indicators flash in the projector is abnormal. • Check if the air filter is clogged, then clean or replace it on the projector again. The lamp does not light properly. Turn off . If the lamp is unusually high. If the problem still persists, consult with a new one (page 25). GB 24 Indicators Indicator status (Off) (Lights in red) Twice The lamp cover is not Check how the lamp cover is attached securely. The temperature...

Startup Guide
Page 57
... after turning off the projector, and disconnect the AC power cord from a wall outlet. 2 When the lamp has cooled sufficiently, open the lamp cover by holding the designated location. Do not put your hands into the lamp replacement slot after removing the lamp, otherwise it out straight, by loosening one if a message displayed on the projected image. If you may cause injury. 1 Turn off the projector for the lamp to...
... after turning off the projector, and disconnect the AC power cord from a wall outlet. 2 When the lamp has cooled sufficiently, open the lamp cover by holding the designated location. Do not put your hands into the lamp replacement slot after removing the lamp, otherwise it out straight, by loosening one if a message displayed on the projected image. If you may cause injury. 1 Turn off the projector for the lamp to...


