Operating Instructions
Page 2
... user to the presence of Conformity Trade Name: SONY Model No.: VPL-CS2, VPL-CX1 Responsible Party: Sony Electronics Inc. Refer servicing to correct the interference by turning the equipment off and on a circuit different from that interference will not occur in the literature accompanying the appliance. This symbol is connected. - Attn: Business Information Center (BIC) 12451 Gateway Boulevard Ft. Address: 1 Sony...
... user to the presence of Conformity Trade Name: SONY Model No.: VPL-CS2, VPL-CX1 Responsible Party: Sony Electronics Inc. Refer servicing to correct the interference by turning the equipment off and on a circuit different from that interference will not occur in the literature accompanying the appliance. This symbol is connected. - Attn: Business Information Center (BIC) 12451 Gateway Boulevard Ft. Address: 1 Sony...

Operating Instructions
Page 5
... 7 Location and Function of Controls ... 9 Front/Left Side/Bottom 9 Rear/Right Side 9 Control Panel 11 Connector Panel 12 Remote Commander 13 Setting Up and Projecting Installing the Projector 15 Connecting the Projector 16 Connecting with a Computer ......16 Connecting with a VCR or 15k RGB/Component Equipment 18 Selecting the Menu Language ..........20 Projecting 22 Effective Tools for Your Presentation 25 Maintenance Maintenance 31 Replacing the Lamp 31 Cleaning the Air Filter 32 Troubleshooting 33 Warning Messages...
... 7 Location and Function of Controls ... 9 Front/Left Side/Bottom 9 Rear/Right Side 9 Control Panel 11 Connector Panel 12 Remote Commander 13 Setting Up and Projecting Installing the Projector 15 Connecting the Projector 16 Connecting with a Computer ......16 Connecting with a VCR or 15k RGB/Component Equipment 18 Selecting the Menu Language ..........20 Projecting 22 Effective Tools for Your Presentation 25 Maintenance Maintenance 31 Replacing the Lamp 31 Cleaning the Air Filter 32 Troubleshooting 33 Warning Messages...

Operating Instructions
Page 6
... local power supply. • Should any windows that face the screen with opaque draperies. • It is desirable to install the projector in handy if you lift up may , however, see tiny black points and/or bright points (red, blue, or green) that the carpet and wall paper be changed to a dark color. The air coming out is not to be used for...
... local power supply. • Should any windows that face the screen with opaque draperies. • It is desirable to install the projector in handy if you lift up may , however, see tiny black points and/or bright points (red, blue, or green) that the carpet and wall paper be changed to a dark color. The air coming out is not to be used for...
Operating Instructions
Page 7
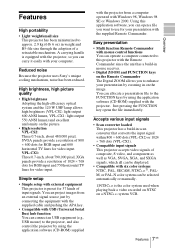
... of input signals. Easy presentation • Multi function Remote Commander with mouse control functions You can operate a computer connected to this application software, you can open a file you to the FUNCTION keys by zooming in weight and B5-file size through the adoption of composite, S video, and component as well as VGA, SVGA, XGA, and SXGA signals, which all can be displayed. • Compatible with the projector. VPL-CX1...
... of input signals. Easy presentation • Multi function Remote Commander with mouse control functions You can operate a computer connected to this application software, you can open a file you to the FUNCTION keys by zooming in weight and B5-file size through the adoption of composite, S video, and component as well as VGA, SVGA, XGA, and SXGA signals, which all can be displayed. • Compatible with the projector. VPL-CX1...

Operating Instructions
Page 11
... conditions: - The ON/ STANDBY indicator lights in power saving mode. Overview Control Panel RESET MENU POWER ENTER INPUT APA VOLUME - + LAMP/COVER FAN/TEMP POWER SAVING ON/STANDBY 1 I / 1 (on/standby) key Turns on and off the projector when the projector is in green while the cooling fan runs after the power is turned off. In power saving mode, any key is input from a computer. 4 VOLUME +/- t 5 Indicators • LAMP/COVER: Lights up or flashes under the following the message on the screen, or press and hold...
... conditions: - The ON/ STANDBY indicator lights in power saving mode. Overview Control Panel RESET MENU POWER ENTER INPUT APA VOLUME - + LAMP/COVER FAN/TEMP POWER SAVING ON/STANDBY 1 I / 1 (on/standby) key Turns on and off the projector when the projector is in green while the cooling fan runs after the power is turned off. In power saving mode, any key is input from a computer. 4 VOLUME +/- t 5 Indicators • LAMP/COVER: Lights up or flashes under the following the message on the screen, or press and hold...

Operating Instructions
Page 13
CLICK (D ZOOM) 6 9 D ZOOM 1 FUNCTION 2 7 8 1 I / 1 + PIC 1 VOLUME - Overview Remote Commander The keys that have the same names as the mouse of the computer connected to the unit. 5 Arrow keys (M/m/ You can control a connected computer using the supplied Remote Commander" on the control panel function identically. For details, see "To control the computer using the Remote Commander. MUTING I / 1 key 2 APA (Auto Pixel Alignment) key 3 ENTER key 4 Joystick Functions as those on page 23. INPUT APA 2 MENU ENTER 3 4 5 0 + RESET R -
CLICK (D ZOOM) 6 9 D ZOOM 1 FUNCTION 2 7 8 1 I / 1 + PIC 1 VOLUME - Overview Remote Commander The keys that have the same names as the mouse of the computer connected to the unit. 5 Arrow keys (M/m/ You can control a connected computer using the supplied Remote Commander" on the control panel function identically. For details, see "To control the computer using the Remote Commander. MUTING I / 1 key 2 APA (Auto Pixel Alignment) key 3 ENTER key 4 Joystick Functions as those on page 23. INPUT APA 2 MENU ENTER 3 4 5 0 + RESET R -
Operating Instructions
Page 16
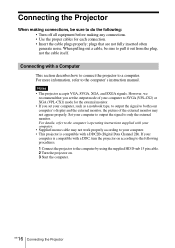
... both your computer's display and the external monitor, the picture of the external monitor may not work properly according to your computer. • This projector is compatible with a DDC, turn the projector on . 3 Start the computer. Connecting with your computer to output the signal to the computer's instruction manual. Notes • The projector accepts VGA, SVGA, XGA, and SXGA signals. Connecting the Projector When making connections, be sure...
... both your computer's display and the external monitor, the picture of the external monitor may not work properly according to your computer. • This projector is compatible with a DDC, turn the projector on . 3 Start the computer. Connecting with your computer to output the signal to the computer's instruction manual. Notes • The projector accepts VGA, SVGA, XGA, and SXGA signals. Connecting the Projector When making connections, be sure...
Operating Instructions
Page 23
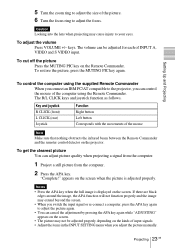
... Looking into the lens when projecting may not be adjusted for each of the picture. 6 Turn the focus ring to the projector, you adjust the picture manually. To adjust the volume Press VOLUME +/- To cut off the picture Press the MUTING PIC key on the screen when the picture is displayed on the projector. Setting Up and Projecting To control the computer using the Remote Commander. To restore the picture, press the MUTING...
... Looking into the lens when projecting may not be adjusted for each of the picture. 6 Turn the focus ring to the projector, you adjust the picture manually. To adjust the volume Press VOLUME +/- To cut off the picture Press the MUTING PIC key on the screen when the picture is displayed on the projector. Setting Up and Projecting To control the computer using the Remote Commander. To restore the picture, press the MUTING...

Operating Instructions
Page 26
... change the menu language, see "Selecting the Menu Language" on the screen are automatically stored in the on-screen menu. The selected menu appears. To reset items that can change the setting. If no input signal, "NO INPUT- GB 26 Using the MENU The menu appears. To clear the menu Press the MENU key. Items that have been adjusted Press the RESET key. PICTURE CTRL INPUT-A CONTRAST: 8 0 BRIGHT: 50 GAMMA MODE: GRAPHICS COLOR TEMP: HIGH 2 Use the...
... change the menu language, see "Selecting the Menu Language" on the screen are automatically stored in the on-screen menu. The selected menu appears. To reset items that can change the setting. If no input signal, "NO INPUT- GB 26 Using the MENU The menu appears. To clear the menu Press the MENU key. Items that have been adjusted Press the RESET key. PICTURE CTRL INPUT-A CONTRAST: 8 0 BRIGHT: 50 GAMMA MODE: GRAPHICS COLOR TEMP: HIGH 2 Use the...

Operating Instructions
Page 28
... page 40. VPL-CS2: When SVGA, XGA or SXGA signal is input VPL-CX1: When XGA or SXGA signal is input INPUT SETTING DOT PHASE: 1 5 SIZE H 800 SHIFT H H:200 SCAN CONV: ON INPUT-A V:30 No. 13 640 480 Memory No. Use the < or the , key to the dots of input picture element to adjust the input signal. SIZE Adjusts the horizontal size of the picture. Signal type When the RGB signal is input The INPUT SETTING Menu The INPUT SETTING menu is used to that...
... page 40. VPL-CS2: When SVGA, XGA or SXGA signal is input VPL-CX1: When XGA or SXGA signal is input INPUT SETTING DOT PHASE: 1 5 SIZE H 800 SHIFT H H:200 SCAN CONV: ON INPUT-A V:30 No. 13 640 480 Memory No. Use the < or the , key to the dots of input picture element to adjust the input signal. SIZE Adjusts the horizontal size of the picture. Signal type When the RGB signal is input The INPUT SETTING Menu The INPUT SETTING menu is used to that...

Operating Instructions
Page 29
... 41 to find if the signal is displayed as a DVD player, set to the projector. Make fine adjustment by adjusting SIZE. Adjustments and Settings Using the Menu ASPECT Sets the aspect ratio of user memories for INPUT-A into which you can also adjust the preset data through the INPUT SETTING menu. If more than 4:3, a part of preset data for input signals for INPUT-A (the preset memory). The INPUT SETTING Menu 29 GB This projector has 20 types of...
... 41 to find if the signal is displayed as a DVD player, set to the projector. Make fine adjustment by adjusting SIZE. Adjustments and Settings Using the Menu ASPECT Sets the aspect ratio of user memories for INPUT-A into which you can also adjust the preset data through the INPUT SETTING menu. If more than 4:3, a part of preset data for input signals for INPUT-A (the preset memory). The INPUT SETTING Menu 29 GB This projector has 20 types of...

Operating Instructions
Page 30
...: Turns off the power, and warning messages. Note If the setting is not correct, "Please check INPUT-A setting." Available languages are: English, French, German, Italian, Spanish, Japanese and Chinese. INPUT-A Selects the RGB or component signal input from the INPUT A connector. LANGUAGE Selects the language used has been operated. LAMP TIMER Indicates the total number of hours for which the lamp currently used in the menu and on-screen displays. SET SETTING INPUT-A STATUS: ON INPUT-A: RGB KEYSTONE MEMORY: OFF DIGITAL KEYSTONE...
...: Turns off the power, and warning messages. Note If the setting is not correct, "Please check INPUT-A setting." Available languages are: English, French, German, Italian, Spanish, Japanese and Chinese. INPUT-A Selects the RGB or component signal input from the INPUT A connector. LANGUAGE Selects the language used has been operated. LAMP TIMER Indicates the total number of hours for which the lamp currently used in the menu and on-screen displays. SET SETTING INPUT-A STATUS: ON INPUT-A: RGB KEYSTONE MEMORY: OFF DIGITAL KEYSTONE...

Operating Instructions
Page 31
... lamp cover and tighten the screws. When replacing the lamp after turning it over so you replace the lamp, wait for at least an hour for the lamp to cool. 1 Place a protective sheet (cloth) beneath the projector. Caution The lamp becomes a high temperature after turning off the projector, then unplug the power cord. When you can see its underside. Turn the projector over . 2 Open the lamp cover by the handle. 1 Handle 3 2 4 Insert the new lamp...
... lamp cover and tighten the screws. When replacing the lamp after turning it over so you replace the lamp, wait for at least an hour for the lamp to cool. 1 Place a protective sheet (cloth) beneath the projector. Caution The lamp becomes a high temperature after turning off the projector, then unplug the power cord. When you can see its underside. Turn the projector over . 2 Open the lamp cover by the handle. 1 Handle 3 2 4 Insert the new lamp...

Operating Instructions
Page 32
6 Turn the projector back over. 7 Connect the power cord and turn the projector to standby mode. 8 Press the following keys on the control panel in the following order for less than five seconds each: RESET,
6 Turn the projector back over. 7 Connect the power cord and turn the projector to standby mode. 8 Press the following keys on the control panel in the following order for less than five seconds each: RESET,
Operating Instructions
Page 33
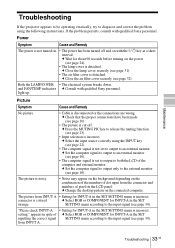
c Close the lamp cover securely (see page 30). and FAN/TEMP indicators c Consult with qualified Sony personnel. SETTING menu according to the input signal (see page 31). • The air filter cover is detached. "Please check INPUT-A • Setting for about 90 seconds before turning on the LCD panel. appears in the SET SETTING menu is disconnected or the connections are wrong. c Wait for INPUT-A in spite of the computer and external monitor. Picture Symptom Cause...
c Close the lamp cover securely (see page 30). and FAN/TEMP indicators c Consult with qualified Sony personnel. SETTING menu according to the input signal (see page 31). • The air filter cover is detached. "Please check INPUT-A • Setting for about 90 seconds before turning on the LCD panel. appears in the SET SETTING menu is disconnected or the connections are wrong. c Wait for INPUT-A in spite of the computer and external monitor. Picture Symptom Cause...

Operating Instructions
Page 34
... mouse port on the lens. c Leave the projector for about two hours with new batteries (see page 14). • The front/rear remote control detector is disconnected or the connections are dead. c Adjust SHIFT in the INPUT SETTING menu has not been adjusted properly. c Restart the computer. The picture flickers. • DOT PHASE in the INPUT SETTING menu properly (see page 28). GB 34 Troubleshooting Symptom Cause and Remedy On-screen display...
... mouse port on the lens. c Leave the projector for about two hours with new batteries (see page 14). • The front/rear remote control detector is disconnected or the connections are dead. c Adjust SHIFT in the INPUT SETTING menu has not been adjusted properly. c Restart the computer. The picture flickers. • DOT PHASE in the INPUT SETTING menu properly (see page 28). GB 34 Troubleshooting Symptom Cause and Remedy On-screen display...
Operating Instructions
Page 35
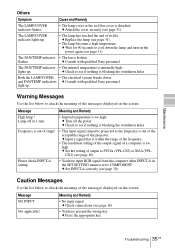
...; This input signal cannot be projected as the frequency is too high. c Replace the lamp (see page 16). Maintenance Others Symptom Cause and Remedy The LAMP/COVER indicator flashes. • The lamp cover or the air filter cover is unusually high. flashes. The FAN/TEMP indicator • The internal temperature is detached. Both the LAMP/COVER • The electrical system breaks down the lamp and turn on the screen. and FAN/TEMP indicators c Consult with qualified Sony personnel. light up. Warning Messages Use the...
...; This input signal cannot be projected as the frequency is too high. c Replace the lamp (see page 16). Maintenance Others Symptom Cause and Remedy The LAMP/COVER indicator flashes. • The lamp cover or the air filter cover is unusually high. flashes. The FAN/TEMP indicator • The internal temperature is detached. Both the LAMP/COVER • The electrical system breaks down the lamp and turn on the screen. and FAN/TEMP indicators c Consult with qualified Sony personnel. light up. Warning Messages Use the...
Operating Instructions
Page 38
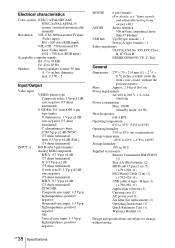
... temperature -20°C to 60°C (-4°F to 140°F) Storage humidity 10% to change without notice. B type (1) (1-790-081-11) Application software (1) Carrying case (1) AC power cord (1) Air filter (for replacement) (1) Operating Instructions (1) Quick Reference Card (1) Warranty Booklet (1) Design and specifications are subject to 90% Supplied accessories Remote Commander RM-PJM10 (1) Size AA (R6) batteries (2) HD D-sub 15 pin (2 m) (1) (1-791-992-11) PS/2 Mouse Cable...
... temperature -20°C to 60°C (-4°F to 140°F) Storage humidity 10% to change without notice. B type (1) (1-790-081-11) Application software (1) Carrying case (1) AC power cord (1) Air filter (for replacement) (1) Operating Instructions (1) Quick Reference Card (1) Warranty Booklet (1) Design and specifications are subject to 90% Supplied accessories Remote Commander RM-PJM10 (1) Size AA (R6) batteries (2) HD D-sub 15 pin (2 m) (1) (1-791-992-11) PS/2 Mouse Cable...

Operating Instructions
Page 39
Optional accessories Projector Lamp LMP-C120 (for replacement) Signal Cable SMF-402 (HD D-sub 15-pin (male) y 3 K phono type (male)) Monitor Cable SMF-410 (HD D-sub 15 pin (male) y HD D-sub 15 pin (male)) Signal Adapter ADP-20 (Macintosh y HD D- sub 15-pin) Screens 50-inch Portable Screen VPS-50C1) 100-inch Flat Screen VPS-100FH Some of the items may not...
Optional accessories Projector Lamp LMP-C120 (for replacement) Signal Cable SMF-402 (HD D-sub 15-pin (male) y 3 K phono type (male)) Monitor Cable SMF-410 (HD D-sub 15 pin (male) y HD D-sub 15 pin (male)) Signal Adapter ADP-20 (Macintosh y HD D- sub 15-pin) Screens 50-inch Portable Screen VPS-50C1) 100-inch Flat Screen VPS-100FH Some of the items may not...

Operating Instructions
Page 43
... assignment 39 INPUT SETTING menu .28 INPUT-A 30 Installation examples ......15 notes 36 unsuitable conditions ..36 K KEYSTONE MEMORY 30 L Lamp replacement ..........31 LAMP TIMER 30 LANGUAGE 30 selecting the menu language 20 Location and function of controls connector panel ..........12 control panel 11 front/left/bottom side ....9 rear/right side 9 Remote Commander ...13 M Menu clearing the menu display 26 INPUT SETTING menu 28 PICTURE CTRL menu 27 SET SETTING menu .30 using the menu ...........26 Message caution 35 warning 35 Mouse cable connection 18 pin...
... assignment 39 INPUT SETTING menu .28 INPUT-A 30 Installation examples ......15 notes 36 unsuitable conditions ..36 K KEYSTONE MEMORY 30 L Lamp replacement ..........31 LAMP TIMER 30 LANGUAGE 30 selecting the menu language 20 Location and function of controls connector panel ..........12 control panel 11 front/left/bottom side ....9 rear/right side 9 Remote Commander ...13 M Menu clearing the menu display 26 INPUT SETTING menu 28 PICTURE CTRL menu 27 SET SETTING menu .30 using the menu ...........26 Message caution 35 warning 35 Mouse cable connection 18 pin...


