
User Guide
Page 4
... model's specifications sheet. Hard Disk Drive Recovery Your computer is equipped with Click to locate your computer. Creating CDs or DVDs with Sony software Create picture & video with: DVDs with the VAIO Recovery Wizard utility program that recovers your Sony ATRAC CD Walkman; Burn music CDs from MP3, WMA, WAV, and CDA files, or make backup copies of TIFF files for your computer's operating system and preinstalled software. From the VAIO Support Central menu...
... model's specifications sheet. Hard Disk Drive Recovery Your computer is equipped with Click to locate your computer. Creating CDs or DVDs with Sony software Create picture & video with: DVDs with the VAIO Recovery Wizard utility program that recovers your Sony ATRAC CD Walkman; Burn music CDs from MP3, WMA, WAV, and CDA files, or make backup copies of TIFF files for your computer's operating system and preinstalled software. From the VAIO Support Central menu...
User Guide
Page 9
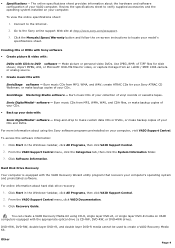
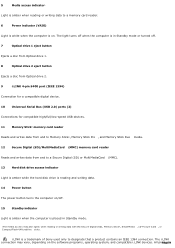
... and writing data. 14 Power button The power button turns the computer on the software programs, operating system, and compatible i.LINK devices. The i.LINK connection may vary, depending on /off . 7 Optical drive 1 eject button Ejects a disc from Optical drive 1. 8 Optical drive 2 eject button Ejects a disc from Optical drive 2. 9 i.LINK 4-pin S400 port (IEEE 1394) Connection for a compatible digital device. 10 Universal Serial Bus (USB 2.0) ports (2) Connections for compatible high/full/low-speed USB devices. 11 Memory Stick® memory card reader Reads and writes data...
... and writing data. 14 Power button The power button turns the computer on the software programs, operating system, and compatible i.LINK devices. The i.LINK connection may vary, depending on /off . 7 Optical drive 1 eject button Ejects a disc from Optical drive 1. 8 Optical drive 2 eject button Ejects a disc from Optical drive 2. 9 i.LINK 4-pin S400 port (IEEE 1394) Connection for a compatible digital device. 10 Universal Serial Bus (USB 2.0) ports (2) Connections for compatible high/full/low-speed USB devices. 11 Memory Stick® memory card reader Reads and writes data...
User Guide
Page 12
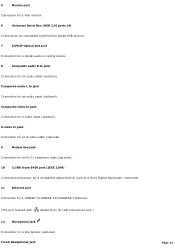
.../low-speed USB devices. 7 S/PDIF Optical Out port Connection for a digital audio or optical device. 8 Composite audio R In jack2 Connection for a video cable (optional). S-video In jack2 Connection for an S-video cable (optional). 9 Modem line jack3 Connection for an RJ-11 telephone cable (optional). 10 i.LINK 6-pin S400 port (IEEE 1394) Connection and power for a compatible digital device, such as a Sony Digital Handycam® camcorder. 11 Ethernet port Connection for a 10BASE-T/100BASE-TX/1000BASE-T Ethernet. (The port marked with (Network) is for LAN connections only...
.../low-speed USB devices. 7 S/PDIF Optical Out port Connection for a digital audio or optical device. 8 Composite audio R In jack2 Connection for a video cable (optional). S-video In jack2 Connection for an S-video cable (optional). 9 Modem line jack3 Connection for an RJ-11 telephone cable (optional). 10 i.LINK 6-pin S400 port (IEEE 1394) Connection and power for a compatible digital device, such as a Sony Digital Handycam® camcorder. 11 Ethernet port Connection for a 10BASE-T/100BASE-TX/1000BASE-T Ethernet. (The port marked with (Network) is for LAN connections only...

User Guide
Page 29
.... See the online Specifications sheet for your computer's hardware configuration. Connecting a Display (Monitor) Connecting the Radio Frequency Receiver Connecting a Wireless Keyboard Connecting the Wireless Optical Mouse Connecting the Keyboard and Mouse Connecting 5.1 (6-Channel) Speaker Systems Configuring Software for Your Speaker System Configuring Software for Your Speaker System Connecting the Power Cords Turning On Your Computer Page 29 Setting Up Your Computer Your computer may vary from the...
.... See the online Specifications sheet for your computer's hardware configuration. Connecting a Display (Monitor) Connecting the Radio Frequency Receiver Connecting a Wireless Keyboard Connecting the Wireless Optical Mouse Connecting the Keyboard and Mouse Connecting 5.1 (6-Channel) Speaker Systems Configuring Software for Your Speaker System Configuring Software for Your Speaker System Connecting the Power Cords Turning On Your Computer Page 29 Setting Up Your Computer Your computer may vary from the...

User Guide
Page 30
If necessary, plug the display's cable into the appropriate monitor port. 2. To connect a display Install your computer's hardware configuration 1. Page 30 Plug the display's cable into the rear of the monitor port may vary, depending on the Sony Online Support Web site at http://www.sony.com/pcsupport, for details about your equipment so that you can easily reach the power outlet in the event of an emergency. Connecting a Display (Monitor) The location, availability, and type of the display. See the specifications sheet for your computer on the model purchased.
If necessary, plug the display's cable into the appropriate monitor port. 2. To connect a display Install your computer's hardware configuration 1. Page 30 Plug the display's cable into the rear of the monitor port may vary, depending on the Sony Online Support Web site at http://www.sony.com/pcsupport, for details about your equipment so that you can easily reach the power outlet in the event of an emergency. Connecting a Display (Monitor) The location, availability, and type of the display. See the specifications sheet for your computer on the model purchased.
User Guide
Page 37
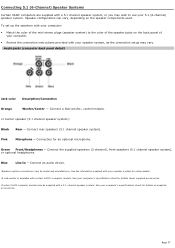
To set up the speakers with your computer: Match the color of the mini stereo plugs (speaker system) to use your s peaker s ys tem for an optional microphone. Connect the supplied speakers (2-channel), front speakers (5.1 channel speaker system), or optional headphones. Page 37 Speaker configuration can vary, depending on the back panel of the speaker jacks on the speaker components used. See your speaker system, as the connection setup may vary. Audio jacks...
To set up the speakers with your computer: Match the color of the mini stereo plugs (speaker system) to use your s peaker s ys tem for an optional microphone. Connect the supplied speakers (2-channel), front speakers (5.1 channel speaker system), or optional headphones. Page 37 Speaker configuration can vary, depending on the back panel of the speaker jacks on the speaker components used. See your speaker system, as the connection setup may vary. Audio jacks...

User Guide
Page 44
Your VAIO® computer is determined by the type of connecting your computer, TV monitor or display, and TV programming access, is supplied with certain video cables. See the online Specifications sheet for your computer's hardware configuration. Page 44 Setting Up TV Connections The best method of cable service connection available in your in-home cable access, you may vary from the illustrations shown in this section. Your computer's hardware configuration may require extra cables, adapters or connection equipment...
Your VAIO® computer is determined by the type of connecting your computer, TV monitor or display, and TV programming access, is supplied with certain video cables. See the online Specifications sheet for your computer's hardware configuration. Page 44 Setting Up TV Connections The best method of cable service connection available in your in-home cable access, you may vary from the illustrations shown in this section. Your computer's hardware configuration may require extra cables, adapters or connection equipment...

User Guide
Page 71
... disk drive, the preinstalled VAIO Recovery Wizard utility program cannot restore the drive partitions, operating system, or original software programs. Before replacing the hard disk drive, create a VAIO Recovery Media Kit or purchase a kit from the Windows® taskbar, click Control Panel, then click Performance and Maintenance. 2. Use the VAIO Recovery Wizard utility to hold additional 3.5-inch hard disk drives. Click Start from Sony. Your computer must have an active Internet connection to DVD software program creates a new folder location on the new drive. See Before upgrading...
... disk drive, the preinstalled VAIO Recovery Wizard utility program cannot restore the drive partitions, operating system, or original software programs. Before replacing the hard disk drive, create a VAIO Recovery Media Kit or purchase a kit from the Windows® taskbar, click Control Panel, then click Performance and Maintenance. 2. Use the VAIO Recovery Wizard utility to hold additional 3.5-inch hard disk drives. Click Start from Sony. Your computer must have an active Internet connection to DVD software program creates a new folder location on the new drive. See Before upgrading...
User Guide
Page 97
... your wireless mouse within the distance limitations of the mouse by turning clockwise the ring that may cause the mouse to ensure proper mouse tracking. Using a piece of obstructions that the supplied AA batteries are using a USB mouse, verify that the mouse is plugged securely into the appropriate USB port. Save and close all open software programs and turn off the computer. The mouse driver(s) may be working properly. Using an optical mouse If...
... your wireless mouse within the distance limitations of the mouse by turning clockwise the ring that may cause the mouse to ensure proper mouse tracking. Using a piece of obstructions that the supplied AA batteries are using a USB mouse, verify that the mouse is plugged securely into the appropriate USB port. Save and close all open software programs and turn off the computer. The mouse driver(s) may be working properly. Using an optical mouse If...

User Guide
Page 99
... all open software programs and turn off the computer. The mouse driver(s) may be working properly. Using a piece of tape, remove any dust or dirt on the computer's front panel is free of the mouse2. Press the CONNECT button on the mouse and the computer to reestablish the connection between the two devices. Verify the infrared receiver on the mouse ball and inside the mouse mechanism. Remove the mouse ball cover...
... all open software programs and turn off the computer. The mouse driver(s) may be working properly. Using a piece of tape, remove any dust or dirt on the computer's front panel is free of the mouse2. Press the CONNECT button on the mouse and the computer to reestablish the connection between the two devices. Verify the infrared receiver on the mouse ball and inside the mouse mechanism. Remove the mouse ball cover...

User Guide
Page 115
... Add a Printer. Enter the appropriate path for the disk or CD, and click OK. If the printer is not included in the list, and no drivers are installing a recently manufactured printer equipped with the printer: 1. Some printers do I install a printer? Connect your USB or IEEE 1284 printer to the appropriate port on -screen instructions to the user manual or guide supplied with the appropriate Windows...
... Add a Printer. Enter the appropriate path for the disk or CD, and click OK. If the printer is not included in the list, and no drivers are installing a recently manufactured printer equipped with the printer: 1. Some printers do I install a printer? Connect your USB or IEEE 1284 printer to the appropriate port on -screen instructions to the user manual or guide supplied with the appropriate Windows...
User Guide
Page 116
... Add Printer Wizard, click Next. 4. Select the appropriate port, usually LPT1 if using the parallel port, and then click Next. 6. Refer to the user manual or guide supplied with installation. Click Start in the list, and no drivers are installing a recently manufactured printer equipped with the appropriate Windows XP Printer driver: 1. Place a check mark in the list, but the printer manufacturer provides a disk with Plug and Play capability. 5. Enter...
... Add Printer Wizard, click Next. 4. Select the appropriate port, usually LPT1 if using the parallel port, and then click Next. 6. Refer to the user manual or guide supplied with installation. Click Start in the list, and no drivers are installing a recently manufactured printer equipped with the appropriate Windows XP Printer driver: 1. Place a check mark in the list, but the printer manufacturer provides a disk with Plug and Play capability. 5. Enter...
User Guide
Page 126
...'s hardware c onfiguration. 2Y ou c an loc ate the online H elp for using the VAIO® Recovery Wizard and the Intel Storage Utility programs. VAIO® Recovery Options Guide - Click VAIO User Guide. Specifications - Click Start in the Windows taskbar and point to remove the RAID configuration. Your computer is only s upplied with c ertain V A I D-ready. It lists detailed procedures for details about restoring individual software programs, software drivers, drive partition(s), or your Sony VAIO® computer. To access the...
...'s hardware c onfiguration. 2Y ou c an loc ate the online H elp for using the VAIO® Recovery Wizard and the Intel Storage Utility programs. VAIO® Recovery Options Guide - Click VAIO User Guide. Specifications - Click Start in the Windows taskbar and point to remove the RAID configuration. Your computer is only s upplied with c ertain V A I D-ready. It lists detailed procedures for details about restoring individual software programs, software drivers, drive partition(s), or your Sony VAIO® computer. To access the...
User Guide
Page 131
.... Model number. 3. T he s erial number is on using your specific computer model, such as hardware and software specifications. safety and legal information. quick solutions to common problems. An automated tutorial library that contains interactive, easy-to-understand lessons on a white barc ode label. Example: 4. Hardware feature or software program that has a problem. (See the online VAIO® Computer User Guide for products, accessories and parts...
.... Model number. 3. T he s erial number is on using your specific computer model, such as hardware and software specifications. safety and legal information. quick solutions to common problems. An automated tutorial library that contains interactive, easy-to-understand lessons on a white barc ode label. Example: 4. Hardware feature or software program that has a problem. (See the online VAIO® Computer User Guide for products, accessories and parts...
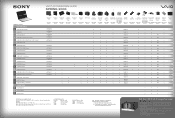
VAIO Accessories Guide Spring 2006
Page 1
... audio CD and movie DVD collection • PC-enabled control for 200 audio CDs and/or movie DVDs • Operated through Microsoft® Windows® XP Media Center Edition 2005 • Automatic download of title, jacket cover and other information (Internet connection required) • Automatic and sequential copying of 200 audio CDs to the PC hard drive • Multi episode TV program recording to DVD® software, i.LINK®4 connector cable...
... audio CD and movie DVD collection • PC-enabled control for 200 audio CDs and/or movie DVDs • Operated through Microsoft® Windows® XP Media Center Edition 2005 • Automatic download of title, jacket cover and other information (Internet connection required) • Automatic and sequential copying of 200 audio CDs to the PC hard drive • Multi episode TV program recording to DVD® software, i.LINK®4 connector cable...
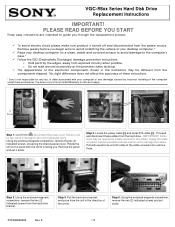
VGC-RBxx Series Hard Disk Drive Replacement Instructions
Page 1
... removal of your desktop computer.* ü Place your desktop computer on a clean, stable and covered surface to avoid damage to damage the cables. Some force may be required to remove them. Proceed and disconnect these instructions. * Sony is turned off and disconnected from the hard drive. E 1/2 Using the enclosed magnetic screwdriver, remove the two (2) indicated screws, loosening the chassis panel cover. Locate the power cable [1] and serial ATA cable [2]. Step 5. VGC-RBxx Series Hard Disk Drive Replacement Instructions IMPORTANT! Remove...
... removal of your desktop computer.* ü Place your desktop computer on a clean, stable and covered surface to avoid damage to damage the cables. Some force may be required to remove them. Proceed and disconnect these instructions. * Sony is turned off and disconnected from the hard drive. E 1/2 Using the enclosed magnetic screwdriver, remove the two (2) indicated screws, loosening the chassis panel cover. Locate the power cable [1] and serial ATA cable [2]. Step 5. VGC-RBxx Series Hard Disk Drive Replacement Instructions IMPORTANT! Remove...
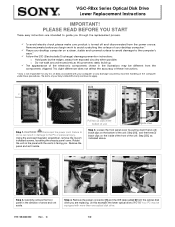
VGC-RBxx Series Optical Disk Drive Lower Replacement Instructions
Page 1
... terms of your desktop computer on the inside of the front of your desktop computer.* ü Place your Sony Limited Wa rranty continue to the computer's case.* ü Follow the ESD (Electrostatic Discharge) damage prevention instructions: o Hold parts by the edges, away from the power source. Your PC may be equipped with more than one optical disk drive. VGC-RBxx Series Optical Disk Drive Lower Replacement Instructions IMPORTANT! Failure to do so...
... terms of your desktop computer on the inside of the front of your desktop computer.* ü Place your Sony Limited Wa rranty continue to the computer's case.* ü Follow the ESD (Electrostatic Discharge) damage prevention instructions: o Hold parts by the edges, away from the power source. Your PC may be equipped with more than one optical disk drive. VGC-RBxx Series Optical Disk Drive Lower Replacement Instructions IMPORTANT! Failure to do so...
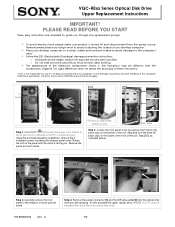
VGC-RBxx Series Optical Disk Drive Upper Replacement Instructions
Page 1
... upper optical drive.) NOTE! The terms of your desktop computer on a clean, stable and covered surface to avoid damage to avoid scratching the surface of unit. Remove the power connector [1] and the IDE data cable [ 2] from the optical disk drive you are intended to guide you begin work to the computer's case.* ü Follow the ESD (Electrostatic Discharge) damage prevention instructions: o Hold parts by pulling down thet w o(2) black clips...
... upper optical drive.) NOTE! The terms of your desktop computer on a clean, stable and covered surface to avoid damage to avoid scratching the surface of unit. Remove the power connector [1] and the IDE data cable [ 2] from the optical disk drive you are intended to guide you begin work to the computer's case.* ü Follow the ESD (Electrostatic Discharge) damage prevention instructions: o Hold parts by pulling down thet w o(2) black clips...
Safety Information
Page 6
... (wireless keyboard), and PCVA-MS2 (wireless mouse) These devices comply with Part 15 of Conformity Trade Name: SONY Model No.: PCV-C41L PCV-C42L Responsible Party: Sony Electronics Inc. This equipment generates, uses, and can be determined by one or more of the device. Operation is encouraged to try to radio or television reception, which can radiate radio frequency energy and, if not installed and used...
... (wireless keyboard), and PCVA-MS2 (wireless mouse) These devices comply with Part 15 of Conformity Trade Name: SONY Model No.: PCV-C41L PCV-C42L Responsible Party: Sony Electronics Inc. This equipment generates, uses, and can be determined by one or more of the device. Operation is encouraged to try to radio or television reception, which can radiate radio frequency energy and, if not installed and used...
Welcome Mat
Page 1
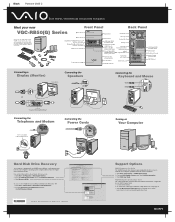
...) Ethernet port Audio ports & jacks Monitor/TV Out ports and jacks VHF/UHF port Connecting a Display (Monitor) Display (Monitor) not included Connecting the Speakers WOOFER CENTER REAR FRONT Connecting the Keyboard and Mouse or DVI-D port (Do not connect both the DVI-D and VGA cables from a single monitor to the computer at http://www.sony.com/pcsupport. 3 Click the Manuals/Specs/Warranty button and follow the on how to locate your computer's supplied accessories. Printed in appearance from Windows XP: 1 Click Start > Control Panel > Performance and Maintenance...
...) Ethernet port Audio ports & jacks Monitor/TV Out ports and jacks VHF/UHF port Connecting a Display (Monitor) Display (Monitor) not included Connecting the Speakers WOOFER CENTER REAR FRONT Connecting the Keyboard and Mouse or DVI-D port (Do not connect both the DVI-D and VGA cables from a single monitor to the computer at http://www.sony.com/pcsupport. 3 Click the Manuals/Specs/Warranty button and follow the on how to locate your computer's supplied accessories. Printed in appearance from Windows XP: 1 Click Start > Control Panel > Performance and Maintenance...


