
VAIO User Guide (Large File - 12.11 MB)
Page 10
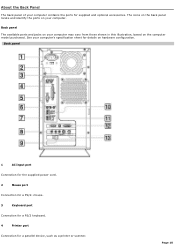
... hardware configuration. Back panel 1 AC Input port Connection for the supplied power cord. 2 Mouse port Connection for a PS/2® mouse. 3 Keyboard port Connection for a PS/2 keyboard. 4 Printer port Connection for supplied and optional accessories. About the Back Panel The back panel of your computer may vary from those shown in this illustration, based on...
... hardware configuration. Back panel 1 AC Input port Connection for the supplied power cord. 2 Mouse port Connection for a PS/2® mouse. 3 Keyboard port Connection for a PS/2 keyboard. 4 Printer port Connection for supplied and optional accessories. About the Back Panel The back panel of your computer may vary from those shown in this illustration, based on...
VAIO User Guide (Large File - 12.11 MB)
Page 11
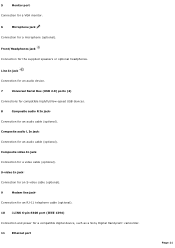
... Connection for an RJ-11 telephone cable (optional). 10 i.LINK 6-pin S400 port (IEEE 1394) Connection and power for the supplied speakers or optional headphones. Front/Headphones jack Connection for a compatible digital device, such as a Sony Digital Handycam® camcorder. 11 Ethernet port Page 11 Line In jack Connection for an audio device...
... Connection for an RJ-11 telephone cable (optional). 10 i.LINK 6-pin S400 port (IEEE 1394) Connection and power for the supplied speakers or optional headphones. Front/Headphones jack Connection for a compatible digital device, such as a Sony Digital Handycam® camcorder. 11 Ethernet port Page 11 Line In jack Connection for an audio device...
VAIO User Guide (Large File - 12.11 MB)
Page 18
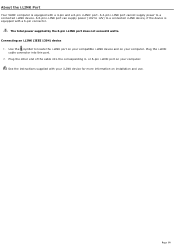
... of the cable into this port. 2. Page 18 or 6-pin i.LINK port on your i.LINK device for more information on installation and use. The total power supplied by the 6-pin i.LINK port does not exceed 6 watts. About the i.LINK Port Your VAIO® computer is equipped with a 6-pin connector. See the instructions...
... of the cable into this port. 2. Page 18 or 6-pin i.LINK port on your i.LINK device for more information on installation and use. The total power supplied by the 6-pin i.LINK port does not exceed 6 watts. About the i.LINK Port Your VAIO® computer is equipped with a 6-pin connector. See the instructions...
VAIO User Guide (Large File - 12.11 MB)
Page 21
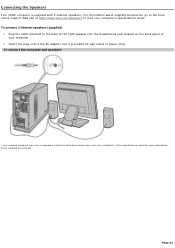
... speaker into a grounded AC wall outlet or power strip. Page 21 To connect the com puter and speakers 1 Y our s upplied s peakers may vary in appearanc e from the illus tration s hown here. To connect 2-channel speakers (supplied) 1. See your c omputer's online s ...pec ific ations s heet for more information about supplied accessories, go to the Sony online support Web site at http://www.sony.com/pcsupport to the back of your computer's specifications sheet. Connecting the Speakers Your VAIO® computer is supplied with 2-...
... speaker into a grounded AC wall outlet or power strip. Page 21 To connect the com puter and speakers 1 Y our s upplied s peakers may vary in appearanc e from the illus tration s hown here. To connect 2-channel speakers (supplied) 1. See your c omputer's online s ...pec ific ations s heet for more information about supplied accessories, go to the Sony online support Web site at http://www.sony.com/pcsupport to the back of your computer's specifications sheet. Connecting the Speakers Your VAIO® computer is supplied with 2-...
VAIO User Guide (Large File - 12.11 MB)
Page 50
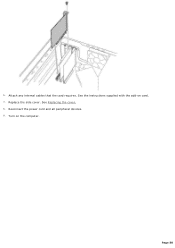
See Replacing the cover. 8. See the instructions supplied with the add-on the computer. Replace the side cover. Page 50 6. Reconnect the power cord and all peripheral devices. 9. Attach any internal cables that the card requires. Turn on card. 7.
See Replacing the cover. 8. See the instructions supplied with the add-on the computer. Replace the side cover. Page 50 6. Reconnect the power cord and all peripheral devices. 9. Attach any internal cables that the card requires. Turn on card. 7.
VAIO User Guide (Large File - 12.11 MB)
Page 55
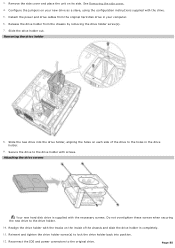
...holder with the necessary screws. Attaching the driv e screws Your new hard disk drive is supplied with screws. Reinsert and tighten the drive holder screw(s) to the holes in the drive holder. 9. Detach the power and drive cables from the chassis by removing the drive holder screw(s). 7. Release the ... e holder 8. Page 55 3. Remove the side cover and place the unit on each side of the chassis and slide the drive holder in your computer. 6. Slide the drive holder out. Realign the drive holder with the drive. 5. Configure the jumpers on your new drive as a slave, using ...
...holder with the necessary screws. Attaching the driv e screws Your new hard disk drive is supplied with screws. Reinsert and tighten the drive holder screw(s) to the holes in the drive holder. 9. Detach the power and drive cables from the chassis by removing the drive holder screw(s). 7. Release the ... e holder 8. Page 55 3. Remove the side cover and place the unit on each side of the chassis and slide the drive holder in your computer. 6. Slide the drive holder out. Realign the drive holder with the drive. 5. Configure the jumpers on your new drive as a slave, using ...

VAIO User Guide (Large File - 12.11 MB)
Page 56
...then right-click to complete the process. Connect the second power connector to your c omputer's hardware c onfiguration. Replace the side cover. See Replacing the cover. 16. A shortcut menu appears. 3. The Computer Management window appears. 4. Follow the wizard's on the newly... installed, unformatted hard disk (Disk label identified with red marking). 13. Reconnect the power cord to the new drive, following the instructions supplied with memory c ard readers . Log...
...then right-click to complete the process. Connect the second power connector to your c omputer's hardware c onfiguration. Replace the side cover. See Replacing the cover. 16. A shortcut menu appears. 3. The Computer Management window appears. 4. Follow the wizard's on the newly... installed, unformatted hard disk (Disk label identified with red marking). 13. Reconnect the power cord to the new drive, following the instructions supplied with memory c ard readers . Log...

VAIO User Guide (Large File - 12.11 MB)
Page 187
... adjusted correctly. (See the manual supplied with your display for details.) Confirm that the computer is not in an optical drive (unless you plugged the computer into a power strip or Uninterruptible Power Supply (UPS), make sure the power strip or UPS is turned on ... c omputers are connected firmly. If you are using bootable media). Confirm that the power cord and all cables are not equipped with a floppy dis k drive. About VAIO Computer Functions My computer does not start. Verify that the computer is plugged into a power source and turned on.
... adjusted correctly. (See the manual supplied with your display for details.) Confirm that the computer is not in an optical drive (unless you plugged the computer into a power strip or Uninterruptible Power Supply (UPS), make sure the power strip or UPS is turned on ... c omputers are connected firmly. If you are using bootable media). Confirm that the power cord and all cables are not equipped with a floppy dis k drive. About VAIO Computer Functions My computer does not start. Verify that the computer is plugged into a power source and turned on.
VAIO User Guide (Large File - 12.11 MB)
Page 188
... the computer into a power strip or Uninterruptible Power Supply (UPS), make sure the power strip or UPS is turned on and working. Verify that the monitor is not in monitor, confirm that it is turned on the keyboard. 1 C ertain V A I O c omputers are adjusted correctly. (See the manual supplied with a floppy dis k drive. About VAIO Computer Functions My computer does...
... the computer into a power strip or Uninterruptible Power Supply (UPS), make sure the power strip or UPS is turned on and working. Verify that the monitor is not in monitor, confirm that it is turned on the keyboard. 1 C ertain V A I O c omputers are adjusted correctly. (See the manual supplied with a floppy dis k drive. About VAIO Computer Functions My computer does...
VAIO User Guide (Large File - 12.11 MB)
Page 231
... both a surge protector and a battery backup. To remove power from the computer, you do not intend to use the computer for a long time. Do not attempt to open the power supply. About the Power Source Before opening your equipment, refer the repair or replacement of the power supply to qualified personnel only. Never pull the cord itself...
... both a surge protector and a battery backup. To remove power from the computer, you do not intend to use the computer for a long time. Do not attempt to open the power supply. About the Power Source Before opening your equipment, refer the repair or replacement of the power supply to qualified personnel only. Never pull the cord itself...
VAIO User Guide (Large File - 12.11 MB)
Page 232
...VAIO® computer and your wireless device. Verify that any infrared receiver(s) on loose surfaces (such as rugs or blankets) or near your service until you for the service call. Do not drop them or bump them against other objects. Your Sony computer...; Always switch the power off before operating it . Do not place your computer on the computer or wireless device is...computer is free of obstructions that may prevent proper operation. Confirm that the supplied AA batteries are not magnetically shielded Ambient temperature of your Sony computer...
...VAIO® computer and your wireless device. Verify that any infrared receiver(s) on loose surfaces (such as rugs or blankets) or near your service until you for the service call. Do not drop them or bump them against other objects. Your Sony computer...; Always switch the power off before operating it . Do not place your computer on the computer or wireless device is...computer is free of obstructions that may prevent proper operation. Confirm that the supplied AA batteries are not magnetically shielded Ambient temperature of your Sony computer...
VAIO User Guide (Large File - 12.11 MB)
Page 238
... about supplied accessories and your model's specifications sheet. Preinstalled software Help files - Click Start in the Windows® taskbar, click All Programs, then click VAIO Control Center. 2. This support resource offers a variety of available topics, enabling you to connect power cords, cables, peripheral devices, and register your computer with Sony®. From the VAIO Control...
... about supplied accessories and your model's specifications sheet. Preinstalled software Help files - Click Start in the Windows® taskbar, click All Programs, then click VAIO Control Center. 2. This support resource offers a variety of available topics, enabling you to connect power cords, cables, peripheral devices, and register your computer with Sony®. From the VAIO Control...
Marketing Specifications
Page 2
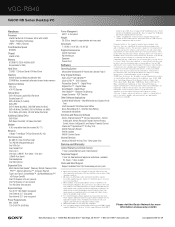
... varying software packages and add-on the Sony Desktop Computer are NOT authorized to 1GB. When available, Sony will be available from http://www.esupport.sony.com media for themselves the suitability and ...Supplied Accessories VAIO® Keyboard PS/2® Mouse Speakers Power Cord Software Operating System Microsoft® Windows® XP Home with Service Pack 2 Sony Original Software VAIO Zone™ with any representations or warranty that a product contains an IEEE 1394 connector. DVD Media/Formats are subject to DVD™ - VGC-RB40 VAIO® RB Series Desktop...
... varying software packages and add-on the Sony Desktop Computer are NOT authorized to 1GB. When available, Sony will be available from http://www.esupport.sony.com media for themselves the suitability and ...Supplied Accessories VAIO® Keyboard PS/2® Mouse Speakers Power Cord Software Operating System Microsoft® Windows® XP Home with Service Pack 2 Sony Original Software VAIO Zone™ with any representations or warranty that a product contains an IEEE 1394 connector. DVD Media/Formats are subject to DVD™ - VGC-RB40 VAIO® RB Series Desktop...


