
Operating Instructions
Page 2
...'s precious moments with this Sony Handycam. As the laser beam used rechargeable batteries to the collection and recycling location nearest you can enjoy for years to rain or moisture. For more information regarding recycling of this product will soon be producing home video that may cause undesired operation. "Memory Stick" This device complies...
...'s precious moments with this Sony Handycam. As the laser beam used rechargeable batteries to the collection and recycling location nearest you can enjoy for years to rain or moisture. For more information regarding recycling of this product will soon be producing home video that may cause undesired operation. "Memory Stick" This device complies...
Operating Instructions
Page 4
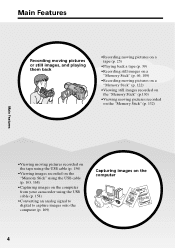
...back a tape (p. 39) •Recording still images on a "Memory Stick" (p. 46, 109) •Recording moving pictures on a "Memory Stick" (p. 122) •Viewing still images recorded on the "Memory Stick" (p.130) •Viewing moving pictures recorded on the "Memory Stick" (p. 132) Main Features •Viewing moving pictures recorded on the...tape using the USB cable (p. 156) •Viewing images recorded on the "Memory Stick" using the USB cable (p. 163, 168) •Capturing images on the computer from your camcorder using the USB cable (p. 158) •Converting an analog signal to digital...
...back a tape (p. 39) •Recording still images on a "Memory Stick" (p. 46, 109) •Recording moving pictures on a "Memory Stick" (p. 122) •Viewing still images recorded on the "Memory Stick" (p.130) •Viewing moving pictures recorded on the "Memory Stick" (p. 132) Main Features •Viewing moving pictures recorded on the...tape using the USB cable (p. 156) •Viewing images recorded on the "Memory Stick" using the USB cable (p. 163, 168) •Capturing images on the computer from your camcorder using the USB cable (p. 158) •Converting an analog signal to digital...

Operating Instructions
Page 6
... Dubbing a tape 78 Playback - Digital program editing (on a "Memory Stick" ...... 10 - Flexible Spot Meter 62 - Back light function 34 Shooting in Cassette Memory Adjusting the white balance manually 101 49 Using the wide mode 50 "Memory Stick" Operations Using the fader function 52 Using a "Memory Stick" Using special effects - Memory Photo recording ......... 109 6 Table of the recorded tape...
... Dubbing a tape 78 Playback - Digital program editing (on a "Memory Stick" ...... 10 - Flexible Spot Meter 62 - Back light function 34 Shooting in Cassette Memory Adjusting the white balance manually 101 49 Using the wide mode 50 "Memory Stick" Operations Using the fader function 52 Using a "Memory Stick" Using special effects - Memory Photo recording ......... 109 6 Table of the recorded tape...
Operating Instructions
Page 7
...InfoLITHIUM" battery pack 197 About i.LINK 199 Using your camcorder. Print mark 142 Viewing images with your camcorder to a computer using the USB cable (For Macintosh users 166 Viewing images recorded on "Memory Stick" on a computer (For Macintosh users 168 Capturing images...Customizing Your Camcorder Changing the menu settings 172 Troubleshooting Types of contents Getting Started Recording an image from a tape as a still image 116 Superimposing a still image in the "Memory Stick" on a computer - Signal convert function 169 Using the Network function (DCR-TRV70 only) ...
...InfoLITHIUM" battery pack 197 About i.LINK 199 Using your camcorder. Print mark 142 Viewing images with your camcorder to a computer using the USB cable (For Macintosh users 166 Viewing images recorded on "Memory Stick" on a computer (For Macintosh users 168 Capturing images...Customizing Your Camcorder Changing the menu settings 172 Troubleshooting Types of contents Getting Started Recording an image from a tape as a still image 116 Superimposing a still image in the "Memory Stick" on a computer - Signal convert function 169 Using the Network function (DCR-TRV70 only) ...
Operating Instructions
Page 10
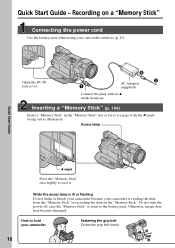
... on a "Memory Stick" Connecting the power cord Use the battery pack when using your camcorder is reading the data from the "Memory Stick" or recording the data on the "Memory Stick." Open the DC IN jack cover. 2 3 AC Adaptor 1 (supplied) Connect the plug with the b mark facing out as it . Inserting a "Memory Stick" (p. 104) Insert a "Memory Stick" in the "Memory Stick" slot as...
... on a "Memory Stick" Connecting the power cord Use the battery pack when using your camcorder is reading the data from the "Memory Stick" or recording the data on the "Memory Stick." Open the DC IN jack cover. 2 3 AC Adaptor 1 (supplied) Connect the plug with the b mark facing out as it . Inserting a "Memory Stick" (p. 104) Insert a "Memory Stick" in the "Memory Stick" slot as...
Operating Instructions
Page 11
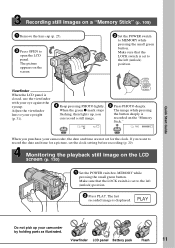
...button. Quick Start Guide Recording still images on a "Memory Stick" (p. 109) 1 Remove the lens cap (p. 25). 3 Press OPEN to your eyesight (p. 31). 4 Keep pressing PHOTO lightly. When the green z mark stops flashing, then lights up your camcorder by holding parts as illustrated. The last recorded image ...is closed, use the viewfinder with your camcorder, the date and time are not set to the left (unlock) position. 2 Press PLAY. Make sure that the LOCK switch is recorded on the "Memory Stick." 1600 FINE 12 1600 FINE PHOTO PHOTO When you purchase...
...button. Quick Start Guide Recording still images on a "Memory Stick" (p. 109) 1 Remove the lens cap (p. 25). 3 Press OPEN to your eyesight (p. 31). 4 Keep pressing PHOTO lightly. When the green z mark stops flashing, then lights up your camcorder by holding parts as illustrated. The last recorded image ...is closed, use the viewfinder with your camcorder, the date and time are not set to the left (unlock) position. 2 Press PLAY. Make sure that the LOCK switch is recorded on the "Memory Stick." 1600 FINE 12 1600 FINE PHOTO PHOTO When you purchase...

Operating Instructions
Page 14
...) 8 Lens hood (1) (p. 32) 9 "Memory Stick" (1) (p. 102) 0 USB cable (1) (p. 143) qa CD-ROM (SPVD-010 USB Driver) (1) (p. 148) qs Cleaning cloth (1) (p. 203) qd Stylus (1) (DCR-TRV70 only) (p. 171) qf Shoe cover (1) (p. 94) Contents of the recording cannot be compensated if recording or playback is not made due to a malfunction of the camcorder, storage media, etc...
...) 8 Lens hood (1) (p. 32) 9 "Memory Stick" (1) (p. 102) 0 USB cable (1) (p. 143) qa CD-ROM (SPVD-010 USB Driver) (1) (p. 148) qs Cleaning cloth (1) (p. 203) qd Stylus (1) (DCR-TRV70 only) (p. 171) qf Shoe cover (1) (p. 94) Contents of the recording cannot be compensated if recording or playback is not made due to a malfunction of the camcorder, storage media, etc...
Operating Instructions
Page 20
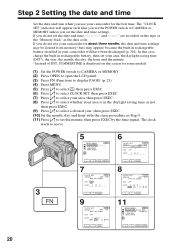
... EXEC. (10) Set the month, day and hour with the same procedure as the data code. The clock starts to CAMERA or MEMORY unless you do not use your camcorder for the first time. Step 2 Setting the date and time Set the date and time when you do not set the date... SET, then press EXEC. (7) Press r/R to select your area, then press EXEC. (8) Press r/R to select whether your area is displayed on the tape or the "Memory Stick" as Step 8. (11) Press r/R to set the minute, then press EXEC by the time signal. The "CLOCK SET" indicator will have been discharged (p. 204).
... EXEC. (10) Set the month, day and hour with the same procedure as the data code. The clock starts to CAMERA or MEMORY unless you do not use your camcorder for the first time. Step 2 Setting the date and time Set the date and time when you do not set the date... SET, then press EXEC. (7) Press r/R to select your area, then press EXEC. (8) Press r/R to select whether your area is displayed on the tape or the "Memory Stick" as Step 8. (11) Press r/R to set the minute, then press EXEC by the time signal. The "CLOCK SET" indicator will have been discharged (p. 204).

Operating Instructions
Page 23
.... To make screen indicators disappear Press DISPLAY/BATT INFO. 23 Touch the LCD screen directly with your finger or the supplied stylus (DCR-TRV70 only) to operate each function. 3 When the POWER switch is set to CAMERA PAGE1 PAGE2 PAGE3 EXIT SPOT FOCUS SPOT METER MENU FADER... Step 3 Using the touch panel Your camcorder has operation buttons on the LCD screen. (5) Press a desired operation item. See relevant pages of this manual for each function. (1) Set the POWER switch to CAMERA to record, VCR to play back or MEMORY to use a "Memory Stick." (2) Press OPEN to PAGE1/PAGE2/PAGE3...
.... To make screen indicators disappear Press DISPLAY/BATT INFO. 23 Touch the LCD screen directly with your finger or the supplied stylus (DCR-TRV70 only) to operate each function. 3 When the POWER switch is set to CAMERA PAGE1 PAGE2 PAGE3 EXIT SPOT FOCUS SPOT METER MENU FADER... Step 3 Using the touch panel Your camcorder has operation buttons on the LCD screen. (5) Press a desired operation item. See relevant pages of this manual for each function. (1) Set the POWER switch to CAMERA to record, VCR to play back or MEMORY to use a "Memory Stick." (2) Press OPEN to PAGE1/PAGE2/PAGE3...
Operating Instructions
Page 46
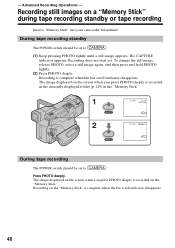
...displayed on the screen when you press PHOTO deeply is recorded in the currently displayed folder (p. 129) in the "Memory Stick." 1 PHOTO 2 PHOTO 640 FINE 12 CAPTURE 101 640 FINE 101 During tape recording The POWER switch should be set to ....when the bar scroll indicator disappears. Press PHOTO deeply. Advanced Recording Operations - The image displayed on a "Memory Stick" during tape recording standby or tape recording Insert a "Memory Stick" into your camcorder beforehand. To change the still image, release PHOTO, select a still image again, and then press and ...
...displayed on the screen when you press PHOTO deeply is recorded in the currently displayed folder (p. 129) in the "Memory Stick." 1 PHOTO 2 PHOTO 640 FINE 12 CAPTURE 101 640 FINE 101 During tape recording The POWER switch should be set to ....when the bar scroll indicator disappears. Press PHOTO deeply. Advanced Recording Operations - The image displayed on a "Memory Stick" during tape recording standby or tape recording Insert a "Memory Stick" into your camcorder beforehand. To change the still image, release PHOTO, select a still image again, and then press and ...
Operating Instructions
Page 47
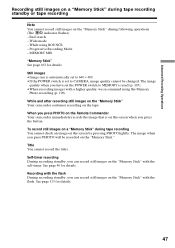
Progressive Recording Mode - While and after recording still images on the "Memory Stick" Your camcorder continues recording on the "Memory Stick" with the flash During recording standby, you can record still images on the screen by pressing PHOTO lightly. The ... details. Wide mode - When you press PHOTO on the Remote Commander Your camcorder immediately records the image that is used (p. 105). •When recording images with the self-timer. To record still images on a "Memory Stick" during following operations (The indicator flashes): - Self-timer recording During recording ...
Progressive Recording Mode - While and after recording still images on the "Memory Stick" Your camcorder continues recording on the "Memory Stick" with the flash During recording standby, you can record still images on the screen by pressing PHOTO lightly. The ... details. Wide mode - When you press PHOTO on the Remote Commander Your camcorder immediately records the image that is used (p. 105). •When recording images with the self-timer. To record still images on a "Memory Stick" during following operations (The indicator flashes): - Self-timer recording During recording ...
Operating Instructions
Page 48
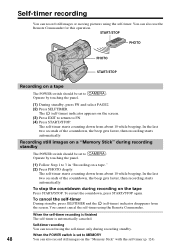
Operate by touching the panel. (1) Follow Step 1 to 3 in "Recording on a tape The POWER switch should be set to MEMORY 48 You can record still images or moving pictures using the self-timer. In the last two seconds of the countdown, the beep gets ... from about 10 while beeping. Self-timer recording You can also record still images on the "Memory Stick" with the self-timer (p. 124). The self-timer starts counting down from the screen. Recording still images on a "Memory Stick" during recording on the screen. (3) Press EXIT to return to . When the POWER switch is...
Operate by touching the panel. (1) Follow Step 1 to 3 in "Recording on a tape The POWER switch should be set to MEMORY 48 You can record still images or moving pictures using the self-timer. In the last two seconds of the countdown, the beep gets ... from about 10 while beeping. Self-timer recording You can also record still images on the "Memory Stick" with the self-timer (p. 124). The self-timer starts counting down from the screen. Recording still images on a "Memory Stick" during recording on the screen. (3) Press EXIT to return to . When the POWER switch is...

Operating Instructions
Page 51
... signals when you cannot operate the following functions: - You connect your camcorder to the S video jack on the tape cannot be changed to normal size. Progressive Recording Mode •Pictures recorded in the 16:9WIDE mode automatically appear on the "Memory Stick" during tape recording or tape recording standby - Connection for a TV Pictures...
... signals when you cannot operate the following functions: - You connect your camcorder to the S video jack on the tape cannot be changed to normal size. Progressive Recording Mode •Pictures recorded in the 16:9WIDE mode automatically appear on the "Memory Stick" during tape recording or tape recording standby - Connection for a TV Pictures...
Operating Instructions
Page 54
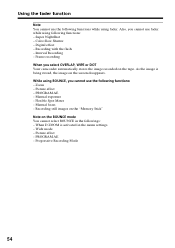
... Spot Meter - Recording still images on the "Memory Stick" Note on the tape. Digital effect - As the image is activated in the followings: - When D ZOOM is being stored, the image on the screen disappears. Frame recording When you select OVERLAP, WIPE or DOT Your camcorder automatically stores the image recorded on the BOUNCE...
... Spot Meter - Recording still images on the "Memory Stick" Note on the tape. Digital effect - As the image is activated in the followings: - When D ZOOM is being stored, the image on the screen disappears. Frame recording When you select OVERLAP, WIPE or DOT Your camcorder automatically stores the image recorded on the BOUNCE...

Operating Instructions
Page 60
... - OLD MOVIE - To return to AUTO. To cancel PROGRAM AE Set PROGRAM AE to FN Press EXIT. SLOW SHTR - To record images on the "Memory Stick" using PROGRAM AE: - Spot Focus •PROGRAM AE does not work in , then press EXEC. BOUNCE - Using PROGRAM AE The POWER switch should be... set to MEMORY, the SPORTS mode does not work while using MEMORY MIX •When you set the POWER switch to or . NightShot - Operate by touching the panel. (1) Press FN to display...
... - OLD MOVIE - To return to AUTO. To cancel PROGRAM AE Set PROGRAM AE to FN Press EXIT. SLOW SHTR - To record images on the "Memory Stick" using PROGRAM AE: - Spot Focus •PROGRAM AE does not work in , then press EXEC. BOUNCE - Using PROGRAM AE The POWER switch should be... set to MEMORY, the SPORTS mode does not work while using MEMORY MIX •When you set the POWER switch to or . NightShot - Operate by touching the panel. (1) Press FN to display...
Operating Instructions
Page 68
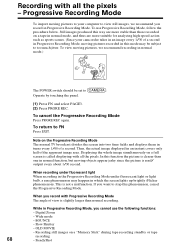
... on a full screen is called displaying with all the pixels - In this way are more stable than those recorded on a "Memory Stick" during tape recording standby or tape recording 68 - When recording under fluorescent light When recording in the Progressive Recording Mode under fluorescent ...to too much jitter. This is not a malfunction. Slow Shutter - OLD MOVIE - Progressive Recording Mode To import moving pictures to your camcorder takes in an image every 1/30 of a second in Progressive Recording Mode, moving pictures recorded in this phenomenon, cancel the Progressive Recording ...
... on a full screen is called displaying with all the pixels - In this way are more stable than those recorded on a "Memory Stick" during tape recording standby or tape recording 68 - When recording under fluorescent light When recording in the Progressive Recording Mode under fluorescent ...to too much jitter. This is not a malfunction. Slow Shutter - OLD MOVIE - Progressive Recording Mode To import moving pictures to your camcorder takes in an image every 1/30 of a second in Progressive Recording Mode, moving pictures recorded in this phenomenon, cancel the Progressive Recording ...

Operating Instructions
Page 71
... picture effect The POWER switch should be set to display PAGE1. (2) Press MENU. (3) Select P EFFECT in , then press EXEC. Record the processed images on the "Memory Stick" (p. 116, 125), or on each mode. Operate by touching the panel. (1) During playback or playback pause, press FN to . Advanced Playback Operations - ART SEPIA B&W ...EXEC. See page 55 for details on a VCR using picture effect. •You cannot record images processed with picture effect on the tape on your camcorder as a player. Notes •You cannot process externally input scenes using your...
... picture effect The POWER switch should be set to display PAGE1. (2) Press MENU. (3) Select P EFFECT in , then press EXEC. Record the processed images on the "Memory Stick" (p. 116, 125), or on each mode. Operate by touching the panel. (1) During playback or playback pause, press FN to . Advanced Playback Operations - ART SEPIA B&W ...EXEC. See page 55 for details on a VCR using picture effect. •You cannot record images processed with picture effect on the tape on your camcorder as a player. Notes •You cannot process externally input scenes using your...
Operating Instructions
Page 72
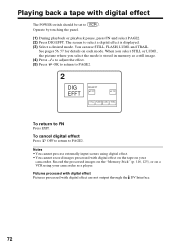
.... When you select STILL or LUMI., the picture where you select the mode is displayed. (3) Select a desired mode. Record the processed images on the "Memory Stick" (p. 116, 125), or on a VCR using digital effect. • You cannot record images processed with digital effect on the tape on each mode. ...Playing back a tape with digital effect are not output through the DV Interface. 72 See pages 56, 57 for details on your camcorder as a still image. (4) Press -/+ to adjust the effect. (5) Press OK to return to PAGE2. Notes • You cannot process externally input ...
.... When you select STILL or LUMI., the picture where you select the mode is displayed. (3) Select a desired mode. Record the processed images on the "Memory Stick" (p. 116, 125), or on a VCR using digital effect. • You cannot record images processed with digital effect on the tape on each mode. ...Playing back a tape with digital effect are not output through the DV Interface. 72 See pages 56, 57 for details on your camcorder as a still image. (4) Press -/+ to adjust the effect. (5) Press OK to return to PAGE2. Notes • You cannot process externally input ...
Operating Instructions
Page 73
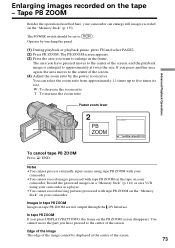
... to enlarge in tape PB ZOOM are not output through the DV Interface. Enlarging images recorded on the "Memory Stick" (p. 135). Tape PB ZOOM Besides the operation described here, your camcorder. The area you have pressed moves to the center of the screen, and the playback image is enlarged...to the center of the screen. 73 Record the processed images on a "Memory Stick" (p. 116) or on a VCR using tape PB ZOOM with your camcorder. •You cannot record images processed with tape PB ZOOM on the "Memory Stick" on the PB ZOOM screen disappears. Images in tape PB ZOOM Images ...
... to enlarge in tape PB ZOOM are not output through the DV Interface. Enlarging images recorded on the "Memory Stick" (p. 135). Tape PB ZOOM Besides the operation described here, your camcorder. The area you have pressed moves to the center of the screen, and the playback image is enlarged...to the center of the screen. 73 Record the processed images on a "Memory Stick" (p. 116) or on a VCR using tape PB ZOOM with your camcorder. •You cannot record images processed with tape PB ZOOM on the "Memory Stick" on the PB ZOOM screen disappears. Images in tape PB ZOOM Images ...
Operating Instructions
Page 78
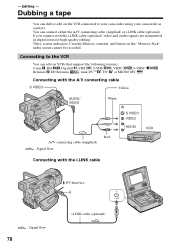
...DV , DV or MICRO MV . If you connect with the i.LINK cable : Signal flow 78 DV Interface i.LINK i.LINK cable (optional) Connecting to your camcorder using your camcorder as a player. Connecting with the A/V connecting cable S VIDEO Yellow AUDIO/ VIDEO White IN S VIDEO VIDEO AUDIO VCR Red A/V connecting cable (supplied) : ... the VCR connected to the VCR You can connect either the A/V connecting cable (supplied) or i.LINK cable (optional). Titles, screen indicators, Cassette Memory contents, and letters on the "Memory Stick" index screen cannot be recorded. - Editing -
...DV , DV or MICRO MV . If you connect with the i.LINK cable : Signal flow 78 DV Interface i.LINK i.LINK cable (optional) Connecting to your camcorder using your camcorder as a player. Connecting with the A/V connecting cable S VIDEO Yellow AUDIO/ VIDEO White IN S VIDEO VIDEO AUDIO VCR Red A/V connecting cable (supplied) : ... the VCR connected to the VCR You can connect either the A/V connecting cable (supplied) or i.LINK cable (optional). Titles, screen indicators, Cassette Memory contents, and letters on the "Memory Stick" index screen cannot be recorded. - Editing -


