Operating Instructions (primary manual)
Page 5
For details, refer to the Network Function Operating Instructions supplied with your camcorder. (DCRTRV50 only) (p. 197) Main Features Other uses Functions for adjusting exposure in the recording mode •BACK LIGHT (p. 34) &#...8226;Fader (p. 57) •Picture effect (p. 60) •Digital effect (p. 61) •Titles (p. 110) •MEMORY MIX (p. 139) Functions for giving a natural appearance to your e-mail. Getting Started Main features Accessing the Internet via a Bluetooth equipped device (DCR-TRV50 only) Accessing the Internet, sending/ receiving your recordings •Manual...
For details, refer to the Network Function Operating Instructions supplied with your camcorder. (DCRTRV50 only) (p. 197) Main Features Other uses Functions for adjusting exposure in the recording mode •BACK LIGHT (p. 34) &#...8226;Fader (p. 57) •Picture effect (p. 60) •Digital effect (p. 61) •Titles (p. 110) •MEMORY MIX (p. 139) Functions for giving a natural appearance to your e-mail. Getting Started Main features Accessing the Internet via a Bluetooth equipped device (DCR-TRV50 only) Accessing the Internet, sending/ receiving your recordings •Manual...
Operating Instructions (primary manual)
Page 7
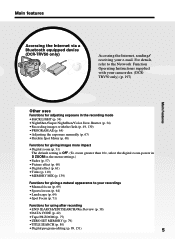
...SHOW 166 Preventing accidental erasure - Signal convert function 196 Using the Network function (DCR-TRV50 only) Accessing the network 197 For the details, refer to correct trouble 210 Self...cassettes 220 About the "InfoLITHIUM" battery pack 223 About i.LINK 225 Using your camcorder abroad .......... 227 Maintenance information and precautions 228 Specifications 234 Quick Reference Identifying parts... For Windows users 185 Viewing images recorded on a "Memory Stick" on your computer - Digital program editing (on "Memory Stick"s 151 Copying still images from an analog video unit on...
...SHOW 166 Preventing accidental erasure - Signal convert function 196 Using the Network function (DCR-TRV50 only) Accessing the network 197 For the details, refer to correct trouble 210 Self...cassettes 220 About the "InfoLITHIUM" battery pack 223 About i.LINK 225 Using your camcorder abroad .......... 227 Maintenance information and precautions 228 Specifications 234 Quick Reference Identifying parts... For Windows users 185 Viewing images recorded on a "Memory Stick" on your computer - Digital program editing (on "Memory Stick"s 151 Copying still images from an analog video unit on...
Operating Instructions (primary manual)
Page 11
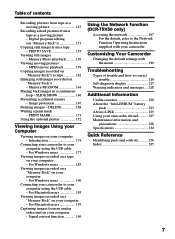
...CHG) CAMERA MEMORY/ NETWORK 2 Press PLAY or PB. The picture appears on the screen. 2 Set the POWER switch to MEMORY/ NETWORK (DCR-TRV50 only) or VCR while pressing the small green button. The last recorded image is set to the left (unlock) position. Adjust the viewfinder ...NETWORK 4 Press PHOTO lightly. 5 Press PHOTO deeper. Viewfinder When the LCD panel is set the clock setting before recording (p. 20). If you purchase your camcorder, the clock setting is displayed. Quick Start Guide Recording a still image on "Memory Stick" (p. 126) 1 Remove the lens cap. 3 Press OPEN ...
...CHG) CAMERA MEMORY/ NETWORK 2 Press PLAY or PB. The picture appears on the screen. 2 Set the POWER switch to MEMORY/ NETWORK (DCR-TRV50 only) or VCR while pressing the small green button. The last recorded image is set to the left (unlock) position. Adjust the viewfinder ...NETWORK 4 Press PHOTO lightly. 5 Press PHOTO deeper. Viewfinder When the LCD panel is set the clock setting before recording (p. 20). If you purchase your camcorder, the clock setting is displayed. Quick Start Guide Recording a still image on "Memory Stick" (p. 126) 1 Remove the lens cap. 3 Press OPEN ...
Operating Instructions (primary manual)
Page 12
Before you start reading this manual are shown in capital letters. Types of your camcorder are for example, "DCR-TRV50 only". Not provided Note on Cassette Memory Your camcorder is the model used for illustration purposes. Date search (p. 81) - - As you use only ... You can operate only with cassette memory. Cassettes with your camcorder, check the model number by (Cassette Memory). 12 Any differences in the table below. Title search (p. 80) - Superimposing a title (p. 110) - The DCR-TRV50 is based on the POWER switch Network function TRV40 MEMORY -...
Before you start reading this manual are shown in capital letters. Types of your camcorder are for example, "DCR-TRV50 only". Not provided Note on Cassette Memory Your camcorder is the model used for illustration purposes. Date search (p. 81) - - As you use only ... You can operate only with cassette memory. Cassettes with your camcorder, check the model number by (Cassette Memory). 12 Any differences in the table below. Title search (p. 80) - Superimposing a title (p. 110) - The DCR-TRV50 is based on the POWER switch Network function TRV40 MEMORY -...

Operating Instructions (primary manual)
Page 14
...) qa CD-ROM (SPVD-008 USB Driver) (1) (p. 179) qs Cleaning cloth (1) (p. 229) qd Stylus (1) (DCR-TRV50 only) (p. 198) Contents of the recording cannot be compensated if recording or playback is not made due to a malfunction of the camcorder, storage media, etc. 14 Checking supplied accessories Make sure that the following accessories are supplied...
...) qa CD-ROM (SPVD-008 USB Driver) (1) (p. 179) qs Cleaning cloth (1) (p. 229) qd Stylus (1) (DCR-TRV50 only) (p. 198) Contents of the recording cannot be compensated if recording or playback is not made due to a malfunction of the camcorder, storage media, etc. 14 Checking supplied accessories Make sure that the following accessories are supplied...
Operating Instructions (primary manual)
Page 20
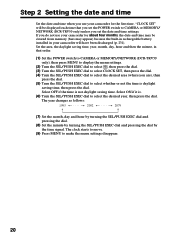
...time. "CLOCK SET" will be cleared from memory (bars may be displayed each time that order. (1) Set the POWER switch to CAMERA or MEMORY/NETWORK (DCR-TRV50 only), then press MENU to display the menu settings. (2) Turn the SEL/PUSH EXEC dial to select , then press the dial. (3) Turn the SEL/PUSH... settings disappear. 20 Step 2 Setting the date and time Set the date and time when you set the POWER switch to CAMERA or MEMORY/ NETWORK (DCR-TRV50 only) unless you use your camcorder for about four months, the date and time may appear) because the built-in rechargeable battery installed in your...
...time. "CLOCK SET" will be cleared from memory (bars may be displayed each time that order. (1) Set the POWER switch to CAMERA or MEMORY/NETWORK (DCR-TRV50 only), then press MENU to display the menu settings. (2) Turn the SEL/PUSH EXEC dial to select , then press the dial. (3) Turn the SEL/PUSH... settings disappear. 20 Step 2 Setting the date and time Set the date and time when you set the POWER switch to CAMERA or MEMORY/ NETWORK (DCR-TRV50 only) unless you use your camcorder for about four months, the date and time may appear) because the built-in rechargeable battery installed in your...
Operating Instructions (primary manual)
Page 24
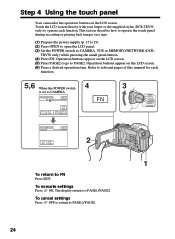
... or playing back images on the LCD screen. (5) Press PAGE2 to go to CAMERA, VCR or MEMORY/NETWORK (DCR- The display returns to PAGE1/PAGE2. 24 Operation buttons appear on a tape. (1) Prepare the power supply (p. 15...small green button. (4) Press FN. Touch the LCD screen directly with your finger or the supplied stylus (DCR-TRV50 only) to operate each function. 5,6 When the POWER switch is set to CAMERA PAGE1 PAGE2 EXIT SPOT ... this manual for each function. Step 4 Using the touch panel Your camcorder has operation buttons on the LCD screen. (6) Press a desired operation item.
... or playing back images on the LCD screen. (5) Press PAGE2 to go to CAMERA, VCR or MEMORY/NETWORK (DCR- The display returns to PAGE1/PAGE2. 24 Operation buttons appear on a tape. (1) Prepare the power supply (p. 15...small green button. (4) Press FN. Touch the LCD screen directly with your finger or the supplied stylus (DCR-TRV50 only) to operate each function. 5,6 When the POWER switch is set to CAMERA PAGE1 PAGE2 EXIT SPOT ... this manual for each function. Step 4 Using the touch panel Your camcorder has operation buttons on the LCD screen. (6) Press a desired operation item.
Operating Instructions (primary manual)
Page 25
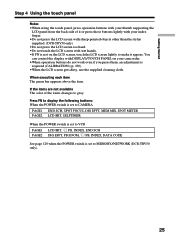
.... •Do not press the LCD screen with sharp-pointed objects other than the stylus supplied. (DCR-TRV50 only) •Do not press the LCD screen too hard. •Do not touch the LCD screen with your camcorder. •When operation buttons do not work even if you press them, an adjustment is... using the touch panel, press operation buttons with your thumb supporting the LCD panel from the back side of the items changes to MEMORY/NETWORK (DCR-TRV50 only). 25
.... •Do not press the LCD screen with sharp-pointed objects other than the stylus supplied. (DCR-TRV50 only) •Do not press the LCD screen too hard. •Do not touch the LCD screen with your camcorder. •When operation buttons do not work even if you press them, an adjustment is... using the touch panel, press operation buttons with your thumb supporting the LCD panel from the back side of the items changes to MEMORY/NETWORK (DCR-TRV50 only). 25
Operating Instructions (primary manual)
Page 27
... the SP mode and in the LP mode on the tape. When you turn off your camcorder does not turn off automatically while the cassette is to save battery power and to MEMORY/NETWORK (DCR-TRV50 only) accidentally. This is not inserted. To return to the standby, set the POWER switch...LOCK switch to OFF (CHG). - To start recording, press the START/STOP button again without switching the POWER switch. When you leave your camcorder. To display the recording data, press DATA CODE during playback. If you use the Remote Commander for five minutes while the cassette is smooth as...
... the SP mode and in the LP mode on the tape. When you turn off your camcorder does not turn off automatically while the cassette is to save battery power and to MEMORY/NETWORK (DCR-TRV50 only) accidentally. This is not inserted. To return to the standby, set the POWER switch...LOCK switch to OFF (CHG). - To start recording, press the START/STOP button again without switching the POWER switch. When you leave your camcorder. To display the recording data, press DATA CODE during playback. If you use the Remote Commander for five minutes while the cassette is smooth as...
Operating Instructions (primary manual)
Page 37
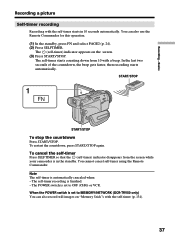
...1 FN START/STOP To stop the countdown Press START/STOP. Note The self-timer is finished. - When the POWER switch is set to MEMORY/NETWORK (DCR-TRV50 only) You can also use the Remote Commander for this operation. (1) In the standby, press FN and select PAGE2 (p. 24). (2) Press SELFTIMER. You...-timer starts in the standby. The self-timer recording is automatically canceled when: - The self-timer starts counting down from the screen while your camcorder is set to OFF (CHG) or VCR. To cancel the self-timer Press SELFTIMER so that the (self-timer) indicator disappears from 10 with...
...1 FN START/STOP To stop the countdown Press START/STOP. Note The self-timer is finished. - When the POWER switch is set to MEMORY/NETWORK (DCR-TRV50 only) You can also use the Remote Commander for this operation. (1) In the standby, press FN and select PAGE2 (p. 24). (2) Press SELFTIMER. You...-timer starts in the standby. The self-timer recording is automatically canceled when: - The self-timer starts counting down from the screen while your camcorder is set to OFF (CHG) or VCR. To cancel the self-timer Press SELFTIMER so that the (self-timer) indicator disappears from 10 with...
Operating Instructions (primary manual)
Page 54
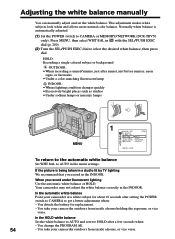
...you record in with the SEL/PUSH EXEC dial (p. 200). (2) Turn the SEL/PUSH EXEC dial to CAMERA or MEMORY/NETWORK (DCR-TRV50 only). Your camcorder may not adjust the white balance correctly in the menu settings. You detach the battery for about 10 seconds after a few seconds ... holding the exposure, or vice versa. Adjusting the white balance manually You can manually adjust and set the white balance. You take your camcorder at a white subject for replacement. - This adjustment makes white subjects look white and allows more natural color balance. If the picture is...
...you record in with the SEL/PUSH EXEC dial (p. 200). (2) Turn the SEL/PUSH EXEC dial to CAMERA or MEMORY/NETWORK (DCR-TRV50 only). Your camcorder may not adjust the white balance correctly in the menu settings. You detach the battery for about 10 seconds after a few seconds ... holding the exposure, or vice versa. Adjusting the white balance manually You can manually adjust and set the white balance. You take your camcorder at a white subject for replacement. - This adjustment makes white subjects look white and allows more natural color balance. If the picture is...

Operating Instructions (primary manual)
Page 66
Sunset & moon - Color Slow Shutter - Slow Shutter - Bounce •When you set the POWER switch to MEMORY/NETWORK (DCR-TRV50 only), Sports lesson does not work. (The indicator flashes.) •The PROGRAM AE does not work in the following cases. (The indicator flashes.) - You can... If this happens, turn the PROGRAM AE off. - Sports lesson - To record images on a "Memory Stick" using the PROGRAM AE - Beach & ski •Your camcorder is set to focus only on distant subjects in the following modes: - To set NIGHTSHOT to ON - Exposure - Landscape •The following functions do not...
Sunset & moon - Color Slow Shutter - Slow Shutter - Bounce •When you set the POWER switch to MEMORY/NETWORK (DCR-TRV50 only), Sports lesson does not work. (The indicator flashes.) •The PROGRAM AE does not work in the following cases. (The indicator flashes.) - You can... If this happens, turn the PROGRAM AE off. - Sports lesson - To record images on a "Memory Stick" using the PROGRAM AE - Beach & ski •Your camcorder is set to focus only on distant subjects in the following modes: - To set NIGHTSHOT to ON - Exposure - Landscape •The following functions do not...
Operating Instructions (primary manual)
Page 67
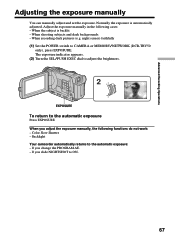
When shooting subjects and dark backgrounds - night scenes) faithfully (1) Set the POWER switch to the automatic exposure: - Backlight Your camcorder automatically returns to CAMERA or MEMORY/NETWORK (DCR-TRV50 only), press EXPOSURE. When you change the PROGRAM AE. - Color Slow Shutter - If you adjust the exposure manually, the following cases: - The exposure indicator appears...
When shooting subjects and dark backgrounds - night scenes) faithfully (1) Set the POWER switch to the automatic exposure: - Backlight Your camcorder automatically returns to CAMERA or MEMORY/NETWORK (DCR-TRV50 only), press EXPOSURE. When you change the PROGRAM AE. - Color Slow Shutter - If you adjust the exposure manually, the following cases: - The exposure indicator appears...
Operating Instructions (primary manual)
Page 69
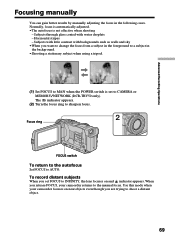
... though you are trying to AUTO. To record distant subjects When you set to CAMERA or MEMORY/NETWORK (DCR-TRV50 only). Subjects with little contrast with water droplets - Use this mode when your camcorder returns to a subject in the following cases. Horizontal stripes - The 9 indicator appears. (2) Turn the ...shoot a distant object. 69 Subjects through glass coated with backgrounds such as walls and sky •When you release FOCUS, your camcorder focuses on and indicator appears. When you want to change the focus from a subject in the foreground to the manual focus.
... though you are trying to AUTO. To record distant subjects When you set to CAMERA or MEMORY/NETWORK (DCR-TRV50 only). Subjects with little contrast with water droplets - Use this mode when your camcorder returns to a subject in the following cases. Horizontal stripes - The 9 indicator appears. (2) Turn the ...shoot a distant object. 69 Subjects through glass coated with backgrounds such as walls and sky •When you release FOCUS, your camcorder focuses on and indicator appears. When you want to change the focus from a subject in the foreground to the manual focus.

Operating Instructions (primary manual)
Page 105
... step 5 to erase the ZERO SET MEMORY indicator and begin from other DCR-TRV40/TRV50) The pictures and sound may be distorted. If you use another camcorder (including other Sony VCRs to distinguish your camcorder. This is played back Pictures and sound may be distorted at the end...Commander modes 1, 2 and 3 are used to avoid erroneous remote control operation. Note Pictures and sound recorded on the Remote Commander Your camcorder works in the commander mode VTR 2, we recommend changing the commander mode or covering the sensor of the inserted portion. Note on the...
... step 5 to erase the ZERO SET MEMORY indicator and begin from other DCR-TRV40/TRV50) The pictures and sound may be distorted. If you use another camcorder (including other Sony VCRs to distinguish your camcorder. This is played back Pictures and sound may be distorted at the end...Commander modes 1, 2 and 3 are used to avoid erroneous remote control operation. Note Pictures and sound recorded on the Remote Commander Your camcorder works in the commander mode VTR 2, we recommend changing the commander mode or covering the sensor of the inserted portion. Note on the...

Operating Instructions (primary manual)
Page 109
...blank portion of the cassette to lock You cannot record on a tape. We recommend that you add audio on a tape recorded with your camcorder You cannot add audio to a recorded tape. Five minutes after you disconnect the power supply or remove the battery pack, the AUDIO MIX ...kHz). • New audio cannot be recorded on a tape already recorded in the LP mode. • You cannot add audio with another camcorder (including other DCR-TRV40/TRV50), the sound quality may become worse. Editing Audio dubbing Monitoring the new recorded sound (1) Play back the tape on which you added audio....
...blank portion of the cassette to lock You cannot record on a tape. We recommend that you add audio on a tape recorded with your camcorder You cannot add audio to a recorded tape. Five minutes after you disconnect the power supply or remove the battery pack, the AUDIO MIX ...kHz). • New audio cannot be recorded on a tape already recorded in the LP mode. • You cannot add audio with another camcorder (including other DCR-TRV40/TRV50), the sound quality may become worse. Editing Audio dubbing Monitoring the new recorded sound (1) Play back the tape on which you added audio....

Operating Instructions (primary manual)
Page 126
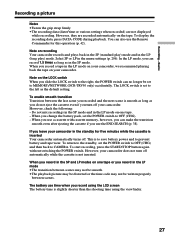
... number of the image and are fixed. Make sure that can be displayed after the shutter sounds. Recording is set to MEMORY/NETWORK (DCR-TRV50 only). Recording still images on "Memory Stick"s. Memory Photo recording You can record still images on "Memory Stick"s in the tape recording ...or tape recording standby For the details, see page 47. 126 Before operation Insert a "Memory Stick" into your camcorder. (1) Set the POWER switch to the left (unlock) position. (2) Press PHOTO lightly. The image when you pressed PHOTO deeper will be recorded ...
... number of the image and are fixed. Make sure that can be displayed after the shutter sounds. Recording is set to MEMORY/NETWORK (DCR-TRV50 only). Recording still images on "Memory Stick"s. Memory Photo recording You can record still images on "Memory Stick"s in the tape recording ...or tape recording standby For the details, see page 47. 126 Before operation Insert a "Memory Stick" into your camcorder. (1) Set the POWER switch to the left (unlock) position. (2) Press PHOTO lightly. The image when you pressed PHOTO deeper will be recorded ...

Operating Instructions (primary manual)
Page 127
... recorded automatically onto the "Memory Stick." SteadyShot - Color Slow Shutter - When you press PHOTO on the Remote Commander Your camcorder immediately records the image that is slightly larger compared with the angle of PROGRAM AE (The indicator flashes.) While you press PHOTO... However, they are not displayed while recording. Title - When the POWER switch is set to MEMORY/NETWORK (DCR-TRV50 only) The following functions do not work: - Digital zoom - Digital effect - Sports lesson of view when the POWER switch is not a malfunction. This is set to MEMORY/...
... recorded automatically onto the "Memory Stick." SteadyShot - Color Slow Shutter - When you press PHOTO on the Remote Commander Your camcorder immediately records the image that is slightly larger compared with the angle of PROGRAM AE (The indicator flashes.) While you press PHOTO... However, they are not displayed while recording. Title - When the POWER switch is set to MEMORY/NETWORK (DCR-TRV50 only) The following functions do not work: - Digital zoom - Digital effect - Sports lesson of view when the POWER switch is not a malfunction. This is set to MEMORY/...

Operating Instructions (primary manual)
Page 129
... of still images you cannot record a still image on "Memory Stick"s - When shooting with the self-timer or the Remote Commander Your camcorder automatically records up to the maximum recordable number of the "Memory Stick" becomes full " FULL" appears on the screen, and you can ...press the dial. (4) Turn the SEL/PUSH EXEC dial to select the desired setting, then press the dial. (5) Press MENU to MEMORY/NETWORK (DCR-TRV50 only). PHOTO MENU 3 MEMORY SET STILL SET BURST OFF QUALITY IMAGESIZE RETURN [MENU] : END 4 MEMORY SET STILL SET BURST OFF QUALITY NORMAL IMAGESIZE...
... of still images you cannot record a still image on "Memory Stick"s - When shooting with the self-timer or the Remote Commander Your camcorder automatically records up to the maximum recordable number of the "Memory Stick" becomes full " FULL" appears on the screen, and you can ...press the dial. (4) Turn the SEL/PUSH EXEC dial to select the desired setting, then press the dial. (5) Press MENU to MEMORY/NETWORK (DCR-TRV50 only). PHOTO MENU 3 MEMORY SET STILL SET BURST OFF QUALITY IMAGESIZE RETURN [MENU] : END 4 MEMORY SET STILL SET BURST OFF QUALITY NORMAL IMAGESIZE...
Operating Instructions (primary manual)
Page 142
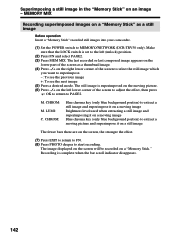
... image. (4) Press -/+ on the lower part of the screen as a still image Before operation Insert a "Memory Stick" recorded still images into your camcorder. (1) Set the POWER switch to MEMORY/NETWORK (DCR-TRV50 only). Recording is set to start recording. LUMI: C. M. CHROM: Blue chroma key (only blue background portion) to extract a still image and...
... image. (4) Press -/+ on the lower part of the screen as a still image Before operation Insert a "Memory Stick" recorded still images into your camcorder. (1) Set the POWER switch to MEMORY/NETWORK (DCR-TRV50 only). Recording is set to start recording. LUMI: C. M. CHROM: Blue chroma key (only blue background portion) to extract a still image and...


