Camera Operations Guide
Page 7
... to a "Memory Stick 89 Dubbing still images from a "Memory Stick" to other operating instructions supplied with your camcorder: • Editing images with specific information - PROGRAM AE/16:9 WIDE, etc 61 Using the (MEMORY SET) menu - Image protection/ Print mark 99 Printing recorded images (PictBridge compliant printer 101 Troubleshooting Troubleshooting 103 Warning indicators...
... to a "Memory Stick 89 Dubbing still images from a "Memory Stick" to other operating instructions supplied with your camcorder: • Editing images with specific information - PROGRAM AE/16:9 WIDE, etc 61 Using the (MEMORY SET) menu - Image protection/ Print mark 99 Printing recorded images (PictBridge compliant printer 101 Troubleshooting Troubleshooting 103 Warning indicators...
Camera Operations Guide
Page 18
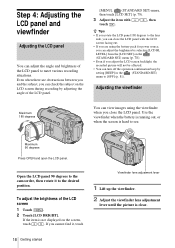
...the subject on the screen, touch / . If you close the LCD panel with / , then touch . To adjust the brightness of the LCD panel. [MENU], (STANDARD SET) menu, then touch [LCD SET] (p. 78). 3 Adjust the item with the LCD screen facing out. • If you are obstructions between you and the ...; If you rotate the LCD panel 180 degrees to the lens side, you can adjust the angle and brightness of the LCD panel to the camcorder, then rotate it , touch Viewfinder lens adjustment lever 1 Lift up the viewfinder. 2 Adjust the viewfinder lens adjustment lever until the picture is clear....
...the subject on the screen, touch / . If you close the LCD panel with / , then touch . To adjust the brightness of the LCD panel. [MENU], (STANDARD SET) menu, then touch [LCD SET] (p. 78). 3 Adjust the item with the LCD screen facing out. • If you are obstructions between you and the ...; If you rotate the LCD panel 180 degrees to the lens side, you can adjust the angle and brightness of the LCD panel to the camcorder, then rotate it , touch Viewfinder lens adjustment lever 1 Lift up the viewfinder. 2 Adjust the viewfinder lens adjustment lever until the picture is clear....
Camera Operations Guide
Page 19
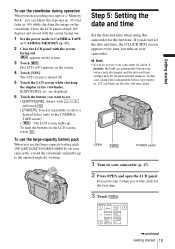
... 35) and fader (p. 40) while checking the image on the viewfinder. Step 5: Setting the date and time Set the date and time when using this camcorder for about 3 months, the built-in the viewfinder. [EXPOSURE], etc. If you set the clock for viewing. EXPO- TAPE mode). • : The ...LCD screen lights up to the optimal angle for the first time. 3 Touch . 60min MENU 1/3 FADER SPOT METER -:--:-- In that case, charge the rechargeable button-type battery (p. 123) and then set the date and time, the [CLOCK SET] ...
... 35) and fader (p. 40) while checking the image on the viewfinder. Step 5: Setting the date and time Set the date and time when using this camcorder for about 3 months, the built-in the viewfinder. [EXPOSURE], etc. If you set the clock for viewing. EXPO- TAPE mode). • : The ...LCD screen lights up to the optimal angle for the first time. 3 Touch . 60min MENU 1/3 FADER SPOT METER -:--:-- In that case, charge the rechargeable button-type battery (p. 123) and then set the date and time, the [CLOCK SET] ...
Camera Operations Guide
Page 20
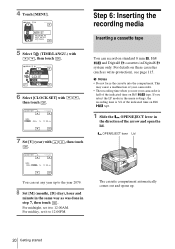
...[M] (month), [D] (day), hour and minute in the same way as write-protection), see page 115. DISPLAY MENU ROTATE A. For details on Hi8 tape. 1 Slide the OPEN/EJECT lever in Digital8 system only. SHUT OFF CLOCK SET WORLD TIME LANGUAGE PROGRAM AE OK 6 Select [CLOCK SET] with / , then... touch . This may cause a malfunction of your camcorder is half of the indicated time on standard 8 mm , Hi8 and Digital8 cassettes in the direction of the indicated time on these cassettes (such as was done in the menu settings, the recording time is 3/4 of the arrow and ...
...[M] (month), [D] (day), hour and minute in the same way as write-protection), see page 115. DISPLAY MENU ROTATE A. For details on Hi8 tape. 1 Slide the OPEN/EJECT lever in Digital8 system only. SHUT OFF CLOCK SET WORLD TIME LANGUAGE PROGRAM AE OK 6 Select [CLOCK SET] with / , then... touch . This may cause a malfunction of your camcorder is half of the indicated time on standard 8 mm , Hi8 and Digital8 cassettes in the direction of the indicated time on these cassettes (such as was done in the menu settings, the recording time is 3/4 of the arrow and ...
Camera Operations Guide
Page 22
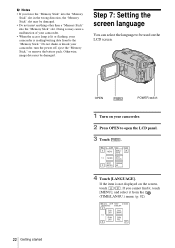
...screen, touch / . If you force the "Memory Stick" into the "Memory Stick" slot. If the item is reading/writing data from the (TIME/LANGU.) menu. (p. 82) 60min LANGUAGE: STBY 0:00:00 ENGLISH ENG LISH 1/2 FRAN ÇAIS ENG [SIMP] ESPA ÑOL SURE 1/3 FADER SPOT FOCUS SPOT ... METER AE 4 Touch [LANGUAGE]. b Notes • If you cannot find it, touch [MENU], and select it from /to the "Memory Stick." Otherwise, image data may be damaged. Do not shake or knock your camcorder is not displayed on your camcorder. 2 Press OPEN to open the LCD panel. 3 Touch . 60min...
...screen, touch / . If you force the "Memory Stick" into the "Memory Stick" slot. If the item is reading/writing data from the (TIME/LANGU.) menu. (p. 82) 60min LANGUAGE: STBY 0:00:00 ENGLISH ENG LISH 1/2 FRAN ÇAIS ENG [SIMP] ESPA ÑOL SURE 1/3 FADER SPOT FOCUS SPOT ... METER AE 4 Touch [LANGUAGE]. b Notes • If you cannot find it, touch [MENU], and select it from /to the "Memory Stick." Otherwise, image data may be damaged. Do not shake or knock your camcorder is not displayed on your camcorder. 2 Press OPEN to open the LCD panel. 3 Touch . 60min...
Camera Operations Guide
Page 25
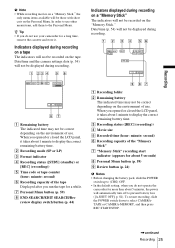
...time may not be those with short cuts on the "Memory Stick." When you do not operate the camcorder for a long time, remove the cassette and store it takes about 5 seconds) H Personal Menu button (p. 59) I Review button (p. 24) b Notes • Before changing the battery pack, ... second) F Recording capacity of the tape Displayed after you do not use other menu items, add them to display the correct remaining battery time. In order to use your camcorder for more than about 1 minute to the Personal Menu. B Recording mode (SP or LP) C Format indicator D Recording status ([STBY...
...time may not be those with short cuts on the "Memory Stick." When you do not operate the camcorder for a long time, remove the cassette and store it takes about 5 seconds) H Personal Menu button (p. 59) I Review button (p. 24) b Notes • Before changing the battery pack, ... second) F Recording capacity of the tape Displayed after you do not use other menu items, add them to display the correct remaining battery time. In order to use your camcorder for more than about 1 minute to the Personal Menu. B Recording mode (SP or LP) C Format indicator D Recording status ([STBY...
Camera Operations Guide
Page 26
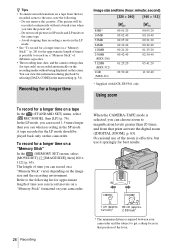
...camera settings data (for best results. 26 Recording 1 cm (approx. 80 cm (approx. 1/2 inch)* 2 5/8 feet)* * The minimum distance required between your camcorder. The length of time you turn the power off). - z Tips • To ensure smooth transition on a tape from that position of the lever. Refer ...to record on a tape In the (STANDARD SET) menu, select [ REC MODE], then [LP] (p. 76). Recording for a longer time on a "Memory Stick" of time it sparingly for tape only) are ...
...camera settings data (for best results. 26 Recording 1 cm (approx. 80 cm (approx. 1/2 inch)* 2 5/8 feet)* * The minimum distance required between your camcorder. The length of time you turn the power off). - z Tips • To ensure smooth transition on a tape from that position of the lever. Refer ...to record on a tape In the (STANDARD SET) menu, select [ REC MODE], then [LP] (p. 76). Recording for a longer time on a "Memory Stick" of time it sparingly for tape only) are ...

Camera Operations Guide
Page 28
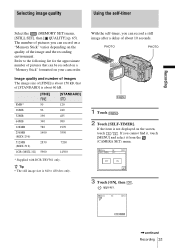
...A mirror-image of about 10 seconds. If you record them. REC START/STOP Open the LCD panel 90 degrees to the camcorder while you cannot find it, touch [MENU], and select it 180 degrees towards the subject so that you can start recording after a delay of the subject appears on the... screen, touch / . You can also utilize this function when recording yourself, to keep the attention of small children attracted to the camcorder, then rotate it from the (CAMERA SET) menu. 60min STBY SELF-TIMER: OFF 0:00:00 OFF ON 3 Touch [ON], then . With the self-timer, you and your ...
...A mirror-image of about 10 seconds. If you record them. REC START/STOP Open the LCD panel 90 degrees to the camcorder while you cannot find it, touch [MENU], and select it 180 degrees towards the subject so that you can start recording after a delay of the subject appears on the... screen, touch / . You can also utilize this function when recording yourself, to keep the attention of small children attracted to the camcorder, then rotate it from the (CAMERA SET) menu. 60min STBY SELF-TIMER: OFF 0:00:00 OFF ON 3 Touch [ON], then . With the self-timer, you and your ...
Camera Operations Guide
Page 30
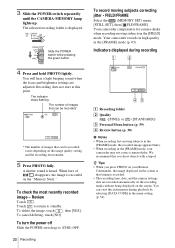
.... Review Touch . Your camcorder records in high quality in the [FIELD] mode. Indicators displayed during playback by selecting [DATA CODE] in the [FRAME] mode, your Remote Commander, the image displayed on the screen at this information during recording 60min FINE 101 P-MENU A Recording folder B Quality...-MEMORY lamp lights up to standby. The number of images that can view this point. To cancel deleting, touch [NO]. Your camcorder compensates for camera-shake when recording moving subjects in the [FRAME] mode (p. 65). To check the most recently recorded image - To...
.... Review Touch . Your camcorder records in high quality in the [FIELD] mode. Indicators displayed during playback by selecting [DATA CODE] in the [FRAME] mode, your Remote Commander, the image displayed on the screen at this information during recording 60min FINE 101 P-MENU A Recording folder B Quality...-MEMORY lamp lights up to standby. The number of images that can view this point. To cancel deleting, touch [NO]. Your camcorder compensates for camera-shake when recording moving subjects in the [FRAME] mode (p. 65). To check the most recently recorded image - To...
Camera Operations Guide
Page 31
...-TIMER: OFF OFF ON 3 Touch [ON], then . Selecting image quality Using the self-timer Recording Select the (MEMORY SET) menu, [STILL SET], then [ QUALITY] (p. 65). The number of [FINE] is about 60 kB. [FINE] [STANDARD] 8MB...5900 120 240 485 980 1970 3550 7200 14500 * Supplied with DCR-TRV361 only. appears. 60min FINE 20 101 P-MENU ,continued Recording 31 If the item is 640 × 480 dots only. z Tip • The still image size...-timer, you can record on a "Memory Stick" varies depending on your camcorder. PHOTO PHOTO 1 Touch . 2 Touch [SELF-TIMER].
...-TIMER: OFF OFF ON 3 Touch [ON], then . Selecting image quality Using the self-timer Recording Select the (MEMORY SET) menu, [STILL SET], then [ QUALITY] (p. 65). The number of [FINE] is about 60 kB. [FINE] [STANDARD] 8MB...5900 120 240 485 980 1970 3550 7200 14500 * Supplied with DCR-TRV361 only. appears. 60min FINE 20 101 P-MENU ,continued Recording 31 If the item is 640 × 480 dots only. z Tip • The still image size...-timer, you can record on a "Memory Stick" varies depending on your camcorder. PHOTO PHOTO 1 Touch . 2 Touch [SELF-TIMER].
Camera Operations Guide
Page 34
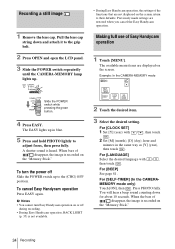
... focus, then press fully. A shutter sound is not available. • During Easy Handycam operation, the settings of disappear, the image is recorded on the "Memory Stick." When the bars of Easy Handycam operation 1 Touch [MENU]. The EASY lights up in the same way as [Y] (year), then touch ....LCD panel. 3 Slide the POWER switch repeatedly until the CAMERA-MEMORY lamp lights up to their defaults. The available menu items are restored when you cancel the Easy Handycam operation. Recording a still image 1 Remove the lens cap. Pull the lens cap string down for about 10 seconds....
... focus, then press fully. A shutter sound is not available. • During Easy Handycam operation, the settings of disappear, the image is recorded on the "Memory Stick." When the bars of Easy Handycam operation 1 Touch [MENU]. The EASY lights up in the same way as [Y] (year), then touch ....LCD panel. 3 Slide the POWER switch repeatedly until the CAMERA-MEMORY lamp lights up to their defaults. The available menu items are restored when you cancel the Easy Handycam operation. Recording a still image 1 Remove the lens cap. Pull the lens cap string down for about 10 seconds....
Camera Operations Guide
Page 35
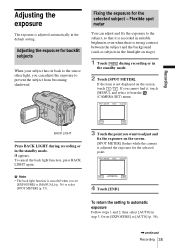
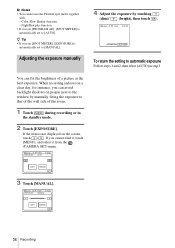
If you cannot find it, touch [MENU], and select it is recorded in suitable brightness even when there is not displayed on the screen, touch / . appears. AUTO END 4 Touch [END]. Or set [... and fix the exposure to the subject, so that it from becoming shadowed. To return the setting to prevent the subject from the (CAMERA SET) menu. Adjusting the exposure for backlit subjects When your subject has its back to the sun or other light, you want to [AUTO] (p. 36). ,continued Recording...
If you cannot find it, touch [MENU], and select it is recorded in suitable brightness even when there is not displayed on the screen, touch / . appears. AUTO END 4 Touch [END]. Or set [... and fix the exposure to the subject, so that it from becoming shadowed. To return the setting to prevent the subject from the (CAMERA SET) menu. Adjusting the exposure for backlit subjects When your subject has its back to the sun or other light, you want to [AUTO] (p. 36). ,continued Recording...
Camera Operations Guide
Page 36
... 3. b Notes • You cannot use the Flexible spot meter together with: - NightShot plus function • If you cannot find it, touch [MENU], and select it from the (CAMERA SET) menu. 60min EXPOSURE: STBY 0:00:00 AUTO AUTO MANUAL 3 Touch [MANUAL]. 60min EXPOSURE: STBY 0:00:00 MANUAL AUTO MANUAL OK 36 Recording Color... you set [PROGRAM AE], [SPOT METER] is not displayed on people next to the window by touching (dim)/ (bright), then touch . 60min STBY 0:00:00 P-MENU To return the setting to [AUTO]. You can avoid backlight shadows on the screen, touch / .
... 3. b Notes • You cannot use the Flexible spot meter together with: - NightShot plus function • If you cannot find it, touch [MENU], and select it from the (CAMERA SET) menu. 60min EXPOSURE: STBY 0:00:00 AUTO AUTO MANUAL 3 Touch [MANUAL]. 60min EXPOSURE: STBY 0:00:00 MANUAL AUTO MANUAL OK 36 Recording Color... you set [PROGRAM AE], [SPOT METER] is not displayed on people next to the window by touching (dim)/ (bright), then touch . 60min STBY 0:00:00 P-MENU To return the setting to [AUTO]. You can avoid backlight shadows on the screen, touch / .
Camera Operations Guide
Page 37
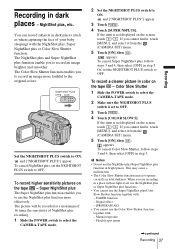
...total darkness. and ["NIGHTSHOT PLUS"] appear. Super NightShot plus The Super NightShot plus function enables you cannot find it, touch [MENU], and select it from the (CAMERA SET) menu. 5 Touch [ON], then . If you to the original colors. Digital effect - [PROGRAM AE] • You ... Slow Shutter function. To record higher sensitivity pictures on the screen, touch / . When you cannot find it, touch [MENU], and select it from the (CAMERA SET) menu. 5 Touch [ON], then . Manual exposure - Flexible spot meter ,continued Recording 37 Recording NIGHTSHOT PLUS OFF ON Set ...
...total darkness. and ["NIGHTSHOT PLUS"] appear. Super NightShot plus The Super NightShot plus function enables you cannot find it, touch [MENU], and select it from the (CAMERA SET) menu. 5 Touch [ON], then . If you to the original colors. Digital effect - [PROGRAM AE] • You ... Slow Shutter function. To record higher sensitivity pictures on the screen, touch / . When you cannot find it, touch [MENU], and select it from the (CAMERA SET) menu. 5 Touch [ON], then . Manual exposure - Flexible spot meter ,continued Recording 37 Recording NIGHTSHOT PLUS OFF ON Set ...

Camera Operations Guide
Page 38
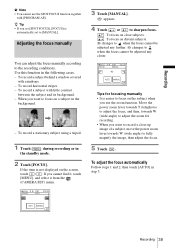
...FOCUS You can make image color deeper (p. 62). Or set [NS LIGHT] to [OFF] on the menu is recommended. The motion of the picture may not be reproduced properly. The maximum shooting distance using the...in dark places (such as night scene or in complete darkness, setting [NS LIGHT] to [ON] on the menu. You can select and adjust the focal point to aim it at this time. • Adjust the focus manually... focus automatically. • Do not cover the infrared port with your camcorder changes depending on the screen. [SPOT FOCUS] flashes while the camera is hard to adjust the focus on...
...FOCUS You can make image color deeper (p. 62). Or set [NS LIGHT] to [OFF] on the menu is recommended. The motion of the picture may not be reproduced properly. The maximum shooting distance using the...in dark places (such as night scene or in complete darkness, setting [NS LIGHT] to [ON] on the menu. You can select and adjust the focal point to aim it at this time. • Adjust the focus manually... focus automatically. • Do not cover the infrared port with your camcorder changes depending on the screen. [SPOT FOCUS] flashes while the camera is hard to adjust the focus on...
Camera Operations Guide
Page 39
... adjust the focus automatically Follow steps 1 and 2, then touch [AUTO] in the background. - z Tip • If you cannot find it, touch [MENU], and select it from the (CAMERA SET) menu. 60min FOCUS: STBY AUTO 0:00:00 3 Touch [MANUAL]. If the item is automatically set to focus on the subject when you want...
... adjust the focus automatically Follow steps 1 and 2, then touch [AUTO] in the background. - z Tip • If you cannot find it, touch [MENU], and select it from the (CAMERA SET) menu. 60min FOCUS: STBY AUTO 0:00:00 3 Touch [MANUAL]. If the item is automatically set to focus on the subject when you want...

Camera Operations Guide
Page 40
... in only) POWER switch Fading in , the picture gradually changes from black-and-white to color. If you cannot find it, touch [MENU], and select it from the (PICT. APPLI.) menu. 60min FADER: STBY OFF 0:00:00 OFF BLACK FADER 1/2 WHITE MOSAIC FADER FADER [MONOTONE] When fading in and out of a scene...
... in only) POWER switch Fading in , the picture gradually changes from black-and-white to color. If you cannot find it, touch [MENU], and select it from the (PICT. APPLI.) menu. 60min FADER: STBY OFF 0:00:00 OFF BLACK FADER 1/2 WHITE MOSAIC FADER FADER [MONOTONE] When fading in and out of a scene...
Camera Operations Guide
Page 41
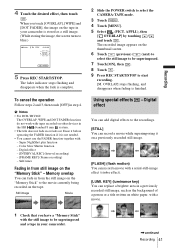
.... (While storing the image, the screen turns to start recording. [M. To cancel the operation Follow steps 2 and 3, then touch [OFF] in your camcorder is not needed. • You cannot use the FADER function together with the still image to be superimposed. 7 Touch [ON], then . 8 Touch .... 9 Press REC START/STOP to blue.) 60min STBY 0:00:00 BLACK FADER P-MENU 5 Press REC START/STOP. b Notes • For DCR-TRV460: The OVERLAP, WIPE and DOT FADER functions do not work with a serial-still-image effect (strobe effect). [LUMI. Digital effect...
.... (While storing the image, the screen turns to start recording. [M. To cancel the operation Follow steps 2 and 3, then touch [OFF] in your camcorder is not needed. • You cannot use the FADER function together with the still image to be superimposed. 7 Touch [ON], then . 8 Touch .... 9 Press REC START/STOP to blue.) 60min STBY 0:00:00 BLACK FADER P-MENU 5 Press REC START/STOP. b Notes • For DCR-TRV460: The OVERLAP, WIPE and DOT FADER functions do not work with a serial-still-image effect (strobe effect). [LUMI. Digital effect...
Camera Operations Guide
Page 42
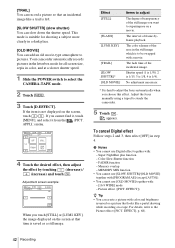
... is left. [SLOW SHUTTR] (slow shutter) You can slow down the shutter speed. If you touch [STILL] or [LUMI. APPLI.) menu. 60min D. The interval of the incidental image. Color Slow Shutter function - Picture effect ([PICT. [TRAIL] You can record a picture so... incidental image like a pastel drawing while recording on a tape. Adjustment screen example: 60min D. EFFECT], p. 68). 42 Recording Your camcorder automatically records pictures in the letterbox mode for shooting a subject more clearly in color, and at that time is to pictures. Super NightShot...
... is left. [SLOW SHUTTR] (slow shutter) You can slow down the shutter speed. If you touch [STILL] or [LUMI. APPLI.) menu. 60min D. The interval of the incidental image. Color Slow Shutter function - Picture effect ([PICT. [TRAIL] You can record a picture so... incidental image like a pastel drawing while recording on a tape. Adjustment screen example: 60min D. EFFECT], p. 68). 42 Recording Your camcorder automatically records pictures in the letterbox mode for shooting a subject more clearly in color, and at that time is to pictures. Super NightShot...

Camera Operations Guide
Page 43
...) in the "Memory Stick" will be displayed on top of a still image into a frame with the still image. The still image stored in your camcorder. 2 Slide the POWER switch repeatedly to select the CAMERA-TAPE mode (when you are recording on a tape) or the CAMERA-MEMORY mode (when you ... and a tape (only if you have the movie swap into the blue area of a still image such as an illustration or into a movie. APPLI.) menu. The still image is superimposed on the movie which can superimpose a still image you have a "Memory Stick" with the subject against a blue background. Still...
...) in the "Memory Stick" will be displayed on top of a still image into a frame with the still image. The still image stored in your camcorder. 2 Slide the POWER switch repeatedly to select the CAMERA-TAPE mode (when you are recording on a tape) or the CAMERA-MEMORY mode (when you ... and a tape (only if you have the movie swap into the blue area of a still image such as an illustration or into a movie. APPLI.) menu. The still image is superimposed on the movie which can superimpose a still image you have a "Memory Stick" with the subject against a blue background. Still...


