
Operating Instructions
Page 169
... folder Press RETURN in the folder. Once you want to view. "Memory Stick" Operations - Before operation Insert a "Memory Stick" into your camcorder. to select the desired image in step (3). When no image is in the current selected PB folder and the folder information are displayed. (5) ... you record an image, the current recording folder becomes the current PB folder. Note Folders created, or renamed with your computer may not be recognized by your camcorder. (1) Set the POWER switch to MEMORY. Selecting a folder to view You can select a folder to view images in 1 , then press the ...
... folder Press RETURN in the folder. Once you want to view. "Memory Stick" Operations - Before operation Insert a "Memory Stick" into your camcorder. to select the desired image in step (3). When no image is in the current selected PB folder and the folder information are displayed. (5) ... you record an image, the current recording folder becomes the current PB folder. Note Folders created, or renamed with your computer may not be recognized by your camcorder. (1) Set the POWER switch to MEMORY. Selecting a folder to view You can select a folder to view images in 1 , then press the ...
Operating Instructions
Page 183
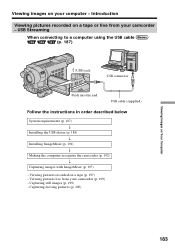
... instructions in order described below System requirements (p. 187) r Installing the USB driver (p. 189) r Installing ImageMixer (p. 191) r Making the computer recognize the camcorder (p. 192) r Capturing images with ImageMixer (p. 197) - Viewing pictures live from your camcorder (p. 199) - Capturing still images (p. 199) - Capturing moving pictures (p. 200) Viewing Images on a tape (p. 197) - Viewing images on a tape or...
... instructions in order described below System requirements (p. 187) r Installing the USB driver (p. 189) r Installing ImageMixer (p. 191) r Making the computer recognize the camcorder (p. 192) r Capturing images with ImageMixer (p. 197) - Viewing pictures live from your camcorder (p. 199) - Capturing still images (p. 199) - Capturing moving pictures (p. 200) Viewing Images on a tape (p. 197) - Viewing images on a tape or...
Operating Instructions
Page 185
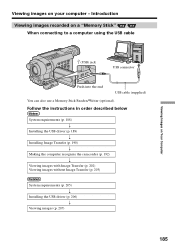
Follow the instructions in order described below System requirements (p. 188) r Installing the USB driver (p. 189) r Installing Image Transfer (p. 190) r Making the computer recognize the camcorder (p. 192) r Viewing images with Image Transfer (p. 202) Viewing images without Image Transfer (p. 203) System requirements (p. 205) r Installing the USB driver (p. 206) r Viewing images (p. 207) 185 ...
Follow the instructions in order described below System requirements (p. 188) r Installing the USB driver (p. 189) r Installing Image Transfer (p. 190) r Making the computer recognize the camcorder (p. 192) r Viewing images with Image Transfer (p. 202) Viewing images without Image Transfer (p. 203) System requirements (p. 205) r Installing the USB driver (p. 206) r Viewing images (p. 207) 185 ...

Operating Instructions
Page 189
... on the screen. This starts USB driver installation. Carry out installation again following the steps on the screen. Viewing Images on Your Computer Connecting your camcorder to your computer using Windows XP, log in with permission of computer administrators. (1) Turn on your computer and allow Windows to load. (2) Insert the supplied... USB driver installation is complete, the USB driver will not be properly registered. Click The title screen appears. (4) Move the cursor to "Making the computer recognize the camcorder."
... on the screen. This starts USB driver installation. Carry out installation again following the steps on the screen. Viewing Images on Your Computer Connecting your camcorder to your computer using Windows XP, log in with permission of computer administrators. (1) Turn on your computer and allow Windows to load. (2) Insert the supplied... USB driver installation is complete, the USB driver will not be properly registered. Click The title screen appears. (4) Move the cursor to "Making the computer recognize the camcorder."
Operating Instructions
Page 192
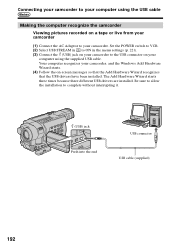
... using the supplied USB cable. Be sure to allow the installation to your camcorder, and the Windows Add Hardware Wizard starts. (4) Follow the on-screen messages so that the Add Hardware Wizard recognizes that the USB drivers have been installed. The Add Hardware Wizard starts three...the menu settings (p. 221). (3) Connect the (USB) jack on your camcorder to the USB connector on your computer using the USB cable Making the computer recognize the camcorder Viewing pictures recorded on a tape or live from your camcorder (1) Connect the AC Adaptor to complete without interrupting it. (USB) ...
... using the supplied USB cable. Be sure to allow the installation to your camcorder, and the Windows Add Hardware Wizard starts. (4) Follow the on-screen messages so that the Add Hardware Wizard recognizes that the USB drivers have been installed. The Add Hardware Wizard starts three...the menu settings (p. 221). (3) Connect the (USB) jack on your camcorder to the USB connector on your computer using the USB cable Making the computer recognize the camcorder Viewing pictures recorded on a tape or live from your camcorder (1) Connect the AC Adaptor to complete without interrupting it. (USB) ...
Operating Instructions
Page 193
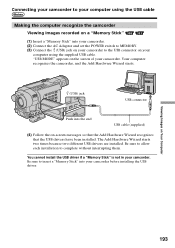
... into the end USB cable (supplied) (4) Follow the on your computer using the USB cable Making the computer recognize the camcorder Viewing images recorded on a "Memory Stick" (1) Insert a "Memory Stick" into your camcorder. (2) Connect the AC Adaptor and set the POWER switch to MEMORY. (3) Connect the (USB) jack on ...your camcorder to the USB connector on -screen messages so that the Add Hardware Wizard recognizes that the USB drivers have been installed. The Add Hardware Wizard starts two times because two ...
... into the end USB cable (supplied) (4) Follow the on your computer using the USB cable Making the computer recognize the camcorder Viewing images recorded on a "Memory Stick" (1) Insert a "Memory Stick" into your camcorder. (2) Connect the AC Adaptor and set the POWER switch to MEMORY. (3) Connect the (USB) jack on ...your camcorder to the USB connector on -screen messages so that the Add Hardware Wizard recognizes that the USB drivers have been installed. The Add Hardware Wizard starts two times because two ...
Operating Instructions
Page 203
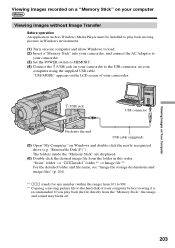
... camcorder. (USB) jack USB connector Push into your camcorder, and connect the AC Adaptor to your camcorder. (3) Set the POWER switch to MEMORY. (4) Connect the (USB) jack on your camcorder ...the image and sound may break off. "Removable Disk (F:)"). "USB MODE" appears on the LCD screen of your computer before viewing it is recommended. The folders inside the "Memory Stick" are...the end USB cable (supplied) (5) Open "My Computer" on Windows and double-click the newly recognized drive (e.g. Viewing images recorded on a "Memory Stick" on your computer Viewing images without Image Transfer...
... camcorder. (USB) jack USB connector Push into your camcorder, and connect the AC Adaptor to your camcorder. (3) Set the POWER switch to MEMORY. (4) Connect the (USB) jack on your camcorder ...the image and sound may break off. "Removable Disk (F:)"). "USB MODE" appears on the LCD screen of your computer before viewing it is recommended. The folders inside the "Memory Stick" are...the end USB cable (supplied) (5) Open "My Computer" on Windows and double-click the newly recognized drive (e.g. Viewing images recorded on a "Memory Stick" on your computer Viewing images without Image Transfer...
Operating Instructions
Page 204
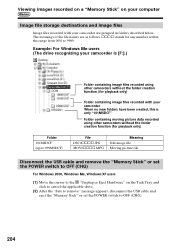
... your computer Image file storage destinations and image files Image files recorded with your camcorder are as follows. Example: For Windows Me users (The drive recognizing your camcorder is only "101MSDCF" Folder containing moving picture data recorded using other camcorders without the folder creation function (for any number within the range from 0001 to...
... your computer Image file storage destinations and image files Image files recorded with your camcorder are as follows. Example: For Windows Me users (The drive recognizing your camcorder is only "101MSDCF" Folder containing moving picture data recorded using other camcorders without the folder creation function (for any number within the range from 0001 to...
Operating Instructions
Page 206
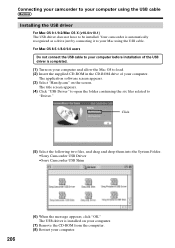
... in the CD-ROM drive of the USB driver is completed. (1) Turn on your computer and allow the Mac OS to be installed. Your camcorder is automatically recognized as a drive just by connecting it to "Driver." The USB driver is installed on the screen. The application software screen appears. (3) Select "Handycam" on... cable to your computer before installation of your computer. Click (5) Select the following two files, and drag and drop them into the System Folder. •Sony Camcorder USB Driver •Sony Camcorder USB Shim 206 (6) When the message appears, click "OK."
... in the CD-ROM drive of the USB driver is completed. (1) Turn on your computer and allow the Mac OS to be installed. Your camcorder is automatically recognized as a drive just by connecting it to "Driver." The USB driver is installed on the screen. The application software screen appears. (3) Select "Handycam" on... cable to your computer before installation of your computer. Click (5) Select the following two files, and drag and drop them into the System Folder. •Sony Camcorder USB Driver •Sony Camcorder USB Shim 206 (6) When the message appears, click "OK."
Operating Instructions
Page 230
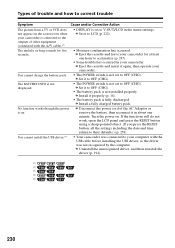
...work, open the LCD panel and press the RESET button using a sharp-pointed object. (If you press the RESET button, all the settings including the date and time return to their defaults.) (p. 258) You cannot install the USB driver.*5) • Your camcorder was not recognized by the computer.... The melody or beep sounds for at least one minute. c Install a fully charged battery pack. c Set it to V-OUT/LCD in about one hour to OFF (CHG). c Disconnect the power cord ...
...work, open the LCD panel and press the RESET button using a sharp-pointed object. (If you press the RESET button, all the settings including the date and time return to their defaults.) (p. 258) You cannot install the USB driver.*5) • Your camcorder was not recognized by the computer.... The melody or beep sounds for at least one minute. c Install a fully charged battery pack. c Set it to V-OUT/LCD in about one hour to OFF (CHG). c Disconnect the power cord ...


