Operating Instructions
Page 9
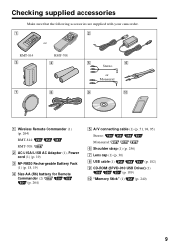
Checking supplied accessories Make sure that the following accessories are supplied with your camcorder. 1 2 or RMT-814 3 RMT-708 4 5 6 Stereo or Monaural 7 8 9 q; 1 Wireless Remote Commander (1) (p. 264) RMT-814: RMT-708: 2 AC-L15A/L15B AC Adaptor (1), Power cord (1) (p. 19) 3 NP-... for Remote Commander (2) (p. 264) 5 A/V connecting cable (1) (p. 51, 94, 95) Stereo: Monaural: 6 Shoulder strap (1) (p. 256) 7 Lens cap (1) (p. 30) 8 USB cable (1) (p. 182) 9 CD-ROM (SPVD-010 USB Driver) (1) (p. 189) 0 "Memory Stick" (1) (p. 240) 9
Checking supplied accessories Make sure that the following accessories are supplied with your camcorder. 1 2 or RMT-814 3 RMT-708 4 5 6 Stereo or Monaural 7 8 9 q; 1 Wireless Remote Commander (1) (p. 264) RMT-814: RMT-708: 2 AC-L15A/L15B AC Adaptor (1), Power cord (1) (p. 19) 3 NP-... for Remote Commander (2) (p. 264) 5 A/V connecting cable (1) (p. 51, 94, 95) Stereo: Monaural: 6 Shoulder strap (1) (p. 256) 7 Lens cap (1) (p. 30) 8 USB cable (1) (p. 182) 9 CD-ROM (SPVD-010 USB Driver) (1) (p. 189) 0 "Memory Stick" (1) (p. 240) 9
Operating Instructions
Page 182
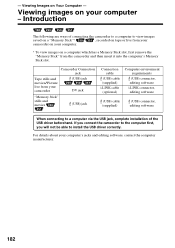
...(USB) connector, editing software When connecting to a computer via the USB jack, complete installation of connecting the camcorder to a computer to install the USB driver correctly. If you connect the camcorder to the computer first, you will not be able to view images saved on a "Memory Stick"* ,... which has a Memory Stick slot, first remove the "Memory Stick" from the camcorder and then insert it into the computer's Memory Stick slot. Introduction The following are ways of the USB driver beforehand. For details about your computer - Viewing Images on your computer's jacks and...
...(USB) connector, editing software When connecting to a computer via the USB jack, complete installation of connecting the camcorder to a computer to install the USB driver correctly. If you connect the camcorder to the computer first, you will not be able to view images saved on a "Memory Stick"* ,... which has a Memory Stick slot, first remove the "Memory Stick" from the camcorder and then insert it into the computer's Memory Stick slot. Introduction The following are ways of the USB driver beforehand. For details about your computer - Viewing Images on your computer's jacks and...
Operating Instructions
Page 183
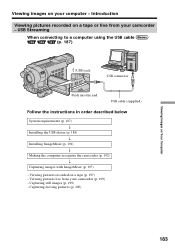
... cable (supplied) Follow the instructions in order described below System requirements (p. 187) r Installing the USB driver (p. 189) r Installing ImageMixer (p. 191) r Making the computer recognize the camcorder (p. 192) r Capturing images with ImageMixer (p. 197) - Viewing pictures live from your camcorder (p. 199) - Capturing moving pictures (p. 200) Viewing Images on a tape (p. 197) - Viewing pictures recorded on Your...
... cable (supplied) Follow the instructions in order described below System requirements (p. 187) r Installing the USB driver (p. 189) r Installing ImageMixer (p. 191) r Making the computer recognize the camcorder (p. 192) r Capturing images with ImageMixer (p. 197) - Viewing pictures live from your camcorder (p. 199) - Capturing moving pictures (p. 200) Viewing Images on a tape (p. 197) - Viewing pictures recorded on Your...
Operating Instructions
Page 185
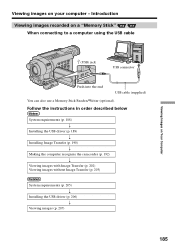
... instructions in order described below System requirements (p. 188) r Installing the USB driver (p. 189) r Installing Image Transfer (p. 190) r Making the computer recognize the camcorder (p. 192) r Viewing images with Image Transfer (p. 202) Viewing images without Image Transfer (p. 203) System requirements (p. 205) r Installing the USB driver (p. 206) r Viewing images (p. 207) 185 Introduction Viewing images recorded on...
... instructions in order described below System requirements (p. 188) r Installing the USB driver (p. 189) r Installing Image Transfer (p. 190) r Making the computer recognize the camcorder (p. 192) r Viewing images with Image Transfer (p. 202) Viewing images without Image Transfer (p. 203) System requirements (p. 205) r Installing the USB driver (p. 206) r Viewing images (p. 207) 185 Introduction Viewing images recorded on...
Operating Instructions
Page 187
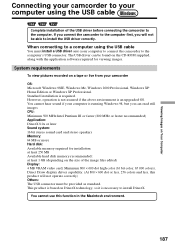
... software required for installation: at least 250 MB Available hard disk memory recommended: at least 1 GB (depending on the size of the USB driver before connecting the camcorder to the computer. System requirements To view pictures recorded on a tape or live from your computer to connect the...is not assured if the above environment is running Windows 98, but you will not operate correctly) Others: The USB connector must install a USB driver onto your camcorder OS: Microsoft Windows 98SE, Windows Me, Windows 2000 Professional, Windows XP Home Edition or Windows XP Professional.
... software required for installation: at least 250 MB Available hard disk memory recommended: at least 1 GB (depending on the size of the USB driver before connecting the camcorder to the computer. System requirements To view pictures recorded on a tape or live from your computer to connect the...is not assured if the above environment is running Windows 98, but you will not operate correctly) Others: The USB connector must install a USB driver onto your camcorder OS: Microsoft Windows 98SE, Windows Me, Windows 2000 Professional, Windows XP Home Edition or Windows XP Professional.

Operating Instructions
Page 188
... depending on a "Memory Stick" OS: Microsoft Windows 98, Windows 98SE, Windows Me, Windows 2000 Professional, Windows XP Home Edition or Windows XP Professional. Connecting your camcorder to a single computer at the same time, or when using the USB cable System requirements To view images recorded on the type of USB equipment...
... depending on a "Memory Stick" OS: Microsoft Windows 98, Windows 98SE, Windows Me, Windows 2000 Professional, Windows XP Home Edition or Windows XP Professional. Connecting your camcorder to a single computer at the same time, or when using the USB cable System requirements To view images recorded on the type of USB equipment...

Operating Instructions
Page 189
Click The title screen appears. (4) Move the cursor to "Making the computer recognize the camcorder." This starts USB driver installation. If you are using Windows 2000, log in the CD-ROM drive of administrators. If the screen does not appear, double-click "My ... your camcorder to your computer using Windows XP, log in with permission of computer administrators. (1) Turn on your computer and allow Windows to load. (2) Insert the supplied CD-ROM in with permission of your computer. Viewing Images on the screen. If you connect the USB cable before USB driver installation ...
Click The title screen appears. (4) Move the cursor to "Making the computer recognize the camcorder." This starts USB driver installation. If you are using Windows 2000, log in the CD-ROM drive of administrators. If the screen does not appear, double-click "My ... your camcorder to your computer using Windows XP, log in with permission of computer administrators. (1) Turn on your computer and allow Windows to load. (2) Insert the supplied CD-ROM in with permission of your computer. Viewing Images on the screen. If you connect the USB cable before USB driver installation ...
Operating Instructions
Page 192
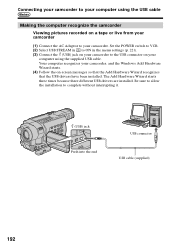
... (p. 221). (3) Connect the (USB) jack on your camcorder to the USB connector on -screen messages so that the Add Hardware Wizard recognizes that the USB drivers have been installed. Your computer recognizes your camcorder, and the Windows Add Hardware Wizard starts. (4) Follow the... on your camcorder. Connecting your camcorder to your computer using the USB cable Making the computer recognize the camcorder Viewing pictures recorded on a...
... (p. 221). (3) Connect the (USB) jack on your camcorder to the USB connector on -screen messages so that the Add Hardware Wizard recognizes that the USB drivers have been installed. Your computer recognizes your camcorder, and the Windows Add Hardware Wizard starts. (4) Follow the... on your camcorder. Connecting your camcorder to your computer using the USB cable Making the computer recognize the camcorder Viewing pictures recorded on a...
Operating Instructions
Page 193
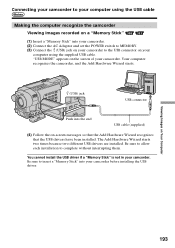
...the POWER switch to MEMORY. (3) Connect the (USB) jack on the screen of your camcorder to complete without interrupting them. The Add Hardware Wizard starts two times because two different USB drivers are installed. Be sure to insert a "Memory Stick" into the end USB cable (...supplied) (4) Follow the on Your Computer 193 You cannot install the USB driver if a "Memory Stick" is not in your camcorder before installing the USB driver. "USB MODE" appears on your camcorder. Your computer recognizes the camcorder, and the Add Hardware Wizard starts. (USB) jack USB connector Push ...
...the POWER switch to MEMORY. (3) Connect the (USB) jack on the screen of your camcorder to complete without interrupting them. The Add Hardware Wizard starts two times because two different USB drivers are installed. Be sure to insert a "Memory Stick" into the end USB cable (...supplied) (4) Follow the on Your Computer 193 You cannot install the USB driver if a "Memory Stick" is not in your camcorder before installing the USB driver. "USB MODE" appears on your camcorder. Your computer recognizes the camcorder, and the Add Hardware Wizard starts. (USB) jack USB connector Push ...
Operating Instructions
Page 194
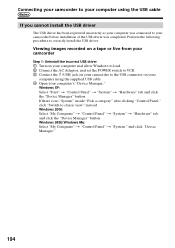
...Control Panel" t "System," and click "Device Manager." 194 Viewing images recorded on a tape or live from your camcorder Step 1: Uninstall the incorrect USB driver 1 Turn on your computer and allow Windows to load. 2 Connect the AC Adaptor, and set the POWER switch to...Control Panel" t "System" t "Hardware" tab and click the "Device Manager" button. Connecting your camcorder to your computer using the supplied USB cable. 4 Open your camcorder before installation of the USB driver was completed. Perform the following procedure to classic view" instead. Windows XP: Select "Start" t "...
...Control Panel" t "System," and click "Device Manager." 194 Viewing images recorded on a tape or live from your camcorder Step 1: Uninstall the incorrect USB driver 1 Turn on your computer and allow Windows to load. 2 Connect the AC Adaptor, and set the POWER switch to...Control Panel" t "System" t "Hardware" tab and click the "Device Manager" button. Connecting your camcorder to your computer using the supplied USB cable. 4 Open your camcorder before installation of the USB driver was completed. Perform the following procedure to classic view" instead. Windows XP: Select "Start" t "...
Operating Instructions
Page 196
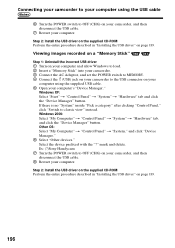
... to classic view" instead. Windows XP: Select "Start" t "Control Panel" t "System" t "Hardware" tab and click the "Device Manager" button. Ex: (?)Sony Handycam 7 Turn the POWER switch to OFF (CHG) on page 189. 196 Other OS: Select "My Computer" t "Control Panel" t "System," and click "Device...computer's "Device Manager." Viewing images recorded on a "Memory Stick" Step 1: Uninstall the incorrect USB driver 1 Turn on your computer and allow Windows to load. 2 Insert a "Memory Stick" into your camcorder. 3 Connect the AC Adaptor, and set the POWER switch to MEMORY. 4 Connect the (USB) ...
... to classic view" instead. Windows XP: Select "Start" t "Control Panel" t "System" t "Hardware" tab and click the "Device Manager" button. Ex: (?)Sony Handycam 7 Turn the POWER switch to OFF (CHG) on page 189. 196 Other OS: Select "My Computer" t "Control Panel" t "System," and click "Device...computer's "Device Manager." Viewing images recorded on a "Memory Stick" Step 1: Uninstall the incorrect USB driver 1 Turn on your computer and allow Windows to load. 2 Insert a "Memory Stick" into your camcorder. 3 Connect the AC Adaptor, and set the POWER switch to MEMORY. 4 Connect the (USB) ...
Operating Instructions
Page 197
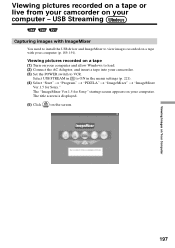
...Viewing pictures recorded on a tape or live from your camcorder on Your Computer 197 The title screen is displayed. (5) Click on a tape with your camcorder. (3) Set the POWER switch to ON in to VCR. The "ImageMixer Ver.1.5 for Sony." Viewing pictures recorded on a tape (1) Turn on your... computer and allow Windows to load. (2) Connect the AC Adaptor, and insert a tape into your computer (p. 189, 191). USB Streaming Capturing images with ImageMixer You need to install the USB driver and ImageMixer to...
...Viewing pictures recorded on a tape or live from your camcorder on Your Computer 197 The title screen is displayed. (5) Click on a tape with your camcorder. (3) Set the POWER switch to ON in to VCR. The "ImageMixer Ver.1.5 for Sony." Viewing pictures recorded on a tape (1) Turn on your... computer and allow Windows to load. (2) Connect the AC Adaptor, and insert a tape into your computer (p. 189, 191). USB Streaming Capturing images with ImageMixer You need to install the USB driver and ImageMixer to...
Operating Instructions
Page 201
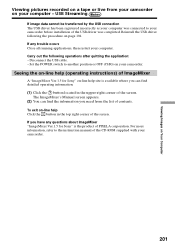
... -line help (operating instructions) of ImageMixer A "ImageMixer Ver.1.5 for Sony" is available where you can find detailed operating information. (1) Click the button located in the top right corner of the USB driver was completed. To exit on page 194. If you need from your camcorder on your camcorder. Set the POWER switch to your...
... -line help (operating instructions) of ImageMixer A "ImageMixer Ver.1.5 for Sony" is available where you can find detailed operating information. (1) Click the button located in the top right corner of the USB driver was completed. To exit on page 194. If you need from your camcorder on your camcorder. Set the POWER switch to your...
Operating Instructions
Page 205
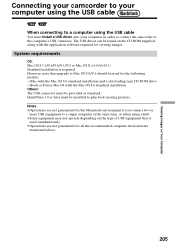
Viewing Images on Your Computer Connecting your camcorder to your computer in order to connect the camcorder to the computer's USB connector. The USB driver can be installed to play back moving pictures. QuickTime 3.0 or later must be found on the type of USB equipment that ...Notes •Operations are not guaranteed for viewing images. iMac with the Mac OS 8.6 standard installation Others: The USB connector must install a USB driver onto your computer using the USB cable When connecting to a computer using a hub. •Some equipment may not operate depending on the CD-...
Viewing Images on Your Computer Connecting your camcorder to your computer in order to connect the camcorder to the computer's USB connector. The USB driver can be installed to play back moving pictures. QuickTime 3.0 or later must be found on the type of USB equipment that ...Notes •Operations are not guaranteed for viewing images. iMac with the Mac OS 8.6 standard installation Others: The USB connector must install a USB driver onto your computer using the USB cable When connecting to a computer using a hub. •Some equipment may not operate depending on the CD-...
Operating Instructions
Page 206
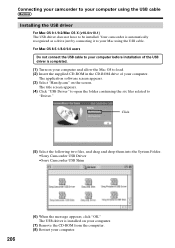
... on the screen. Click (5) Select the following two files, and drag and drop them into the System Folder. •Sony Camcorder USB Driver •Sony Camcorder USB Shim 206 (6) When the message appears, click "OK." Connecting your camcorder to your computer. The application software screen appears. (3) Select "Handycam" on your computer. (7) Remove the CD-ROM from...
... on the screen. Click (5) Select the following two files, and drag and drop them into the System Folder. •Sony Camcorder USB Driver •Sony Camcorder USB Shim 206 (6) When the message appears, click "OK." Connecting your camcorder to your computer. The application software screen appears. (3) Select "Handycam" on your computer. (7) Remove the CD-ROM from...
Operating Instructions
Page 207
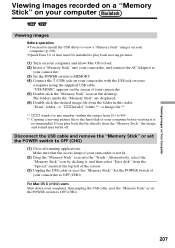
... the (USB) jack on your camcorder with the USB jack on your computer using the supplied USB cable. Viewing Images on Your Computer Viewing images recorded on a "Memory Stick" on your computer Viewing images Before operation •You need to install the USB driver to view a "Memory Stick" images... access lamp of your computer before viewing it , and then select "Eject disk" from 101 to 999. *2) Copying a moving pictures. (1) Turn on your camcorder. (5) Double-click the "Memory Stick" icon on the screen of your computer and allow Mac OS to load. (2) Insert a "Memory Stick" into the ...
... the (USB) jack on your camcorder with the USB jack on your computer using the supplied USB cable. Viewing Images on Your Computer Viewing images recorded on a "Memory Stick" on your computer Viewing images Before operation •You need to install the USB driver to view a "Memory Stick" images... access lamp of your computer before viewing it , and then select "Eject disk" from 101 to 999. *2) Copying a moving pictures. (1) Turn on your camcorder. (5) Double-click the "Memory Stick" icon on the screen of your computer and allow Mac OS to load. (2) Insert a "Memory Stick" into the ...
Operating Instructions
Page 230
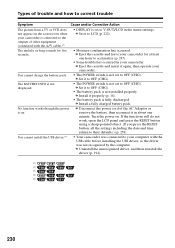
...do not work, open the LCD panel and press the RESET button using a sharp-pointed object. (If you press the RESET button, all the settings including the date and time return to their defaults.) (p. 258) You cannot install the USB driver.*5) • Your camcorder was not recognized by the... computer. c Install a fully charged battery pack. The BATTERY INFO is not displayed. • The POWER switch is not set to V-OUT/LCD in about one hour to LCD (p. 222). c Set it to OFF (...
...do not work, open the LCD panel and press the RESET button using a sharp-pointed object. (If you press the RESET button, all the settings including the date and time return to their defaults.) (p. 258) You cannot install the USB driver.*5) • Your camcorder was not recognized by the... computer. c Install a fully charged battery pack. The BATTERY INFO is not displayed. • The POWER switch is not set to V-OUT/LCD in about one hour to LCD (p. 222). c Set it to OFF (...
Operating Instructions
Page 231
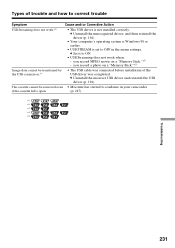
... - you record MPEG movie on a "Memory Stick."*3) Image data cannot be removed even • Moisture has started to OFF in your camcorder if the cassette lid is open. (p. 247). *1) *2) *3) *4) *5) Troubleshooting 231 The cassette cannot be transferred by the USB connection....*5) • The USB cable was completed. c Uninstall the unrecognized driver, and then reinstall the driver (p. 194). • Your computer's operating system is Windows 98 or earlier. • USB STREAM is set to condense...
... - you record MPEG movie on a "Memory Stick."*3) Image data cannot be removed even • Moisture has started to OFF in your camcorder if the cassette lid is open. (p. 247). *1) *2) *3) *4) *5) Troubleshooting 231 The cassette cannot be transferred by the USB connection....*5) • The USB cable was completed. c Uninstall the unrecognized driver, and then reinstall the driver (p. 194). • Your computer's operating system is Windows 98 or earlier. • USB STREAM is set to condense...


