Operating Instructions
Page 185
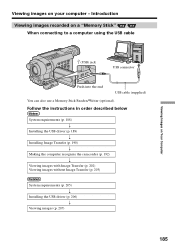
... - Follow the instructions in order described below System requirements (p. 188) r Installing the USB driver (p. 189) r Installing Image Transfer (p. 190) r Making the computer recognize the camcorder (p. 192) r Viewing images with Image Transfer (p. 202) Viewing images without Image Transfer (p. 203) System requirements (p. 205) r Installing the USB driver (p. 206) r Viewing images (p. 207) 185 Viewing Images on Your Computer Viewing...
... - Follow the instructions in order described below System requirements (p. 188) r Installing the USB driver (p. 189) r Installing Image Transfer (p. 190) r Making the computer recognize the camcorder (p. 192) r Viewing images with Image Transfer (p. 202) Viewing images without Image Transfer (p. 203) System requirements (p. 205) r Installing the USB driver (p. 206) r Viewing images (p. 207) 185 Viewing Images on Your Computer Viewing...
Operating Instructions
Page 190
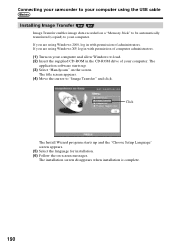
... the "Choose Setup Language" screen appears. (5) Select the language for installation. (6) Follow the on a "Memory Stick" to be automatically transferred (copied) to your computer. The title screen appears. (4) Move the cursor to load. (2) Insert the supplied CD-ROM in with permission... of computer administrators. (1) Turn on the screen. Connecting your camcorder to your computer using the USB cable Installing Image Transfer Image Transfer enables image data recorded on -screen messages. Click The Install Wizard program starts up . (3) Select ...
... the "Choose Setup Language" screen appears. (5) Select the language for installation. (6) Follow the on a "Memory Stick" to be automatically transferred (copied) to your computer. The title screen appears. (4) Move the cursor to load. (2) Insert the supplied CD-ROM in with permission... of computer administrators. (1) Turn on the screen. Connecting your camcorder to your computer using the USB cable Installing Image Transfer Image Transfer enables image data recorded on -screen messages. Click The Install Wizard program starts up . (3) Select ...
Operating Instructions
Page 191
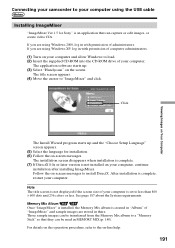
...or less. Those sample images can be used in there. For details on the operation procedure, refer to a "Memory Stick" so that can be transferred from the Memory Mix album to the on-line help. 191 Click The Install Wizard program starts up . (3) Select "Handycam" on the screen. The... or edit images, or create video CDs. The application software starts up and the "Choose Setup Language" screen appears. (5) Select the language for Sony" is not installed on your computer. See page 187 about the System requirements. If you are stored in MEMORY MIX (p. 140). Viewing Images on...
...or less. Those sample images can be used in there. For details on the operation procedure, refer to a "Memory Stick" so that can be transferred from the Memory Mix album to the on-line help. 191 Click The Install Wizard program starts up . (3) Select "Handycam" on the screen. The... or edit images, or create video CDs. The application software starts up and the "Choose Setup Language" screen appears. (5) Select the language for Sony" is not installed on your computer. See page 187 about the System requirements. If you are stored in MEMORY MIX (p. 140). Viewing Images on...
Operating Instructions
Page 201
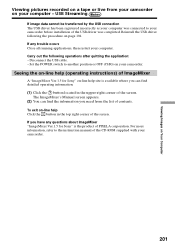
...USB cable. - USB Streaming If image data cannot be transferred by the USB connection The USB driver has been registered incorrectly as your computer was completed. Reinstall the USB driver following operations after quitting the application: - Seeing the on-line help (operating instructions) of ImageMixer A "ImageMixer Ver.1.5 for Sony...computer - For more information, refer to another position or OFF (CHG) on your camcorder before installation of the USB driver was connected to your camcorder. To exit on-line help site is the product of PIXELA corporation. Viewing Images on...
...USB cable. - USB Streaming If image data cannot be transferred by the USB connection The USB driver has been registered incorrectly as your computer was completed. Reinstall the USB driver following operations after quitting the application: - Seeing the on-line help (operating instructions) of ImageMixer A "ImageMixer Ver.1.5 for Sony...computer - For more information, refer to another position or OFF (CHG) on your camcorder before installation of the USB driver was connected to your camcorder. To exit on-line help site is the product of PIXELA corporation. Viewing Images on...

Operating Instructions
Page 202
...album and the image, then press the import button. Viewing images recorded on a "Memory Stick" on your computer Viewing images with Image Transfer The image data recorded on a "Memory Stick" is added in your album, and you can also view images with ImageMixer. (1) ... a "Memory Stick" into your camcorder, and connect the AC Adaptor to your camcorder. (3) Set the POWER switch to MEMORY. (4) Connect the (USB) jack on your camcorder to the USB connector on your computer using the supplied USB cable. (5) Image Transfer automatically starts up and the transfer of image data begins. (6) ImageMixer...
...album and the image, then press the import button. Viewing images recorded on a "Memory Stick" on your computer Viewing images with Image Transfer The image data recorded on a "Memory Stick" is added in your album, and you can also view images with ImageMixer. (1) ... a "Memory Stick" into your camcorder, and connect the AC Adaptor to your camcorder. (3) Set the POWER switch to MEMORY. (4) Connect the (USB) jack on your camcorder to the USB connector on your computer using the supplied USB cable. (5) Image Transfer automatically starts up and the transfer of image data begins. (6) ImageMixer...
Operating Instructions
Page 203
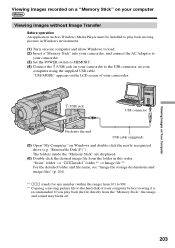
...a moving pictures in this order. Viewing Images on the LCD screen of your computer using the supplied USB cable. "Removable Disk (F:)"). Viewing images recorded on a "Memory Stick" on your computer Viewing images without Image Transfer Before operation An application such as Windows Media Player must... file to the hard disk of your camcorder. (USB) jack USB connector Push into your camcorder, and connect the AC Adaptor to your camcorder. (3) Set the POWER switch to MEMORY. (4) Connect the (USB) jack on your camcorder to the USB connector on Windows and double-click the newly...
...a moving pictures in this order. Viewing Images on the LCD screen of your computer using the supplied USB cable. "Removable Disk (F:)"). Viewing images recorded on a "Memory Stick" on your computer Viewing images without Image Transfer Before operation An application such as Windows Media Player must... file to the hard disk of your camcorder. (USB) jack USB connector Push into your camcorder, and connect the AC Adaptor to your camcorder. (3) Set the POWER switch to MEMORY. (4) Connect the (USB) jack on your camcorder to the USB connector on Windows and double-click the newly...
Operating Instructions
Page 231
... menu settings. c Uninstall the incorrect USB driver and reinstall the USB driver (p. 194). c Set it to OFF in your camcorder if the cassette lid is set to ON. • USB Streaming does not work .*5) • The USB driver is not installed correctly. The cassette cannot be transferred by the USB connection.*5) • The USB cable was completed. c Uninstall...
... menu settings. c Uninstall the incorrect USB driver and reinstall the USB driver (p. 194). c Set it to OFF in your camcorder if the cassette lid is set to ON. • USB Streaming does not work .*5) • The USB driver is not installed correctly. The cassette cannot be transferred by the USB connection.*5) • The USB cable was completed. c Uninstall...


