
Operating Instructions
Page 4
... (p. 185) •Converting an analog signal into digital to indicate model names. USB Streaming (p. 183) •Capturing images on your computer from your camcorder on your computer Before you start reading this manual, camcorder-shape icons are used to capture images onto your computer (p. 208) 4 Capturing... Main Features On the model name indication In this manual, check the model name of your camcorder. CCD-TRV118 : CCD-TRV318 : CCD-TRV418 : DCR-TRV150 : DCR-TRV250 : DCR-TRV350 : DCR-TRV351 : Instructions with icons are for the indicated models only. Instructions with no ...
... (p. 185) •Converting an analog signal into digital to indicate model names. USB Streaming (p. 183) •Capturing images on your computer from your camcorder on your computer Before you start reading this manual, camcorder-shape icons are used to capture images onto your computer (p. 208) 4 Capturing... Main Features On the model name indication In this manual, check the model name of your camcorder. CCD-TRV118 : CCD-TRV318 : CCD-TRV418 : DCR-TRV150 : DCR-TRV250 : DCR-TRV350 : DCR-TRV351 : Instructions with icons are for the indicated models only. Instructions with no ...
Operating Instructions
Page 7
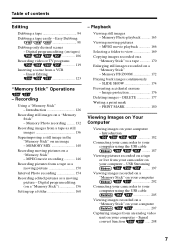
... Images on Your Computer Viewing images on a tape or live from a VCR - Introduction 182 Connecting your camcorder to your computer using the USB cable 205 Viewing images recorded on a "Memory Stick" on an image - Digital program editing (on tapes...folder 160 - Signal convert function ...... 208 7 Memory Photo playback .......... 163 Viewing moving picture - USB Streaming ......... 197 Viewing images recorded on a "Memory Stick" on your computer 202 Connecting your camcorder to a tape 170 Enlarging still images recorded on a "Memory Stick" - Easy Dubbing 98 Dubbing ...
... Images on Your Computer Viewing images on a tape or live from a VCR - Introduction 182 Connecting your camcorder to your computer using the USB cable 205 Viewing images recorded on a "Memory Stick" on an image - Digital program editing (on tapes...folder 160 - Signal convert function ...... 208 7 Memory Photo playback .......... 163 Viewing moving picture - USB Streaming ......... 197 Viewing images recorded on a "Memory Stick" on your computer 202 Connecting your camcorder to a tape 170 Enlarging still images recorded on a "Memory Stick" - Easy Dubbing 98 Dubbing ...
Operating Instructions
Page 26
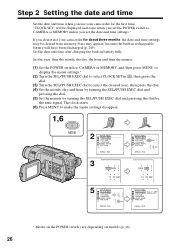
...dial. (3) Turn the SEL/PUSH EXEC dial to CAMERA or MEMORY unless you set the date and time settings.* If you use your camcorder for about three months, the date and time settings may be cleared from memory (bars may appear) because the built-in rechargeable battery will... the SEL/PUSH EXEC dial to make the menu settings disappear. 1,6 MENU 2 SETUP MENU CLOCK SET USB STREAM LTR SIZE LANGUAGE DEMO MODE RETURN - -:- -:- - [MENU] : END 3 2003 JAN 1 12 00 AM 5 SETUP MENU CLOCK SET USB STREAM LTR SIZE 2003 JUL 4 LANGUAGE DEMO MODE RETURN 5 30 PM [MENU] : END SETUP MENU CLOCK...
...dial. (3) Turn the SEL/PUSH EXEC dial to CAMERA or MEMORY unless you set the date and time settings.* If you use your camcorder for about three months, the date and time settings may be cleared from memory (bars may appear) because the built-in rechargeable battery will... the SEL/PUSH EXEC dial to make the menu settings disappear. 1,6 MENU 2 SETUP MENU CLOCK SET USB STREAM LTR SIZE LANGUAGE DEMO MODE RETURN - -:- -:- - [MENU] : END 3 2003 JAN 1 12 00 AM 5 SETUP MENU CLOCK SET USB STREAM LTR SIZE 2003 JUL 4 LANGUAGE DEMO MODE RETURN 5 30 PM [MENU] : END SETUP MENU CLOCK...
Operating Instructions
Page 183
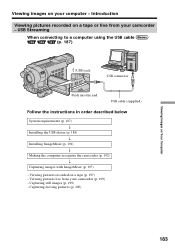
... (p. 197) - Viewing pictures live from your camcorder - USB Streaming When connecting to a computer using the USB cable (p. 187) (USB) jack USB connector Push into the end USB cable (supplied) Follow the instructions in order described below System requirements (p. 187) r Installing the USB driver (p. 189) r Installing ImageMixer (p. 191) r Making the computer recognize the camcorder (p. 192) r Capturing images with ImageMixer (p. 197...
... (p. 197) - Viewing pictures live from your camcorder - USB Streaming When connecting to a computer using the USB cable (p. 187) (USB) jack USB connector Push into the end USB cable (supplied) Follow the instructions in order described below System requirements (p. 187) r Installing the USB driver (p. 189) r Installing ImageMixer (p. 191) r Making the computer recognize the camcorder (p. 192) r Capturing images with ImageMixer (p. 197...
Operating Instructions
Page 192
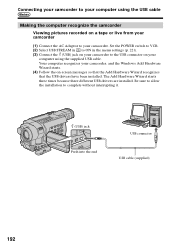
...or live from your computer using the USB cable Making the computer recognize the camcorder Viewing pictures recorded on -screen messages so that the Add Hardware Wizard recognizes that the USB drivers have been installed. Set the POWER switch to VCR. (2) Select USB STREAM in to ON in the menu settings... (p. 221). (3) Connect the (USB) jack on your camcorder to the USB connector on your camcorder (1) Connect the AC Adaptor to complete ...
...or live from your computer using the USB cable Making the computer recognize the camcorder Viewing pictures recorded on -screen messages so that the Add Hardware Wizard recognizes that the USB drivers have been installed. Set the POWER switch to VCR. (2) Select USB STREAM in to ON in the menu settings... (p. 221). (3) Connect the (USB) jack on your camcorder to the USB connector on your camcorder (1) Connect the AC Adaptor to complete ...
Operating Instructions
Page 197
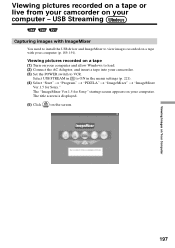
... into your computer - Viewing Images on the screen. The "ImageMixer Ver.1.5 for Sony." Viewing pictures recorded on a tape or live from your camcorder on your camcorder. (3) Set the POWER switch to VCR. USB Streaming Capturing images with ImageMixer You need to install the USB driver and ImageMixer to ON in the menu settings (p. 221). (4) Select "Start...
... into your computer - Viewing Images on the screen. The "ImageMixer Ver.1.5 for Sony." Viewing pictures recorded on a tape or live from your camcorder on your camcorder. (3) Set the POWER switch to VCR. USB Streaming Capturing images with ImageMixer You need to install the USB driver and ImageMixer to ON in the menu settings (p. 221). (4) Select "Start...

Operating Instructions
Page 198
Viewing pictures recorded on a tape or live from your camcorder on your computer - Monitor window (7) Connect the USB connector on your computer to the (USB) jack on your camcorder using the supplied USB cable. (USB) jack Push into the end USB connector USB cable (supplied) 198 USB Streaming (6) Select .
Viewing pictures recorded on a tape or live from your camcorder on your computer - Monitor window (7) Connect the USB connector on your computer to the (USB) jack on your camcorder using the supplied USB cable. (USB) jack Push into the end USB connector USB cable (supplied) 198 USB Streaming (6) Select .
Operating Instructions
Page 199
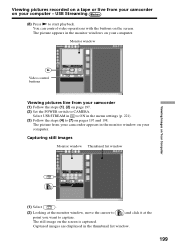
... in the monitor windows on the screen. Monitor window Video control buttons Viewing pictures live from your camcorder on pages 197 and 198. USB Streaming (8) Press N to ON in the thumbnail list window. 199 Capturing still images Monitor window Thumbnail list window Viewing Images on the ...you want to (7) on your computer - Captured images are displayed in the menu settings (p. 221). (3) Follow the steps (4) to capture. Select USB STREAM in to start playback. Viewing pictures recorded on a tape or live from your camcorder (1) Follow the steps (1), (2) on your computer.
... in the monitor windows on the screen. Monitor window Video control buttons Viewing pictures live from your camcorder on pages 197 and 198. USB Streaming (8) Press N to ON in the thumbnail list window. 199 Capturing still images Monitor window Thumbnail list window Viewing Images on the ...you want to (7) on your computer - Captured images are displayed in the menu settings (p. 221). (3) Follow the steps (4) to capture. Select USB STREAM in to start playback. Viewing pictures recorded on a tape or live from your camcorder (1) Follow the steps (1), (2) on your computer.

Operating Instructions
Page 200
... and no cassette is not a malfunction: - The captured images appear in the upper right corner of your camcorder are not displayed correctly. •When your camcorder is in the standby mode with a cassette inserted, it turns off automatically after three minutes. •We ...in the thumbnail list window. Some images are displayed with the cracking noise. - Some images are not displayed correctly due to capture. USB Streaming Capturing moving pictures Monitor window Thumbnail list window Video control buttons (1) Select . (2) Look at the monitor window and click on at...
... and no cassette is not a malfunction: - The captured images appear in the upper right corner of your camcorder are not displayed correctly. •When your camcorder is in the standby mode with a cassette inserted, it turns off automatically after three minutes. •We ...in the thumbnail list window. Some images are displayed with the cracking noise. - Some images are not displayed correctly due to capture. USB Streaming Capturing moving pictures Monitor window Thumbnail list window Video control buttons (1) Select . (2) Look at the monitor window and click on at...
Operating Instructions
Page 201
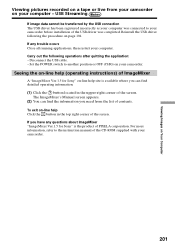
...(operating instructions) of ImageMixer A "ImageMixer Ver.1.5 for Sony" is available where you can find detailed operating information. (1) Click the button located in the top right corner of the USB driver was connected to your camcorder before installation of the screen. Seeing the on page ... is the product of the CD-ROM supplied with your computer was completed. USB Streaming If image data cannot be transferred by the USB connection The USB driver has been registered incorrectly as your camcorder. 201 To exit on your computer - If any questions about ImageMixer "ImageMixer...
...(operating instructions) of ImageMixer A "ImageMixer Ver.1.5 for Sony" is available where you can find detailed operating information. (1) Click the button located in the top right corner of the USB driver was connected to your camcorder before installation of the screen. Seeing the on page ... is the product of the CD-ROM supplied with your computer was completed. USB Streaming If image data cannot be transferred by the USB connection The USB driver has been registered incorrectly as your camcorder. 201 To exit on your computer - If any questions about ImageMixer "ImageMixer...

Operating Instructions
Page 221
... Spanish. AUTO DATE *2) z ON OFF USB STREAM *3) z OFF ON LTR SIZE z NORMAL 2× Meaning POWER switch *1) To set DEMO MODE to STBY (Standby) again, leave the DEMO MODE at twice the normal size. Changing the menu settings Customizing Your Camcorder Icon/item SETUP MENU CLOCK SET Mode -... To deactivate the USB Streaming function. To display the some of the information indicators in Chinese.
... Spanish. AUTO DATE *2) z ON OFF USB STREAM *3) z OFF ON LTR SIZE z NORMAL 2× Meaning POWER switch *1) To set DEMO MODE to STBY (Standby) again, leave the DEMO MODE at twice the normal size. Changing the menu settings Customizing Your Camcorder Icon/item SETUP MENU CLOCK SET Mode -... To deactivate the USB Streaming function. To display the some of the information indicators in Chinese.
Operating Instructions
Page 231
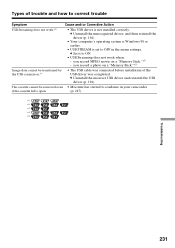
... driver (p. 194). • Your computer's operating system is Windows 98 or earlier. • USB STREAM is open. (p. 247). *1) *2) *3) *4) *5) Troubleshooting 231 c Set it to OFF in your camcorder if the cassette lid is set to ON. • USB Streaming does not work .*5) • The USB driver is not installed correctly. you record a photo on a "Memory Stick."*3) - you...
... driver (p. 194). • Your computer's operating system is Windows 98 or earlier. • USB STREAM is open. (p. 247). *1) *2) *3) *4) *5) Troubleshooting 231 c Set it to OFF in your camcorder if the cassette lid is set to ON. • USB Streaming does not work .*5) • The USB driver is not installed correctly. you record a photo on a "Memory Stick."*3) - you...

Operating Instructions
Page 236
...Folders have pressed PHOTO during formatting a "Memory Stick." •NO FILE AVAILABLE No file is in the current PB folder (p. 169). •USB STREAMING ON GOING You cannot carry out any "Memory Stick" operations during deleting all images on "Memory Stick" (p. 151). • MEMORY STICK ERROR ...ERROR Check the type of the "Memory Stick" format (p. 218). • PLAY ERROR The image cannot be recorded by your camcorder. • DELETING You have pressed PHOTO during USB Streaming (p. 200). •READ-ONLY MEMORY STICK The 100MSDCF is full (p. 131). • FOLDER NO.
...Folders have pressed PHOTO during formatting a "Memory Stick." •NO FILE AVAILABLE No file is in the current PB folder (p. 169). •USB STREAMING ON GOING You cannot carry out any "Memory Stick" operations during deleting all images on "Memory Stick" (p. 151). • MEMORY STICK ERROR ...ERROR Check the type of the "Memory Stick" format (p. 218). • PLAY ERROR The image cannot be recorded by your camcorder. • DELETING You have pressed PHOTO during USB Streaming (p. 200). •READ-ONLY MEMORY STICK The 100MSDCF is full (p. 131). • FOLDER NO.

Operating Instructions
Page 267
... battery 249 Cleaning cassette indicator 248 Clock set 26 Color Slow Shutter 40 Data code 47 Date search 90 DEMO 221 DIGITAL EFFECT 65, 85 Digital8 system 237 Digital program editing 106, 156 DISPLAY 47 DNR 214 DOT 61 Dual sound track tape 238 E Easy Dubbing 98 EDITSEARCH 43 END SEARCH... Tape PB ZOOM 87 Tape photo recording 56 TBC 214 Time code 37 Title 75, 77 TRAIL 65 Transition 31 TV color systems 246 USB jack 183, 185 USB Streaming 197 Quick Reference F, G, H FADER 61 Fade in/out 61 FLASH MOTION 65 FOCUS 71 Format 218 Frame recording 74 Full charge 20 Grip...
... battery 249 Cleaning cassette indicator 248 Clock set 26 Color Slow Shutter 40 Data code 47 Date search 90 DEMO 221 DIGITAL EFFECT 65, 85 Digital8 system 237 Digital program editing 106, 156 DISPLAY 47 DNR 214 DOT 61 Dual sound track tape 238 E Easy Dubbing 98 EDITSEARCH 43 END SEARCH... Tape PB ZOOM 87 Tape photo recording 56 TBC 214 Time code 37 Title 75, 77 TRAIL 65 Transition 31 TV color systems 246 USB jack 183, 185 USB Streaming 197 Quick Reference F, G, H FADER 61 Fade in/out 61 FLASH MOTION 65 FOCUS 71 Format 218 Frame recording 74 Full charge 20 Grip...


