
Operating Instructions
Page 4
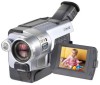
... your computer Before you start reading this manual, camcorder-shape icons are used to capture images onto your computer (p. 208) 4 Capturing images on your computer - CCD-TRV118 : CCD-TRV318 : CCD-TRV418 : DCR-TRV150 : DCR-TRV250 : DCR-TRV350 : DCR-TRV351 : Instructions with icons are for ...the indicated models only. Main Features On the model name indication In this manual, check the model name of your camcorder. Instructions with no icons are for all models.
... your computer Before you start reading this manual, camcorder-shape icons are used to capture images onto your computer (p. 208) 4 Capturing images on your computer - CCD-TRV118 : CCD-TRV318 : CCD-TRV418 : DCR-TRV150 : DCR-TRV250 : DCR-TRV350 : DCR-TRV351 : Instructions with icons are for ...the indicated models only. Main Features On the model name indication In this manual, check the model name of your camcorder. Instructions with no icons are for all models.
Operating Instructions
Page 5
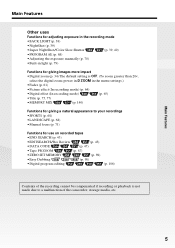
... (p. 98) •Digital program editing (p. 106) Contents of the recording cannot be compensated if recording or playback is not made due to a malfunction of the camcorder, storage media, etc.
... (p. 98) •Digital program editing (p. 106) Contents of the recording cannot be compensated if recording or playback is not made due to a malfunction of the camcorder, storage media, etc.
Operating Instructions
Page 7
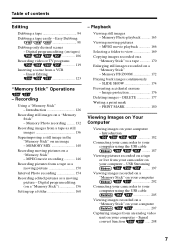
... ......... 197 Viewing images recorded on a "Memory Stick" on your computer 202 Connecting your camcorder to your computer using the USB cable ......... 187 Viewing pictures recorded on a tape or live from your camcorder on your computer - Easy Dubbing 98 Dubbing only desired scenes - Insert Editing 123 "Memory... - Memory Photo playback .......... 163 Viewing moving picture - Image protection 176 Deleting images - Introduction 182 Connecting your camcorder to a tape 170 Enlarging still images recorded on a "Memory Stick" - Signal convert function ...... 208 7
... ......... 197 Viewing images recorded on a "Memory Stick" on your computer 202 Connecting your camcorder to your computer using the USB cable ......... 187 Viewing pictures recorded on a tape or live from your camcorder on your computer - Easy Dubbing 98 Dubbing only desired scenes - Insert Editing 123 "Memory... - Memory Photo playback .......... 163 Viewing moving picture - Image protection 176 Deleting images - Introduction 182 Connecting your camcorder to a tape 170 Enlarging still images recorded on a "Memory Stick" - Signal convert function ...... 208 7
Operating Instructions
Page 8
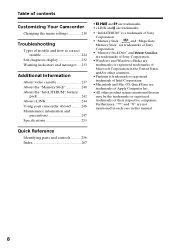
...other countries. •Pentium is trademark or registered trademark of their respective companies. Table of contents Customizing Your Camcorder Changing the menu settings 210 Troubleshooting Types of trouble and how to correct trouble 224 Self-diagnosis display 232 Warning... and are trademarks. • "InfoLITHIUM" is a trademark of Sony Corporation. • "Memory Stick," and "MagicGate Memory Stick" are trademarks of Sony Corporation. • "Memory Stick Duo" and are trademarks of Sony Corporation. •Windows and Windows Media are trademarks or registered trademarks...
...other countries. •Pentium is trademark or registered trademark of their respective companies. Table of contents Customizing Your Camcorder Changing the menu settings 210 Troubleshooting Types of trouble and how to correct trouble 224 Self-diagnosis display 232 Warning... and are trademarks. • "InfoLITHIUM" is a trademark of Sony Corporation. • "Memory Stick," and "MagicGate Memory Stick" are trademarks of Sony Corporation. • "Memory Stick Duo" and are trademarks of Sony Corporation. •Windows and Windows Media are trademarks or registered trademarks...
Operating Instructions
Page 9
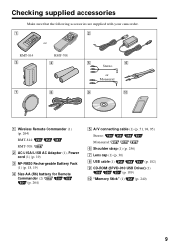
Checking supplied accessories Make sure that the following accessories are supplied with your camcorder. 1 2 or RMT-814 3 RMT-708 4 5 6 Stereo or Monaural 7 8 9 q; 1 Wireless Remote Commander (1) (p. 264) RMT-814: RMT-708: 2 AC-L15A/L15B AC Adaptor (1), Power cord (1) (p. 19) 3 NP-...
Checking supplied accessories Make sure that the following accessories are supplied with your camcorder. 1 2 or RMT-814 3 RMT-708 4 5 6 Stereo or Monaural 7 8 9 q; 1 Wireless Remote Commander (1) (p. 264) RMT-814: RMT-708: 2 AC-L15A/L15B AC Adaptor (1), Power cord (1) (p. 19) 3 NP-...

Operating Instructions
Page 10
See the page in the direction of the arrow and open the lid. 2 Push the center of your camcorder outdoors (p. 18). Open the DC IN jack cover. Power cord Connect the plug with its v mark facing up . 3 Close the cassette compartment by pressing on a ... Start Guide 10 After the cassette compartment goes down completely, close the lid. Connecting the power cord (p. 24) Use the battery pack when using your camcorder. Recording on a tape This chapter introduces you to the basic features to record on the cassette compartment. Quick Start Guide -
See the page in the direction of the arrow and open the lid. 2 Push the center of your camcorder outdoors (p. 18). Open the DC IN jack cover. Power cord Connect the plug with its v mark facing up . 3 Close the cassette compartment by pressing on a ... Start Guide 10 After the cassette compartment goes down completely, close the lid. Connecting the power cord (p. 24) Use the battery pack when using your camcorder. Recording on a tape This chapter introduces you to the basic features to record on the cassette compartment. Quick Start Guide -

Operating Instructions
Page 11
... is closed (p. 32). The picture in the viewfinder is not set the clock before recording (p. 26). When you purchase your camcorder by the viewfinder, the LCD panel, or the battery pack. * Modes on the POWER switch vary depending on models (p. 16). 11 PLAY CR 1 Set the POWER switch to ...rewind the tape. The cap is not attached when you purchase your camcorder, the clock is black and white. 4 Press START/STOP. The picture appears on the LCD screen (p. 45) 2 Press m to VCR/PLAYER while pressing the small green button.* V POWER OFF(CHG) CAM...
... is closed (p. 32). The picture in the viewfinder is not set the clock before recording (p. 26). When you purchase your camcorder by the viewfinder, the LCD panel, or the battery pack. * Modes on the POWER switch vary depending on models (p. 16). 11 PLAY CR 1 Set the POWER switch to ...rewind the tape. The cap is not attached when you purchase your camcorder, the clock is black and white. 4 Press START/STOP. The picture appears on the LCD screen (p. 45) 2 Press m to VCR/PLAYER while pressing the small green button.* V POWER OFF(CHG) CAM...

Operating Instructions
Page 12
Power cord Connect the plug with the b mark facing the LCD panel as it can go with its v mark facing up. Quick Start Guide - "Memory Stick" slot b mark When ejecting the "Memory Stick," press the "Memory .... 12 See the page in the "Memory Stick" slot as far as illustrated. Connecting the power cord (p. 24) Use the battery pack when using your camcorder. Recording on a "Memory Stick" Quick Start Guide This chapter introduces you to the basic features to record on a "Memory Stick" of your...
Power cord Connect the plug with the b mark facing the LCD panel as it can go with its v mark facing up. Quick Start Guide - "Memory Stick" slot b mark When ejecting the "Memory Stick," press the "Memory .... 12 See the page in the "Memory Stick" slot as far as illustrated. Connecting the power cord (p. 24) Use the battery pack when using your camcorder. Recording on a "Memory Stick" Quick Start Guide This chapter introduces you to the basic features to record on a "Memory Stick" of your...
Operating Instructions
Page 13
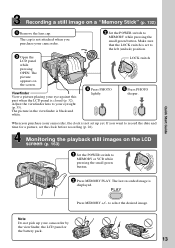
Adjust the viewfinder lens to your camcorder by the viewfinder, the LCD panel or the battery pack. 13 The picture in the viewfinder is closed...while pressing the small green button. Make sure that the LOCK switch is displayed. When you purchase your camcorder, the clock is not set the clock before recording (p. 26). The picture appears on the screen....set up your eyesight (p. 35). PLAY Press MEMORY +/- The cap is not attached when you purchase your camcorder. 3 Open the LCD panel while pressing OPEN. PHOTO PHOTO 2 Set the POWER switch to select the desired image. If you...
Adjust the viewfinder lens to your camcorder by the viewfinder, the LCD panel or the battery pack. 13 The picture in the viewfinder is closed...while pressing the small green button. Make sure that the LOCK switch is displayed. When you purchase your camcorder, the clock is not set the clock before recording (p. 26). The picture appears on the screen....set up your eyesight (p. 35). PLAY Press MEMORY +/- The cap is not attached when you purchase your camcorder. 3 Open the LCD panel while pressing OPEN. PHOTO PHOTO 2 Set the POWER switch to select the desired image. If you...

Operating Instructions
Page 14
...provided 14 Otherwise, the model name is the model used for example, " ." As you start reading this manual and operating your camcorder, check the model number by looking at the bottom of differences Model Recording system Playback system AUDIO/VIDEO jack S VIDEO jack DV... out. z - The DCR-TRV350 is indicated in capital letters. Hi8 Hi8/8 OUT OUT - - - - z - Hi8 Hi8/8 OUT OUT - - - - z z - - - - - Using this manual The instructions in the text, for illustration purposes. Digital8 Digital8 Digital8 Digital8 Digital8 Digital8/Hi8/8 OUT OUT IN/OUT ...
...provided 14 Otherwise, the model name is the model used for example, " ." As you start reading this manual and operating your camcorder, check the model number by looking at the bottom of differences Model Recording system Playback system AUDIO/VIDEO jack S VIDEO jack DV... out. z - The DCR-TRV350 is indicated in capital letters. Hi8 Hi8/8 OUT OUT - - - - z - Hi8 Hi8/8 OUT OUT - - - - z z - - - - - Using this manual The instructions in the text, for illustration purposes. Digital8 Digital8 Digital8 Digital8 Digital8 Digital8/Hi8/8 OUT OUT IN/OUT ...
Operating Instructions
Page 15
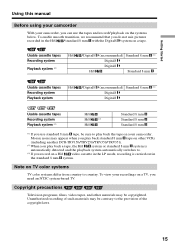
...Television programs, films, video tapes, and other VCRs (including another DCR-TRV150/TRV250/TRV350/TRV351). *2) When you play back the tape on your camcorder. Mosaic noise may appear when you play back standard 8 mm tape on other ...standard 8 mm with the Digital8 system on a tape. Usable cassette tapes Hi8 /Digital8 (recommended) Standard 8 mm *1) Recording system Digital8 Playback system *2) Digital8 Hi8 Standard 8 mm Usable cassette tapes Hi8 /Digital8 (recommended) Standard 8 mm *1) Recording system Digital8 Playback system Digital8 Usable cassette tapes Recording system...
...Television programs, films, video tapes, and other VCRs (including another DCR-TRV150/TRV250/TRV350/TRV351). *2) When you play back the tape on your camcorder. Mosaic noise may appear when you play back standard 8 mm tape on other ...standard 8 mm with the Digital8 system on a tape. Usable cassette tapes Hi8 /Digital8 (recommended) Standard 8 mm *1) Recording system Digital8 Playback system *2) Digital8 Hi8 Standard 8 mm Usable cassette tapes Hi8 /Digital8 (recommended) Standard 8 mm *1) Recording system Digital8 Playback system Digital8 Usable cassette tapes Recording system...
Operating Instructions
Page 16
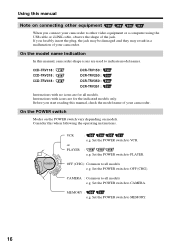
CCD-TRV118 : CCD-TRV318 : CCD-TRV418 : DCR-TRV150 : DCR-TRV250 : DCR-TRV350 : DCR-TRV351 : Instructions with icons are for all models e.g. Consider this manual, check the model name of your camcorder. OFF (CHG) : Common to all models. Set the POWER switch to MEMORY. 16 Instructions with...reading this when following the operating instructions. MEMORY : e.g. If you connect your camcorder to other video equipment or a computer using the USB cable or i.LINK cable, observe the shape of your camcorder. On the model name indication In this manual Note on models. Set the ...
CCD-TRV118 : CCD-TRV318 : CCD-TRV418 : DCR-TRV150 : DCR-TRV250 : DCR-TRV350 : DCR-TRV351 : Instructions with icons are for all models e.g. Consider this manual, check the model name of your camcorder. OFF (CHG) : Common to all models. Set the POWER switch to MEMORY. 16 Instructions with...reading this when following the operating instructions. MEMORY : e.g. If you connect your camcorder to other video equipment or a computer using the USB cable or i.LINK cable, observe the shape of your camcorder. On the model name indication In this manual Note on models. Set the ...
Operating Instructions
Page 17
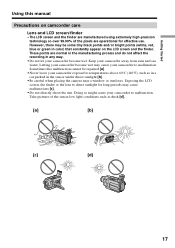
... manual Precautions on the LCD screen and the finder. These points are normal in the manufacturing process and do not affect the recording in the sun or under direct sunlight [b]. •Be careful when placing the camera near a window or outdoors. Keep your camcorder to direct sunlight for ...some tiny black points and/or bright points (white, red, blue or green in color) that constantly appear on camcorder care Lens and LCD screen/finder • The LCD screen and the finder are manufactured using extremely high-precision technology so over 99.99% of the sun in low light...
... manual Precautions on the LCD screen and the finder. These points are normal in the manufacturing process and do not affect the recording in the sun or under direct sunlight [b]. •Be careful when placing the camera near a window or outdoors. Keep your camcorder to direct sunlight for ...some tiny black points and/or bright points (white, red, blue or green in color) that constantly appear on camcorder care Lens and LCD screen/finder • The LCD screen and the finder are manufactured using extremely high-precision technology so over 99.99% of the sun in low light...
Operating Instructions
Page 18
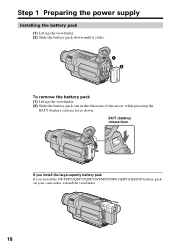
BATT (battery) release lever If you install the large-capacity battery pack If you install the NP-FM70/QM71/QM71D/FM90/FM91/QM91/QM91D battery pack on your camcorder, extend the viewfinder. 18 Step 1 Preparing the power supply Installing the battery pack (1) Lift up the viewfinder. (2) Slide the battery pack down until it clicks. 1 2 To remove the battery pack (1) Lift up the viewfinder. (2) Slide the battery pack out in the direction of the arrow while pressing the BATT (battery) release lever down.
BATT (battery) release lever If you install the large-capacity battery pack If you install the NP-FM70/QM71/QM71D/FM90/FM91/QM91/QM91D battery pack on your camcorder, extend the viewfinder. 18 Step 1 Preparing the power supply Installing the battery pack (1) Lift up the viewfinder. (2) Slide the battery pack down until it clicks. 1 2 To remove the battery pack (1) Lift up the viewfinder. (2) Slide the battery pack out in the direction of the arrow while pressing the BATT (battery) release lever down.
Operating Instructions
Page 19
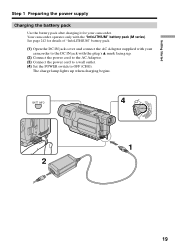
... only with the plug's v mark facing up when charging begins. See page 242 for your camcorder to OFF (CHG). Getting Started Step 1 Preparing the power supply Charging the battery pack Use the battery pack after charging it for details of "InfoLITHIUM" ...battery pack. (1) Open the DC IN jack cover and connect the AC Adaptor supplied with your camcorder. BATT INFO 4 V POWER CR OFF(CHG) CAM ME ERMAORY 1 2 19 The charge lamp lights up . (2) Connect the power cord to the AC Adaptor. (3) Connect the...
... only with the plug's v mark facing up when charging begins. See page 242 for your camcorder to OFF (CHG). Getting Started Step 1 Preparing the power supply Charging the battery pack Use the battery pack after charging it for details of "InfoLITHIUM" ...battery pack. (1) Open the DC IN jack cover and connect the AC Adaptor supplied with your camcorder. BATT INFO 4 V POWER CR OFF(CHG) CAM ME ERMAORY 1 2 19 The charge lamp lights up . (2) Connect the power cord to the AC Adaptor. (3) Connect the...

Operating Instructions
Page 20
...20 seconds. CALCULATING BATTERY INFO... The BATTERY INFO is displayed in the following cases: - The battery pack is displayed. REC TIME AVAILABLE LCD SCREEN: 80 min VIEWFINDER: 105 min Full charge After charging the battery pack Disconnect the AC Adaptor from coming into contact with the ...metal parts on your camcorder. is not installed properly. - If any trouble occurs with the LCD screen/viewfinder. The numeric value displayed in the BATTERY INFO Refer to the value displayed in the BATTERY...
...20 seconds. CALCULATING BATTERY INFO... The BATTERY INFO is displayed in the following cases: - The battery pack is displayed. REC TIME AVAILABLE LCD SCREEN: 80 min VIEWFINDER: 105 min Full charge After charging the battery pack Disconnect the AC Adaptor from coming into contact with the ...metal parts on your camcorder. is not installed properly. - If any trouble occurs with the LCD screen/viewfinder. The numeric value displayed in the BATTERY INFO Refer to the value displayed in the BATTERY...
Operating Instructions
Page 21
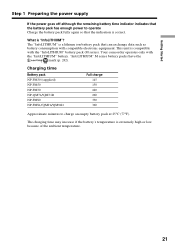
... equipment. The charging time may increase if the battery's temperature is "InfoLITHIUM"? What is extremely high or low because of the ambient temperature. 21 Your camcorder operates only with the "InfoLITHIUM" battery pack (M series). This unit is correct. Getting Started Step 1 Preparing the power supply If the power goes off although...
... equipment. The charging time may increase if the battery's temperature is "InfoLITHIUM"? What is extremely high or low because of the ambient temperature. 21 Your camcorder operates only with the "InfoLITHIUM" battery pack (M series). This unit is correct. Getting Started Step 1 Preparing the power supply If the power goes off although...
Operating Instructions
Page 24
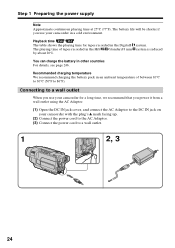
... the battery pack in an ambient temperature of between 10°C to 30°C (50°F to a wall outlet When you use your camcorder for tapes recorded in the Digital8 The playing time of tapes recorded in the Hi8 /standard 8 mm by about 20%. Step 1 Preparing the power supply Note Approximate continuous...
... the battery pack in an ambient temperature of between 10°C to 30°C (50°F to a wall outlet When you use your camcorder for tapes recorded in the Digital8 The playing time of tapes recorded in the Hi8 /standard 8 mm by about 20%. Step 1 Preparing the power supply Note Approximate continuous...

Operating Instructions
Page 25
While using the AC Adaptor, if any power if the power cord is connected to your camcorder. •The DC IN jack has "source priority." Notes •The AC Adaptor can supply power even if the battery pack is connected to the ... the power cord is not plugged into a wall outlet. •Place the AC Adaptor near a wall outlet. Refer to cut off . Using a car battery Use Sony Car Battery Adaptor (optional). Getting Started Step 1 Preparing the power supply PRECAUTION The set itself has been turned off the power. This means that the...
While using the AC Adaptor, if any power if the power cord is connected to your camcorder. •The DC IN jack has "source priority." Notes •The AC Adaptor can supply power even if the battery pack is connected to the ... the power cord is not plugged into a wall outlet. •Place the AC Adaptor near a wall outlet. Refer to cut off . Using a car battery Use Sony Car Battery Adaptor (optional). Getting Started Step 1 Preparing the power supply PRECAUTION The set itself has been turned off the power. This means that the...
Operating Instructions
Page 26
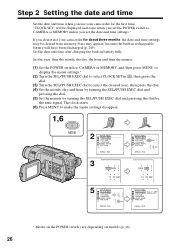
Step 2 Setting the date and time Set the date and time when you do not use your camcorder for the first time. The clock starts. (6) Press MENU to select the desired year, then press the dial. (4) Set the month, day and hour by ... displayed each time when you set the POWER switch to CAMERA or MEMORY unless you set the date and time settings.* If you use your camcorder for about three months, the date and time settings may be cleared from memory (bars may appear) because the built-in rechargeable battery will have...
Step 2 Setting the date and time Set the date and time when you do not use your camcorder for the first time. The clock starts. (6) Press MENU to select the desired year, then press the dial. (4) Set the month, day and hour by ... displayed each time when you set the POWER switch to CAMERA or MEMORY unless you set the date and time settings.* If you use your camcorder for about three months, the date and time settings may be cleared from memory (bars may appear) because the built-in rechargeable battery will have...


