
Operating Instructions
Page 4
... : CCD-TRV318 : CCD-TRV418 : DCR-TRV150 : DCR-TRV250 : DCR-TRV350 : DCR-TRV351 : Instructions with icons are for all models. USB Streaming (p. 183) •Capturing images on your computer from your camcorder on your computer - Main Features On the model name indication In this manual,...Viewing pictures recorded on a tape or live from your camcorder using the USB cable (p. 197) •Viewing images recorded on your camcorder. Instructions with no icons are used to capture images onto your computer (p. 208) 4 Capturing images on a "Memory Stick" using the USB cable (p. 185) •...
... : CCD-TRV318 : CCD-TRV418 : DCR-TRV150 : DCR-TRV250 : DCR-TRV350 : DCR-TRV351 : Instructions with icons are for all models. USB Streaming (p. 183) •Capturing images on your computer from your camcorder on your computer - Main Features On the model name indication In this manual,...Viewing pictures recorded on a tape or live from your camcorder using the USB cable (p. 197) •Viewing images recorded on your camcorder. Instructions with no icons are used to capture images onto your computer (p. 208) 4 Capturing images on a "Memory Stick" using the USB cable (p. 185) •...
Operating Instructions
Page 5
... 61) •Picture effect (In recording mode) (p. 64) •Digital effect (In recording mode) (p. 65) •Title (p. 75, 77) •MEMORY MIX (p. 140) Functions for giving a natural appearance to your recordings •SPORTS (p. 68) •LANDSCAPE (p. 68) •Manual focus (p. 71) Functions ...SEARCH (p. 43) •EDITSEARCH/Rec Review (p. 43) •DATA CODE (p. 47) •Tape PB ZOOM (p. 87) •ZERO SET MEMORY (p. 89) •Easy Dubbing (p. 98) •Digital program editing (p. 106) Contents of the recording cannot be compensated if recording or playback...
... 61) •Picture effect (In recording mode) (p. 64) •Digital effect (In recording mode) (p. 65) •Title (p. 75, 77) •MEMORY MIX (p. 140) Functions for giving a natural appearance to your recordings •SPORTS (p. 68) •LANDSCAPE (p. 68) •Manual focus (p. 71) Functions ...SEARCH (p. 43) •EDITSEARCH/Rec Review (p. 43) •DATA CODE (p. 47) •Tape PB ZOOM (p. 87) •ZERO SET MEMORY (p. 89) •Easy Dubbing (p. 98) •Digital program editing (p. 106) Contents of the recording cannot be compensated if recording or playback...
Operating Instructions
Page 6
...tape 45 To display the screen indicators - Display function 47 Viewing recordings on TV 51 Advanced Recording Operations Recording still images on a "Memory Stick" while recording on a tape 53 Recording still images on a tape 10 - Picture effect 64 Using special effects - Frame ...Using special effects - PHOTO SEARCH/ PHOTO SCAN 92 6 Recording on pictures 42 Checking recordings - Rec Review 43 Playback - ZERO SET MEMORY 89 Searching for a photo - Tape PB ZOOM ...... 87 Quickly locating a scene - BACK LIGHT 38 Shooting in light 79 Inserting a...
...tape 45 To display the screen indicators - Display function 47 Viewing recordings on TV 51 Advanced Recording Operations Recording still images on a "Memory Stick" while recording on a tape 53 Recording still images on a tape 10 - Picture effect 64 Using special effects - Frame ...Using special effects - PHOTO SEARCH/ PHOTO SCAN 92 6 Recording on pictures 42 Checking recordings - Rec Review 43 Playback - ZERO SET MEMORY 89 Searching for a photo - Tape PB ZOOM ...... 87 Quickly locating a scene - BACK LIGHT 38 Shooting in light 79 Inserting a...
Operating Instructions
Page 7
... your computer - MPEG movie playback 166 Selecting a folder to view 169 Copying images recorded on a "Memory Stick" to your computer using the USB cable 205 Viewing images recorded on a "Memory Stick" on your computer 207 Capturing images from your camcorder on an image - DELETE 177 Writing a print mark - Image protection 176 Deleting images...
... your computer - MPEG movie playback 166 Selecting a folder to view 169 Copying images recorded on a "Memory Stick" to your computer using the USB cable 205 Viewing images recorded on a "Memory Stick" on your computer 207 Capturing images from your camcorder on an image - DELETE 177 Writing a print mark - Image protection 176 Deleting images...
Operating Instructions
Page 8
...Additional Information About video cassette 237 About the "Memory Stick 240 About the "InfoLITHIUM" battery pack 242 About i.LINK 244 Using your camcorder abroad .......... 246 Maintenance information and precautions 247 ...Specifications 253 • , and are trademarks. • i.LINK and are trademarks. • "InfoLITHIUM" is a trademark of Sony Corporation. • "Memory Stick," and "MagicGate Memory Stick" are trademarks of Sony Corporation. • "Memory Stick Duo" and are trademarks of Sony...
...Additional Information About video cassette 237 About the "Memory Stick 240 About the "InfoLITHIUM" battery pack 242 About i.LINK 244 Using your camcorder abroad .......... 246 Maintenance information and precautions 247 ...Specifications 253 • , and are trademarks. • i.LINK and are trademarks. • "InfoLITHIUM" is a trademark of Sony Corporation. • "Memory Stick," and "MagicGate Memory Stick" are trademarks of Sony Corporation. • "Memory Stick Duo" and are trademarks of Sony...
Operating Instructions
Page 9
Checking supplied accessories Make sure that the following accessories are supplied with your camcorder. 1 2 or RMT-814 3 RMT-708 4 5 6 Stereo or Monaural 7 8 9 q; 1 Wireless Remote Commander (1) (p. 264) RMT-814: RMT-708: 2 AC-L15A/L15B AC Adaptor (1), Power cord (1) (p. 19) 3 NP-... Commander (2) (p. 264) 5 A/V connecting cable (1) (p. 51, 94, 95) Stereo: Monaural: 6 Shoulder strap (1) (p. 256) 7 Lens cap (1) (p. 30) 8 USB cable (1) (p. 182) 9 CD-ROM (SPVD-010 USB Driver) (1) (p. 189) 0 "Memory Stick" (1) (p. 240) 9
Checking supplied accessories Make sure that the following accessories are supplied with your camcorder. 1 2 or RMT-814 3 RMT-708 4 5 6 Stereo or Monaural 7 8 9 q; 1 Wireless Remote Commander (1) (p. 264) RMT-814: RMT-708: 2 AC-L15A/L15B AC Adaptor (1), Power cord (1) (p. 19) 3 NP-... Commander (2) (p. 264) 5 A/V connecting cable (1) (p. 51, 94, 95) Stereo: Monaural: 6 Shoulder strap (1) (p. 256) 7 Lens cap (1) (p. 30) 8 USB cable (1) (p. 182) 9 CD-ROM (SPVD-010 USB Driver) (1) (p. 189) 0 "Memory Stick" (1) (p. 240) 9

Operating Instructions
Page 12
... the LCD panel as it can go with its v mark facing up. "Memory Stick" slot b mark When ejecting the "Memory Stick," press the "Memory Stick" once lightly. 12 AC Adaptor (supplied) Inserting a "Memory Stick" (p. 127) Insert a "Memory Stick" in parentheses "( )" for more information. Connecting the power cord (p. 24) Use the battery pack when using your camcorder. Quick...
... the LCD panel as it can go with its v mark facing up. "Memory Stick" slot b mark When ejecting the "Memory Stick," press the "Memory Stick" once lightly. 12 AC Adaptor (supplied) Inserting a "Memory Stick" (p. 127) Insert a "Memory Stick" in parentheses "( )" for more information. Connecting the power cord (p. 24) Use the battery pack when using your camcorder. Quick...
Operating Instructions
Page 13
... (p. 35). Adjust the viewfinder lens to MEMORY while pressing the small green button. Make sure that the LOCK switch is black and white. PHOTO PHOTO 2 Set the POWER switch to your camcorder by the viewfinder, the LCD panel or the battery pack. 13 Monitoring ...the playback still images on the screen. PLAY Press MEMORY +/- Viewfinder View a picture placing your camcorder. 3 Open the LCD panel while pressing OPEN. LOCK switch V POWER OFF...
... (p. 35). Adjust the viewfinder lens to MEMORY while pressing the small green button. Make sure that the LOCK switch is black and white. PHOTO PHOTO 2 Set the POWER switch to your camcorder by the viewfinder, the LCD panel or the battery pack. 13 Monitoring ...the playback still images on the screen. PLAY Press MEMORY +/- Viewfinder View a picture placing your camcorder. 3 Open the LCD panel while pressing OPEN. LOCK switch V POWER OFF...

Operating Instructions
Page 14
The DCR-TRV350 is the model used for example, " ...through this manual and operating your camcorder, check the model number by looking at the bottom of differences Model Recording system Playback system AUDIO/VIDEO jack S VIDEO jack DV jack USB jack "Memory Stick" slot LANC jack SteadyShot... manual The instructions in this manual are clearly indicated in capital letters. Types of your camcorder are shown in the text, for illustration purposes. z - z - Digital8 Digital8 Digital8 Digital8 Digital8 Digital8/Hi8/8 OUT OUT IN/OUT OUT OUT IN/OUT IN/OUT IN/OUT IN/OUT ...
The DCR-TRV350 is the model used for example, " ...through this manual and operating your camcorder, check the model number by looking at the bottom of differences Model Recording system Playback system AUDIO/VIDEO jack S VIDEO jack DV jack USB jack "Memory Stick" slot LANC jack SteadyShot... manual The instructions in this manual are clearly indicated in capital letters. Types of your camcorder are shown in the text, for illustration purposes. z - z - Digital8 Digital8 Digital8 Digital8 Digital8 Digital8/Hi8/8 OUT OUT IN/OUT OUT OUT IN/OUT IN/OUT IN/OUT IN/OUT ...
Operating Instructions
Page 16
... indicated models only. V POWER EREAMORY CAM M OFCFR(CHG) VCR or PLAYER : e.g. Set the POWER switch to MEMORY. 16 CCD-TRV118 : CCD-TRV318 : CCD-TRV418 : DCR-TRV150 : DCR-TRV250 : DCR-TRV350 : DCR-TRV351 : Instructions with icons are used to indicate model names. On the POWER switch Modes on the POWER...shape of the jack. Set the POWER switch to all models e.g. If you start reading this manual, check the model name of your camcorder to all models e.g. Before you forcibly insert the plug, the jack may be damaged and they may result in a malfunction of your...
... indicated models only. V POWER EREAMORY CAM M OFCFR(CHG) VCR or PLAYER : e.g. Set the POWER switch to MEMORY. 16 CCD-TRV118 : CCD-TRV318 : CCD-TRV418 : DCR-TRV150 : DCR-TRV250 : DCR-TRV350 : DCR-TRV351 : Instructions with icons are used to indicate model names. On the POWER switch Modes on the POWER...shape of the jack. Set the POWER switch to all models e.g. If you start reading this manual, check the model name of your camcorder to all models e.g. Before you forcibly insert the plug, the jack may be damaged and they may result in a malfunction of your...
Operating Instructions
Page 26
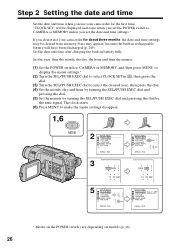
... after charging the built-in , then press the dial. (3) Turn the SEL/PUSH EXEC dial to CAMERA or MEMORY unless you set the date and time settings.* If you do not use your camcorder for the first time. The clock starts. (6) Press MENU to select CLOCK SET in battery fully. "CLOCK SET..." will be cleared from memory (bars may be displayed each time when you set the POWER switch to select the...
... after charging the built-in , then press the dial. (3) Turn the SEL/PUSH EXEC dial to CAMERA or MEMORY unless you set the date and time settings.* If you do not use your camcorder for the first time. The clock starts. (6) Press MENU to select CLOCK SET in battery fully. "CLOCK SET..." will be cleared from memory (bars may be displayed each time when you set the POWER switch to select the...
Operating Instructions
Page 27
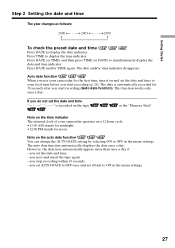
...) and then press TIME (or DATE) to display the date indicator. Press DATE and/or TIME again. or the "Memory Stick" Note on the time indicator The internal clock of your camcorder for the first time, turn it back to your local time before you start recording (p. 26). you stop recording within... date may automatically appear more than once a day if: - you set AUTO DATE to display the time indicator. Auto date function When you use your camcorder operates on and set the date and time is automatically recorded for noon. Press TIME to OFF once and set the date and time. -
...) and then press TIME (or DATE) to display the date indicator. Press DATE and/or TIME again. or the "Memory Stick" Note on the time indicator The internal clock of your camcorder for the first time, turn it back to your local time before you start recording (p. 26). you stop recording within... date may automatically appear more than once a day if: - you set AUTO DATE to display the time indicator. Auto date function When you use your camcorder operates on and set the date and time is automatically recorded for noon. Press TIME to OFF once and set the date and time. -

Operating Instructions
Page 31
... recommend that you play back the tape on one tape or you change the battery pack, set to MEMORY accidentally. Note on recording mode Your camcorder records and plays back in the SP (standard play ) mode. In the LP mode, you can no longer be distorted. *1) 1.5 times: Twice: *2) three minutes: five ... to OFF (CHG). Do not mix recordings in the SP mode and in the LP (long play ) mode or in the LP mode on your camcorder. Basics Recording a picture Note on one tape. - Select SP or LP in the LP mode •The time code may be set the POWER switch...
... recommend that you play back the tape on one tape or you change the battery pack, set to MEMORY accidentally. Note on recording mode Your camcorder records and plays back in the SP (standard play ) mode. In the LP mode, you can no longer be distorted. *1) 1.5 times: Twice: *2) three minutes: five ... to OFF (CHG). Do not mix recordings in the SP mode and in the LP (long play ) mode or in the LP mode on your camcorder. Basics Recording a picture Note on one tape. - Select SP or LP in the LP mode •The time code may be set the POWER switch...
Operating Instructions
Page 33
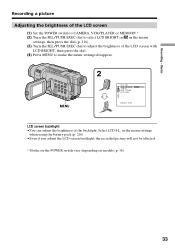
...SEL/PUSH EXEC dial to adjust the brightness of the LCD screen with LCD BRIGHT, then press the dial. (4) Press MENU to select LCD BRIGHT in in the menu settings when using the battery pack (p. 216). •Even if you adjust the LCD screen backlight, the recorded picture will not be affected.... * Modes on the POWER switch vary depending on models (p. 16). 33 LCD COLOR RETURN [ MENU ] : END LCD screen backlight •You can adjust the brightness of the LCD screen (1) Set the POWER switch to CAMERA, VCR/PLAYER or MEMORY.* (2) Turn the SEL/PUSH EXEC dial to make the menu settings disappear....
...SEL/PUSH EXEC dial to adjust the brightness of the LCD screen with LCD BRIGHT, then press the dial. (4) Press MENU to select LCD BRIGHT in in the menu settings when using the battery pack (p. 216). •Even if you adjust the LCD screen backlight, the recorded picture will not be affected.... * Modes on the POWER switch vary depending on models (p. 16). 33 LCD COLOR RETURN [ MENU ] : END LCD screen backlight •You can adjust the brightness of the LCD screen (1) Set the POWER switch to CAMERA, VCR/PLAYER or MEMORY.* (2) Turn the SEL/PUSH EXEC dial to make the menu settings disappear....
Operating Instructions
Page 34
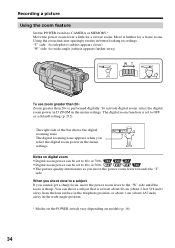
... power in the menu settings. The digital zoom function is performed digitally. Recording a picture Using the zoom feature Set the POWER switch to CAMERA or MEMORY.* Move the power zoom lever a little for a faster zoom. Move it further for a slower zoom. Notes on models (p. 16). 34 The right side of the...
... power in the menu settings. The digital zoom function is performed digitally. Recording a picture Using the zoom feature Set the POWER switch to CAMERA or MEMORY.* Move the power zoom lever a little for a faster zoom. Move it further for a slower zoom. Notes on models (p. 16). 34 The right side of the...
Operating Instructions
Page 35
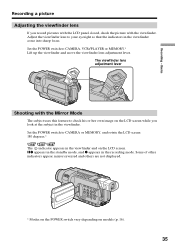
Set the POWER switch to your eyesight so that the indicators in the viewfinder and on the LCD screen. Adjust the viewfinder lens to CAMERA or MEMORY, and rotate the LCD screen 180 degrees.* The indicator appears in the viewfinder come into sharp focus. Xz appears in the standby mode, and ...displayed. * Modes on the POWER switch vary depending on the LCD screen while you record pictures with the LCD panel closed, check the picture with the Mirror Mode The subject uses this feature to CAMERA, VCR/PLAYER or MEMORY.* Lift up the viewfinder and move the viewfinder lens adjustment lever....
Set the POWER switch to your eyesight so that the indicators in the viewfinder and on the LCD screen. Adjust the viewfinder lens to CAMERA or MEMORY, and rotate the LCD screen 180 degrees.* The indicator appears in the viewfinder come into sharp focus. Xz appears in the standby mode, and ...displayed. * Modes on the POWER switch vary depending on the LCD screen while you record pictures with the LCD panel closed, check the picture with the Mirror Mode The subject uses this feature to CAMERA, VCR/PLAYER or MEMORY.* Lift up the viewfinder and move the viewfinder lens adjustment lever....
Operating Instructions
Page 36
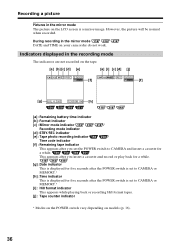
During recording in the mirror mode DATE and TIME on your camcorder do not work. Indicators displayed in the recording mode The indicators are not recorded on the tape. [a] [b] [c] [d] ...the POWER switch to CAMERA and insert a cassette for five seconds after the POWER switch is set to CAMERA or MEMORY.* [i] : Hi8 format indicator This appears while playing back or recording Hi8 format tapes. [j] : Tape counter indicator.... Recording a picture Pictures in the mirror mode The picture on the LCD screen is set to CAMERA or MEMORY.* [h] :Time indicator This is displayed for a while.
During recording in the mirror mode DATE and TIME on your camcorder do not work. Indicators displayed in the recording mode The indicators are not recorded on the tape. [a] [b] [c] [d] ...the POWER switch to CAMERA and insert a cassette for five seconds after the POWER switch is set to CAMERA or MEMORY.* [i] : Hi8 format indicator This appears while playing back or recording Hi8 format tapes. [j] : Tape counter indicator.... Recording a picture Pictures in the mirror mode The picture on the LCD screen is set to CAMERA or MEMORY.* [h] :Time indicator This is displayed for a while.
Operating Instructions
Page 38
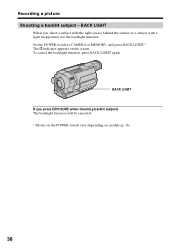
BACK LIGHT If you shoot a subject with the light source behind the subject or a subject with a light background, use the backlight function. To cancel the backlight function, press BACK LIGHT again. BACK LIGHT When you press EXPOSURE when shooting backlit subjects The backlight function will be canceled. * Modes on the POWER switch vary depending on the screen. Set the POWER switch to CAMERA or MEMORY, and press BACK LIGHT.* The . Recording a picture Shooting a backlit subject - indicator appears on models (p. 16). 38
BACK LIGHT If you shoot a subject with the light source behind the subject or a subject with a light background, use the backlight function. To cancel the backlight function, press BACK LIGHT again. BACK LIGHT When you press EXPOSURE when shooting backlit subjects The backlight function will be canceled. * Modes on the POWER switch vary depending on the screen. Set the POWER switch to CAMERA or MEMORY, and press BACK LIGHT.* The . Recording a picture Shooting a backlit subject - indicator appears on models (p. 16). 38

Operating Instructions
Page 39
Using NightShot Set the POWER switch to CAMERA or MEMORY, and slide NIGHTSHOT to the NightShot mode. Your camcorder returns to ON.* The indicator and "NIGHTSHOT" flash on the screen. Basics Recording a picture Shooting in the menu settings. (The default setting is ON.) (p. 213) * ...
Using NightShot Set the POWER switch to CAMERA or MEMORY, and slide NIGHTSHOT to the NightShot mode. Your camcorder returns to ON.* The indicator and "NIGHTSHOT" flash on the screen. Basics Recording a picture Shooting in the menu settings. (The default setting is ON.) (p. 213) * ...

Operating Instructions
Page 41
...ZOOM 16:9WIDE STEADYSHOT N.S.LIGHT RETURN OFF ON [MENU] : END To stop the countdown Press START/STOP. When the POWER switch is set to MEMORY You can also use the Remote Commander for this operation. (1) In the standby mode, press MENU to display the menu settings. (2) Turn the ... disappear. To restart the countdown, press START/STOP again. Note The self-timer is finished. - The (self-timer) indicator appears on a "Memory Stick" with the self-timer starts in 10 seconds automatically. You cannot cancel self-timer using the Remote Commander. To cancel self-timer recording Set...
...ZOOM 16:9WIDE STEADYSHOT N.S.LIGHT RETURN OFF ON [MENU] : END To stop the countdown Press START/STOP. When the POWER switch is set to MEMORY You can also use the Remote Commander for this operation. (1) In the standby mode, press MENU to display the menu settings. (2) Turn the ... disappear. To restart the countdown, press START/STOP again. Note The self-timer is finished. - The (self-timer) indicator appears on a "Memory Stick" with the self-timer starts in 10 seconds automatically. You cannot cancel self-timer using the Remote Commander. To cancel self-timer recording Set...


