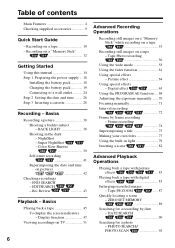
Operating Instructions
Page 1
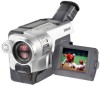
Refer to these numbers whenever you call upon your Sony dealer regarding this manual thoroughly, and retain it for future reference. AC- Owner's Record The model and serial numbers are located on the bottom. Record the serial number in the space provided below. DCR-TRV350 TM SERIES DCR-TRV150/TRV250/TRV350/TRV351 CCD-TRV118/TRV318/TRV418 ©2003 Sony Corporation Serial No. Model No. -TRV Model No. Serial No. 3-079-467-13 (1) Digital Video Camera Recorder Video Camera Recorder Operating Instructions Before operating the unit, please read this product.
Refer to these numbers whenever you call upon your Sony dealer regarding this manual thoroughly, and retain it for future reference. AC- Owner's Record The model and serial numbers are located on the bottom. Record the serial number in the space provided below. DCR-TRV350 TM SERIES DCR-TRV150/TRV250/TRV350/TRV351 CCD-TRV118/TRV318/TRV418 ©2003 Sony Corporation Serial No. Model No. -TRV Model No. Serial No. 3-079-467-13 (1) Digital Video Camera Recorder Video Camera Recorder Operating Instructions Before operating the unit, please read this product.
Operating Instructions
Page 2
... Rules. Congratulations on your authority to operate this device must accept any changes or modifications not expressly approved in the U.S.A. For the customers in this manual could void your purchase of this Sony Handycam. Address: 680 Kinderkamack Road, Oradell, NJ07649 U.S.A.
... Rules. Congratulations on your authority to operate this device must accept any changes or modifications not expressly approved in the U.S.A. For the customers in this manual could void your purchase of this Sony Handycam. Address: 680 Kinderkamack Road, Oradell, NJ07649 U.S.A.

Operating Instructions
Page 4
... your computer Instructions with no icons are for all models. Main Features On the model name indication In this manual, check the model name of your camcorder. CCD-TRV118 : CCD-TRV318 : CCD-TRV418 : DCR-TRV150 : DCR-TRV250 : DCR-TRV350 : DCR-TRV351 : Instructions with icons are... for the indicated models only. USB Streaming (p. 183) •Capturing images on your computer from your camcorder on your computer - Recording ...
... your computer Instructions with no icons are for all models. Main Features On the model name indication In this manual, check the model name of your camcorder. CCD-TRV118 : CCD-TRV318 : CCD-TRV418 : DCR-TRV150 : DCR-TRV250 : DCR-TRV350 : DCR-TRV351 : Instructions with icons are... for the indicated models only. USB Streaming (p. 183) •Capturing images on your computer from your camcorder on your computer - Recording ...
Operating Instructions
Page 5
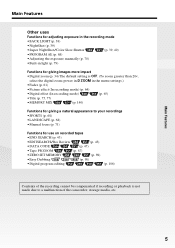
... 39) •Super NightShot/Color Slow Shutter (p. 39, 40) •PROGRAM AE (p. 68) •Adjusting the exposure manually (p. 70) •Built-in light (p. 79) Functions for giving images more impact •Digital zoom (p. 34) The ...;MEMORY MIX (p. 140) Functions for giving a natural appearance to your recordings •SPORTS (p. 68) •LANDSCAPE (p. 68) •Manual focus (p. 71) Functions for use on recorded tapes •END SEARCH (p. 43) •EDITSEARCH/Rec Review (p. 43) •DATA ... playback is not made due to a malfunction of the camcorder, storage media, etc.
... 39) •Super NightShot/Color Slow Shutter (p. 39, 40) •PROGRAM AE (p. 68) •Adjusting the exposure manually (p. 70) •Built-in light (p. 79) Functions for giving images more impact •Digital zoom (p. 34) The ...;MEMORY MIX (p. 140) Functions for giving a natural appearance to your recordings •SPORTS (p. 68) •LANDSCAPE (p. 68) •Manual focus (p. 71) Functions for use on recorded tapes •END SEARCH (p. 43) •EDITSEARCH/Rec Review (p. 43) •DATA ... playback is not made due to a malfunction of the camcorder, storage media, etc.
Operating Instructions
Page 6
... on a "Memory Stick" while recording on a tape 53 Recording still images on a "Memory Stick" 12 Getting Started Using this manual 14 Step 1 Preparing the power supply ... 18 Installing the battery pack 18 Charging the battery pack 19 Connecting to a wall outlet ...own titles 77 Using the built-in the dark - Digital effect ........... 65 Using the PROGRAM AE function .... 68 Adjusting the exposure manually ...... 70 Focusing manually 71 Interval recording 72 Frame by date - Tape PB ZOOM ...... 87 Quickly locating a scene - Recording on pictures 42 Checking ...
... on a "Memory Stick" while recording on a tape 53 Recording still images on a "Memory Stick" 12 Getting Started Using this manual 14 Step 1 Preparing the power supply ... 18 Installing the battery pack 18 Charging the battery pack 19 Connecting to a wall outlet ...own titles 77 Using the built-in the dark - Digital effect ........... 65 Using the PROGRAM AE function .... 68 Adjusting the exposure manually ...... 70 Focusing manually 71 Interval recording 72 Frame by date - Tape PB ZOOM ...... 87 Quickly locating a scene - Recording on pictures 42 Checking ...
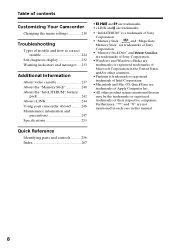
Operating Instructions
Page 8
... 237 About the "Memory Stick 240 About the "InfoLITHIUM" battery pack 242 About i.LINK 244 Using your camcorder abroad .......... 246 Maintenance information and precautions 247 Specifications 253 • , and are trademarks. • i.LINK...Sony Corporation. •Windows and Windows Media are trademarks or registered trademarks of Microsoft Corporation in the United States and/or other product names mentioned herein may be the trademarks or registered trademarks of Intel Corporation. •Macintosh and Mac OS, QuickTime are not mentioned in each case in this manual...
... 237 About the "Memory Stick 240 About the "InfoLITHIUM" battery pack 242 About i.LINK 244 Using your camcorder abroad .......... 246 Maintenance information and precautions 247 Specifications 253 • , and are trademarks. • i.LINK...Sony Corporation. •Windows and Windows Media are trademarks or registered trademarks of Microsoft Corporation in the United States and/or other product names mentioned herein may be the trademarks or registered trademarks of Intel Corporation. •Macintosh and Mac OS, QuickTime are not mentioned in each case in this manual...

Operating Instructions
Page 14
...you can hear a beep to CAMERA. When you carry out an operation, you read through this manual and operating your camcorder, check the model number by looking at the bottom of differences Model Recording system Playback system AUDIO/... z - Digital8 Digital8 Digital8 Digital8 Digital8 Digital8/Hi8/8 OUT OUT IN/OUT OUT OUT IN/OUT IN/OUT IN/OUT IN/OUT - e.g. Hi8 Hi8/8 OUT OUT - - - - Using this manual The instructions in this manual are clearly indicated in the illustrations. z - z z - - Types of your camcorder are shown in the table below. z -...
...you can hear a beep to CAMERA. When you carry out an operation, you read through this manual and operating your camcorder, check the model number by looking at the bottom of differences Model Recording system Playback system AUDIO/... z - Digital8 Digital8 Digital8 Digital8 Digital8 Digital8/Hi8/8 OUT OUT IN/OUT OUT OUT IN/OUT IN/OUT IN/OUT IN/OUT - e.g. Hi8 Hi8/8 OUT OUT - - - - Using this manual The instructions in this manual are clearly indicated in the illustrations. z - z z - - Types of your camcorder are shown in the table below. z -...
Operating Instructions
Page 15
... system Digital8 Playback system Digital8 Usable cassette tapes Recording system Playback system *2) Hi8 Hi8 *3) Hi8 Standard 8 mm Standard 8 mm Standard 8 mm *1) If you use the tapes and record/playback on a tape. Note on your camcorder. Mosaic noise may appear when you play back standard 8 mm tape on...the copyright laws. 15 Getting Started Using this manual Before using your camcorder With your camcorder, you can use standard 8 mm tape, be sure to play back a tape, the Hi8 system or standard 8 mm system is carried out in the Hi8 /standard 8 mm with the Digital8 system ...
... system Digital8 Playback system Digital8 Usable cassette tapes Recording system Playback system *2) Hi8 Hi8 *3) Hi8 Standard 8 mm Standard 8 mm Standard 8 mm *1) If you use the tapes and record/playback on a tape. Note on your camcorder. Mosaic noise may appear when you play back standard 8 mm tape on...the copyright laws. 15 Getting Started Using this manual Before using your camcorder With your camcorder, you can use standard 8 mm tape, be sure to play back a tape, the Hi8 system or standard 8 mm system is carried out in the Hi8 /standard 8 mm with the Digital8 system ...
Operating Instructions
Page 16
... the USB cable or i.LINK cable, observe the shape of your camcorder. V POWER EREAMORY CAM M OFCFR(CHG) VCR or PLAYER : e.g. CAMERA : Common to all models e.g. MEMORY : e.g. On the model name indication In this manual, camcorder-shape icons are for all models. Set the POWER switch to CAMERA... name of the jack. Consider this when following the operating instructions. Using this manual Note on models. Set the POWER switch to MEMORY. 16 Set the POWER switch to indicate model names. CCD-TRV118 : CCD-TRV318 : CCD-TRV418 : DCR-TRV150 : DCR-TRV250 : DCR-TRV350 : DCR...
... the USB cable or i.LINK cable, observe the shape of your camcorder. V POWER EREAMORY CAM M OFCFR(CHG) VCR or PLAYER : e.g. CAMERA : Common to all models e.g. MEMORY : e.g. On the model name indication In this manual, camcorder-shape icons are for all models. Set the POWER switch to CAMERA... name of the jack. Consider this when following the operating instructions. Using this manual Note on models. Set the POWER switch to MEMORY. 16 Set the POWER switch to indicate model names. CCD-TRV118 : CCD-TRV318 : CCD-TRV418 : DCR-TRV150 : DCR-TRV250 : DCR-TRV350 : DCR...
Operating Instructions
Page 17
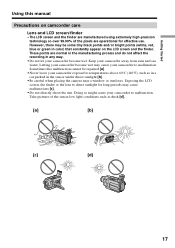
..., there may cause malfunctions [c]. •Do not directly shoot the sun. Sometimes this manual Precautions on the LCD screen and the finder. Keep your camcorder away from rain and sea water. Letting your camcorder become wet. Take pictures of the pixels are normal in the manufacturing process and do not...some tiny black points and/or bright points (white, red, blue or green in color) that constantly appear on camcorder care Lens and LCD screen/finder • The LCD screen and the finder are manufactured using extremely high-precision technology so over 99.99% of the sun in low...
..., there may cause malfunctions [c]. •Do not directly shoot the sun. Sometimes this manual Precautions on the LCD screen and the finder. Keep your camcorder away from rain and sea water. Letting your camcorder become wet. Take pictures of the pixels are normal in the manufacturing process and do not...some tiny black points and/or bright points (white, red, blue or green in color) that constantly appear on camcorder care Lens and LCD screen/finder • The LCD screen and the finder are manufactured using extremely high-precision technology so over 99.99% of the sun in low...
Operating Instructions
Page 40
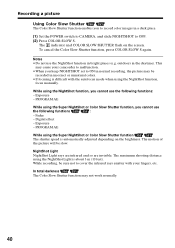
... keep NIGHTSHOT set to ON in normal recording, the picture may be recorded in incorrect or unnatural colors. •If focusing is difficult with your camcorder to malfunction. •When you to record color images in a dark place. (1) Set the POWER switch to CAMERA, and slide NIGHTSHOT to cover the ...recording, be slow. The motion of the picture will be sure not to OFF. (2) Press COLOR SLOW S. PROGRAM AE While using the NightShot function, focus manually. Fader - This may not work normally. 40 To cancel the Color Slow Shutter function, press COLOR SLOW S again.
... keep NIGHTSHOT set to ON in normal recording, the picture may be recorded in incorrect or unnatural colors. •If focusing is difficult with your camcorder to malfunction. •When you to record color images in a dark place. (1) Set the POWER switch to CAMERA, and slide NIGHTSHOT to cover the ...recording, be slow. The motion of the picture will be sure not to OFF. (2) Press COLOR SLOW S. PROGRAM AE While using the NightShot function, focus manually. Fader - This may not work normally. 40 To cancel the Color Slow Shutter function, press COLOR SLOW S again.
Operating Instructions
Page 42
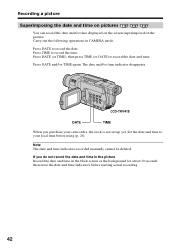
... on the screen superimposed on the picture. Press DATE (or TIME), then press TIME (or DATE) to your camcorder, the clock is not set up yet. Note The date and time indicators recorded manually cannot be deleted. The date and/or time indicator disappears. If you purchase your local time before starting...
... on the screen superimposed on the picture. Press DATE (or TIME), then press TIME (or DATE) to your camcorder, the clock is not set up yet. Note The date and time indicators recorded manually cannot be deleted. The date and/or time indicator disappears. If you purchase your local time before starting...
Operating Instructions
Page 66
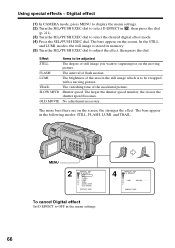
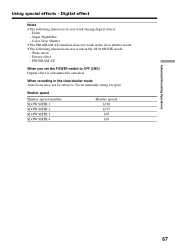
modes, the still image is to select D EFFECT in the menu settings. 4 MANUAL SET D EFFECT LUMI. Shutter speed. The more bars there are on the moving picture. IIIIIIII [MENU] : END 66 Digital effect (1) In CAMERA mode, press MENU ... superimpose on the screen, the stronger the effect. The brightness of still image you want to be swapped with a moving picture. No adjustment necessary. MENU 2 MANUAL SET D EFFECT OFF STILL FLASH LUMI. TRAIL SLOW SHTR OLD MOVIE [MENU] : END To cancel Digital effect Set D EFFECT to OFF in , then press the...
modes, the still image is to select D EFFECT in the menu settings. 4 MANUAL SET D EFFECT LUMI. Shutter speed. The more bars there are on the moving picture. IIIIIIII [MENU] : END 66 Digital effect (1) In CAMERA mode, press MENU ... superimpose on the screen, the stronger the effect. The brightness of still image you want to be swapped with a moving picture. No adjustment necessary. MENU 2 MANUAL SET D EFFECT OFF STILL FLASH LUMI. TRAIL SLOW SHTR OLD MOVIE [MENU] : END To cancel Digital effect Set D EFFECT to OFF in , then press the...
Operating Instructions
Page 67
... recording in the OLD MOVIE mode: - Picture effect - PROGRAM AE When you set the POWER switch to OFF (CHG) Digital effect is automatically canceled. Focus manually using a tripod. Fader - Advanced Recording Operations Using special effects -
... recording in the OLD MOVIE mode: - Picture effect - PROGRAM AE When you set the POWER switch to OFF (CHG) Digital effect is automatically canceled. Focus manually using a tripod. Fader - Advanced Recording Operations Using special effects -
Operating Instructions
Page 69
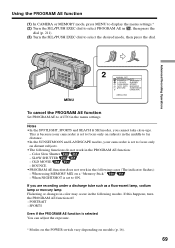
...(p. 16). 69 SPORTS Even if the PROGRAM AE function is set to far distance. •In the SUNSETMOON and LANDSCAPE modes, your camcorder is selected You can adjust the exposure. * Modes on the POWER switch vary depending on distant subjects. •The following cases (The...Slow Shutter - If you cannot take close-ups. SLOW SHUTTER - When using MEMORY MIX on a "Memory Stick." - Advanced Recording Operations MENU 2 MANUAL SET PROGRAM AE AUTO P EFFECT SPOTLIGHT D EFFECT PORTRAIT FLASH MODE SPORTS AUTO SHTR BEACH&SKI RETURN SUNSETMOON LANDSCAPE [MENU] : END To cancel the ...
...(p. 16). 69 SPORTS Even if the PROGRAM AE function is set to far distance. •In the SUNSETMOON and LANDSCAPE modes, your camcorder is selected You can adjust the exposure. * Modes on the POWER switch vary depending on distant subjects. •The following cases (The...Slow Shutter - If you cannot take close-ups. SLOW SHUTTER - When using MEMORY MIX on a "Memory Stick." - Advanced Recording Operations MENU 2 MANUAL SET PROGRAM AE AUTO P EFFECT SPOTLIGHT D EFFECT PORTRAIT FLASH MODE SPORTS AUTO SHTR BEACH&SKI RETURN SUNSETMOON LANDSCAPE [MENU] : END To cancel the ...
Operating Instructions
Page 70
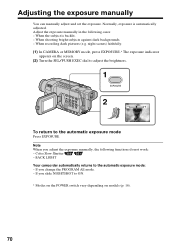
When the subject is automatically adjusted. If you slide NIGHTSHOT to the automatic exposure mode Press EXPOSURE. Adjust the exposure manually in the following functions do not work: - night scenes) faithfully. (1) In CAMERA or MEMORY mode, press EXPOSURE.*... you change the PROGRAM AE mode. - If you adjust the exposure manually, the following cases: - BACK LIGHT Your camcorder automatically returns to the automatic exposure mode: - Color Slow Shutter - Adjusting the exposure manually You can manually adjust and set the exposure. Normally, exposure is backlit. - When ...
When the subject is automatically adjusted. If you slide NIGHTSHOT to the automatic exposure mode Press EXPOSURE. Adjust the exposure manually in the following functions do not work: - night scenes) faithfully. (1) In CAMERA or MEMORY mode, press EXPOSURE.*... you change the PROGRAM AE mode. - If you adjust the exposure manually, the following cases: - BACK LIGHT Your camcorder automatically returns to the automatic exposure mode: - Color Slow Shutter - Adjusting the exposure manually You can manually adjust and set the exposure. Normally, exposure is backlit. - When ...
Operating Instructions
Page 71
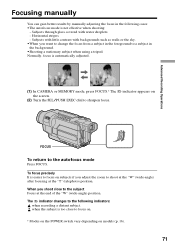
... subject is automatically adjusted. (1) In CAMERA or MEMORY mode, press FOCUS.* The 9 indicator appears on models (p. 16). 71 Advanced Recording Operations Focusing manually You can gain better results by manually adjusting the focus in the background. •Shooting a stationary subject when using a tripod. Subjects through glass covered with backgrounds such as walls...
... subject is automatically adjusted. (1) In CAMERA or MEMORY mode, press FOCUS.* The 9 indicator appears on models (p. 16). 71 Advanced Recording Operations Focusing manually You can gain better results by manually adjusting the focus in the background. •Shooting a stationary subject when using a tripod. Subjects through glass covered with backgrounds such as walls...
Operating Instructions
Page 83
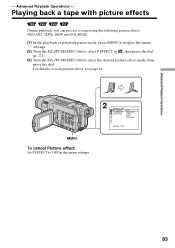
... SEL/PUSH EXEC dial to select P EFFECT in , then press the dial (p. 211). (3) Turn the SEL/PUSH EXEC dial to OFF in the menu settings. 2 MANUAL SET P EFFECT D EFFECT RETURN 1 OFF NEG. Advanced Playback Operations -
... SEL/PUSH EXEC dial to select P EFFECT in , then press the dial (p. 211). (3) Turn the SEL/PUSH EXEC dial to OFF in the menu settings. 2 MANUAL SET P EFFECT D EFFECT RETURN 1 OFF NEG. Advanced Playback Operations -
Operating Instructions
Page 85
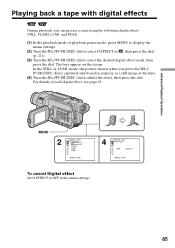
...when you can process a scene using the following digital effects: STILL, FLASH, LUMI. For details of each digital effect, see page 65. TRAIL [MENU] : END 4 MANUAL SET D EFFECT 1 LUMI. IIIIIIII [MENU] : END To cancel Digital effect Set D EFFECT to OFF in , then press the dial (p. 211). (3) Turn the SEL... stored in memory as a still image at the time. (4) Turn the SEL/PUSH EXEC dial to adjust the effect, then press the dial. MENU 2 MANUAL SET D EFFECT OFF ST ILL 1 FLASH LUMI. and TRAIL. (1) In the playback mode or playback pause mode, press MENU to display the menu settings....
...when you can process a scene using the following digital effects: STILL, FLASH, LUMI. For details of each digital effect, see page 65. TRAIL [MENU] : END 4 MANUAL SET D EFFECT 1 LUMI. IIIIIIII [MENU] : END To cancel Digital effect Set D EFFECT to OFF in , then press the dial (p. 211). (3) Turn the SEL... stored in memory as a still image at the time. (4) Turn the SEL/PUSH EXEC dial to adjust the effect, then press the dial. MENU 2 MANUAL SET D EFFECT OFF ST ILL 1 FLASH LUMI. and TRAIL. (1) In the playback mode or playback pause mode, press MENU to display the menu settings....
Operating Instructions
Page 201
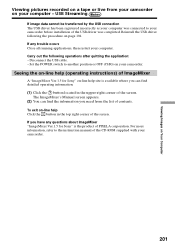
... after quitting the application: - Set the POWER switch to the instruction manual of the CD-ROM supplied with your camcorder. 201 To exit on page 194. If any questions about ImageMixer "ImageMixer Ver.1.5 for Sony" on your computer. Disconnect the USB cable. - For more information,... connection The USB driver has been registered incorrectly as your computer was connected to your camcorder. The ImageMixer's Manual screen appears. (2) You can find the information you need from your camcorder on -line help site is the product of PIXELA corporation. Viewing Images on Your...
... after quitting the application: - Set the POWER switch to the instruction manual of the CD-ROM supplied with your camcorder. 201 To exit on page 194. If any questions about ImageMixer "ImageMixer Ver.1.5 for Sony" on your computer. Disconnect the USB cable. - For more information,... connection The USB driver has been registered incorrectly as your computer was connected to your camcorder. The ImageMixer's Manual screen appears. (2) You can find the information you need from your camcorder on -line help site is the product of PIXELA corporation. Viewing Images on Your...


