
Operating Instructions
Page 14
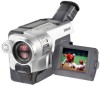
- The DCR-TRV350 is the model used for example, " ." Hi8 Hi8/8 OUT OUT - - - - Hi8 Hi8/8 OUT OUT - - - - Not provided 14 Before you start reading this manual and operating your camcorder, check the model number by looking at the bottom of differences Model Recording system ... manual The instructions in the text, for illustration purposes. Types of your camcorder are clearly indicated in this manual, buttons and settings on your camcorder. Digital8 Digital8 Digital8 Digital8 Digital8 Digital8/Hi8/8 OUT OUT IN/OUT OUT OUT IN/OUT IN/OUT IN/OUT IN...
- The DCR-TRV350 is the model used for example, " ." Hi8 Hi8/8 OUT OUT - - - - Hi8 Hi8/8 OUT OUT - - - - Not provided 14 Before you start reading this manual and operating your camcorder, check the model number by looking at the bottom of differences Model Recording system ... manual The instructions in the text, for illustration purposes. Types of your camcorder are clearly indicated in this manual, buttons and settings on your camcorder. Digital8 Digital8 Digital8 Digital8 Digital8 Digital8/Hi8/8 OUT OUT IN/OUT OUT OUT IN/OUT IN/OUT IN/OUT IN...
Operating Instructions
Page 15
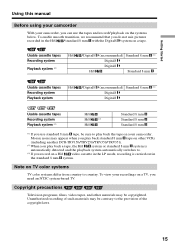
... 8 mm tape on other materials may be contrary to the provision of such materials may be sure to play back a tape, the Hi8 system or standard 8 mm system is carried out in the standard 8 mm system. Copyright precautions Television programs, films, video tapes, and... record/playback on a Hi8 video cassette in the LP mode, recording is automatically detected and the playback system automatically switches to. *3) If you record on the systems below. Note on your camcorder. Getting Started Using this manual Before using your camcorder With your camcorder, you can use standard...
... 8 mm tape on other materials may be contrary to the provision of such materials may be sure to play back a tape, the Hi8 system or standard 8 mm system is carried out in the standard 8 mm system. Copyright precautions Television programs, films, video tapes, and... record/playback on a Hi8 video cassette in the LP mode, recording is automatically detected and the playback system automatically switches to. *3) If you record on the systems below. Note on your camcorder. Getting Started Using this manual Before using your camcorder With your camcorder, you can use standard...
Operating Instructions
Page 24
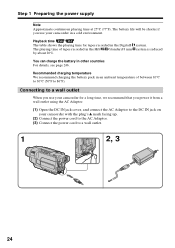
... from a wall outlet using the AC Adaptor. (1) Open the DC IN jack cover, and connect the AC Adaptor to the DC IN jack on your camcorder with the plug's v mark facing up. (2) Connect the power cord to the AC Adaptor. (3) Connect the power cord to 86°F). system is ... We recommend charging the battery pack in an ambient temperature of tapes recorded in a cold environment. Connecting to a wall outlet When you use your camcorder in the Hi8 /standard 8 mm by about 20%. Step 1 Preparing the power supply Note Approximate continuous playing time at 25°C (77°F). The battery ...
... from a wall outlet using the AC Adaptor. (1) Open the DC IN jack cover, and connect the AC Adaptor to the DC IN jack on your camcorder with the plug's v mark facing up. (2) Connect the power cord to the AC Adaptor. (3) Connect the power cord to 86°F). system is ... We recommend charging the battery pack in an ambient temperature of tapes recorded in a cold environment. Connecting to a wall outlet When you use your camcorder in the Hi8 /standard 8 mm by about 20%. Step 1 Preparing the power supply Note Approximate continuous playing time at 25°C (77°F). The battery ...
Operating Instructions
Page 29
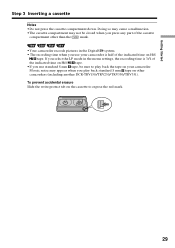
... pictures in the menu settings, the recording time is half of the cassette compartment other camcorders (including another DCR-TRV150/TRV250/TRV350/TRV351). If you play back the tape on Hi8 tape. Doing so may cause a malfunction. •The cassette compartment may appear when you select the LP ...mode in the Digital8 system. • The recording time when you use your camcorder is 3/4 of the indicated time on Hi8 tape. •If you press ...
... pictures in the menu settings, the recording time is half of the cassette compartment other camcorders (including another DCR-TRV150/TRV250/TRV350/TRV351). If you play back the tape on Hi8 tape. Doing so may cause a malfunction. •The cassette compartment may appear when you select the LP ...mode in the Digital8 system. • The recording time when you use your camcorder is 3/4 of the indicated time on Hi8 tape. •If you press ...
Operating Instructions
Page 36
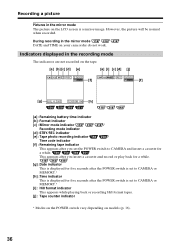
...[f] : Remaining tape indicator This appears after the POWER switch is set the POWER switch to CAMERA or MEMORY.* [i] : Hi8 format indicator This appears while playing back or recording Hi8 format tapes. [j] : Tape counter indicator * Modes on the POWER switch vary depending on models (p. 16). 36 This appears...is set to CAMERA or MEMORY.* [h] :Time indicator This is a mirror-image. During recording in the mirror mode The picture on the LCD screen is displayed for five seconds after you set to CAMERA and insert a cassette for a while. Recording a picture Pictures in the mirror...
...[f] : Remaining tape indicator This appears after the POWER switch is set the POWER switch to CAMERA or MEMORY.* [i] : Hi8 format indicator This appears while playing back or recording Hi8 format tapes. [j] : Tape counter indicator * Modes on the POWER switch vary depending on models (p. 16). 36 This appears...is set to CAMERA or MEMORY.* [h] :Time indicator This is a mirror-image. During recording in the mirror mode The picture on the LCD screen is displayed for five seconds after you set to CAMERA and insert a cassette for a while. Recording a picture Pictures in the mirror...
Operating Instructions
Page 46
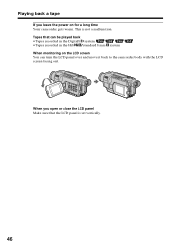
Tapes that the LCD panel is not a malfunction. This is set vertically. 46 Playing back a tape If you open or close the LCD panel Make sure that can turn the LCD panel over and move it back to the camcorder body with the LCD screen facing out. When you leave the power on the LCD screen You can be played back •Tapes recorded in the Digital8 system •Tapes recorded in the Hi8 /standard 8 mm system When monitoring on for a long time Your camcorder gets warm.
Tapes that the LCD panel is not a malfunction. This is set vertically. 46 Playing back a tape If you open or close the LCD panel Make sure that can turn the LCD panel over and move it back to the camcorder body with the LCD screen facing out. When you leave the power on the LCD screen You can be played back •Tapes recorded in the Digital8 system •Tapes recorded in the Hi8 /standard 8 mm system When monitoring on for a long time Your camcorder gets warm.
Operating Instructions
Page 48
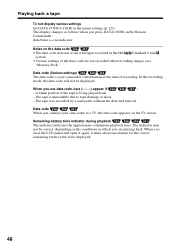
...the time of recording. In the recording mode, the data code will not be displayed. The tape was recorded by a camcorder without the date and time set. When you close the LCD panel and open it again, it takes about one minute for the correct remaining battery time to DATE in the... being played back. - The tape is unreadable due to a TV, the data code appears on the conditions in the Hi8 /standard 8 mm system. •Various settings of the tape is your camcorder to tape damage or noise. - Data code When you are not recorded when recording images on a "Memory Stick." When...
...the time of recording. In the recording mode, the data code will not be displayed. The tape was recorded by a camcorder without the date and time set. When you close the LCD panel and open it again, it takes about one minute for the correct remaining battery time to DATE in the... being played back. - The tape is unreadable due to a TV, the data code appears on the conditions in the Hi8 /standard 8 mm system. •Various settings of the tape is your camcorder to tape damage or noise. - Data code When you are not recorded when recording images on a "Memory Stick." When...
Operating Instructions
Page 50
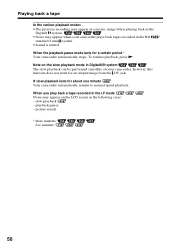
...minutes: five minutes: 50 Note on the slow playback mode in the Hi8 / standard 8 mm system. •Sound is muted. slow playback - playback pause - When the playback pause mode lasts for about one minute Your camcorder automatically returns to normal speed playback. Playing back a tape In the ...as a mosaic image when playing back in the Digital8 system. •Noise may appear on the LCD screen in the following cases: - If slow playback lasts for a certain period * Your camcorder automatically stops. To resume playback, press N. When you play back a tape recorded in the LP...
...minutes: five minutes: 50 Note on the slow playback mode in the Hi8 / standard 8 mm system. •Sound is muted. slow playback - playback pause - When the playback pause mode lasts for about one minute Your camcorder automatically returns to normal speed playback. Playing back a tape In the ...as a mosaic image when playing back in the Digital8 system. •Noise may appear on the LCD screen in the following cases: - If slow playback lasts for a certain period * Your camcorder automatically stops. To resume playback, press N. When you play back a tape recorded in the LP...
Operating Instructions
Page 62
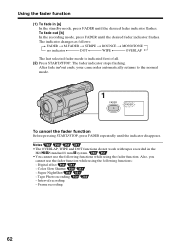
... indicator stops flashing. Notes •The OVERLAP, WIPE and DOT functions do not work with tapes recorded in /out ends, your camcorder automatically returns to the normal mode. 1 FADER FADER To cancel the fader function Before pressing START/STOP, press FADER repeatedly until the... disappears. Also, you cannot use the following functions: - Color Slow Shutter - Tape Photo recording - Interval recording - After fade in the Hi8 /standard 8 mm system. •You cannot use the fader function while using the following functions while using the fader function. Super NightShot -...
... indicator stops flashing. Notes •The OVERLAP, WIPE and DOT functions do not work with tapes recorded in /out ends, your camcorder automatically returns to the normal mode. 1 FADER FADER To cancel the fader function Before pressing START/STOP, press FADER repeatedly until the... disappears. Also, you cannot use the following functions: - Color Slow Shutter - Tape Photo recording - Interval recording - After fade in the Hi8 /standard 8 mm system. •You cannot use the fader function while using the following functions while using the fader function. Super NightShot -...

Operating Instructions
Page 82
Inserting a scene You can insert a scene in the Hi8 / standard 8 mm system. •The picture and the sound may not work with tapes recorded in the middle of EDITSEARCH and release the button at .... The ZERO SET MEMORY indicator flashes and the counter resets to zero. (3) Keep pressing the - 7 side of a recorded tape by setting the start recording. Your camcorder returns to start and end points. The zero set memory function does not work correctly. 82 ZERO SET MEMORY EDITSEARCH Notes •The zero set...
Inserting a scene You can insert a scene in the Hi8 / standard 8 mm system. •The picture and the sound may not work with tapes recorded in the middle of EDITSEARCH and release the button at .... The ZERO SET MEMORY indicator flashes and the counter resets to zero. (3) Keep pressing the - 7 side of a recorded tape by setting the start recording. Your camcorder returns to start and end points. The zero set memory function does not work correctly. 82 ZERO SET MEMORY EDITSEARCH Notes •The zero set...
Operating Instructions
Page 84
... a player •Picture effect does not work with picture effects Notes •You cannot record images on a tape on your camcorder while you are not output through the DV jack. on a "Memory Stick" as follows: - When you can record images as a still image - However,...the POWER switch to OFF (CHG) or stop playing back Picture effect is automatically canceled. 84 Playing back a tape with tapes recorded in the Hi8 /standard 8 mm system. •You cannot process externally input scenes using Picture effect. Pictures processed by Picture effect Pictures processed by Picture effect ...
... a player •Picture effect does not work with picture effects Notes •You cannot record images on a tape on your camcorder while you are not output through the DV jack. on a "Memory Stick" as follows: - When you can record images as a still image - However,...the POWER switch to OFF (CHG) or stop playing back Picture effect is automatically canceled. 84 Playing back a tape with tapes recorded in the Hi8 /standard 8 mm system. •You cannot process externally input scenes using Picture effect. Pictures processed by Picture effect Pictures processed by Picture effect ...

Operating Instructions
Page 86
Playing back a tape with digital effects Notes •You cannot record images on a tape on your camcorder as a player •Digital effect does not work with tapes recorded in the Hi8 /standard 8 mm system. •You cannot process externally input scenes using Digital effect. Pictures processed by Digital effect Pictures processed by Digital...
Playing back a tape with digital effects Notes •You cannot record images on a tape on your camcorder as a player •Digital effect does not work with tapes recorded in the Hi8 /standard 8 mm system. •You cannot process externally input scenes using Digital effect. Pictures processed by Digital effect Pictures processed by Digital...
Operating Instructions
Page 88
... is set to OFF (CHG). - You stop playing back. - You press TITLE. 88 The POWER switch is automatically canceled when: - Images in the Hi8 /standard 8 mm system. •You cannot process externally input scenes using Tape PB ZOOM. Enlarging recorded images - Tape PB ZOOM Notes •You cannot ...record images on a tape or on a "Memory Stick" on your camcorder while you can record images on a VCR using your camcorder as a player. •Tape PB ZOOM does not work with tapes recorded in Tape PB ZOOM These images are processing the...
... is set to OFF (CHG). - You stop playing back. - You press TITLE. 88 The POWER switch is automatically canceled when: - Images in the Hi8 /standard 8 mm system. •You cannot process externally input scenes using Tape PB ZOOM. Enlarging recorded images - Tape PB ZOOM Notes •You cannot ...record images on a tape or on a "Memory Stick" on your camcorder while you can record images on a VCR using your camcorder as a player. •Tape PB ZOOM does not work with tapes recorded in Tape PB ZOOM These images are processing the...
Operating Instructions
Page 89
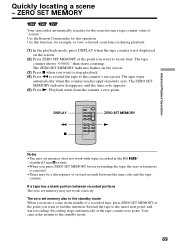
...set memory also in the standby mode When you insert a scene in the Hi8 / standard 8 mm system. •When you press ZERO SET MEMORY before...of "0:00:00. The ZERO SET MEMORY indicator disappears, and the time code appears. (5) Press N. Your camcorder returns to the insert start point, and start recording. " Use the Remote Commander for this function, for ... automatically at the point you want to the counter's zero point. Use this operation. ZERO SET MEMORY Your camcorder automatically searches for example, to view a desired scene later on the screen. (3) Press x when you want...
...set memory also in the standby mode When you insert a scene in the Hi8 / standard 8 mm system. •When you press ZERO SET MEMORY before...of "0:00:00. The ZERO SET MEMORY indicator disappears, and the time code appears. (5) Press N. Your camcorder returns to the insert start point, and start recording. " Use the Remote Commander for this function, for ... automatically at the point you want to the counter's zero point. Use this operation. ZERO SET MEMORY Your camcorder automatically searches for example, to view a desired scene later on the screen. (3) Press x when you want...

Operating Instructions
Page 91
If a tape has a blank portion between recorded portions The date search function may not accurately find the point where the recording date changes. DATE SEARCH Notes •The date search function does not work with tapes recorded in the Hi8 / standard 8 mm system. •If one day's recording is less than two minutes, your camcorder may not work correctly. 91 Advanced Playback Operations Searching for a recording by date -
If a tape has a blank portion between recorded portions The date search function may not accurately find the point where the recording date changes. DATE SEARCH Notes •The date search function does not work with tapes recorded in the Hi8 / standard 8 mm system. •If one day's recording is less than two minutes, your camcorder may not work correctly. 91 Advanced Playback Operations Searching for a recording by date -

Operating Instructions
Page 95
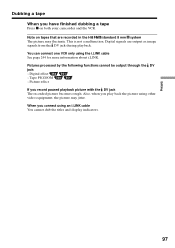
... VCR has an S video jack Pictures can edit on VCRs that support the following systems: 8 mm , Hi8 , Digital8 , VHS , S-VHS , VHSC , S-VHSC , Betamax , ED Betamax , mini DV , DV , or MICRO MV . If your VCR. If your camcorder and the VCR. Connect an S video cable (optional) to the S video jacks of both your... the audio input jack on both your VCR is OFF.) (p. 214) You can be reproduced more faithfully by using an S video cable (optional). If your camcorder and the VCR. 95 With this connection, you have finished dubbing a tape Press x on the VCR.
... VCR has an S video jack Pictures can edit on VCRs that support the following systems: 8 mm , Hi8 , Digital8 , VHS , S-VHS , VHSC , S-VHSC , Betamax , ED Betamax , mini DV , DV , or MICRO MV . If your VCR. If your camcorder and the VCR. Connect an S video cable (optional) to the S video jacks of both your... the audio input jack on both your VCR is OFF.) (p. 214) You can be reproduced more faithfully by using an S video cable (optional). If your camcorder and the VCR. 95 With this connection, you have finished dubbing a tape Press x on the VCR.
Operating Instructions
Page 97
... display indicators. 97 When you play back the picture using other video equipment, the picture may fluctuate. Note on both your camcorder and the VCR. Digital signals are recorded in the Hi8 /standard 8 mm system The picture may jitter. Tape PB ZOOM - Also, when you connect using the i.LINK cable See page...
... display indicators. 97 When you play back the picture using other video equipment, the picture may fluctuate. Note on both your camcorder and the VCR. Digital signals are recorded in the Hi8 /standard 8 mm system The picture may jitter. Tape PB ZOOM - Also, when you connect using the i.LINK cable See page...
Operating Instructions
Page 98
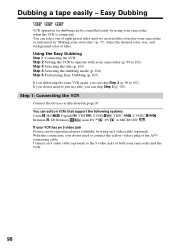
...the VCR is connected. Connect an S video cable (optional) to the S video jacks of eight preset titles and two custom titles stored in your camcorder as illustrated in page 95. Using the Easy Dubbing Step 1 Connecting the VCR Step 2 Setting the VCR to connect the yellow (video) plug of... titles. If your VCR has an S video jack Picture can edit on VCRs that support the following systems: 8 mm , Hi8 , Digital8 , VHS , S-VHS , VHSC , S-VHSC , Betamax , ED Betamax , mini DV , DV , or MICRO MV . Dubbing a tape easily - Select the desired color, size,...
...the VCR is connected. Connect an S video cable (optional) to the S video jacks of eight preset titles and two custom titles stored in your camcorder as illustrated in page 95. Using the Easy Dubbing Step 1 Connecting the VCR Step 2 Setting the VCR to connect the yellow (video) plug of... titles. If your VCR has an S video jack Picture can edit on VCRs that support the following systems: 8 mm , Hi8 , Digital8 , VHS , S-VHS , VHSC , S-VHSC , Betamax , ED Betamax , mini DV , DV , or MICRO MV . Dubbing a tape easily - Select the desired color, size,...
Operating Instructions
Page 106
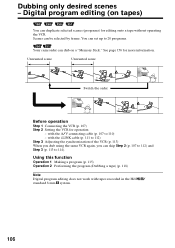
... for operation - Dubbing only desired scenes - You can set up to 110) - with the A/V connecting cable (p. 107 to 20 programs. Your camcorder can dub on tapes) You can be selected by frame. Using this function Operation 1 Making a program (p. 115) Operation 2 Performing the program (Dubbing... a tape) (p. 118) Note Digital program editing does not work with tapes recorded in the Hi8 / standard 8 mm system. 106 Unwanted scene Unwanted scene Switch the order Before operation Step 1 Connecting the VCR (p. 107) Step 2 Setting the...
... for operation - Dubbing only desired scenes - You can set up to 110) - with the A/V connecting cable (p. 107 to 20 programs. Your camcorder can dub on tapes) You can be selected by frame. Using this function Operation 1 Making a program (p. 115) Operation 2 Performing the program (Dubbing... a tape) (p. 118) Note Digital program editing does not work with tapes recorded in the Hi8 / standard 8 mm system. 106 Unwanted scene Unwanted scene Switch the order Before operation Step 1 Connecting the VCR (p. 107) Step 2 Setting the...
Operating Instructions
Page 120
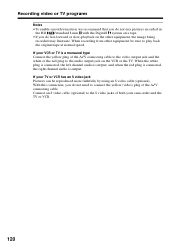
If your camcorder and the TV or VCR. 120 Connect an S video cable (optional) to the S video jacks of both your VCR or TV is output. If your ... at normal speed. Recording video or TV programs Notes •To enable smooth transition, we recommend that you do not mix pictures recorded in the Hi8 /standard 8 mm with the Digital8 system on a tape. •If you do fast-forward or slow-playback on the VCR or the TV. When the...
If your camcorder and the TV or VCR. 120 Connect an S video cable (optional) to the S video jacks of both your VCR or TV is output. If your ... at normal speed. Recording video or TV programs Notes •To enable smooth transition, we recommend that you do not mix pictures recorded in the Hi8 /standard 8 mm with the Digital8 system on a tape. •If you do fast-forward or slow-playback on the VCR or the TV. When the...


