
Operating Instructions
Page 3
... receiver. - Consult the dealer or an experienced radio/ TV technician for a Class B digital device, pursuant to comply with the limits for help. 3 TRV27 Responsible Party:Sony Electronics Inc. Address: 680 Kinderkamack Road, Oradell, NJ07649 U.S.A. Telephone No.: 201-930-6972...into an outlet on , the user is encouraged to try to provide reasonable protection against harmful interference in CANADA "Memory Stick" This Class B digital apparatus complies with the instructions, may cause undesired operation. Operation is subject to the following two conditions: (1) ...
... receiver. - Consult the dealer or an experienced radio/ TV technician for a Class B digital device, pursuant to comply with the limits for help. 3 TRV27 Responsible Party:Sony Electronics Inc. Address: 680 Kinderkamack Road, Oradell, NJ07649 U.S.A. Telephone No.: 201-930-6972...into an outlet on , the user is encouraged to try to provide reasonable protection against harmful interference in CANADA "Memory Stick" This Class B digital apparatus complies with the instructions, may cause undesired operation. Operation is subject to the following two conditions: (1) ...
Operating Instructions
Page 4
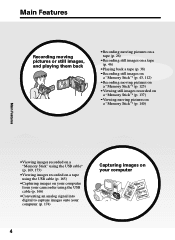
... a "Memory Stick"* (p. 137) •Viewing moving pictures on a "Memory Stick"* (p. 140) Main Features •Viewing images recorded on a "Memory Stick" using the USB cable* (p. 169, 173) •Viewing images recorded on a tape using the USB cable (p. 165) •Capturing images on your computer from your camcorder using the USB cable (p. 166) •Converting an analog signal into digital...
... a "Memory Stick"* (p. 137) •Viewing moving pictures on a "Memory Stick"* (p. 140) Main Features •Viewing images recorded on a "Memory Stick" using the USB cable* (p. 169, 173) •Viewing images recorded on a tape using the USB cable (p. 165) •Capturing images on your computer from your camcorder using the USB cable (p. 166) •Converting an analog signal into digital...
Operating Instructions
Page 6
... SEARCH/PHOTO SCAN 73 Editing Dubbing a tape 75 Dubbing only desired scenes - MEMORY MIX 120 6 TITLE SEARCH ..... 70 Searching a recording by frame recording - Digital program editing (on a tape - Tape PB ZOOM 67 Quickly locating a scene - BACK LIGHT 33 Shooting in the "Memory Stick" on a tape 8 - END SEARCH/EDITSEARCH/ Rec Review 37 Playback - Picture effect...
... SEARCH/PHOTO SCAN 73 Editing Dubbing a tape 75 Dubbing only desired scenes - MEMORY MIX 120 6 TITLE SEARCH ..... 70 Searching a recording by frame recording - Digital program editing (on a tape - Tape PB ZOOM 67 Quickly locating a scene - BACK LIGHT 33 Shooting in the "Memory Stick" on a tape 8 - END SEARCH/EDITSEARCH/ Rec Review 37 Playback - Picture effect...
Operating Instructions
Page 7
... - SLIDE SHOW 147 Preventing accidental erasure - Signal convert function 174 Customizing Your Camcorder Changing the menu settings 175 Troubleshooting Types of contents Recording moving pictures - Digital program editing (on a "Memory Stick" - For Macintosh users (except DCR-TRV16 171 Viewing images recorded on a "Memory Stick" - PRINT MARK 151 Using the optional printer 152 Viewing Images Using Your...
... - SLIDE SHOW 147 Preventing accidental erasure - Signal convert function 174 Customizing Your Camcorder Changing the menu settings 175 Troubleshooting Types of contents Recording moving pictures - Digital program editing (on a "Memory Stick" - For Macintosh users (except DCR-TRV16 171 Viewing images recorded on a "Memory Stick" - PRINT MARK 151 Using the optional printer 152 Viewing Images Using Your...
Operating Instructions
Page 10
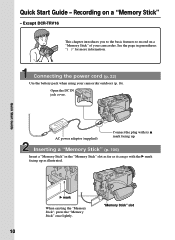
... ejecting the "Memory Stick", press the "Memory Stick" once lightly. Quick Start Guide - Connecting the power cord (p. 22) Use the battery pack when using your camcorder. "Memory Stick" slot 10 Recording on a "Memory Stick" of your camcorder outdoors (p. 16). Open the DC IN jack cover. See the page in the "Memory Stick" slot as far as illustrated. Inserting a "Memory Stick" (p. 106) Insert a "Memory Stick" in parentheses...
... ejecting the "Memory Stick", press the "Memory Stick" once lightly. Quick Start Guide - Connecting the power cord (p. 22) Use the battery pack when using your camcorder. "Memory Stick" slot 10 Recording on a "Memory Stick" of your camcorder outdoors (p. 16). Open the DC IN jack cover. See the page in the "Memory Stick" slot as far as illustrated. Inserting a "Memory Stick" (p. 106) Insert a "Memory Stick" in parentheses...

Operating Instructions
Page 11
.... 5 Press PHOTO deeper. The last recorded image is closed, use the viewfinder with your camcorder, the clock setting is set to the left (unlock) position. Monitoring the playback still images on a "Memory Stick" (p. 112) 1 Remove the lens cap. 3 Open the LCD panel while pressing OPEN.... POWER VCR OFF(CHG) CAMERA MEMORY 2 Press MEMORY PLAY. LOCK switch POWER VCR OFF(CHG) CAMERA MEMORY Quick Start Guide Viewfinder When the LCD panel is...
.... 5 Press PHOTO deeper. The last recorded image is closed, use the viewfinder with your camcorder, the clock setting is set to the left (unlock) position. Monitoring the playback still images on a "Memory Stick" (p. 112) 1 Remove the lens cap. 3 Open the LCD panel while pressing OPEN.... POWER VCR OFF(CHG) CAMERA MEMORY 2 Press MEMORY PLAY. LOCK switch POWER VCR OFF(CHG) CAMERA MEMORY Quick Start Guide Viewfinder When the LCD panel is...
Operating Instructions
Page 15
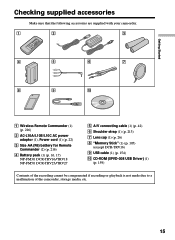
... supplied with your camcorder. 1 2 3 4 5 6 7 8 9 0 1 Wireless Remote Commander (1) (p. 216) 2 AC-L10A/L10B/L10C AC power adaptor (1), Power cord (1) (p. 22) 3 Size AA (R6) battery for Remote Commander (2) (p. 216) 4 Battery pack (1) (p. 16, 17) NP-FM30: DCR-TRV16/TRV18 NP-FM50: DCR-TRV25/TRV27 5 A/V connecting cable (1) (p. 42) 6 Shoulder strap (1) (p. 213) 7 Lens cap (1) (p. 26) 8 "Memory Stick" (1) (p. 105) (except DCR...
... supplied with your camcorder. 1 2 3 4 5 6 7 8 9 0 1 Wireless Remote Commander (1) (p. 216) 2 AC-L10A/L10B/L10C AC power adaptor (1), Power cord (1) (p. 22) 3 Size AA (R6) battery for Remote Commander (2) (p. 216) 4 Battery pack (1) (p. 16, 17) NP-FM30: DCR-TRV16/TRV18 NP-FM50: DCR-TRV25/TRV27 5 A/V connecting cable (1) (p. 42) 6 Shoulder strap (1) (p. 213) 7 Lens cap (1) (p. 26) 8 "Memory Stick" (1) (p. 105) (except DCR...

Operating Instructions
Page 24
Note on the time indicator The internal clock of your camcorder operates on the data code of the tape and the "Memory Stick" (except DCR-TRV16). Step 2 Setting the date and time The year changes as follows: 1995 T t 2002 T t 2079 If you do not set the date and time and are recorded on a 12-hour cycle. •12:00 AM stands for midnight. •12:00 PM stands for noon. 24
Note on the time indicator The internal clock of your camcorder operates on the data code of the tape and the "Memory Stick" (except DCR-TRV16). Step 2 Setting the date and time The year changes as follows: 1995 T t 2002 T t 2079 If you do not set the date and time and are recorded on a 12-hour cycle. •12:00 AM stands for midnight. •12:00 PM stands for noon. 24
Operating Instructions
Page 35
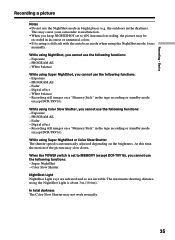
...-TRV16). Exposure - Fader - Exposure - PROGRAM AE - Recording still images on a "Memory Stick" in the daytime). Digital effect - When the POWER switch is about 3 m (10 feet). White balance While using NightShot, you cannot use the NightShot mode in normal recording, the picture may cause your camcorder to malfunction. •When you keep NIGHTSHOT set to...
...-TRV16). Exposure - Fader - Exposure - PROGRAM AE - Recording still images on a "Memory Stick" in the daytime). Digital effect - When the POWER switch is about 3 m (10 feet). White balance While using NightShot, you cannot use the NightShot mode in normal recording, the picture may cause your camcorder to malfunction. •When you keep NIGHTSHOT set to...

Operating Instructions
Page 36
... OFF D ZOOM ON PHOTO REC 16:9WIDE STEADYSHOT FRAME REC INT. The (self-timer) indicator appears on "Memory Stick"s with the self-timer starts in the standby mode. Note The self-timer is set to MEMORY You can also use the Remote Commander for this operation. (1) In the standby mode, press MENU, then...
... OFF D ZOOM ON PHOTO REC 16:9WIDE STEADYSHOT FRAME REC INT. The (self-timer) indicator appears on "Memory Stick"s with the self-timer starts in the standby mode. Note The self-timer is set to MEMORY You can also use the Remote Commander for this operation. (1) In the standby mode, press MENU, then...

Operating Instructions
Page 43
... the bar scroll indicator disappears. The CAPTURE indicator appears. You can be recorded on a tape (p. 46). Before operation •Insert a "Memory Stick" into your camcorder (p. 106). •Set PHOTO REC in to MEMORY in the tape recording or standby mode. Except DCR-TRV16 You can record still images on a tape - Recording does not start...
... the bar scroll indicator disappears. The CAPTURE indicator appears. You can be recorded on a tape (p. 46). Before operation •Insert a "Memory Stick" into your camcorder (p. 106). •Set PHOTO REC in to MEMORY in the tape recording or standby mode. Except DCR-TRV16 You can record still images on a tape - Recording does not start...
Operating Instructions
Page 44
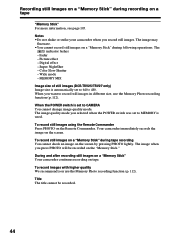
Digital effect - Your camcorder immediately records the image on tape. During and after recording still images on a "Memory Stick" Your camcorder continues recording on the screen. Notes •Do not shake or strike your camcorder when you use the Memory Photo recording function (p. 112). Super NightShot - Wide mode - The image quality mode you selected when the POWER switch...
Digital effect - Your camcorder immediately records the image on tape. During and after recording still images on a "Memory Stick" Your camcorder continues recording on the screen. Notes •Do not shake or strike your camcorder when you use the Memory Photo recording function (p. 112). Super NightShot - Wide mode - The image quality mode you selected when the POWER switch...
Operating Instructions
Page 45
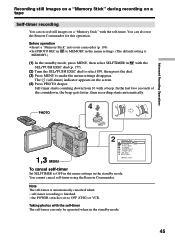
... in the standby mode. 45 Note The self-timer is finished. - Before operation •Insert a "Memory Stick" into your camcorder (p. 106). •Set PHOTO REC in to MEMORY in the menu settings. (The default setting is set to make the menu settings disappear. You cannot cancel... MENU to OFF (CHG) or VCR. You can also use the Remote Commander for this operation. Advanced Recording Operations Recording still images on a "Memory Stick" during recording on a tape Self-timer recording You can record still images on the screen. (4) Press PHOTO deeper. PHOTO 4 PHOTO 1,3 MENU ...
... in the standby mode. 45 Note The self-timer is finished. - Before operation •Insert a "Memory Stick" into your camcorder (p. 106). •Set PHOTO REC in to MEMORY in the menu settings. (The default setting is set to make the menu settings disappear. You cannot cancel... MENU to OFF (CHG) or VCR. You can also use the Remote Commander for this operation. Advanced Recording Operations Recording still images on a "Memory Stick" during recording on a tape Self-timer recording You can record still images on the screen. (4) Press PHOTO deeper. PHOTO 4 PHOTO 1,3 MENU ...
Operating Instructions
Page 47
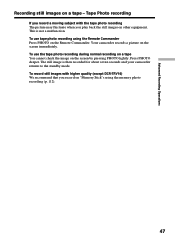
... on "Memory Stick"s using the Remote Commander Press PHOTO on a tape - To use tape photo recording using the memory photo recording (p. 112). 47 The still image is not a malfunction. Press PHOTO deeper. To record still images with the tape photo recording The picture may fluctuate when you record on other equipment. Your camcorder records... image on the screen immediately. Advanced Recording Operations Recording still images on the Remote Commander. This is then recorded for about seven seconds and your camcorder returns to the standby mode.
... on "Memory Stick"s using the Remote Commander Press PHOTO on a tape - To use tape photo recording using the memory photo recording (p. 112). 47 The still image is not a malfunction. Press PHOTO deeper. To record still images with the tape photo recording The picture may fluctuate when you record on other equipment. Your camcorder records... image on the screen immediately. Advanced Recording Operations Recording still images on the Remote Commander. This is then recorded for about seven seconds and your camcorder returns to the standby mode.
Operating Instructions
Page 49
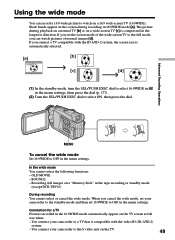
...the dial (p. 177). (2) Turn the SEL/PUSH EXEC dial to watch pictures of normal images [d]. When you cancel the wide mode, set your camcorder to the standby mode and then set the screen mode of the wide-screen TV to the full mode, you can record a 16:9 wide picture...16:9WIDE to the S video jack on a "Memory Stick" in the 16:9WIDE mode automatically appear on the screen during playback on a normal TV [b] or on a 16:9 wide-screen TV (16:9WIDE). You connect your camcorder to OFF in the menu settings. You connect your camcorder to a TV that is automatically selected. [a] [b]...
...the dial (p. 177). (2) Turn the SEL/PUSH EXEC dial to watch pictures of normal images [d]. When you cancel the wide mode, set your camcorder to the standby mode and then set the screen mode of the wide-screen TV to the full mode, you can record a 16:9 wide picture...16:9WIDE to the S video jack on a "Memory Stick" in the 16:9WIDE mode automatically appear on the screen during playback on a normal TV [b] or on a 16:9 wide-screen TV (16:9WIDE). You connect your camcorder to OFF in the menu settings. You connect your camcorder to a TV that is automatically selected. [a] [b]...
Operating Instructions
Page 52
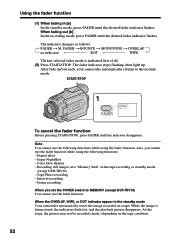
Digital effect - Interval recording - While the image is indicated first of all. (2) Press START/STOP. START/STOP 1 FADER FADER To cancel the fader function Before pressing .... Note You cannot use the following functions: - Super NightShot - When the OVERLAP, WIPE, or DOT indicator appear in the standby mode Your camcorder automatically stores the image recorded on a "Memory Stick" in [a] In the standby mode, press FADER until the desired fader indicator flashes. Recording still images on a tape. At this stage, the...
Digital effect - Interval recording - While the image is indicated first of all. (2) Press START/STOP. START/STOP 1 FADER FADER To cancel the fader function Before pressing .... Note You cannot use the following functions: - Super NightShot - When the OVERLAP, WIPE, or DOT indicator appear in the standby mode Your camcorder automatically stores the image recorded on a "Memory Stick" in [a] In the standby mode, press FADER until the desired fader indicator flashes. Recording still images on a tape. At this stage, the...
Operating Instructions
Page 54
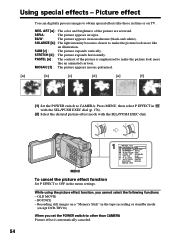
...NEG. MOSAIC [f] : The picture appears mosaic-patterned. [a] [b] [c] [d] [e] [f] (1) Set the POWER switch to OFF in films or on a "Memory Stick" in monochrome (black-and-white). ART D EFFECT SEPIA FLASH MODE B&W FLASH LVL SOLARIZE WHT BAL SLIM N. BOUNCE - SEPIA : The picture appears in ... EFFECT NEG. S. SOLARIZE [b] : The light intensity becomes clearer to obtain special effects like an illustration. Picture effect You can digitally process images to make the picture look more like an animated cartoon. ART [a] : The color and brightness of the picture is...
...NEG. MOSAIC [f] : The picture appears mosaic-patterned. [a] [b] [c] [d] [e] [f] (1) Set the POWER switch to OFF in films or on a "Memory Stick" in monochrome (black-and-white). ART D EFFECT SEPIA FLASH MODE B&W FLASH LVL SOLARIZE WHT BAL SLIM N. BOUNCE - SEPIA : The picture appears in ... EFFECT NEG. S. SOLARIZE [b] : The light intensity becomes clearer to obtain special effects like an illustration. Picture effect You can digitally process images to make the picture look more like an animated cartoon. ART [a] : The color and brightness of the picture is...

Operating Instructions
Page 57
...Shutter - Recording still images on a "Memory Stick" in the slow shutter mode Auto focus may not be automatically canceled. Digital effect Notes •The following functions do not work in the slow shutter mode. •The following functions do not work during digital effect: - Picture effect - Advanced ... in the old movie mode: - Wide mode - Focus manually using a tripod. PROGRAM AE When you set the POWER switch to OFF (CHG) Digital effect will be effective. Shutter speed Shutter speed number SLOW SHTR 1 SLOW SHTR 2 SLOW SHTR 3 SLOW SHTR 4 Shutter speed 1/30 1/15 1/8...
...Shutter - Recording still images on a "Memory Stick" in the slow shutter mode Auto focus may not be automatically canceled. Digital effect Notes •The following functions do not work in the slow shutter mode. •The following functions do not work during digital effect: - Picture effect - Advanced ... in the old movie mode: - Wide mode - Focus manually using a tripod. PROGRAM AE When you set the POWER switch to OFF (CHG) Digital effect will be effective. Shutter speed Shutter speed number SLOW SHTR 1 SLOW SHTR 2 SLOW SHTR 3 SLOW SHTR 4 Shutter speed 1/30 1/15 1/8...

Operating Instructions
Page 65
... set the POWER switch to OFF in with picture effect During playback, you can process a scene using your camcorder as a player. When you have processed using the picture effect function, record images on a "Memory Stick" (except DCR-TRV16) (p. 117, 128), or on a VCR using the following picture effect functions: NEG. Select P EFFECT in...
... set the POWER switch to OFF in with picture effect During playback, you can process a scene using your camcorder as a player. When you have processed using the picture effect function, record images on a "Memory Stick" (except DCR-TRV16) (p. 117, 128), or on a VCR using the following picture effect functions: NEG. Select P EFFECT in...
Operating Instructions
Page 66
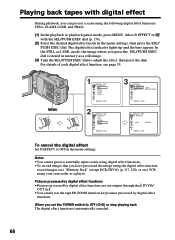
... using your camcorder as a still image. (3) Turn the SEL/PUSH EXEC dial to adjust the effect, then press the dial. Select D EFFECT in with digital effect During playback, you have processed the image using the digital effect function, record images on a "Memory Stick" (except DCR...-TRV16) (p. 117, 128), or on a VCR using the following digital effect functions: STILL, FLASH, LUMI. TRAIL [MENU]...
... using your camcorder as a still image. (3) Turn the SEL/PUSH EXEC dial to adjust the effect, then press the dial. Select D EFFECT in with digital effect During playback, you have processed the image using the digital effect function, record images on a "Memory Stick" (except DCR...-TRV16) (p. 117, 128), or on a VCR using the following digital effect functions: STILL, FLASH, LUMI. TRAIL [MENU]...


