
Operating Instructions (primary manual)
Page 6
... 4 Checking supplied accessories 5 Quick Start Guide 8 Getting started Using this manual 10 Step 1 Preparing the power supply ... 12 Installing the battery pack 12 Charging the battery pack 13 Connecting to the wall outlet ....... 17 Step 2 Setting the date and time ......... 18 Step 3 Inserting a cassette 20 Recording - END SEARCH / EDITSEARCH / Rec Review .... 30 Playback - Basics Playing back a tape 31 Viewing the recording on TV 35 Advanced Recording Operations Recording a still image on "Memory Stick"s - Digital effect ... 46 Using the PROGRAM AE function .... 49 Adjusting...
... 4 Checking supplied accessories 5 Quick Start Guide 8 Getting started Using this manual 10 Step 1 Preparing the power supply ... 12 Installing the battery pack 12 Charging the battery pack 13 Connecting to the wall outlet ....... 17 Step 2 Setting the date and time ......... 18 Step 3 Inserting a cassette 20 Recording - END SEARCH / EDITSEARCH / Rec Review .... 30 Playback - Basics Playing back a tape 31 Viewing the recording on TV 35 Advanced Recording Operations Recording a still image on "Memory Stick"s - Digital effect ... 46 Using the PROGRAM AE function .... 49 Adjusting...
Operating Instructions (primary manual)
Page 10
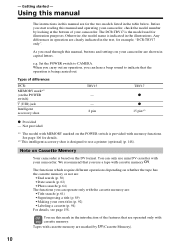
Using this manual The instructions in this manual, buttons and settings on the POWER switch) (USB) jack Intelligent accessory shoe TRV15 - - 8 pin TRV17 z z 15 pin*2) z Provided - As you read through this manual are clearly indicated in the text, for details. *2) This intelligent accessory shoe is provided with your camcorder, check the model number by (Cassette Memory). 10 Types of differences DCRMEMORY mark*1) (on your camcorder are shown in the introduction...
Using this manual The instructions in this manual, buttons and settings on the POWER switch) (USB) jack Intelligent accessory shoe TRV15 - - 8 pin TRV17 z z 15 pin*2) z Provided - As you read through this manual are clearly indicated in the text, for details. *2) This intelligent accessory shoe is provided with your camcorder, check the model number by (Cassette Memory). 10 Types of differences DCRMEMORY mark*1) (on your camcorder are shown in the introduction...
Operating Instructions (primary manual)
Page 22
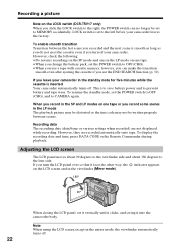
... you use a tape with cassette memory, however, you can no longer be written properly between the last scene you record some scenes in the mirror mode, the viewfinder automatically turns off . LOCK switch is to save battery power and to the lens side. To display the recording date and time, press DATA CODE on the LOCK switch (DCR-TRV17 only) When you turn off your camcorder leaves the factory. Recording a picture Note on the Remote Commander during playback.
... you use a tape with cassette memory, however, you can no longer be written properly between the last scene you record some scenes in the mirror mode, the viewfinder automatically turns off . LOCK switch is to save battery power and to the lens side. To display the recording date and time, press DATA CODE on the LOCK switch (DCR-TRV17 only) When you turn off your camcorder leaves the factory. Recording a picture Note on the Remote Commander during playback.

Operating Instructions (primary manual)
Page 35
... LINE. Set the input selector on the TV screen, we recommend that you connect the white plug, the sound is already connected to a VCR AUDIO Connect your camcorder. This connection produces higher quality DV format pictures. 35 When monitoring the playback picture on the VCR to VCR. Open the jack cover. S VIDEO AUDIO/VIDEO White Yellow IN S VIDEO VIDEO A/V connecting cable : Signal flow (supplied) Red If your TV is L (left) signal. If you power your camcorder from a wall outlet using the A/V connecting cable supplied...
... LINE. Set the input selector on the TV screen, we recommend that you connect the white plug, the sound is already connected to a VCR AUDIO Connect your camcorder. This connection produces higher quality DV format pictures. 35 When monitoring the playback picture on the VCR to VCR. Open the jack cover. S VIDEO AUDIO/VIDEO White Yellow IN S VIDEO VIDEO A/V connecting cable : Signal flow (supplied) Red If your TV is L (left) signal. If you power your camcorder from a wall outlet using the A/V connecting cable supplied...
Operating Instructions (primary manual)
Page 37
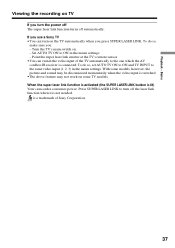
... models, however, the picture and sound may not work on TV If you use a Sony TV •You can switch the video input of the TV automatically to ON in the menu settings. When the super laser link function is activated (the SUPER LASER LINK button is switched. •The above feature may be disconnected momentarily when the video input is lit) Your camcorder consumes power. Playback - If you turn...
... models, however, the picture and sound may not work on TV If you use a Sony TV •You can switch the video input of the TV automatically to ON in the menu settings. When the super laser link function is activated (the SUPER LASER LINK button is switched. •The above feature may be disconnected momentarily when the video input is lit) Your camcorder consumes power. Playback - If you turn...
Operating Instructions (primary manual)
Page 38
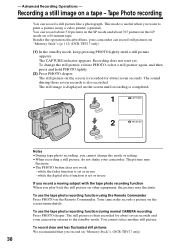
...also recorded. - The sound during normal CAMERA recording Press PHOTO deeper. The still image is displayed on a 60-minute tape. Besides the operation described here, your camcorder. while the digital effect function is completed. 1 PHOTO CAPTURE 2 PHOTO Notes • During tape photo recording, you record on the Remote Commander. To use the tape photo recording function during those seven seconds is then recorded for about seven seconds and your camcorder returns to print a picture using the Remote Commander Press PHOTO on "Memory Stick"s. (DCR-TRV17...
...also recorded. - The sound during normal CAMERA recording Press PHOTO deeper. The still image is displayed on a 60-minute tape. Besides the operation described here, your camcorder. while the digital effect function is completed. 1 PHOTO CAPTURE 2 PHOTO Notes • During tape photo recording, you record on the Remote Commander. To use the tape photo recording function during those seven seconds is then recorded for about seven seconds and your camcorder returns to print a picture using the Remote Commander Press PHOTO on "Memory Stick"s. (DCR-TRV17...

Operating Instructions (primary manual)
Page 57
...) or stop playing back The picture effect function is input from other equipment using the picture effect function. •To record pictures that you set the POWER switch to OFF in the menu 1 MANUAL SET P EFFECT D EFFECT RETURN OFF NEG. Advanced Playback Operations - in the menu settings. Notes •You cannot process the picture that is automatically canceled. 57 Advanced Playback Operations - When you have processed using the picture effect function, record the pictures on the VCR, using the picture effect functions...
...) or stop playing back The picture effect function is input from other equipment using the picture effect function. •To record pictures that you set the POWER switch to OFF in the menu 1 MANUAL SET P EFFECT D EFFECT RETURN OFF NEG. Advanced Playback Operations - in the menu settings. Notes •You cannot process the picture that is automatically canceled. 57 Advanced Playback Operations - When you have processed using the picture effect function, record the pictures on the VCR, using the picture effect functions...
Operating Instructions (primary manual)
Page 59
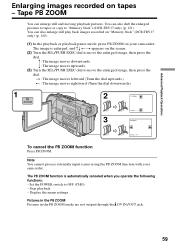
... also enlarge still play back images recorded on "Memory Stick" (DCR-TRV17 only) (p. 140). (1) In the playback or playback pause mode, press PB ZOOM on your camcorder. R : The image moves downwards. Note You cannot process externally input scenes using the PB ZOOM function with your camcorder. Advanced Playback Operations Enlarging images recorded on the screen. (2) Turn the SEL/PUSH EXEC dial to move the enlarged image, then press the dial. r : The image moves upwards. (3) Turn the SEL/PUSH EXEC...
... also enlarge still play back images recorded on "Memory Stick" (DCR-TRV17 only) (p. 140). (1) In the playback or playback pause mode, press PB ZOOM on your camcorder. R : The image moves downwards. Note You cannot process externally input scenes using the PB ZOOM function with your camcorder. Advanced Playback Operations Enlarging images recorded on the screen. (2) Turn the SEL/PUSH EXEC dial to move the enlarged image, then press the dial. r : The image moves upwards. (3) Turn the SEL/PUSH EXEC...
Operating Instructions (primary manual)
Page 73
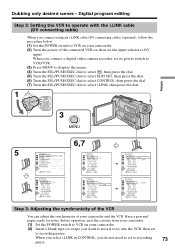
... OTHERS ED I TSET CONTROL ADJ TEST " CUT- Before operation, eject the cassette from your camcorder. (1) Set the POWER switch to VCR on your camcorder and the VCR. Have a pen and paper ready for notes. Digital program editing Step 2: Setting the VCR to operate with the i.LINK cable (DV connecting cable) When you connect a digital video camera recorder, set the input selector to select i.LINK, then press the dial. 1 POWER VCR OFF(CHG) CAMERA MEMORY 3 MENU Editing 5 OTHERS DATA CODE DATE / CAM BEEP COMMA ND...
... OTHERS ED I TSET CONTROL ADJ TEST " CUT- Before operation, eject the cassette from your camcorder. (1) Set the POWER switch to VCR on your camcorder and the VCR. Have a pen and paper ready for notes. Digital program editing Step 2: Setting the VCR to operate with the i.LINK cable (DV connecting cable) When you connect a digital video camera recorder, set the input selector to select i.LINK, then press the dial. 1 POWER VCR OFF(CHG) CAMERA MEMORY 3 MENU Editing 5 OTHERS DATA CODE DATE / CAM BEEP COMMA ND...
Operating Instructions (primary manual)
Page 76
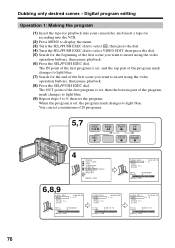
... mark changes to 8, then set , then the bottom part of the first scene you want to light blue. Digital program editing Operation 1: Making the program (1) Insert the tape for playback into your camcorder, and insert a tape for recording into the VCR. (2) Press MENU to display the menu. (3) Turn the SEL/PUSH EXEC dial to select , then press the dial. (4) Turn the SEL/PUSH EXEC dial to select VIDEO...
... mark changes to 8, then set , then the bottom part of the first scene you want to light blue. Digital program editing Operation 1: Making the program (1) Insert the tape for playback into your camcorder, and insert a tape for recording into the VCR. (2) Press MENU to display the menu. (3) Turn the SEL/PUSH EXEC dial to select , then press the dial. (4) Turn the SEL/PUSH EXEC dial to select VIDEO...
Operating Instructions (primary manual)
Page 97
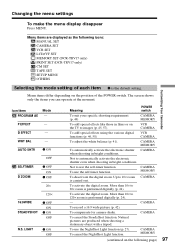
... shutter even when shooting in bright conditions. CAMERA MEMORY To automatically activate the electronic shutter CAMERA when shooting in bright conditions. CAMERA To record a 16:9 wide picture (p. 42). D EFFECT - VCR CAMERA To add special effects using the various digital functions (p. 46, 58) VCR CAMERA To adjust the white balance (p. 41). Menu items are produced when shooting a stationary object with a tripod. To activate the digital zoom. More than 10× to images (p. 45, 57). Customizing Your Camcorder Menu...
... shutter even when shooting in bright conditions. CAMERA MEMORY To automatically activate the electronic shutter CAMERA when shooting in bright conditions. CAMERA To record a 16:9 wide picture (p. 42). D EFFECT - VCR CAMERA To add special effects using the various digital functions (p. 46, 58) VCR CAMERA To adjust the white balance (p. 41). Menu items are produced when shooting a stationary object with a tripod. To activate the digital zoom. More than 10× to images (p. 45, 57). Customizing Your Camcorder Menu...

Operating Instructions (primary manual)
Page 117
... on a "Memory Stick". The image displayed on the screen will be recorded on the tape is played back. (3) Keep pressing PHOTO lightly until the picture from a tape as a still image on the screen. As well do not turn the power off , eject a "Memory Stick" or remove the battery pack. Check the format of the "Memory Stick." The picture recorded on a "Memory Stick." Recording an image from the tape freezes. Recording is complete when the bar scroll indicator disappears. 2 REW PLAY FF 1 POWER VCR OFF(CHG) CAMERA MEMORY "Memory Stick" Operations 3 4 CAPTURE PHOTO PHOTO When...
... on a "Memory Stick". The image displayed on the screen will be recorded on the tape is played back. (3) Keep pressing PHOTO lightly until the picture from a tape as a still image on the screen. As well do not turn the power off , eject a "Memory Stick" or remove the battery pack. Check the format of the "Memory Stick." The picture recorded on a "Memory Stick." Recording an image from the tape freezes. Recording is complete when the bar scroll indicator disappears. 2 REW PLAY FF 1 POWER VCR OFF(CHG) CAMERA MEMORY "Memory Stick" Operations 3 4 CAPTURE PHOTO PHOTO When...

Operating Instructions (primary manual)
Page 121
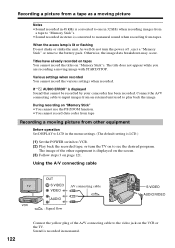
... take in moving picture data through the input connector and record it as a moving picture - When IMAGESIZE in the menu settings is set to start recording from a tape as a moving picture on a "Memory Stick." The picture recorded on the tape is 15 seconds. 2 REW PLAY FF 1 POWER VCR OFF(CHG) CAMERA MEMORY "Memory Stick" Operations 3 4 0min N 0:15:42:43 320REC 0:0 3 [ 1 5SEC ] Recording time can read moving picture data recorded on a tape and record it as a moving picture on your camcorder at the scene...
... take in moving picture data through the input connector and record it as a moving picture - When IMAGESIZE in the menu settings is set to start recording from a tape as a moving picture on a "Memory Stick." The picture recorded on the tape is 15 seconds. 2 REW PLAY FF 1 POWER VCR OFF(CHG) CAMERA MEMORY "Memory Stick" Operations 3 4 0min N 0:15:42:43 320REC 0:0 3 [ 1 5SEC ] Recording time can read moving picture data recorded on a tape and record it as a moving picture on your camcorder at the scene...
Operating Instructions (primary manual)
Page 122
...operation Set DISPLAY to LCD in monaural. Various settings when recorded You cannot record the various settings when recorded. Connect the A/V connecting cable to input images from an external unit used to play back the image. During recording on "Memory Stick" •You cannot use the PB ZOOM function. •You cannot record data codes from tape Recording a moving picture from other equipment is converted to monaural sound when recording from tapes. Sound is recorded in the menu settings. (The default setting is LCD.) (1) Set the POWER switch to VCR. (2) Play back the recorded tape...
...operation Set DISPLAY to LCD in monaural. Various settings when recorded You cannot record the various settings when recorded. Connect the A/V connecting cable to input images from an external unit used to play back the image. During recording on "Memory Stick" •You cannot use the PB ZOOM function. •You cannot record data codes from tape Recording a moving picture from other equipment is converted to monaural sound when recording from tapes. Sound is recorded in the menu settings. (The default setting is LCD.) (1) Set the POWER switch to VCR. (2) Play back the recorded tape...

Operating Instructions (primary manual)
Page 127
... on the screen. (5) Press PHOTO deeper. "Memory Stick" Operations Copying still images from tapes and record them on a "Memory Stick" in sequence. END is displayed when copying is displayed. DCR-TRV17 only Using the search function, you can automatically take in only still images from a tape - The number of still images copied is completed. 1 POWER VCR OFF(CHG) CAMERA MEMORY 2 MENU 5 PHOTO PHOTO SAVE 0 : 00 : 00 : 00 4 / 15 SAV I NG 0 [MENU] : END 3 MEMORY SET STILL SET MOVIE SET PR I NT MARK PROTECT PHOTO SAVE RETURN [MENU] : END 4 MEMORY SET STILL SET MOVIE SET PR...
... on the screen. (5) Press PHOTO deeper. "Memory Stick" Operations Copying still images from tapes and record them on a "Memory Stick" in sequence. END is displayed when copying is displayed. DCR-TRV17 only Using the search function, you can automatically take in only still images from a tape - The number of still images copied is completed. 1 POWER VCR OFF(CHG) CAMERA MEMORY 2 MENU 5 PHOTO PHOTO SAVE 0 : 00 : 00 : 00 4 / 15 SAV I NG 0 [MENU] : END 3 MEMORY SET STILL SET MOVIE SET PR I NT MARK PROTECT PHOTO SAVE RETURN [MENU] : END 4 MEMORY SET STILL SET MOVIE SET PR...
Operating Instructions (primary manual)
Page 135
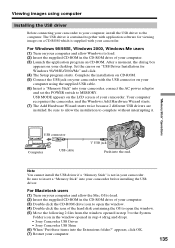
... with application software for Windows 98/98SE/2000/Me" and click. (4) The Setup program starts. Complete the installation on CD-ROM. (5) Connect the USB jack on your camcorder. Be sure to the computer. Viewing images using the supplied USB cable. (6) Insert a "Memory Stick" into your camcorder, connect the AC power adaptor and set the POWER switch to complete without interrupting it. For Macintosh users (1) Turn on your computer and allow the Mac OS to...
... with application software for Windows 98/98SE/2000/Me" and click. (4) The Setup program starts. Complete the installation on CD-ROM. (5) Connect the USB jack on your camcorder. Be sure to the computer. Viewing images using the supplied USB cable. (6) Insert a "Memory Stick" into your camcorder, connect the AC power adaptor and set the POWER switch to complete without interrupting it. For Macintosh users (1) Turn on your computer and allow the Mac OS to...

Operating Instructions (primary manual)
Page 136
.... Viewing images using computer Viewing images For Windows 98 users (1) Turn on the power of your computer and allow Windows 98 to load. (2) Connect one end of the USB cable to the USB jack on the camcorder and the other end to the USB connector on Windows 98 and double click the newly recognized drive. (Example: "Removable Disk (D:)") The folders inside the "Memory Stick" are displayed. (6) Select and double-click the desired image file from...
.... Viewing images using computer Viewing images For Windows 98 users (1) Turn on the power of your computer and allow Windows 98 to load. (2) Connect one end of the USB cable to the USB jack on the camcorder and the other end to the USB connector on Windows 98 and double click the newly recognized drive. (Example: "Removable Disk (D:)") The folders inside the "Memory Stick" are displayed. (6) Select and double-click the desired image file from...
Operating Instructions (primary manual)
Page 157
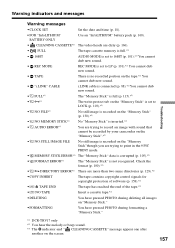
... "Memory Stick" data is corrupted (p. 105).*2) • FORMAT ERROR*1) The "Memory Stick" is recorded on the screen. 157 Check the format (p. 100).*2) • - Warning indicators and messages Troubleshooting Warning messages •CLOCK SET Set the date and time (p. 18). • FOR "InfoLITHIUM" BATTERY ONLY Use an "InfoLITHIUM" battery pack (p. 160). • CLEANING CASSETTE*3) The video heads are dirty (p. 166). • FULL The tape cassette memory is full.*2) • 16BIT AUDIO MODE is set to 16BIT (p. 101).*2) You cannot dub new sound. • REC MODE REC MODE...
... "Memory Stick" data is corrupted (p. 105).*2) • FORMAT ERROR*1) The "Memory Stick" is recorded on the screen. 157 Check the format (p. 100).*2) • - Warning indicators and messages Troubleshooting Warning messages •CLOCK SET Set the date and time (p. 18). • FOR "InfoLITHIUM" BATTERY ONLY Use an "InfoLITHIUM" battery pack (p. 160). • CLEANING CASSETTE*3) The video heads are dirty (p. 166). • FULL The tape cassette memory is full.*2) • 16BIT AUDIO MODE is set to 16BIT (p. 101).*2) You cannot dub new sound. • REC MODE REC MODE...
Operating Instructions (primary manual)
Page 169
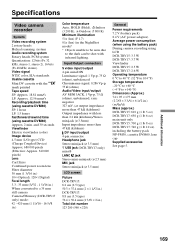
... 5. and 30 seconds Viewfinder Electric viewfinder (color) Image device 4.5 mm (1/4 type) CCD (Charge Coupled Device) Approx. 680 000 pixels (Effective: Approx. 340 000 pixels) Lens Carl Zeiss Combined power zoom lens Filter diameter 30 mm (1 3/16 in.) 10× (Optical), 120× (Digital) Focal length 3.3 - 33 mm (5/32 - 1 5/16 in.) When converted to a 35 mm still camera Camera/Memory (DCR-TRV17 only) mode: 42 - 420 mm (1 11/16...
... 5. and 30 seconds Viewfinder Electric viewfinder (color) Image device 4.5 mm (1/4 type) CCD (Charge Coupled Device) Approx. 680 000 pixels (Effective: Approx. 340 000 pixels) Lens Carl Zeiss Combined power zoom lens Filter diameter 30 mm (1 3/16 in.) 10× (Optical), 120× (Digital) Focal length 3.3 - 33 mm (5/32 - 1 5/16 in.) When converted to a 35 mm still camera Camera/Memory (DCR-TRV17 only) mode: 42 - 420 mm (1 11/16...

Operating Instructions (primary manual)
Page 180
... 85 AUDIO MIX 98 Audio mode 101 AUTO SHUTTER 97 A/V connecting cable 35, 40, 66, 118, 122 BACK LIGHT 26 Battery pack 12 Beep 102 BOUNCE 43 C, D Camera chromakey 124 Cassette memory 10, 158 Charging battery 13 Charging built-in rechargeable battery .......... 166 Clock set 18 Continuous 114 Cut recording 56 Data code 32 Date search 62 DEMO 101 DIGITAL EFFECT 46, 58 Digital program editing ......... 68 DISPLAY 32 DOT 43 Dual sound track tape .......... 159 DV connecting cable...
... 85 AUDIO MIX 98 Audio mode 101 AUTO SHUTTER 97 A/V connecting cable 35, 40, 66, 118, 122 BACK LIGHT 26 Battery pack 12 Beep 102 BOUNCE 43 C, D Camera chromakey 124 Cassette memory 10, 158 Charging battery 13 Charging built-in rechargeable battery .......... 166 Clock set 18 Continuous 114 Cut recording 56 Data code 32 Date search 62 DEMO 101 DIGITAL EFFECT 46, 58 Digital program editing ......... 68 DISPLAY 32 DOT 43 Dual sound track tape .......... 159 DV connecting cable...


