Operating Instructions
Page 1
Serial No. Model No. Record the serial number in the space provided below. STR-DG800 ©2006 Sony Corporation Refer to them whenever you call upon your Sony dealer regarding this product. 2-667-346-12 (1) Multi Channel AV Receiver Operating Instructions Owner's Record The model and serial numbers are located on the rear of the unit.
Serial No. Model No. Record the serial number in the space provided below. STR-DG800 ©2006 Sony Corporation Refer to them whenever you call upon your Sony dealer regarding this product. 2-667-346-12 (1) Multi Channel AV Receiver Operating Instructions Owner's Record The model and serial numbers are located on the rear of the unit.
Operating Instructions
Page 5
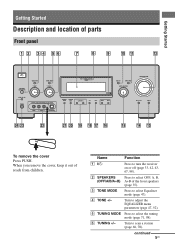
TUNING + AUTO CAL MIC PHONES VIDEO 3 IN/PORTABLE AV IN VIDEO L AUDIO R DIGITAL(OPT) MULTI CHANNEL DECODING DISPLAY INPUT MODE INPUT SELECTOR MASTER VOLUME MEMORY/ CATEGORY ENTER MODE - MOVIE MUSIC MULTI CH IN DIRECT wf wd ws wa w; D TONE +/- Getting Started Getting Started Description and location of reach from children. CATEGORY + ...the tuning mode (page 71, 98). E TUNING MODE Press to adjust the EQUALIZER menu parameters (page 47, 52). Turn to turn the receiver on or off (page 33, 42, 43, 67, 98). ql qk qj qh qg qf qd PUSH To remove the cover Press PUSH...
TUNING + AUTO CAL MIC PHONES VIDEO 3 IN/PORTABLE AV IN VIDEO L AUDIO R DIGITAL(OPT) MULTI CHANNEL DECODING DISPLAY INPUT MODE INPUT SELECTOR MASTER VOLUME MEMORY/ CATEGORY ENTER MODE - MOVIE MUSIC MULTI CH IN DIRECT wf wd ws wa w; D TONE +/- Getting Started Getting Started Description and location of reach from children. CATEGORY + ...the tuning mode (page 71, 98). E TUNING MODE Press to adjust the EQUALIZER menu parameters (page 47, 52). Turn to turn the receiver on or off (page 33, 42, 43, 67, 98). ql qk qj qh qg qf qd PUSH To remove the cover Press PUSH...
Operating Instructions
Page 6
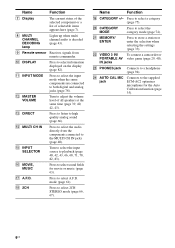
..., 67). Q A.F.D. I Remote sensor Receives signals from the components connected to select sound fields for the Auto Calibration function (page 35). 6US mode (page 61). R 2CH Press to a headphone (page 94). H MULTI CHANNEL DECODING lamp Lights up when multi channel audio is decoded (page 43). Press ... commander. U MEMORY/ ENTER Press to select the category mode (page 74). V VIDEO 3 IN/ To connect a camcorder or PORTABLE AV video game (page 29, 40). Name Function G Display The current status of the selected component or a list of all speakers at the...
..., 67). Q A.F.D. I Remote sensor Receives signals from the components connected to select sound fields for the Auto Calibration function (page 35). 6US mode (page 61). R 2CH Press to a headphone (page 94). H MULTI CHANNEL DECODING lamp Lights up when multi channel audio is decoded (page 43). Press ... commander. U MEMORY/ ENTER Press to select the category mode (page 74). V VIDEO 3 IN/ To connect a camcorder or PORTABLE AV video game (page 29, 40). Name Function G Display The current status of the selected component or a list of all speakers at the...
Operating Instructions
Page 10
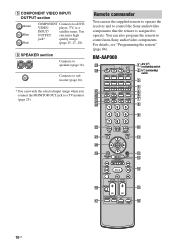
... (page 16). * You can also program the remote to control non-Sony audio/video components. RM-AAP008 wl TV RM SET UP AV ?/1 ?/1 wk SYSTEM STANDBY VIDEO 1 VIDEO 2 VIDEO 3 DVD TV/SAT MD/TAPE SA-CD/CD TUNER PHONO MULTI CH SOURCE 2ND ZONE wj wh 2CH A.F.D. B < B ql v qs... image (page 25, 27, 28). TUNING AUTO CAL wf wd 123 1 AV ?/1 (on/standby) switch 2 ?/1 (on/standby) switch 3 4 5 6 7 8 456 9 789 ws - /- - You OUTPUT can use the supplied remote to operate the receiver and to control the Sony audio/video components that the remote is assigned to a TV monitor (page 25...
... (page 16). * You can also program the remote to control non-Sony audio/video components. RM-AAP008 wl TV RM SET UP AV ?/1 ?/1 wk SYSTEM STANDBY VIDEO 1 VIDEO 2 VIDEO 3 DVD TV/SAT MD/TAPE SA-CD/CD TUNER PHONO MULTI CH SOURCE 2ND ZONE wj wh 2CH A.F.D. B < B ql v qs... image (page 25, 27, 28). TUNING AUTO CAL wf wd 123 1 AV ?/1 (on/standby) switch 2 ?/1 (on/standby) switch 3 4 5 6 7 8 456 9 789 ws - /- - You OUTPUT can use the supplied remote to operate the receiver and to control the Sony audio/video components that the remote is assigned to a TV monitor (page 25...
Operating Instructions
Page 11
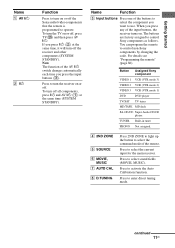
...remote. To turn off all components, press ?/1 and AV ?/1 (A) at the same time, it will turn off the receiver and other components (SYSTEM STANDBY). You can program the remote to select sound fields (MOVIE, MUSIC). Press to control non-Sony components by changing the code. D 2ND ZONE E ...details see "Programming the remote" (page 86). Note The function of the buttons to operate. To turn the receiver on or off , press TV(wk) and then press AV ?/1. continued 11US Button Assigned Sony component VIDEO 1 VCR (VTR mode 3) VIDEO 2 VCR (VTR mode 2) VIDEO 3 VCR (VTR mode 1)...
...remote. To turn off all components, press ?/1 and AV ?/1 (A) at the same time, it will turn off the receiver and other components (SYSTEM STANDBY). You can program the remote to select sound fields (MOVIE, MUSIC). Press to control non-Sony components by changing the code. D 2ND ZONE E ...details see "Programming the remote" (page 86). Note The function of the buttons to operate. To turn the receiver on or off , press TV(wk) and then press AV ?/1. continued 11US Button Assigned Sony component VIDEO 1 VCR (VTR mode 3) VIDEO 2 VCR (VTR mode 2) VIDEO 3 VCR (VTR mode 1)...
Operating Instructions
Page 22
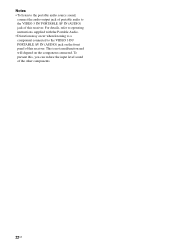
To prevent this, you can reduce the input level sound of the other components. 22US This is not a malfunction and will depend on the front panel of this receiver. For details, refer to operating instructions supplied with the Portable Audio. • Distortion may occur when listening to a component connected to the VIDEO 3 IN/ PORTABLE AV IN (AUDIO) jack of this receiver. Notes • To listen to the portable audio source sound, connect the audio output jack of portable audio to the VIDEO 3 IN/ PORTABLE AV IN (AUDIO) jack on the component connected.
To prevent this, you can reduce the input level sound of the other components. 22US This is not a malfunction and will depend on the front panel of this receiver. For details, refer to operating instructions supplied with the Portable Audio. • Distortion may occur when listening to a component connected to the VIDEO 3 IN/ PORTABLE AV IN (AUDIO) jack of this receiver. Notes • To listen to the portable audio source sound, connect the audio output jack of portable audio to the VIDEO 3 IN/ PORTABLE AV IN (AUDIO) jack on the component connected.
Operating Instructions
Page 33
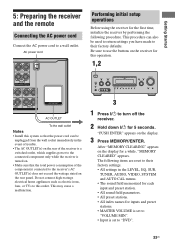
... AV IN VIDEO L AUDIO R DIGITAL(OPT) MULTI CHANNEL DECODING DISPLAY INPUT MODE INPUT SELECTOR MASTER VOLUME MEMORY/ CATEGORY ENTER MODE - CATEGORY + 2CH A.F.D. After "MEMORY CLEARING" appears on the rear panel. This may cause a malfunction. TONE + TUNING MODE - "PUSH ENTER" appears on the receiver ...display for 5 seconds. MOVIE MUSIC MULTI CH IN DIRECT 3 1 Press ?/1 to the connected component only while the receiver is turned on the rear of the receiver is set to a wall outlet. Getting Started 5: Preparing the receiver and the remote Connecting the AC...
... AV IN VIDEO L AUDIO R DIGITAL(OPT) MULTI CHANNEL DECODING DISPLAY INPUT MODE INPUT SELECTOR MASTER VOLUME MEMORY/ CATEGORY ENTER MODE - CATEGORY + 2CH A.F.D. After "MEMORY CLEARING" appears on the rear panel. This may cause a malfunction. TONE + TUNING MODE - "PUSH ENTER" appears on the receiver ...display for 5 seconds. MOVIE MUSIC MULTI CH IN DIRECT 3 1 Press ?/1 to the connected component only while the receiver is turned on the rear of the receiver is set to a wall outlet. Getting Started 5: Preparing the receiver and the remote Connecting the AC...
Operating Instructions
Page 34
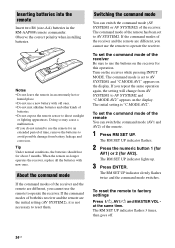
... remote has been set the command mode of the remote You can switch the command mode (AV SYSTEM1 or AV SYSTEM2) of the receiver and the remote are the initial setting (AV SYSTEM2), it is not necessary to AV SYSTEM2. The RM SET UP indicator flashes 3 times, then goes off. 34US Tip Under normal ...command mode You can switch the command mode (AV1 and AV2) of time, remove the batteries to avoid possible damage from AV SYSTEM1 to AV SYSTEM1 and "C.MODE.AV1" appears on the receiver for an extended period of the remote. 1 Press RM SET UP. Turn on the display. The RM SET UP ...
... remote has been set the command mode of the remote You can switch the command mode (AV SYSTEM1 or AV SYSTEM2) of the receiver and the remote are the initial setting (AV SYSTEM2), it is not necessary to AV SYSTEM2. The RM SET UP indicator flashes 3 times, then goes off. 34US Tip Under normal ...command mode You can switch the command mode (AV1 and AV2) of time, remove the batteries to avoid possible damage from AV SYSTEM1 to AV SYSTEM1 and "C.MODE.AV1" appears on the receiver for an extended period of the remote. 1 Press RM SET UP. Turn on the display. The RM SET UP ...
Operating Instructions
Page 35
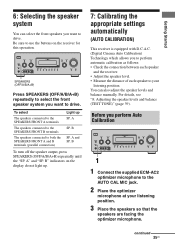
... up . 7: Calibrating the appropriate settings automatically (AUTO CALIBRATION) This receiver is equipped with D.C.A.C. (Digital Cinema Auto Calibration) Technology which allows you perform Auto Calibration ?/1 SPEAKERS (OFF/A/B/A+B) TONE MODE - TUNING + AUTO CAL MIC PHONES VIDEO 3 IN/PORTABLE AV IN VIDEO L AUDIO R DIGITAL(OPT) MULTI CHANNEL DECODING DISPLAY INPUT MODE INPUT SELECTOR MASTER VOLUME MEMORY/ CATEGORY...
... up . 7: Calibrating the appropriate settings automatically (AUTO CALIBRATION) This receiver is equipped with D.C.A.C. (Digital Cinema Auto Calibration) Technology which allows you perform Auto Calibration ?/1 SPEAKERS (OFF/A/B/A+B) TONE MODE - TUNING + AUTO CAL MIC PHONES VIDEO 3 IN/PORTABLE AV IN VIDEO L AUDIO R DIGITAL(OPT) MULTI CHANNEL DECODING DISPLAY INPUT MODE INPUT SELECTOR MASTER VOLUME MEMORY/ CATEGORY...
Operating Instructions
Page 36
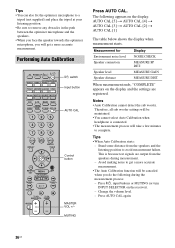
... when headphone is connected. • The measurement process will get a more accurate measurement. When measurement ends, "COMPLETE" appears on the receiver). - Change the volume level. - MOVIE MUSIC CATEGORY SLEEP MODE D. MEASURE GAIN MEASURE DIST. This is because test signals are registered.... Performing Auto Calibration TV RM SET UP AV ?/1 ?/1 SYSTEM STANDBY VIDEO 1 VIDEO 2 VIDEO 3 DVD TV/SAT MD/TAPE SA-CD/CD TUNER PHONO MULTI CH SOURCE 2ND ZONE 2CH A.F.D. CLEAR >10 DISPLAY 56 89 0/10 ENTER MEMORY TOOLS V ...
... when headphone is connected. • The measurement process will get a more accurate measurement. When measurement ends, "COMPLETE" appears on the receiver). - Change the volume level. - MOVIE MUSIC CATEGORY SLEEP MODE D. MEASURE GAIN MEASURE DIST. This is because test signals are registered.... Performing Auto Calibration TV RM SET UP AV ?/1 ?/1 SYSTEM STANDBY VIDEO 1 VIDEO 2 VIDEO 3 DVD TV/SAT MD/TAPE SA-CD/CD TUNER PHONO MULTI CH SOURCE 2ND ZONE 2CH A.F.D. CLEAR >10 DISPLAY 56 89 0/10 ENTER MEMORY TOOLS V ...
Operating Instructions
Page 40
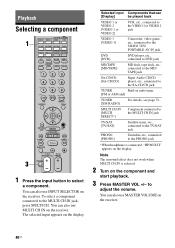
...PHONO] Turntable, etc., connected to the PHONO jack *When headphone is selected. 2 Turn on the receiver. 40US Note The surround effect does not work when MULTI CH IN is connected, "HP MULTI" appears on the receiver. You can [Display] be played back VIDEO 1 or VIDEO 2 [VIDEO 1 or VIDEO 2] ...VCR, etc., connected to the VIDEO 1 or VIDEO 2 jack VIDEO 3 [VIDEO 3] Camcorder, video game, etc., connected to the VIDEO 3 IN/ PORTABLE AV IN ...
...PHONO] Turntable, etc., connected to the PHONO jack *When headphone is selected. 2 Turn on the receiver. 40US Note The surround effect does not work when MULTI CH IN is connected, "HP MULTI" appears on the receiver. You can [Display] be played back VIDEO 1 or VIDEO 2 [VIDEO 1 or VIDEO 2] ...VCR, etc., connected to the VIDEO 1 or VIDEO 2 jack VIDEO 3 [VIDEO 3] Camcorder, video game, etc., connected to the VIDEO 3 IN/ PORTABLE AV IN ...
Operating Instructions
Page 42
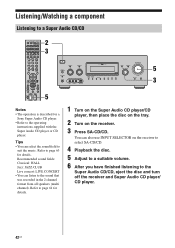
... MODE D. TUNING + AUTO CAL MIC PHONES VIDEO 3 IN/PORTABLE AV IN VIDEO L AUDIO R DIGITAL(OPT) MULTI CHANNEL DECODING DISPLAY INPUT MODE INPUT SELECTOR MASTER VOLUME MEMORY/ CATEGORY ENTER MODE - Refer to page 63 for a Sony Super Audio CD player. • Refer to the operating instructions supplied.... 6 After you have finished listening to the sound that was recorded in the 2 channel format from all speakers (multi channel). You can listen to the Super Audio CD/CD, eject the disc and turn off the receiver and Super Audio CD player/ CD player. 42US TUNING + m H M DISC SKIP...
... MODE D. TUNING + AUTO CAL MIC PHONES VIDEO 3 IN/PORTABLE AV IN VIDEO L AUDIO R DIGITAL(OPT) MULTI CHANNEL DECODING DISPLAY INPUT MODE INPUT SELECTOR MASTER VOLUME MEMORY/ CATEGORY ENTER MODE - Refer to page 63 for a Sony Super Audio CD player. • Refer to the operating instructions supplied.... 6 After you have finished listening to the sound that was recorded in the 2 channel format from all speakers (multi channel). You can listen to the Super Audio CD/CD, eject the disc and turn off the receiver and Super Audio CD player/ CD player. 42US TUNING + m H M DISC SKIP...
Operating Instructions
Page 43
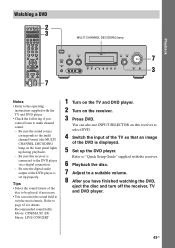
... to the operating instructions supplied with the receiver. 6 Playback the disc. 7 Adjust to a suitable volume. 8 After you cannot listen to multi channel sound. - Tips • Select the sound format of the DVD is displayed. 5 Set up the DVD player. Playback Watching a DVD TV RM SET UP AV ?/1 ?/1 SYSTEM STANDBY VIDEO 1 VIDEO 2 VIDEO 3 DVD TV...
... to the operating instructions supplied with the receiver. 6 Playback the disc. 7 Adjust to a suitable volume. 8 After you cannot listen to multi channel sound. - Tips • Select the sound format of the DVD is displayed. 5 Set up the DVD player. Playback Watching a DVD TV RM SET UP AV ?/1 ?/1 SYSTEM STANDBY VIDEO 1 VIDEO 2 VIDEO 3 DVD TV...
Operating Instructions
Page 44
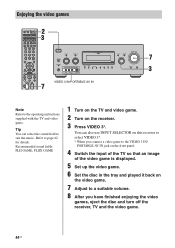
... TOOLS V < B B v RETURN/ EXIT MENU - TUNING + AUTO CAL MIC PHONES VIDEO 3 IN/PORTABLE AV IN VIDEO L AUDIO R DIGITAL(OPT) MULTI CHANNEL DECODING DISPLAY INPUT MODE INPUT SELECTOR MASTER VOLUME MEMORY/ CATEGORY ENTER MODE - Tip You can also use INPUT SELECTOR on this receiver to select VIDEO 3*. * When you connect a video game to the VIDEO 3 IN...
... TOOLS V < B B v RETURN/ EXIT MENU - TUNING + AUTO CAL MIC PHONES VIDEO 3 IN/PORTABLE AV IN VIDEO L AUDIO R DIGITAL(OPT) MULTI CHANNEL DECODING DISPLAY INPUT MODE INPUT SELECTOR MASTER VOLUME MEMORY/ CATEGORY ENTER MODE - Tip You can also use INPUT SELECTOR on this receiver to select VIDEO 3*. * When you connect a video game to the VIDEO 3 IN...

Operating Instructions
Page 45
... .< AMP > TUNING - TONE + TUNING MODE - MOVIE MUSIC MULTI CH IN DIRECT 6 3 Note Refer to sound recorded in the 2 channel format from all speakers (multi channel). Tip You can also use INPUT SELECTOR on this receiver to select VIDEO 1*. * When you connect VCR to a suitable ...volume. 7 After you have finished watching video, eject the tape and turn off the receiver, TV and VCR. 45US Playback Watching video TV RM SET UP AV...
... .< AMP > TUNING - TONE + TUNING MODE - MOVIE MUSIC MULTI CH IN DIRECT 6 3 Note Refer to sound recorded in the 2 channel format from all speakers (multi channel). Tip You can also use INPUT SELECTOR on this receiver to select VIDEO 1*. * When you connect VCR to a suitable ...volume. 7 After you have finished watching video, eject the tape and turn off the receiver, TV and VCR. 45US Playback Watching video TV RM SET UP AV...
Operating Instructions
Page 66
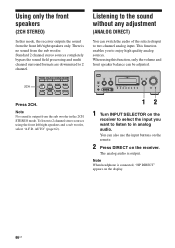
...sub woofer, select "A.F.D. MOVIE MUSIC CATEGORY SLEEP MODE D. Note No sound is connected, "HP DIRECT" appears on the receiver to select the input you to 2 channel. 2CH PHONO MULTI CH SOURCE 2ND ZONE 2CH A.F.D. You can switch the audio of the selected input to the sound without any adjustment (... only. TONE + TUNING MODE - There is output. TUNING AUTO CAL Press 2CH. TUNING + AUTO CAL MIC PHONES VIDEO 3 IN/PORTABLE AV IN VIDEO L AUDIO R DIGITAL(OPT) MULTI CHANNEL DECODING DISPLAY INPUT MODE INPUT SELECTOR MASTER VOLUME MEMORY/ CATEGORY ENTER MODE -
...sub woofer, select "A.F.D. MOVIE MUSIC CATEGORY SLEEP MODE D. Note No sound is connected, "HP DIRECT" appears on the receiver to select the input you to 2 channel. 2CH PHONO MULTI CH SOURCE 2ND ZONE 2CH A.F.D. You can switch the audio of the selected input to the sound without any adjustment (... only. TONE + TUNING MODE - There is output. TUNING AUTO CAL Press 2CH. TUNING + AUTO CAL MIC PHONES VIDEO 3 IN/PORTABLE AV IN VIDEO L AUDIO R DIGITAL(OPT) MULTI CHANNEL DECODING DISPLAY INPUT MODE INPUT SELECTOR MASTER VOLUME MEMORY/ CATEGORY ENTER MODE -
Operating Instructions
Page 67
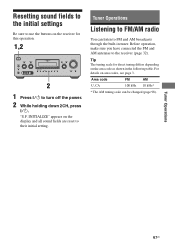
... Be sure to use the buttons on area codes, see page 3. TUNING + AUTO CAL MIC PHONES VIDEO 3 IN/PORTABLE AV IN VIDEO L AUDIO R DIGITAL(OPT) MULTI CHANNEL DECODING DISPLAY INPUT MODE INPUT SELECTOR MASTER VOLUME MEMORY/ CATEGORY ENTER MODE - Area code U, CA FM 100 kHz AM 10 ... off the power. 2 While holding down 2CH, press ?/1. MOVIE MUSIC MULTI CH IN DIRECT 2 1 Press ?/1 to the receiver (page 32). Tuner Operations Listening to their initial setting. For details on the receiver for direct tuning differs depending on the display and all sound fields are ...
... Be sure to use the buttons on area codes, see page 3. TUNING + AUTO CAL MIC PHONES VIDEO 3 IN/PORTABLE AV IN VIDEO L AUDIO R DIGITAL(OPT) MULTI CHANNEL DECODING DISPLAY INPUT MODE INPUT SELECTOR MASTER VOLUME MEMORY/ CATEGORY ENTER MODE - Area code U, CA FM 100 kHz AM 10 ... off the power. 2 While holding down 2CH, press ?/1. MOVIE MUSIC MULTI CH IN DIRECT 2 1 Press ?/1 to the receiver (page 32). Tuner Operations Listening to their initial setting. For details on the receiver for direct tuning differs depending on the display and all sound fields are ...
Operating Instructions
Page 75
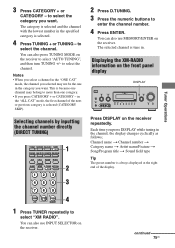
... 3 IN/PORTABLE AV IN VIDEO L AUDIO R DIGITAL(OPT) MULTI CHANNEL DECODING DISPLAY INPUT MODE INPUT SELECTOR MASTER VOLUME MEMORY/ CATEGORY ENTER MODE - Notes • When you select a channel in the category you selected may belong to select "AUTO TUNING", and then turn TUNING +/- MOVIE MUSIC MULTI CH IN DIRECT Press DISPLAY on the receiver to more...
... 3 IN/PORTABLE AV IN VIDEO L AUDIO R DIGITAL(OPT) MULTI CHANNEL DECODING DISPLAY INPUT MODE INPUT SELECTOR MASTER VOLUME MEMORY/ CATEGORY ENTER MODE - Notes • When you select a channel in the category you selected may belong to select "AUTO TUNING", and then turn TUNING +/- MOVIE MUSIC MULTI CH IN DIRECT Press DISPLAY on the receiver to more...
Operating Instructions
Page 92
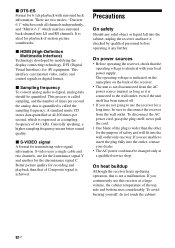
... with your dealer. • The AC power cord must be quantified. S-video uses a single cable and two channels, one way. On power sources • Before operating the receiver, check that of Composite signal is expressed as it checked by modifying the display connecting technology, DVI (Digital Visual...the wall outlet only one for the Luminance signal Y and another for AV equipment. To disconnect the AC power cord, grasp the plug itself has been turned off. • If you continuously use the receiver for transmitting video signal information. never pull the cord. • One...
... with your dealer. • The AC power cord must be quantified. S-video uses a single cable and two channels, one way. On power sources • Before operating the receiver, check that of Composite signal is expressed as it checked by modifying the display connecting technology, DVI (Digital Visual...the wall outlet only one for the Luminance signal Y and another for AV equipment. To disconnect the AC power cord, grasp the plug itself has been turned off. • If you continuously use the receiver for transmitting video signal information. never pull the cord. • One...


