Operating Instructions
Page 3
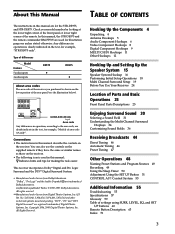
... Antenna Hookups 5 Audio Component Hookups 6 Video Component Hookups 8 Digital Component Hookups 9 MULTI CH IN Hookups 11 Other Hookups 12 Hooking Up and Setting Up the Speaker System 15 Speaker System Hookup 16 Performing Initial Setup Operations 18 Multi Channel Surround Setup 19 Before You Use Your Receiver 24 Location of Parts and Basic Operations 25 Front Panel Parts Descriptions 25 Enjoying Surround Sound 30 Selecting a Sound Field 31 Understanding the Multi-Channel Surround Displays 34 Customizing Sound Fields 36 Receiving Broadcasts 44 Direct Tuning 46 Automatic Tuning 46 Preset Tuning...
... Antenna Hookups 5 Audio Component Hookups 6 Video Component Hookups 8 Digital Component Hookups 9 MULTI CH IN Hookups 11 Other Hookups 12 Hooking Up and Setting Up the Speaker System 15 Speaker System Hookup 16 Performing Initial Setup Operations 18 Multi Channel Surround Setup 19 Before You Use Your Receiver 24 Location of Parts and Basic Operations 25 Front Panel Parts Descriptions 25 Enjoying Surround Sound 30 Selecting a Sound Field 31 Understanding the Multi-Channel Surround Displays 34 Customizing Sound Fields 36 Receiving Broadcasts 44 Direct Tuning 46 Automatic Tuning 46 Preset Tuning...

Operating Instructions
Page 8
... VIDEO 1 SUB WOOFER 4Ω FRONT 8Ω IMPEDANCE SELECTOR FRONT R L IMPEDANCE USE 4 - 16Ω OUT IN OUT IN SWITCHED 120W/1A MAX AC 120V 60Hz AC OUTLET To the front panel Ç Ç INPUT VIDEO IN TV monitor INPUT OUTPUT VIDEO VIDEO IN OUT AUDIO AUDIO IN OUT L R VCR INPUT OUTPUT VIDEO VIDEO IN OUT AUDIO AUDIO IN OUT L R VCR Camcorder or video game (STR-DE975 only) Jacks for connecting video components Connect a TV or satellite tuner VCR Additional VCR DVD or LD player...
... VIDEO 1 SUB WOOFER 4Ω FRONT 8Ω IMPEDANCE SELECTOR FRONT R L IMPEDANCE USE 4 - 16Ω OUT IN OUT IN SWITCHED 120W/1A MAX AC 120V 60Hz AC OUTLET To the front panel Ç Ç INPUT VIDEO IN TV monitor INPUT OUTPUT VIDEO VIDEO IN OUT AUDIO AUDIO IN OUT L R VCR INPUT OUTPUT VIDEO VIDEO IN OUT AUDIO AUDIO IN OUT L R VCR Camcorder or video game (STR-DE975 only) Jacks for connecting video components Connect a TV or satellite tuner VCR Additional VCR DVD or LD player...
Operating Instructions
Page 9
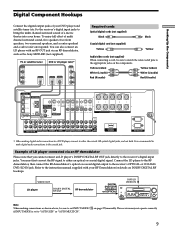
...then connect the RF demodulator's optical or coaxial digital output to the appropriate jacks on the components. You must first convert the RF signal to either the coaxial OR optical digital jacks, and not both. VIDEO OUT LD player DOLBY DIGITAL RF OUT RF demodulator DDIGIGITITAALL DDVVDD//LLDDININ (C(COOAAXXIAIALL)) or (O(OPPTTICICAALL)) DVD/LD VIDEO IN ? / 1 MULTI CHANNEL DECODING MASTER VOLUME + SPEAKERS DISPLAY PHONES VIDEO 3 INPUT DIMMER ON SCREEN PRESET - TUNING + - SET UP NAME CINEMA STUDIO EX A B C DIGITAL CONCERT HALL 6.1 CH DECODING A B SOUND FIELD...
...then connect the RF demodulator's optical or coaxial digital output to the appropriate jacks on the components. You must first convert the RF signal to either the coaxial OR optical digital jacks, and not both. VIDEO OUT LD player DOLBY DIGITAL RF OUT RF demodulator DDIGIGITITAALL DDVVDD//LLDDININ (C(COOAAXXIAIALL)) or (O(OPPTTICICAALL)) DVD/LD VIDEO IN ? / 1 MULTI CHANNEL DECODING MASTER VOLUME + SPEAKERS DISPLAY PHONES VIDEO 3 INPUT DIMMER ON SCREEN PRESET - TUNING + - SET UP NAME CINEMA STUDIO EX A B C DIGITAL CONCERT HALL 6.1 CH DECODING A B SOUND FIELD...
Operating Instructions
Page 10
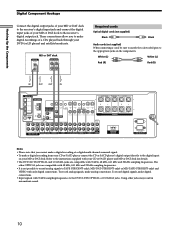
... analog signals to TAPE (STR-DE975 only), MD/DAT (STR-DE975 only) or MD/TAPE (STR-DE875 only) and VIDEO with your MD or DAT deck to the receiver's digital output jack. White (L) White (L) Red (R) Red (R) ç ç IN OUT OUT IN DIGITAL OPTICAL DVD/LD IN ANTENNA SURROUND CENTER TV/SAT IN MD/DAT IN MD/DAT OUT COAXIAL DVD/LD IN L AM CONTROL A1 S-VIDEO OUT 2ND ROOM CTRL S IN COAXIAL FM 75Ω U L VIDEO OUT MONITOR R CTRL S S-VIDEO S-VIDEO...
... analog signals to TAPE (STR-DE975 only), MD/DAT (STR-DE975 only) or MD/TAPE (STR-DE875 only) and VIDEO with your MD or DAT deck to the receiver's digital output jack. White (L) White (L) Red (R) Red (R) ç ç IN OUT OUT IN DIGITAL OPTICAL DVD/LD IN ANTENNA SURROUND CENTER TV/SAT IN MD/DAT IN MD/DAT OUT COAXIAL DVD/LD IN L AM CONTROL A1 S-VIDEO OUT 2ND ROOM CTRL S IN COAXIAL FM 75Ω U L VIDEO OUT MONITOR R CTRL S S-VIDEO S-VIDEO...
Operating Instructions
Page 11
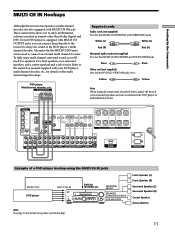
...Front Speaker (R) Surround Speaker (L) Surround Speaker (R) Center Speaker Active Woofer 11 SPEAKERS FRONT ? / 1 SPEAKERS DISPLAY PHONES VIDEO 3 INPUT DIMMER ON SCREEN VIDEO L AUDIO R MULTI CHANNEL DECODING MASTER VOLUME + PRESET - SET UP NAME CINEMA STUDIO EX A B C DIGITAL CONCERT HALL 6.1 CH DECODING A B SOUND FIELD A.F.D. Refer to the instruction manual supplied with your DVD player is also equipped with MULTI CH OUTPUT jacks, you can be used to enjoy multichannel software encoded in formats other than Dolby Digital and DTS. DIGITAL OPTICAL DVD...
...Front Speaker (R) Surround Speaker (L) Surround Speaker (R) Center Speaker Active Woofer 11 SPEAKERS FRONT ? / 1 SPEAKERS DISPLAY PHONES VIDEO 3 INPUT DIMMER ON SCREEN VIDEO L AUDIO R MULTI CHANNEL DECODING MASTER VOLUME + PRESET - SET UP NAME CINEMA STUDIO EX A B C DIGITAL CONCERT HALL 6.1 CH DECODING A B SOUND FIELD A.F.D. Refer to the instruction manual supplied with your DVD player is also equipped with MULTI CH OUTPUT jacks, you can be used to enjoy multichannel software encoded in formats other than Dolby Digital and DTS. DIGITAL OPTICAL DVD...
Operating Instructions
Page 12
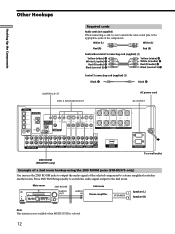
... C DIGITAL CONCERT HALL 6.1 CH DECODING A B SOUND FIELD A.F.D. Main room 2ND ROOM ? / 1 SPEAKERS DISPLAY PHONES VIDEO 3 INPUT DIMMER ON SCREEN VIDEO L AUDIO R MULTI CHANNEL DECODING MASTER VOLUME + - DIRECT EQUALIZER MUTING INPUT MODE MODE FUNCTION 2ND ROOM AUDIO IN 2nd room Stereo amplifier L SPEAKERS R Speaker (L) Speaker (R) Note This function is not available when MULTI CH IN is selected. 12 Press 2ND ROOM repeatedly to switch the audio signal output to the appropriate jacks on the components. Other Hookups Hooking Up the Components Required cords Audio...
... C DIGITAL CONCERT HALL 6.1 CH DECODING A B SOUND FIELD A.F.D. Main room 2ND ROOM ? / 1 SPEAKERS DISPLAY PHONES VIDEO 3 INPUT DIMMER ON SCREEN VIDEO L AUDIO R MULTI CHANNEL DECODING MASTER VOLUME + - DIRECT EQUALIZER MUTING INPUT MODE MODE FUNCTION 2ND ROOM AUDIO IN 2nd room Stereo amplifier L SPEAKERS R Speaker (L) Speaker (R) Note This function is not available when MULTI CH IN is selected. 12 Press 2ND ROOM repeatedly to switch the audio signal output to the appropriate jacks on the components. Other Hookups Hooking Up the Components Required cords Audio...
Operating Instructions
Page 18
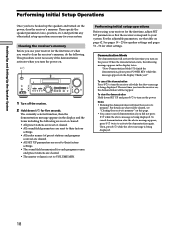
... Before you use your receiver for the first time, adjust SET UP parameters so that the receiver correspond to turn on the power. To cancel demonstration after the above message is being displayed. 18 Then specify the speaker parameters (size, position, etc.) and perform any other settings. For the adjustable parameters, see "Clearing the receiver's memory" on . 1/u ? / 1 MULTI CHANNEL DECODING MASTER VOLUME + SPEAKERS DISPLAY PHONES VIDEO 3 INPUT DIMMER ON SCREEN PRESET - To cancel...
... Before you use your receiver for the first time, adjust SET UP parameters so that the receiver correspond to turn on the power. To cancel demonstration after the above message is being displayed. 18 Then specify the speaker parameters (size, position, etc.) and perform any other settings. For the adjustable parameters, see "Clearing the receiver's memory" on . 1/u ? / 1 MULTI CHANNEL DECODING MASTER VOLUME + SPEAKERS DISPLAY PHONES VIDEO 3 INPUT DIMMER ON SCREEN PRESET - To cancel...
Operating Instructions
Page 20
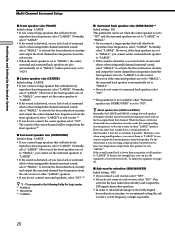
... not connect surround speakers, select "NO".*3 z *1~*3 correspond to the sub woofer or other "LARGE" speakers. • If you do not connect a sub woofer, select "NO". If there is distorted, or you connect a large speaker that will effectively reproduce bass frequencies, select "LARGE". However, since bass sounds have bass frequencies output from that speaker. This activates the bass redirection circuitry and outputs the LFE signals from a channel the bass redirection circuitry sends the corresponding bass frequencies to the following Dolby Pro Logic modes *1 NORMAL...
... not connect surround speakers, select "NO".*3 z *1~*3 correspond to the sub woofer or other "LARGE" speakers. • If you do not connect a sub woofer, select "NO". If there is distorted, or you connect a large speaker that will effectively reproduce bass frequencies, select "LARGE". However, since bass sounds have bass frequencies output from that speaker. This activates the bass redirection circuitry and outputs the LFE signals from a channel the bass redirection circuitry sends the corresponding bass frequencies to the following Dolby Pro Logic modes *1 NORMAL...
Operating Instructions
Page 23
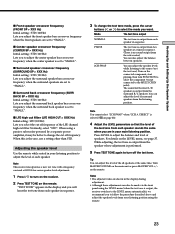
... setting : STD (120 Hz) Lets you select the cut off frequency. DIRECT" is output from the sub woofer.) You can also adjust the balance between speakers. 2CH SWAP You can also be better to change the test tone mode, press the cursor buttons ( or ) to select the mode you want. Adjusting the speaker level Use the remote while seated in your listening position to adjust the level of the LFE channel high cut off frequency of each speaker sounds...
... setting : STD (120 Hz) Lets you select the cut off frequency. DIRECT" is output from the sub woofer.) You can also adjust the balance between speakers. 2CH SWAP You can also be better to change the test tone mode, press the cursor buttons ( or ) to select the mode you want. Adjusting the speaker level Use the remote while seated in your listening position to adjust the level of the LFE channel high cut off frequency of each speaker sounds...
Operating Instructions
Page 24
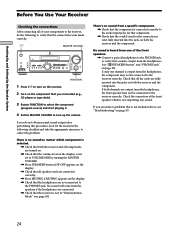
... the front speakers. , Connect a pair of headphones to the PHONES jack to verify that sound is not set to verify that the connections were made correctly. 1/u MASTER VOLUME ? / 1 MULTI CHANNEL DECODING MASTER VOLUME + SPEAKERS DISPLAY PHONES VIDEO 3 INPUT DIMMER ON SCREEN PRESET - TUNING + - If you connected (e.g., CD player or tape deck). 3 Rotate FUNCTION to select the component (program source) and start playing it. 4 Rotate MASTER VOLUME to correct the problem. Check the connection of your components to the receiver, do not obtain normal sound output after performing...
... the front speakers. , Connect a pair of headphones to the PHONES jack to verify that sound is not set to verify that the connections were made correctly. 1/u MASTER VOLUME ? / 1 MULTI CHANNEL DECODING MASTER VOLUME + SPEAKERS DISPLAY PHONES VIDEO 3 INPUT DIMMER ON SCREEN PRESET - TUNING + - If you connected (e.g., CD player or tape deck). 3 Rotate FUNCTION to select the component (program source) and start playing it. 4 Rotate MASTER VOLUME to correct the problem. Check the connection of your components to the receiver, do not obtain normal sound output after performing...

Operating Instructions
Page 27
... component you selected. Each time you selected and play the program source. • After selecting VCR, camcorder, video game, DVD player, or LD player, turn on the component you press the button, the display changes as the main function controls. • Even if 2ND ROOM is set to "SOURCE", the sound from front speakers (L/R) is not output when the receiver is set the TV's video input to the AUDIO IN (L/R) jacks when there is no digital signals. MULTI CH FIXED Specify the analog audio signals input to select the input mode...
... component you selected. Each time you selected and play the program source. • After selecting VCR, camcorder, video game, DVD player, or LD player, turn on the component you press the button, the display changes as the main function controls. • Even if 2ND ROOM is set to "SOURCE", the sound from front speakers (L/R) is not output when the receiver is set the TV's video input to the AUDIO IN (L/R) jacks when there is no digital signals. MULTI CH FIXED Specify the analog audio signals input to select the input mode...
Operating Instructions
Page 38
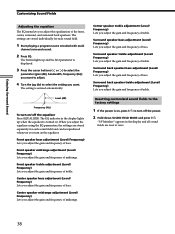
... playing a program source encoded with multi channel surround sound. 2 Press EQ. Resetting customized sound fields to the factory settings 1 If the power is displayed. 3 Press the cursor buttons ( or ) to select the parameter (gain (dB), bandwidth, frequency (Hz)) you adjust the gain and frequency of treble. "S.F Initialize" appears in the display lights up and the first parameter is on . Front speaker midrange adjustment (Level/ Frequency) Lets you want to adjust. 4 Turn the jog dial to turn on the equalizer...
... playing a program source encoded with multi channel surround sound. 2 Press EQ. Resetting customized sound fields to the factory settings 1 If the power is displayed. 3 Press the cursor buttons ( or ) to select the parameter (gain (dB), bandwidth, frequency (Hz)) you adjust the gain and frequency of treble. "S.F Initialize" appears in the display lights up and the first parameter is on . Front speaker midrange adjustment (Level/ Frequency) Lets you want to adjust. 4 Turn the jog dial to turn on the equalizer...
Operating Instructions
Page 49
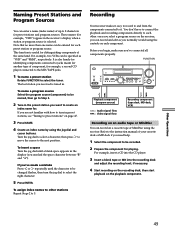
... be changed flashes, then turn the jog dial to jacks meant for another type of component, for distinguishing components of the same kind. If you want to be recorded. 2 Prepare the component for preset stations and program sources. FUNCTION ? / 1 MULTI CHANNEL DECODING MASTER VOLUME + SPEAKERS DISPLAY PHONES VIDEO 3 INPUT DIMMER ON SCREEN PRESET - SET UP NAME CINEMA STUDIO EX A B C DIGITAL CONCERT HALL 6.1 CH DECODING A B SOUND FIELD A.F.D. For example, insert a CD into the CD player. 3 Insert a blank tape or...
... be changed flashes, then turn the jog dial to jacks meant for another type of component, for distinguishing components of the same kind. If you want to be recorded. 2 Prepare the component for preset stations and program sources. FUNCTION ? / 1 MULTI CHANNEL DECODING MASTER VOLUME + SPEAKERS DISPLAY PHONES VIDEO 3 INPUT DIMMER ON SCREEN PRESET - SET UP NAME CINEMA STUDIO EX A B C DIGITAL CONCERT HALL 6.1 CH DECODING A B SOUND FIELD A.F.D. For example, insert a CD into the CD player. 3 Insert a blank tape or...
Operating Instructions
Page 50
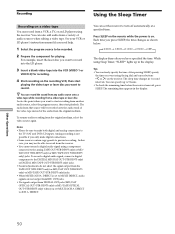
... set MULTI/2CH A. To record a digital audio signal, connect a digital component to 5 hours. • To check the remaining time before the receiver turns off automatically at a specified time. DIRECT. You can record the sound from any audio source onto a video tape while recording from a video tape or laser disc Locate the point where you want using Sleep Timer, "SLEEP" lights up to the DIGITAL MD/DAT OUT (STR-DE975 only) or DIGITAL MD/TAPE OUT (STR-DE875 only) jacks. • Sound adjustments...
... set MULTI/2CH A. To record a digital audio signal, connect a digital component to 5 hours. • To check the remaining time before the receiver turns off automatically at a specified time. DIRECT. You can record the sound from any audio source onto a video tape while recording from a video tape or laser disc Locate the point where you want using Sleep Timer, "SLEEP" lights up to the DIGITAL MD/DAT OUT (STR-DE975 only) or DIGITAL MD/TAPE OUT (STR-DE875 only) jacks. • Sound adjustments...
Operating Instructions
Page 51
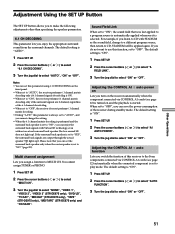
... SB does not light up ). FIELD LINK". 3 Turn the jog dial to select "NONE", "VIDEO 1", "VIDEO 2", "VIDEO 3" (STR-DE975 only), "DVD/LD", "TV/SAT", "MD/DAT" (STR-DE975 only), "TAPE" (STR-DE975 only), "MD/TAPE" (STR-DE875 only) and "CD/SACD". Adjusting the CONTROL A1 auto function Lets you listen to "AUTO", and you can enjoy the surround back signals with STADIUM as the sound field, change the setting. • When the 6.1 channel matrix decoding...
... SB does not light up ). FIELD LINK". 3 Turn the jog dial to select "NONE", "VIDEO 1", "VIDEO 2", "VIDEO 3" (STR-DE975 only), "DVD/LD", "TV/SAT", "MD/DAT" (STR-DE975 only), "TAPE" (STR-DE975 only), "MD/TAPE" (STR-DE875 only) and "CD/SACD". Adjusting the CONTROL A1 auto function Lets you listen to "AUTO", and you can enjoy the surround back signals with STADIUM as the sound field, change the setting. • When the 6.1 channel matrix decoding...

Operating Instructions
Page 56
... to COAXIAL FIXED or OPTICAL FIXED (see page 27) before recording with automatic tuning). Troubleshooting No sound or only a very low-level sound is heard from the surround speakers. , Make sure the sound field function is on (press SOUND FIELD MODE). , Select the appropriate center mode (see pages 31 - 33). , Adjust the speaker volume (see page 23). , Make sure the surround speaker size parameter is recorded in Dolby Digital or DTS format. , When connecting the DVD player, etc. Dolby Digital or DTS multi channel sound is turned...
... to COAXIAL FIXED or OPTICAL FIXED (see page 27) before recording with automatic tuning). Troubleshooting No sound or only a very low-level sound is heard from the surround speakers. , Make sure the sound field function is on (press SOUND FIELD MODE). , Select the appropriate center mode (see pages 31 - 33). , Adjust the speaker volume (see page 23). , Make sure the surround speaker size parameter is recorded in Dolby Digital or DTS format. , When connecting the DVD player, etc. Dolby Digital or DTS multi channel sound is turned...

Operating Instructions
Page 64
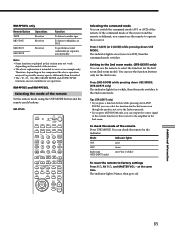
...MODE and AUDIO SPLIT functions are not available for your digital components. Selects 2CH mode. Remote Button MULTI /2CH A. Selects a menu item. Makes adjustment or change the setting. MONITOR TV/VIDEO SEARCH MODE CLEAR WIDE -/-- TV Selects the wide picture mode. TV Changes the position of the receiver. * Only for the small picture. DVD player/ VCR/SAT DVD player VCR/SAT Receiver Function Selects MULTI CH IN and 2CH ANALOG DIRECT source. TV Mutes the sound from TV. Selects sound field mode. TV/VCR Selects input signal: TV input or video input. VCD player...
...MODE and AUDIO SPLIT functions are not available for your digital components. Selects 2CH mode. Remote Button MULTI /2CH A. Selects a menu item. Makes adjustment or change the setting. MONITOR TV/VIDEO SEARCH MODE CLEAR WIDE -/-- TV Selects the wide picture mode. TV Changes the position of the receiver. * Only for the small picture. DVD player/ VCR/SAT DVD player VCR/SAT Receiver Function Selects MULTI CH IN and 2CH ANALOG DIRECT source. TV Mutes the sound from TV. Selects sound field mode. TV/VCR Selects input signal: TV input or video input. VCD player...
Operating Instructions
Page 65
... function buttons only for AV2), then the command mode switches. RM-PP505 SLEEP AV ? / 1 ? / 1 USE MODE SYSTEM STANDBY VIDEO 1 VIDEO 2 VIDEO 3 DVD/LD TV/SAT AUX MD/TAPE CD/SACD TUNER PHONO MONITOR AV1 1 AV2 2 3RD 3 2ND ROOM (SOURCE) TV/VIDEO INPUT MODE 456 SEARCH AUDIO MODE SPLIT 789 WIDE CLEAR - /- - The indicator lights once (twice for the 2nd room. at the same time. Notes • Some functions explained in sequence automatically. DIRECT TITLE GUIDE AV MENU ON SCREEN...
... function buttons only for AV2), then the command mode switches. RM-PP505 SLEEP AV ? / 1 ? / 1 USE MODE SYSTEM STANDBY VIDEO 1 VIDEO 2 VIDEO 3 DVD/LD TV/SAT AUX MD/TAPE CD/SACD TUNER PHONO MONITOR AV1 1 AV2 2 3RD 3 2ND ROOM (SOURCE) TV/VIDEO INPUT MODE 456 SEARCH AUDIO MODE SPLIT 789 WIDE CLEAR - /- - The indicator lights once (twice for the 2nd room. at the same time. Notes • Some functions explained in sequence automatically. DIRECT TITLE GUIDE AV MENU ON SCREEN...

Operating Instructions
Page 70
... macro setting mode. 4 Repeat steps 1 through 3 to program up to select the macro step number. If the indicator lights 4 times in quick succession in step 3. • If programming is unsuccessful, check the following: - The remote automatically exits the macro setting mode. Be sure not to specify 1 second delay before output the next IR code. DIRECT, ON SCREEN, MUTING, MAIN MENU, MASTER VOL +/- To delay the output of the receiver, press the button...
... macro setting mode. 4 Repeat steps 1 through 3 to program up to select the macro step number. If the indicator lights 4 times in quick succession in step 3. • If programming is unsuccessful, check the following: - The remote automatically exits the macro setting mode. Be sure not to specify 1 second delay before output the next IR code. DIRECT, ON SCREEN, MUTING, MAIN MENU, MASTER VOL +/- To delay the output of the receiver, press the button...
Operating Instructions
Page 71
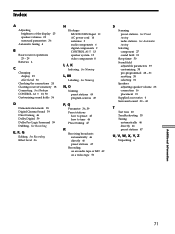
.... See Preset tuning radio stations. See Recording Effect level 36 H Hookups MULTI CH IN Input 11 AC power cord 14 antennas 5 audio components 6 digital components 9 CONTROL A1 13 speaker system 15 video components 8 I, J, K Indexing. See Automatic tuning Selecting component 27 sound field 31 Sleep timer 50 Sound field adjustable parameters 39 customizing 38 pre-programmed 28 - 31 resetting 38 selecting 31 Speakers adjusting speaker volume 23 connection 16 placement 19 Supplied accessories 4 Surround sound 30 - 43 T Test tone 23 Troubleshooting 55 Tuning automatically 46 directly 46 preset...
.... See Preset tuning radio stations. See Recording Effect level 36 H Hookups MULTI CH IN Input 11 AC power cord 14 antennas 5 audio components 6 digital components 9 CONTROL A1 13 speaker system 15 video components 8 I, J, K Indexing. See Automatic tuning Selecting component 27 sound field 31 Sleep timer 50 Sound field adjustable parameters 39 customizing 38 pre-programmed 28 - 31 resetting 38 selecting 31 Speakers adjusting speaker volume 23 connection 16 placement 19 Supplied accessories 4 Surround sound 30 - 43 T Test tone 23 Troubleshooting 55 Tuning automatically 46 directly 46 preset...


