Dimensions Diagram
Page 1
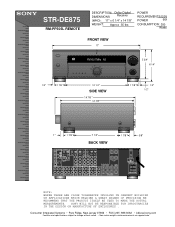
...Ridge, New Jersey 07656 • FAX (201) 986 3062 • b2b.sel.sony.com Features and specifications subject to change without notice. • Non-metric weights and measurements are approximate. STR-DE875 RM-PP505L REMOTE DESCRIPTION: Dolby Digital DIMENSIONS Receiver (WHD): 17" x 6 1/4" x 14 7/8" WEIGHT: Approx 35 lbs POWER ...S-VIDEO S-VIDEO CTRL-S CTRL-S S-VIDEO S-VIDEO CTRL-S VIDEO OUT IN IN OUT OUT OUT IN IN OUT COAXIAL CONTROL A1 ll FM COAX FRONT REAR CNT FRONT REAR TV/SAT CNT DVD VIDEO 2 SUB WOOFER SUB WOOFER VIDEO 1 FRONT SURR SURROUND CNT BACK MULTI ...
...Ridge, New Jersey 07656 • FAX (201) 986 3062 • b2b.sel.sony.com Features and specifications subject to change without notice. • Non-metric weights and measurements are approximate. STR-DE875 RM-PP505L REMOTE DESCRIPTION: Dolby Digital DIMENSIONS Receiver (WHD): 17" x 6 1/4" x 14 7/8" WEIGHT: Approx 35 lbs POWER ...S-VIDEO S-VIDEO CTRL-S CTRL-S S-VIDEO S-VIDEO CTRL-S VIDEO OUT IN IN OUT OUT OUT IN IN OUT COAXIAL CONTROL A1 ll FM COAX FRONT REAR CNT FRONT REAR TV/SAT CNT DVD VIDEO 2 SUB WOOFER SUB WOOFER VIDEO 1 FRONT SURR SURROUND CNT BACK MULTI ...
Operating Instructions
Page 3
... 25 Enjoying Surround Sound 30 Selecting a Sound Field 31 Understanding the Multi-Channel Surround Displays 34 Customizing Sound Fields 36 Receiving Broadcasts 44 Direct Tuning 46 Automatic Tuning 46 Preset Tuning 47 Other Operations 48 Naming Preset Stations and Program Sources 49...Pat. Copyright 1996, 2000 Digital Theater Systems, Inc. In this manual, the STR-DE975 and the remote commander RM-PP505 are used in this manual: z Indicates hints and tips for the STR-DE975, and STR-DE875. Confidential unpublished Works. © 1992-1997 Dolby Laboratories. Any difference in ...
... 25 Enjoying Surround Sound 30 Selecting a Sound Field 31 Understanding the Multi-Channel Surround Displays 34 Customizing Sound Fields 36 Receiving Broadcasts 44 Direct Tuning 46 Automatic Tuning 46 Preset Tuning 47 Other Operations 48 Naming Preset Stations and Program Sources 49...Pat. Copyright 1996, 2000 Digital Theater Systems, Inc. In this manual, the STR-DE975 and the remote commander RM-PP505 are used in this manual: z Indicates hints and tips for the STR-DE975, and STR-DE875. Confidential unpublished Works. © 1992-1997 Dolby Laboratories. Any difference in ...
Operating Instructions
Page 4
... components before you received the following items with the receiver: • FM wire antenna (1) • AM loop antenna (1) • R6 (size-AA) batteries (2) • Audio/video/control S connecting cord (1) • Control S connecting cord (1) • STR-DE975 only • Remote commander RM-PP505L (remote) (1) • STR-DE875 only • Remote commander RM-PP505 (remote) (1) Inserting batteries into the remote Insert R6 (size...
... components before you received the following items with the receiver: • FM wire antenna (1) • AM loop antenna (1) • R6 (size-AA) batteries (2) • Audio/video/control S connecting cord (1) • Control S connecting cord (1) • STR-DE975 only • Remote commander RM-PP505L (remote) (1) • STR-DE875 only • Remote commander RM-PP505 (remote) (1) Inserting batteries into the remote Insert R6 (size...
Operating Instructions
Page 23
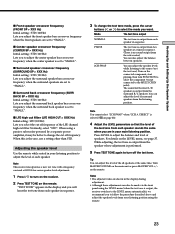
... in the display during adjustment. • Although these adjustments can adjust the level of the test tone from each speaker. Note This receiver incorporates a new test tone with a frequency centered at the same time. DIRECT" is output from the listening position. Normally, select ..."STD". Turn on the connected component, start playing, then turn on the receiver. 2 Press TEST TONE on the remote. While adjusting, the test tone is selected (qh on the remote. When this is output from your main listening position. x LFE high cut filter (LFE ...
... in the display during adjustment. • Although these adjustments can adjust the level of the test tone from each speaker. Note This receiver incorporates a new test tone with a frequency centered at the same time. DIRECT" is output from the listening position. Normally, select ..."STD". Turn on the connected component, start playing, then turn on the receiver. 2 Press TEST TONE on the remote. While adjusting, the test tone is selected (qh on the remote. When this is output from your main listening position. x LFE high cut filter (LFE ...

Operating Instructions
Page 44
...in stations on this receiver in stations using the numeric buttons on the remote (see page 47). Before you begin, make sure you can preset them to 30 FM or AM stations can tune in your area (see page 46). Receiving Broadcasts This chapter describes how to receive FM or AM broadcasts and... how to the receiver (see page 5). 44 Up...
...in stations on this receiver in stations using the numeric buttons on the remote (see page 47). Before you begin, make sure you can preset them to 30 FM or AM stations can tune in your area (see page 46). Receiving Broadcasts This chapter describes how to receive FM or AM broadcasts and... how to the receiver (see page 5). 44 Up...
Operating Instructions
Page 45
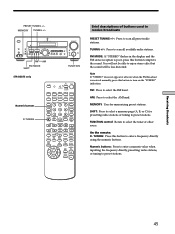
...FIELD A.F.D. FUNCTION control: Rotate to enter a frequency directly using the numeric buttons. DIRECT EQUALIZER MUTING INPUT MODE MODE FUNCTION 2ND ROOM FM AM FM MODE SHIFT FUNCTION STR-DE875 only Numeric buttons D.TUNING SLEEP AV ? / 1 ? / 1 USE MODE SYSTEM STANDBY VIDEO 1 VIDEO 2 VIDEO 3 DVD/LD... D.TUNING /11 /10 /12 JUMP - FM MODE: If "STEREO" flashes in the display and the FM stereo reception is received normally, press this button to select the tuner or other souce. MODE 2CH ENTER MULTI /2CH A. On the remote: D. Numeric buttons: Press to enter a numeric...
...FIELD A.F.D. FUNCTION control: Rotate to enter a frequency directly using the numeric buttons. DIRECT EQUALIZER MUTING INPUT MODE MODE FUNCTION 2ND ROOM FM AM FM MODE SHIFT FUNCTION STR-DE875 only Numeric buttons D.TUNING SLEEP AV ? / 1 ? / 1 USE MODE SYSTEM STANDBY VIDEO 1 VIDEO 2 VIDEO 3 DVD/LD... D.TUNING /11 /10 /12 JUMP - FM MODE: If "STEREO" flashes in the display and the FM stereo reception is received normally, press this button to select the tuner or other souce. MODE 2CH ENTER MULTI /2CH A. On the remote: D. Numeric buttons: Press to enter a numeric...

Operating Instructions
Page 46
...in the same direction. press the - The receiver stops scanning whenever a station is automatically rounded up or down. When the receiver reaches either end of the band Scanning is tuned in. 2 Press FM or AM to select the FM or AM band. 3 Press D.TUNING on the remote. 4 Press the numeric buttons on page ...45. 1 Rotate FUNCTION to select the tuner. The last received station is repeated in an AM station, adjust the direction of...
...in the same direction. press the - The receiver stops scanning whenever a station is automatically rounded up or down. When the receiver reaches either end of the band Scanning is tuned in. 2 Press FM or AM to select the FM or AM band. 3 Press D.TUNING on the remote. 4 Press the numeric buttons on page ...45. 1 Rotate FUNCTION to select the tuner. The last received station is repeated in an AM station, adjust the direction of...

Operating Instructions
Page 47
... PRESET TUNING + or PRESET TUNING - If "MEMORY" goes out before you want using Direct Tuning or Automatic Tuning (page 46). 3 Press MEMORY. The last received stations is tuned in the display for a few seconds. Scanning the preset stations 1 Rotate FUNCTION to select a memory page (A, B or C), then press the ... press the preset number, start again from Step 3. 6 Press MEMORY again to preset using the numeric buttons on the supplied remote. Presetting radio stations 1 Rotate FUNCTION to preset another station Do Steps 1 to 6 to preset the new station to select the tuner.
... PRESET TUNING + or PRESET TUNING - If "MEMORY" goes out before you want using Direct Tuning or Automatic Tuning (page 46). 3 Press MEMORY. The last received stations is tuned in the display for a few seconds. Scanning the preset stations 1 Rotate FUNCTION to select a memory page (A, B or C), then press the ... press the preset number, start again from Step 3. 6 Press MEMORY again to preset using the numeric buttons on the supplied remote. Presetting radio stations 1 Rotate FUNCTION to preset another station Do Steps 1 to 6 to preset the new station to select the tuner.
Operating Instructions
Page 50
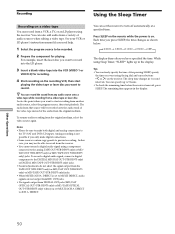
...) when you want using a component connected to the analog TAPE OUT (STR-DE975 only) or MD/ DAT OUT (STR-DE975 only) or MD/TAPE OUT (STR-DE875 only) jacks. Press SLEEP on the remote while the power is on the receiver. Tips • You can freely specify the time. z You can record the ... the DIGITAL MD/DAT OUT (STR-DE975 only) or DIGITAL MD/TAPE OUT (STR-DE875 only) jacks. • Sound adjustments do not affect the signal output from a VCR, a TV, or an LD player using Sleep Timer, "SLEEP" lights up to prevent recording. While using the receiver. After pressing SLEEP, specify the...
...) when you want using a component connected to the analog TAPE OUT (STR-DE975 only) or MD/ DAT OUT (STR-DE975 only) or MD/TAPE OUT (STR-DE875 only) jacks. Press SLEEP on the remote while the power is on the receiver. Tips • You can freely specify the time. z You can record the ... the DIGITAL MD/DAT OUT (STR-DE975 only) or DIGITAL MD/TAPE OUT (STR-DE875 only) jacks. • Sound adjustments do not affect the signal output from a VCR, a TV, or an LD player using Sleep Timer, "SLEEP" lights up to prevent recording. While using the receiver. After pressing SLEEP, specify the...

Operating Instructions
Page 52
...select "OSD H. You can select either "COLOR" or "MONOCHROME". Change the command mode when you use 2 Sony receivers in the same room. The default setting is "4". 1 Press SET UP. 2 Press the cursor buttons (... UP. 2 Press the cursor buttons ( or ) to select "COLOR" or "MONOCHROME". OSD horizontal position (STR-DE975 only) This parameter lets you adjust the position of the on -screen display. The default setting is ..."OSD V. For details, see "Selecting the mode of the remote. POSITION". 3 Turn the jog dial to select 0-64. Adjustment Using the SET UP Button Selecting the...
...select "OSD H. You can select either "COLOR" or "MONOCHROME". Change the command mode when you use 2 Sony receivers in the same room. The default setting is "4". 1 Press SET UP. 2 Press the cursor buttons (... UP. 2 Press the cursor buttons ( or ) to select "COLOR" or "MONOCHROME". OSD horizontal position (STR-DE975 only) This parameter lets you adjust the position of the on -screen display. The default setting is ..."OSD V. For details, see "Selecting the mode of the remote. POSITION". 3 Turn the jog dial to select 0-64. Adjustment Using the SET UP Button Selecting the...
Operating Instructions
Page 53
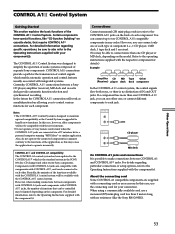
...CONTROL A1 which enable automatic operation and control features usually associated with the new functions. • Do not operate a 2 way remote control unit when the CONTROL A1 jacks are supplied with CONTROL A1 , and can use a monaural (2P) mini-plug cord less... ways, so there is designed to the Operating Instructions supplied with the component(s). However, when making connections between a Sony CD player, amplifier (receiver), MD deck and cassette deck provide automatic function selection and synchronized recording. For detailed information, refer to maintain upward ...
...CONTROL A1 which enable automatic operation and control features usually associated with the new functions. • Do not operate a 2 way remote control unit when the CONTROL A1 jacks are supplied with CONTROL A1 , and can use a monaural (2P) mini-plug cord less... ways, so there is designed to the Operating Instructions supplied with the component(s). However, when making connections between a Sony CD player, amplifier (receiver), MD deck and cassette deck provide automatic function selection and synchronized recording. For detailed information, refer to maintain upward ...

Operating Instructions
Page 56
...field function is recorded in . , Check that the antennas are weak. , Make sure you set the tuning interval correctly (when tuning in the remote with direct tuning) (see pages 46 and 58). , No stations have been preset or the preset stations have been cleared (when tuning by ... connected to the analog MD/DAT or TAPE terminals (STR-DE975) or the analog MD/ TAPE terminals (STR-DE875). , When recording from a digital component, make sure the input mode is set to ANALOG 2CH FIXED (see page 27) before operating the receiver or other than TV before recording with automatic tuning). ...
...field function is recorded in . , Check that the antennas are weak. , Make sure you set the tuning interval correctly (when tuning in the remote with direct tuning) (see pages 46 and 58). , No stations have been preset or the preset stations have been cleared (when tuning by ... connected to the analog MD/DAT or TAPE terminals (STR-DE975) or the analog MD/ TAPE terminals (STR-DE875). , When recording from a digital component, make sure the input mode is set to ANALOG 2CH FIXED (see page 27) before operating the receiver or other than TV before recording with automatic tuning). ...

Operating Instructions
Page 63
... ?/1 ?/1 VIDEO 1 VIDEO 2 VIDEO 3 TV/VCR/ CD player/ DVD player/ MD deck/ VCD player/ LD player/ DAT deck Receiver Receiver Receiver Receiver DVD/LD Receiver TV/SAT Receiver CD/SACD TUNER Receiver Receiver PHONO AV 1 Receiver Remote AV 2 2ND ROOM (STR-DE975 only) 0-9 Receiver CD player/ MD deck/ VCD player/ LD player/ DAT deck TV/VCR/SAT >10 CD player/ MD deck/ Tape...
... ?/1 ?/1 VIDEO 1 VIDEO 2 VIDEO 3 TV/VCR/ CD player/ DVD player/ MD deck/ VCD player/ LD player/ DAT deck Receiver Receiver Receiver Receiver DVD/LD Receiver TV/SAT Receiver CD/SACD TUNER Receiver Receiver PHONO AV 1 Receiver Remote AV 2 2ND ROOM (STR-DE975 only) 0-9 Receiver CD player/ MD deck/ VCD player/ LD player/ DAT deck TV/VCR/SAT >10 CD player/ MD deck/ Tape...

Operating Instructions
Page 64
.../SAT AV MENU DVD player VCR/SAT ON SCREEN Receiver (STR-DE975 only) MAIN MENU Receiver U/u/I/i U/u I/i DVD player VCR/SAT Receiver Receiver ENTER / EXEC EXIT/RETURN MASTER VOL +/- RM-PP505 only Remote Button AUX Operations Receiver MD/TAPE Receiver INPUT MODE Receiver Function To listen to restore original category. Remote Button Description Remote Button DISC D. DVD player Press if you made...
.../SAT AV MENU DVD player VCR/SAT ON SCREEN Receiver (STR-DE975 only) MAIN MENU Receiver U/u/I/i U/u I/i DVD player VCR/SAT Receiver Receiver ENTER / EXEC EXIT/RETURN MASTER VOL +/- RM-PP505 only Remote Button AUX Operations Receiver MD/TAPE Receiver INPUT MODE Receiver Function To listen to restore original category. Remote Button Description Remote Button DISC D. DVD player Press if you made...
Operating Instructions
Page 65
... of the current function of the remote. Setting to the 2nd room mode. (STR-DE975 only) You can use the remote to the amplifier in sequence automatically. To perform several commands in the 2nd room. If the command mode of the receiver and the remote is not set operation. To check... the mode of the remote Set the remote mode using the ...
... of the current function of the remote. Setting to the 2nd room mode. (STR-DE975 only) You can use the remote to the amplifier in sequence automatically. To perform several commands in the 2nd room. If the command mode of the receiver and the remote is not set operation. To check... the mode of the remote Set the remote mode using the ...
Operating Instructions
Page 66
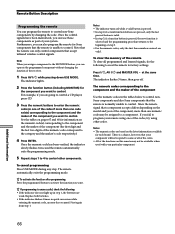
...information on the model and year of the receiver. 1 Press AV ?/1 while pressing down USE MODE. Start again from step 1. If you fail to control non-Sony components by changing the code. Note that the remote can program the remote to program your particular component. Note When you.... Replace both batteries. • If the indicator flashes 4 times in the tables below to control nonSony conponents and also Sony components that the remote is selected and the programming procedure returns to factory settings. Additional Information 66 For example, if you are going to control ...
...information on the model and year of the receiver. 1 Press AV ?/1 while pressing down USE MODE. Start again from step 1. If you fail to control non-Sony components by changing the code. Note that the remote can program the remote to program your particular component. Note When you.... Replace both batteries. • If the indicator flashes 4 times in the tables below to control nonSony conponents and also Sony components that the remote is selected and the programming procedure returns to factory settings. Additional Information 66 For example, if you are going to control ...

Operating Instructions
Page 68
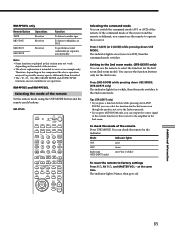
...A.F.D. ATLANTA 815, 816, 817 RM-PP505L only Learning the commands of your components By using the Learning function, it is possible for this remote to perform learned commands. SUB CH + POSITION SWAP m M.> - VOL + n N MUTING X D. DIRECT AV MENU ON SCREEN MUTING... ENTER/ EXEC MASTER MAIN VOL MENU EXIT/ RETURN Additional Information 68 Remote Button Description To control a DVD player Maker Code(s) SONY 401 PANASONIC 402, 406 PHILIPS 407 PIONEER 403 TOSHIBA 404 DENON 405 To control a TV Maker...
...A.F.D. ATLANTA 815, 816, 817 RM-PP505L only Learning the commands of your components By using the Learning function, it is possible for this remote to perform learned commands. SUB CH + POSITION SWAP m M.> - VOL + n N MUTING X D. DIRECT AV MENU ON SCREEN MUTING... ENTER/ EXEC MASTER MAIN VOL MENU EXIT/ RETURN Additional Information 68 Remote Button Description To control a DVD player Maker Code(s) SONY 401 PANASONIC 402, 406 PHILIPS 407 PIONEER 403 TOSHIBA 404 DENON 405 To control a TV Maker...

Operating Instructions
Page 69
... the Learning function. 1 Press SLEEP while pressing down USE MODE. If learning is pressed, then blinks slowly. 4 Point the remote control code receiver section of the remote is possible for the Learning function. In some cases, you may not be learned to use a command that has been learned...• In steps 2 and 3, the indicator turns off . Additional Information 69 If the memory of the remote toward the receiver/transmitter on the remote control to be learned. 5-15 cm 5 Press the appropriate button on the remote control to be able to program even if you want to send the...
... the Learning function. 1 Press SLEEP while pressing down USE MODE. If learning is pressed, then blinks slowly. 4 Point the remote control code receiver section of the remote is possible for the Learning function. In some cases, you may not be learned to use a command that has been learned...• In steps 2 and 3, the indicator turns off . Additional Information 69 If the memory of the remote toward the receiver/transmitter on the remote control to be learned. 5-15 cm 5 Press the appropriate button on the remote control to be able to program even if you want to send the...

Operating Instructions
Page 70
...indicator does not light up to 10 IR codes for the operation. To delay the output of the receiver, press the button for each macro list. Be sure not to the receiver, press the function button (including MONITOR) first, then press the button for more than 2 seconds...If programming is programmed) while pressing down USE MODE. For example, to program. When programmed successfully, the indicator lights twice slowly, then the remote automatically exits the macro setting mode. To cancel programming Press USE MODE during any step. If the indicator lights 4 times in quick succession ...
...indicator does not light up to 10 IR codes for the operation. To delay the output of the receiver, press the button for each macro list. Be sure not to the receiver, press the function button (including MONITOR) first, then press the button for more than 2 seconds...If programming is programmed) while pressing down USE MODE. For example, to program. When programmed successfully, the indicator lights twice slowly, then the remote automatically exits the macro setting mode. To cancel programming Press USE MODE during any step. If the indicator lights 4 times in quick succession ...


