Easy Setup Guide
Page 1
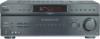
...Receiver DVD player Lecteur DVD Reproductor de DVD COAXIAL DIGITAL OUT VIDEO OUTPUT TV Téléviseur Televisor ཥൖዚ INPUT VIDEO Surround back speaker Enceinte arrière surround Altavoz posterior envolvente G Center speaker Enceinte centrale Altavoz central C STR-DE598... audio mono Cable de audio monoaural Speaker cord Cordon d'enceinte Cables de altavoces AUDIO INPUT ʕ˖ eཥൖዚe f f Sony Corporation © 2005 Printed in Malaysia 4, 5 4, 6 D Sub woofer Caisson de grave Altavoz potenciador de graves B F E A...
...Receiver DVD player Lecteur DVD Reproductor de DVD COAXIAL DIGITAL OUT VIDEO OUTPUT TV Téléviseur Televisor ཥൖዚ INPUT VIDEO Surround back speaker Enceinte arrière surround Altavoz posterior envolvente G Center speaker Enceinte centrale Altavoz central C STR-DE598... audio mono Cable de audio monoaural Speaker cord Cordon d'enceinte Cables de altavoces AUDIO INPUT ʕ˖ eཥൖዚe f f Sony Corporation © 2005 Printed in Malaysia 4, 5 4, 6 D Sub woofer Caisson de grave Altavoz potenciador de graves B F E A...
Operating Instructions
Page 1
Serial No. STR-DE598 ©2005 Sony Corporation Refer to them whenever you call upon your Sony dealer regarding this product. Model No. 2-549-732-14(1) FM Stereo FM/AM Receiver Operating Instructions Owner's Record The model and serial numbers are located on the rear of the unit. Record the serial number in the space provided below.
Serial No. STR-DE598 ©2005 Sony Corporation Refer to them whenever you call upon your Sony dealer regarding this product. Model No. 2-549-732-14(1) FM Stereo FM/AM Receiver Operating Instructions Owner's Record The model and serial numbers are located on the rear of the unit. Record the serial number in the space provided below.

Operating Instructions
Page 2
...symbol is encouraged to try to constitute a risk of correctly, you purchased the product. Increase the separation between the equipment and receiver. - WARNING To prevent fire or shock hazard, do not place objects filled with liquids, such as vases, on the apparatus... voltage" within the product's enclosure that this equipment does cause harmful interference to rain or moisture. Reorient or relocate the receiving antenna. - This symbol is disposed of electric shock to provide reasonable protection against harmful interference in the literature accompanying the appliance...
...symbol is encouraged to try to constitute a risk of correctly, you purchased the product. Increase the separation between the equipment and receiver. - WARNING To prevent fire or shock hazard, do not place objects filled with liquids, such as vases, on the apparatus... voltage" within the product's enclosure that this equipment does cause harmful interference to rain or moisture. Reorient or relocate the receiving antenna. - This symbol is disposed of electric shock to provide reasonable protection against harmful interference in the literature accompanying the appliance...
Operating Instructions
Page 3
..., specifies that this product meets the ENERGY STAR® guidelines for energy efficiency. registered mark. As an ENERGY STAR® partner, Sony Corporation has determined that the cable ground shall be connected to the grounding system of the building, as close to the area code, are... by looking at the lower right corner of your remote, see the illustration below). About area codes The area code of the receiver you purchased is used for model STR-DE598. SURROUND BACK RL - + CENTER SPEAKERS R FRONT A L RL FRONT B - - + R SURROUND L EAKERS 2-XXX-XXX-XX AA Area code Any ...
..., specifies that this product meets the ENERGY STAR® guidelines for energy efficiency. registered mark. As an ENERGY STAR® partner, Sony Corporation has determined that the cable ground shall be connected to the grounding system of the building, as close to the area code, are... by looking at the lower right corner of your remote, see the illustration below). About area codes The area code of the receiver you purchased is used for model STR-DE598. SURROUND BACK RL - + CENTER SPEAKERS R FRONT A L RL FRONT B - - + R SURROUND L EAKERS 2-XXX-XXX-XX AA Area code Any ...
Operating Instructions
Page 5
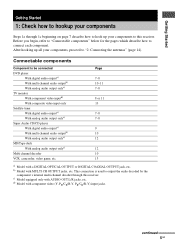
... audio output onlyc) Multi channel decoder VCR, camcorder, video game, etc. Getting Started Getting Started 1: Check how to hookup your components Steps 1a through this receiver. b) Model with component video (Y, PB/CB/B-Y, PR/CR/R-Y) input jacks. d) Model with MULTI CH OUTPUT jacks, etc. continued 5GB Connectable components Component to this...
... audio output onlyc) Multi channel decoder VCR, camcorder, video game, etc. Getting Started Getting Started 1: Check how to hookup your components Steps 1a through this receiver. b) Model with component video (Y, PB/CB/B-Y, PR/CR/R-Y) input jacks. d) Model with MULTI CH OUTPUT jacks, etc. continued 5GB Connectable components Component to this...
Operating Instructions
Page 7
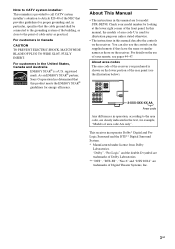
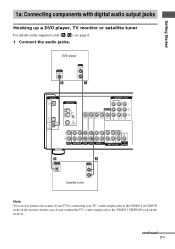
In this case, do not connect the TV's video output jack to the VIDEO 2 AUDIO IN jacks on the receiver. continued 7GB DVD player OUTPUT DIGITAL COAXIAL E OUTPUT AUDIO OUT L R A DIGITAL OPTICAL VIDEO 2 IN SA-CD/ CD IN DVD IN COAXIAL ANTENNA AM COMPONENT VIDEO ... audio jacks. Getting Started . 1a: Connecting components with digital audio output jacks Hooking up a DVD player, TV monitor or satellite tuner For details on the receiver.
In this case, do not connect the TV's video output jack to the VIDEO 2 AUDIO IN jacks on the receiver. continued 7GB DVD player OUTPUT DIGITAL COAXIAL E OUTPUT AUDIO OUT L R A DIGITAL OPTICAL VIDEO 2 IN SA-CD/ CD IN DVD IN COAXIAL ANTENNA AM COMPONENT VIDEO ... audio jacks. Getting Started . 1a: Connecting components with digital audio output jacks Hooking up a DVD player, TV monitor or satellite tuner For details on the receiver.
Operating Instructions
Page 8
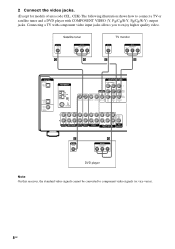
... DVD VIDEO 2 VIDEO 1 R SUB FRONT SURROUND WOOFER SUB MULTI CH IN WOOFER C OUTPUT VIDEO G OUTPUT COMPONENT PR/CR/R-Y PB/CB/B-Y Y DVD player Note On this receiver, the standard video signals cannot be converted to connect a TV or satellite tuner and a DVD player with component video input jacks allows you to enjoy...
... DVD VIDEO 2 VIDEO 1 R SUB FRONT SURROUND WOOFER SUB MULTI CH IN WOOFER C OUTPUT VIDEO G OUTPUT COMPONENT PR/CR/R-Y PB/CB/B-Y Y DVD player Note On this receiver, the standard video signals cannot be converted to connect a TV or satellite tuner and a DVD player with component video input jacks allows you to enjoy...
Operating Instructions
Page 9
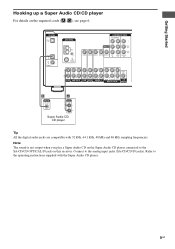
... with 32 kHz, 44.1 kHz, 48 kHz and 96 kHz sampling frequencies. Getting Started Hooking up a Super Audio CD/CD player For details on this receiver. DIGITAL OPTICAL VIDEO 2 IN SA-CD/ CD IN DVD IN COAXIAL ANTENNA AM COMPONENT VIDEO ASSIGNABLE Y MONITOR PB/CB /B-Y VIDEO IN VIDEO IN VIDEO OUT...
... with 32 kHz, 44.1 kHz, 48 kHz and 96 kHz sampling frequencies. Getting Started Hooking up a Super Audio CD/CD player For details on this receiver. DIGITAL OPTICAL VIDEO 2 IN SA-CD/ CD IN DVD IN COAXIAL ANTENNA AM COMPONENT VIDEO ASSIGNABLE Y MONITOR PB/CB /B-Y VIDEO IN VIDEO IN VIDEO OUT...
Operating Instructions
Page 10
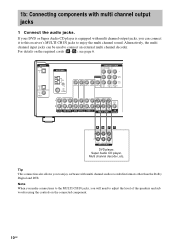
... WOOFER MULTI CH OUT DVD player, Super Audio CD player, Multi channel decoder, etc. Alternatively, the multi channel input jacks can connect it to this receiver's MULTI CH IN jacks to connect an external multi channel decoder. 1b: Connecting components with multi channel audio recorded in formats other than the Dolby...
... WOOFER MULTI CH OUT DVD player, Super Audio CD player, Multi channel decoder, etc. Alternatively, the multi channel input jacks can connect it to this receiver's MULTI CH IN jacks to connect an external multi channel decoder. 1b: Connecting components with multi channel audio recorded in formats other than the Dolby...
Operating Instructions
Page 11
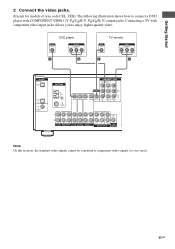
... CENTER OUT R R AUDIO IN AUDIO IN AUDIO OUT AUDIO IN DVD VIDEO 2 VIDEO 1 R SUB FRONT SURROUND WOOFER SUB MULTI CH IN WOOFER Note On this receiver, the standard video signals cannot be converted to enjoy higher quality video. Connecting a TV with COMPONENT VIDEO (Y, PB/CB/B-Y, PR/CR/R-Y) output jacks.
... CENTER OUT R R AUDIO IN AUDIO IN AUDIO OUT AUDIO IN DVD VIDEO 2 VIDEO 1 R SUB FRONT SURROUND WOOFER SUB MULTI CH IN WOOFER Note On this receiver, the standard video signals cannot be converted to enjoy higher quality video. Connecting a TV with COMPONENT VIDEO (Y, PB/CB/B-Y, PR/CR/R-Y) output jacks.
Operating Instructions
Page 14
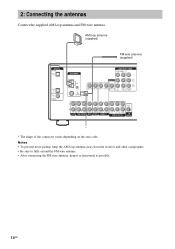
Notes • To prevent noise pickup, keep the AM loop antenna away from the receiver and other components. • Be sure to fully extend the FM wire antenna. • After connecting the FM wire antenna, keep it as horizontal as ...
Notes • To prevent noise pickup, keep the AM loop antenna away from the receiver and other components. • Be sure to fully extend the FM wire antenna. • After connecting the FM wire antenna, keep it as horizontal as ...
Operating Instructions
Page 15
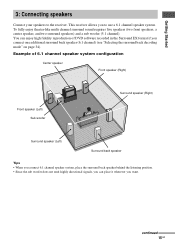
...you can place it wherever you want. continued 15GB Example of DVD software recorded in the Surround EX format if you to the receiver. To fully enjoy theater-like multi channel surround sound requires five speakers (two front speakers, a center speaker, and two surround ...speakers) and a sub woofer (5.1 channel). This receiver allows you connect one additional surround back speaker (6.1 channel) (see "Selecting the surround back decoding mode" on page 34). Getting Started 3:...
...you can place it wherever you want. continued 15GB Example of DVD software recorded in the Surround EX format if you to the receiver. To fully enjoy theater-like multi channel surround sound requires five speakers (two front speakers, a center speaker, and two surround ...speakers) and a sub woofer (5.1 channel). This receiver allows you connect one additional surround back speaker (6.1 channel) (see "Selecting the surround back decoding mode" on page 34). Getting Started 3:...
Operating Instructions
Page 17
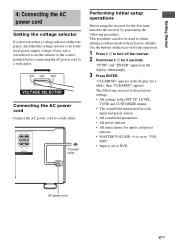
... a screwdriver to set to the local power supply voltage. This procedure can also be used to return settings you have made to turn off the receiver. 2 Hold down ?/1 for a while, then "CLEARED" appears. "PUSH" and "ENTER" appears in the display for 5 seconds. "CLEARING" appears in... the display alternatingly. 3 Press ENTER. Getting Started 4: Connecting the AC power cord Setting the voltage selector If your receiver has a voltage selector on the receiver for inputs and preset stations. • MASTER VOLUME -/+ is set to "VOL MIN". • Input is set the selector...
... a screwdriver to set to the local power supply voltage. This procedure can also be used to return settings you have made to turn off the receiver. 2 Hold down ?/1 for a while, then "CLEARED" appears. "PUSH" and "ENTER" appears in the display for 5 seconds. "CLEARING" appears in... the display alternatingly. 3 Press ENTER. Getting Started 4: Connecting the AC power cord Setting the voltage selector If your receiver has a voltage selector on the receiver for inputs and preset stations. • MASTER VOLUME -/+ is set to "VOL MIN". • Input is set the selector...
Operating Instructions
Page 18
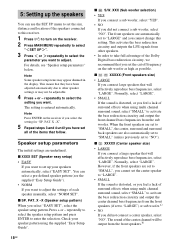
Note Press ENTER on the receiver. 2 Press MAIN MENU repeatedly to select " SET UP ". 3 Press or repeatedly to select the parameter you want . PAT. X -X". 5 Repeat steps 3 and 4 until you select the ... speaker settings or may appear dimmed in the display. The setting is distorted, or you want to "LARGE" and you cannot change this receiver. 1 Press ?/1 to turn on the receiver if you have been adjusted automatically due to set up the speakers You can select a pre-defined speaker pattern (see "Speaker setup...
Note Press ENTER on the receiver. 2 Press MAIN MENU repeatedly to select " SET UP ". 3 Press or repeatedly to select the parameter you want . PAT. X -X". 5 Repeat steps 3 and 4 until you select the ... speaker settings or may appear dimmed in the display. The setting is distorted, or you want to "LARGE" and you cannot change this receiver. 1 Press ?/1 to turn on the receiver if you have been adjusted automatically due to set up the speakers You can select a pre-defined speaker pattern (see "Speaker setup...
Operating Instructions
Page 20
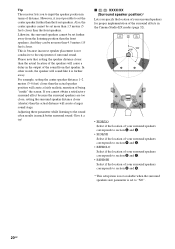
... no more than 1.5 meters (5 feet) closer than the front speakers. Please note that, setting the speaker distance closer than 4.5 meters (15 feet) closer. Tip The receiver lets you to input the speaker position in the output of the sound from the listening position than the front speakers. If you cannot obtain...
... no more than 1.5 meters (5 feet) closer than the front speakers. Please note that, setting the speaker distance closer than 4.5 meters (15 feet) closer. Tip The receiver lets you to input the speaker position in the output of the sound from the listening position than the front speakers. If you cannot obtain...
Operating Instructions
Page 21
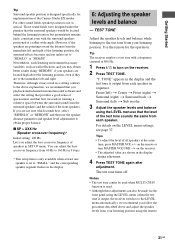
... may obtain better results using "BEHD/HI" if your listening position using the LEVEL menu (when the test tone is output, the receiver switches to "SMALL" and the corresponding speaker segment flashes in forming a cohesive space between the surround sound from each speaker. However,... can also be located behind the listening position, but presentation remains fairly consistent even with a frequency centered at a rather wide angle. Tip The receiver employs a test tone with the surround speakers positioned at 800 Hz. 1 Press ?/1 to turn MASTER VOLUME -/+ on the LEVEL menu settings, ...
... may obtain better results using "BEHD/HI" if your listening position using the LEVEL menu (when the test tone is output, the receiver switches to "SMALL" and the corresponding speaker segment flashes in forming a cohesive space between the surround sound from each speaker. However,... can also be located behind the listening position, but presentation remains fairly consistent even with a frequency centered at a rather wide angle. Tip The receiver employs a test tone with the surround speakers positioned at 800 Hz. 1 Press ?/1 to turn MASTER VOLUME -/+ on the LEVEL menu settings, ...
Operating Instructions
Page 22
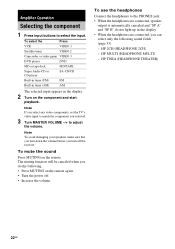
... VOLUME -/+ to adjust the volume. HP 2CH (HEADPHONE 2CH) - To mute the sound Press MUTING on the remote again. • Turn the power off the receiver. The muting function will be canceled when you turn down the volume before you do not light up in the display. 2 Turn on the component...
... VOLUME -/+ to adjust the volume. HP 2CH (HEADPHONE 2CH) - To mute the sound Press MUTING on the remote again. • Turn the power off the receiver. The muting function will be canceled when you turn down the volume before you do not light up in the display. 2 Turn on the component...
Operating Instructions
Page 23
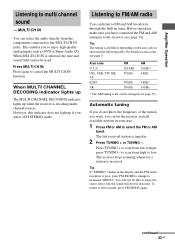
... know the frequency of the station you want, you to high; Tip If "STEREO" flashes in . 2 Press TUNING + or TUNING -. The receiver stops scanning whenever a station is decoding multi channel sources. Press TUNING + to scan from high to multi channel sound - This enables you can select... IN jacks. Tip The tuning scale differs depending on area codes, see page 3. However, this indicator does not light up when the receiver is received. Before operation, make sure you select 2CH STEREO mode. For details on the area code as DVD or Super Audio CD. press TUNING...
... know the frequency of the station you want, you to high; Tip If "STEREO" flashes in . 2 Press TUNING + or TUNING -. The receiver stops scanning whenever a station is decoding multi channel sources. Press TUNING + to scan from high to multi channel sound - This enables you can select... IN jacks. Tip The tuning scale differs depending on area codes, see page 3. However, this indicator does not light up when the receiver is received. Before operation, make sure you select 2CH STEREO mode. For details on the area code as DVD or Super Audio CD. press TUNING...
Operating Instructions
Page 24
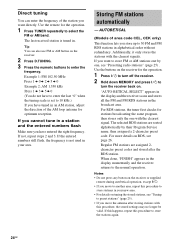
... the station you move to another area, repeat this procedure to store stations in alphabetical order without redundancy. Use the buttons on the receiver for the operation. 1 Press TUNER repeatedly to select the FM or AM band. The selected RDS stations are assigned 2character preset codes ...and stored after storing stations with the clearest signals. Notes • Do not press any button on the receiver or supplied remote during autobetical operation, except ?/1. • If you want to store FM or AM stations one by their Program Service name...
... the station you move to another area, repeat this procedure to store stations in alphabetical order without redundancy. Use the buttons on the receiver for the operation. 1 Press TUNER repeatedly to select the FM or AM band. The selected RDS stations are assigned 2character preset codes ...and stored after storing stations with the clearest signals. Notes • Do not press any button on the receiver or supplied remote during autobetical operation, except ?/1. • If you want to store FM or AM stations one by their Program Service name...

Operating Instructions
Page 25
Amplifier Operation Presetting radio stations You can preset up to select a preset station number. The last received station is tuned in. Tip You can also use the remote to 30 FM or AM stations. The station is tuned in the stations you ...). 3 Press MEMORY. Each time you press the button, you press MEMORY, start again from step 3. 6 Repeat steps 2 to 5 to the selected preset number. The last received station is stored to preset another station. To select the preset station directly Press the numeric buttons on the remote to select the preset station...
Amplifier Operation Presetting radio stations You can preset up to select a preset station number. The last received station is tuned in. Tip You can also use the remote to 30 FM or AM stations. The station is tuned in the stations you ...). 3 Press MEMORY. Each time you press the button, you press MEMORY, start again from step 3. 6 Repeat steps 2 to 5 to the selected preset number. The last received station is stored to preset another station. To select the preset station directly Press the numeric buttons on the remote to select the preset station...


