Easy Setup Guide
Page 1
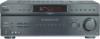
...speaker Enceinte centrale Altavoz central C STR-DE598 Easy Setup Guide Guide de réglage rapide Guía de configuración fácil English This Easy Setup Guide explains how to the operating instructions supplied with the receiver. For details, refer to ...audio cord Cordon audio mono Cable de audio monoaural Speaker cord Cordon d'enceinte Cables de altavoces AUDIO INPUT ʕ˖ eཥൖዚe f f Sony Corporation © 2005 Printed in Malaysia 4, 5 4, 6 D Sub woofer Caisson de grave Altavoz potenciador de graves B F E A Front speaker...
...speaker Enceinte centrale Altavoz central C STR-DE598 Easy Setup Guide Guide de réglage rapide Guía de configuración fácil English This Easy Setup Guide explains how to the operating instructions supplied with the receiver. For details, refer to ...audio cord Cordon audio mono Cable de audio monoaural Speaker cord Cordon d'enceinte Cables de altavoces AUDIO INPUT ʕ˖ eཥൖዚe f f Sony Corporation © 2005 Printed in Malaysia 4, 5 4, 6 D Sub woofer Caisson de grave Altavoz potenciador de graves B F E A Front speaker...
Operating Instructions
Page 1
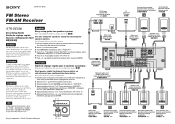
STR-DE598 ©2005 Sony Corporation Refer to them whenever you call upon your Sony dealer regarding this product. 2-549-732-14(1) FM Stereo FM/AM Receiver Operating Instructions Owner's Record The model and serial numbers are located on the rear of the unit. Model No. Serial No. Record the serial number in the space provided below.
STR-DE598 ©2005 Sony Corporation Refer to them whenever you call upon your Sony dealer regarding this product. 2-549-732-14(1) FM Stereo FM/AM Receiver Operating Instructions Owner's Record The model and serial numbers are located on the rear of the unit. Model No. Serial No. Record the serial number in the space provided below.

Operating Instructions
Page 2
... or an experienced radio/TV technician for help to the applicable collection point for the environment and human health, which the receiver is no guarantee that to radio communications. For customers in this manual could void your household waste disposal service or the shop.... By ensuring this product is encouraged to try to provide reasonable protection against harmful interference in a particular installation. Reorient or relocate the receiving antenna. - And don't place lighted candles on , the user is disposed of this product, please contact your local city office, ...
... or an experienced radio/TV technician for help to the applicable collection point for the environment and human health, which the receiver is no guarantee that to radio communications. For customers in this manual could void your household waste disposal service or the shop.... By ensuring this product is encouraged to try to provide reasonable protection against harmful interference in a particular installation. Reorient or relocate the receiving antenna. - And don't place lighted candles on , the user is disposed of this product, please contact your local city office, ...
Operating Instructions
Page 3
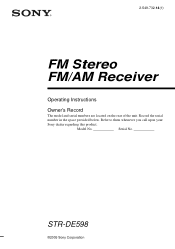
...rear panel (see pages 44-47. For details on the receiver. About area codes The area code of the receiver you purchased is shown on the receiver. This receiver incorporates Dolby* Digital and Pro Logic Surround and the DTS... In this manual, the models of area code U is a U.S. As an ENERGY STAR® partner, Sony Corporation has determined that the cable ground shall be connected to the grounding system of Digital Theater Systems, Inc....FULLY INSERT. For customers in the text, for model STR-DE598. "Dolby", "Pro Logic" and the double-D symbol are trademarks of area code AA only".
...rear panel (see pages 44-47. For details on the receiver. About area codes The area code of the receiver you purchased is shown on the receiver. This receiver incorporates Dolby* Digital and Pro Logic Surround and the DTS... In this manual, the models of area code U is a U.S. As an ENERGY STAR® partner, Sony Corporation has determined that the cable ground shall be connected to the grounding system of Digital Theater Systems, Inc....FULLY INSERT. For customers in the text, for model STR-DE598. "Dolby", "Pro Logic" and the double-D symbol are trademarks of area code AA only".
Operating Instructions
Page 5
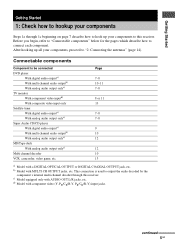
... the audio decoded by the component's internal multi channel decoder through 1c beginning on page 7 describe how to hook up all your components to this receiver. Page 7-8 10-11 7-8 8 or 11 13 7-8 7-8 9 10 12 12 10 13 a) Model with MULTI CH OUTPUT jacks, etc. b) Model with a DIGITAL OPTICAL ... antennas" (page 14). d) Model with AUDIO OUT L/R jacks, etc. Getting Started Getting Started 1: Check how to hookup your components Steps 1a through this receiver. continued 5GB Before you begin, refer to "Connectable components" below for the pages which describe how to connect each component.
... the audio decoded by the component's internal multi channel decoder through 1c beginning on page 7 describe how to hook up all your components to this receiver. Page 7-8 10-11 7-8 8 or 11 13 7-8 7-8 9 10 12 12 10 13 a) Model with MULTI CH OUTPUT jacks, etc. b) Model with a DIGITAL OPTICAL ... antennas" (page 14). d) Model with AUDIO OUT L/R jacks, etc. Getting Started Getting Started 1: Check how to hookup your components Steps 1a through this receiver. continued 5GB Before you begin, refer to "Connectable components" below for the pages which describe how to connect each component.
Operating Instructions
Page 7
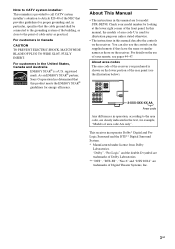
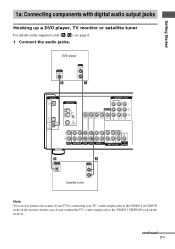
In this case, do not connect the TV's video output jack to the VIDEO 2 AUDIO IN jacks on the receiver. continued 7GB DVD player OUTPUT DIGITAL COAXIAL E OUTPUT AUDIO OUT L R A DIGITAL OPTICAL VIDEO 2 IN SA-CD/ CD IN DVD IN COAXIAL ANTENNA AM COMPONENT VIDEO ... You can also listen to the sound of your TV by connecting your TV's audio output jacks to the VIDEO 2 VIDEO IN jack on the receiver. Getting Started . 1a: Connecting components with digital audio output jacks Hooking up a DVD player, TV monitor or satellite tuner For details on the required cords...
In this case, do not connect the TV's video output jack to the VIDEO 2 AUDIO IN jacks on the receiver. continued 7GB DVD player OUTPUT DIGITAL COAXIAL E OUTPUT AUDIO OUT L R A DIGITAL OPTICAL VIDEO 2 IN SA-CD/ CD IN DVD IN COAXIAL ANTENNA AM COMPONENT VIDEO ... You can also listen to the sound of your TV by connecting your TV's audio output jacks to the VIDEO 2 VIDEO IN jack on the receiver. Getting Started . 1a: Connecting components with digital audio output jacks Hooking up a DVD player, TV monitor or satellite tuner For details on the required cords...
Operating Instructions
Page 8
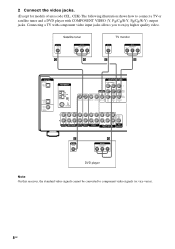
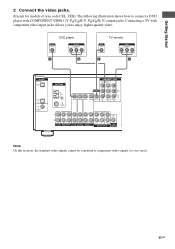
... DVD VIDEO 2 VIDEO 1 R SUB FRONT SURROUND WOOFER SUB MULTI CH IN WOOFER C OUTPUT VIDEO G OUTPUT COMPONENT PR/CR/R-Y PB/CB/B-Y Y DVD player Note On this receiver, the standard video signals cannot be converted to enjoy higher quality video. Connecting a TV with COMPONENT VIDEO (Y, PB/CB/B-Y, PR/CR/R-Y) output jacks.
... DVD VIDEO 2 VIDEO 1 R SUB FRONT SURROUND WOOFER SUB MULTI CH IN WOOFER C OUTPUT VIDEO G OUTPUT COMPONENT PR/CR/R-Y PB/CB/B-Y Y DVD player Note On this receiver, the standard video signals cannot be converted to enjoy higher quality video. Connecting a TV with COMPONENT VIDEO (Y, PB/CB/B-Y, PR/CR/R-Y) output jacks.
Operating Instructions
Page 9
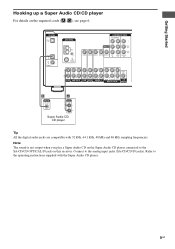
... with 32 kHz, 44.1 kHz, 48 kHz and 96 kHz sampling frequencies. Getting Started Hooking up a Super Audio CD/CD player For details on this receiver. Note The sound is not output when you play a Super Audio CD on the Super Audio CD player connected to the SA-CD/CD OPTICAL...
... with 32 kHz, 44.1 kHz, 48 kHz and 96 kHz sampling frequencies. Getting Started Hooking up a Super Audio CD/CD player For details on this receiver. Note The sound is not output when you play a Super Audio CD on the Super Audio CD player connected to the SA-CD/CD OPTICAL...
Operating Instructions
Page 10
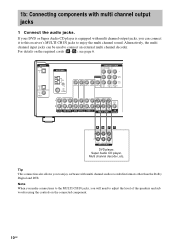
... MULTI CH IN jacks, you will need to connect an external multi channel decoder. Alternatively, the multi channel input jacks can connect it to this receiver's MULTI CH IN jacks to enjoy software with multi channel output jacks 1 Connect the audio jacks. 1b: Connecting components with multi channel audio recorded in...
... MULTI CH IN jacks, you will need to connect an external multi channel decoder. Alternatively, the multi channel input jacks can connect it to this receiver's MULTI CH IN jacks to enjoy software with multi channel output jacks 1 Connect the audio jacks. 1b: Connecting components with multi channel audio recorded in...
Operating Instructions
Page 11
... CENTER OUT R R AUDIO IN AUDIO IN AUDIO OUT AUDIO IN DVD VIDEO 2 VIDEO 1 R SUB FRONT SURROUND WOOFER SUB MULTI CH IN WOOFER Note On this receiver, the standard video signals cannot be converted to enjoy higher quality video.
... CENTER OUT R R AUDIO IN AUDIO IN AUDIO OUT AUDIO IN DVD VIDEO 2 VIDEO 1 R SUB FRONT SURROUND WOOFER SUB MULTI CH IN WOOFER Note On this receiver, the standard video signals cannot be converted to enjoy higher quality video.
Operating Instructions
Page 14
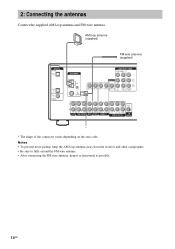
... antennas Connect the supplied AM loop antenna and FM wire antenna. Notes • To prevent noise pickup, keep the AM loop antenna away from the receiver and other components. • Be sure to fully extend the FM wire antenna. • After connecting the FM wire antenna, keep it as horizontal as...
... antennas Connect the supplied AM loop antenna and FM wire antenna. Notes • To prevent noise pickup, keep the AM loop antenna away from the receiver and other components. • Be sure to fully extend the FM wire antenna. • After connecting the FM wire antenna, keep it as horizontal as...
Operating Instructions
Page 15
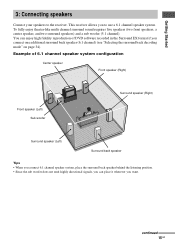
Getting Started 3: Connecting speakers Connect your speakers to use a 6.1 channel speaker system. This receiver allows you want. Example of 6.1 channel speaker system configuration Center speaker Front speaker (Right) Front speaker (Left) Sub woofer Surround speaker (...one additional surround back speaker (6.1 channel) (see "Selecting the surround back decoding mode" on page 34). You can place it wherever you to the receiver. To fully enjoy theater-like multi channel surround sound requires five speakers (two front speakers, a center speaker, and two surround speakers) and a ...
Getting Started 3: Connecting speakers Connect your speakers to use a 6.1 channel speaker system. This receiver allows you want. Example of 6.1 channel speaker system configuration Center speaker Front speaker (Right) Front speaker (Left) Sub woofer Surround speaker (...one additional surround back speaker (6.1 channel) (see "Selecting the surround back decoding mode" on page 34). You can place it wherever you to the receiver. To fully enjoy theater-like multi channel surround sound requires five speakers (two front speakers, a center speaker, and two surround speakers) and a ...
Operating Instructions
Page 17
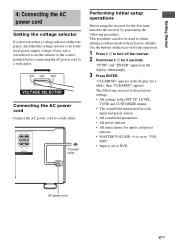
...panel, check that the voltage selector is set to DVD. R L R L FRONT B b To a wall outlet Performing initial setup operations Before using the receiver for 5 seconds. "PUSH" and "ENTER" appears in the display for inputs and preset stations. • MASTER VOLUME -/+ is set to "VOL MIN...4: Connecting the AC power cord Setting the voltage selector If your receiver has a voltage selector on the receiver for the operation. 1 Press ?/1 to turn off the receiver. 2 Hold down ?/1 for the first time, initialize the receiver by performing the following are reset to a wall outlet. "CLEARING...
...panel, check that the voltage selector is set to DVD. R L R L FRONT B b To a wall outlet Performing initial setup operations Before using the receiver for 5 seconds. "PUSH" and "ENTER" appears in the display for inputs and preset stations. • MASTER VOLUME -/+ is set to "VOL MIN...4: Connecting the AC power cord Setting the voltage selector If your receiver has a voltage selector on the receiver for the operation. 1 Press ?/1 to turn off the receiver. 2 Hold down ?/1 for the first time, initialize the receiver by performing the following are reset to a wall outlet. "CLEARING...
Operating Instructions
Page 18
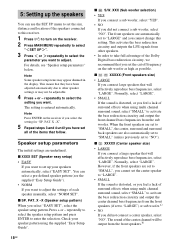
....b) Normally, select "LARGE". 5: Setting up your speaker pattern using the supplied "Easy Setup Guide". 18GB x SW S.W. Note Press ENTER on the receiver. 2 Press MAIN MENU repeatedly to select " SET UP ". 3 Press or repeatedly to select the parameter you feel a lack of surround effects when...of the speakers connected to this setting. PAT. x XXXX SET (Speaker easy setup) • EASY If you cannot change this receiver. 1 Press ?/1 to turn on the receiver if you select the setting for "SP. The front speakers are underlined. x SP. For details, see the supplied "Easy Setup...
....b) Normally, select "LARGE". 5: Setting up your speaker pattern using the supplied "Easy Setup Guide". 18GB x SW S.W. Note Press ENTER on the receiver. 2 Press MAIN MENU repeatedly to select " SET UP ". 3 Press or repeatedly to select the parameter you feel a lack of surround effects when...of the speakers connected to this setting. PAT. x XXXX SET (Speaker easy setup) • EASY If you cannot change this receiver. 1 Press ?/1 to turn on the receiver if you select the setting for "SP. The front speakers are underlined. x SP. For details, see the supplied "Easy Setup...
Operating Instructions
Page 20
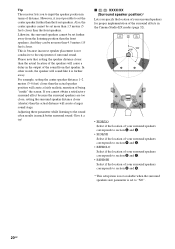
... closer than the actual location of the speakers will sound like it is set the center speaker further than 4.5 meters (15 feet) closer. Tip The receiver lets you to the sound often results in much better surround sound.
... closer than the actual location of the speakers will sound like it is set the center speaker further than 4.5 meters (15 feet) closer. Tip The receiver lets you to the sound often results in much better surround sound.
Operating Instructions
Page 21
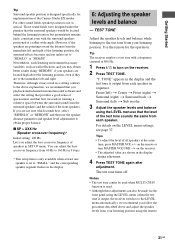
...tone with the surround speakers positioned at 800 Hz. 1 Press ?/1 to "SMALL" and the corresponding speaker segment flashes in sequence. For details on the receiver. 2 Press TEST TONE. Notes • The test tone cannot be used when MULTI CH IN function is used. • Although these adjustments can ... from the surround speakers and the sound of the listening position, the surround effects becomes unclear unless set to turn MASTER VOLUME -/+ on the receiver. • The adjusted value are not sure which sounds best, select "BEHD/LO" or "BEHD/HI" and then use the speaker distance...
...tone with the surround speakers positioned at 800 Hz. 1 Press ?/1 to "SMALL" and the corresponding speaker segment flashes in sequence. For details on the receiver. 2 Press TEST TONE. Notes • The test tone cannot be used when MULTI CH IN function is used. • Although these adjustments can ... from the surround speakers and the sound of the listening position, the surround effects becomes unclear unless set to turn MASTER VOLUME -/+ on the receiver. • The adjusted value are not sure which sounds best, select "BEHD/LO" or "BEHD/HI" and then use the speaker distance...
Operating Instructions
Page 22
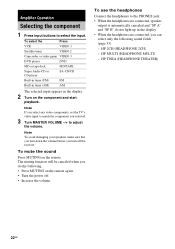
..., you turn down the volume before you can select only the following . • Press MUTING on the remote again. • Turn the power off the receiver. The muting function will be canceled when you selected. 3 Turn MASTER VOLUME -/+ to select the input. HP THEA (HEADPHONE THEATER) 22GB
..., you turn down the volume before you can select only the following . • Press MUTING on the remote again. • Turn the power off the receiver. The muting function will be canceled when you selected. 3 Turn MASTER VOLUME -/+ to select the input. HP THEA (HEADPHONE THEATER) 22GB
Operating Instructions
Page 23
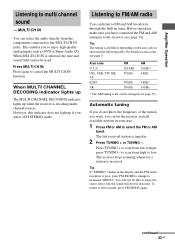
... FM or AM band. Tip The tuning scale differs depending on area codes, see page 3. The last received station is tuned in the following table. press TUNING - to scan from high to FM and AM broadcasts...cancel the MULTI CH IN function. To return to high; MULTI CH IN You can let the receiver scan all available stations in the display and the FM stereo reception is decoding multi channel sources. ... stereo effect, but the sound will be changed (see page 14). When MULTI CH IN is received. For details on the area code as DVD or Super Audio CD. When MULTI CHANNEL DECODING indicator...
... FM or AM band. Tip The tuning scale differs depending on area codes, see page 3. The last received station is tuned in the following table. press TUNING - to scan from high to FM and AM broadcasts...cancel the MULTI CH IN function. To return to high; MULTI CH IN You can let the receiver scan all available stations in the display and the FM stereo reception is decoding multi channel sources. ... stereo effect, but the sound will be changed (see page 14). When MULTI CH IN is received. For details on the area code as DVD or Super Audio CD. When MULTI CHANNEL DECODING indicator...
Operating Instructions
Page 24
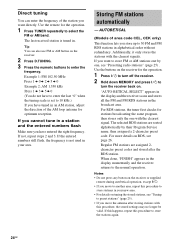
...TUNER repeatedly to select the FM or AM band. If not, repeat steps 2 and 3. Notes • Do not press any button on the receiver or supplied remote during autobetical operation, except ?/1. • If you move the antenna after the RDS station. AUTOBETICAL (Models of the station you ...want directly. The last received station is not used in your area. Additionally, it only stores the stations with the clearest signals. For more details on . Tip You ...
...TUNER repeatedly to select the FM or AM band. If not, repeat steps 2 and 3. Notes • Do not press any button on the receiver or supplied remote during autobetical operation, except ?/1. • If you move the antenna after the RDS station. AUTOBETICAL (Models of the station you ...want directly. The last received station is not used in your area. Additionally, it only stores the stations with the clearest signals. For more details on . Tip You ...

Operating Instructions
Page 25
...Each time you press the button, you want to preset using automatic tuning (page 23) or direct tuning (page 24). 3 Press MEMORY. The last received station is tuned in the display for a few seconds. "MEMORY" appears in . repeatedly to select a preset number. 5 Press MEMORY again. Each ... "MEMORY" goes out before you press MEMORY, start again from step 3. 6 Repeat steps 2 to 5 to preset another station. The last received station is stored to change the memory page. 25GB To select the preset station directly Press the numeric buttons on the remote to the selected...
...Each time you press the button, you want to preset using automatic tuning (page 23) or direct tuning (page 24). 3 Press MEMORY. The last received station is tuned in the display for a few seconds. "MEMORY" appears in . repeatedly to select a preset number. 5 Press MEMORY again. Each ... "MEMORY" goes out before you press MEMORY, start again from step 3. 6 Repeat steps 2 to 5 to preset another station. The last received station is stored to change the memory page. 25GB To select the preset station directly Press the numeric buttons on the remote to the selected...


