
Limited Warranty (U.S. Only)
Page 1
... as fuses or batteries). In addition, if you must be defective, Sony will supply, at no charge, new or rebuilt replacements in Japan 4-557-173-02 General Stereo/Hifi Components/Tape Decks ® CD Players/Mini Disc Players/Audio Systems Hifi Audio LIMITED WARRANTY Sony Electronics Inc. ("Sony") warrants this Product is invalid if the factory applied serial number has been altered or removed from state to any authorized Sony service...
... as fuses or batteries). In addition, if you must be defective, Sony will supply, at no charge, new or rebuilt replacements in Japan 4-557-173-02 General Stereo/Hifi Components/Tape Decks ® CD Players/Mini Disc Players/Audio Systems Hifi Audio LIMITED WARRANTY Sony Electronics Inc. ("Sony") warrants this Product is invalid if the factory applied serial number has been altered or removed from state to any authorized Sony service...
Easy Setup Guide
Page 1
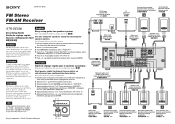
... Stereo FM-AM Receiver DVD player Lecteur DVD Reproductor de DVD COAXIAL DIGITAL OUT VIDEO OUTPUT TV Téléviseur Televisor ཥൖዚ INPUT VIDEO Surround back speaker Enceinte arrière surround Altavoz posterior envolvente G Center speaker Enceinte centrale Altavoz central C STR-DE598 Easy Setup Guide Guide de réglage rapide Guía de configuración fácil English This Easy Setup Guide explains how to connect the DVD player, TV, speakers, and sub woofer so you can use...
... Stereo FM-AM Receiver DVD player Lecteur DVD Reproductor de DVD COAXIAL DIGITAL OUT VIDEO OUTPUT TV Téléviseur Televisor ཥൖዚ INPUT VIDEO Surround back speaker Enceinte arrière surround Altavoz posterior envolvente G Center speaker Enceinte centrale Altavoz central C STR-DE598 Easy Setup Guide Guide de réglage rapide Guía de configuración fácil English This Easy Setup Guide explains how to connect the DVD player, TV, speakers, and sub woofer so you can use...
Operating Instructions
Page 4
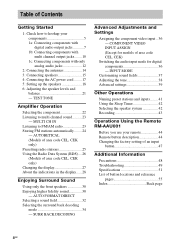
... use your components 5 1a: Connecting components with digital audio output jacks 7 1b: Connecting components with multi channel output jacks........ 10 1c: Connecting components with only analog audio jacks 12 2: Connecting the antennas 14 3: Connecting speakers 15 4: Connecting the AC power cord ........ 17 5: Setting up the speakers 18 6: Adjusting the speaker levels and balance 21 - Table of area code CEL, CEK) Switching the audio input mode for models of Contents Getting Started 1: Check how to hookup your remote 44 Remote button description 44 Changing the factory setting...
... use your components 5 1a: Connecting components with digital audio output jacks 7 1b: Connecting components with multi channel output jacks........ 10 1c: Connecting components with only analog audio jacks 12 2: Connecting the antennas 14 3: Connecting speakers 15 4: Connecting the AC power cord ........ 17 5: Setting up the speakers 18 6: Adjusting the speaker levels and balance 21 - Table of area code CEL, CEK) Switching the audio input mode for models of Contents Getting Started 1: Check how to hookup your remote 44 Remote button description 44 Changing the factory setting...
Operating Instructions
Page 5
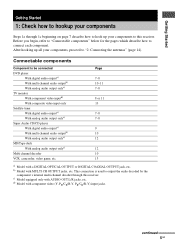
... connected DVD player With digital audio outputa) With multi channel audio outputb) With analog audio output onlyc) TV monitor With component video inputd) With composite video input only Satellite tuner With digital audio outputa) With analog audio output onlyc) Super Audio CD/CD player With digital audio outputa) With multi channel audio outputb) With analog audio output onlyc) MD/Tape deck With analog audio output onlyc) Multi channel decoder VCR, camcorder, video game, etc. This connection is used to this receiver. d) Model with AUDIO OUT L/R jacks, etc. continued 5GB After hooking...
... connected DVD player With digital audio outputa) With multi channel audio outputb) With analog audio output onlyc) TV monitor With component video inputd) With composite video input only Satellite tuner With digital audio outputa) With analog audio output onlyc) Super Audio CD/CD player With digital audio outputa) With multi channel audio outputb) With analog audio output onlyc) MD/Tape deck With analog audio output onlyc) Multi channel decoder VCR, camcorder, video game, etc. This connection is used to this receiver. d) Model with AUDIO OUT L/R jacks, etc. continued 5GB After hooking...
Operating Instructions
Page 18
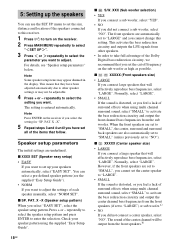
... the speakers You can select a pre-defined speaker pattern (see "Speaker setup parameters" below. When the front speakers are set all of surround effects when using multi channel surround sound, select "SMALL" to activate the bass redirection circuitry and output the front channel bass frequencies from the front speakers (if set to "LARGE" and you cannot change this receiver. 1 Press ?/1 to turn on the receiver if you want . x XXXX SET (Speaker easy setup) • EASY If you have been adjusted...
... the speakers You can select a pre-defined speaker pattern (see "Speaker setup parameters" below. When the front speakers are set all of surround effects when using multi channel surround sound, select "SMALL" to activate the bass redirection circuitry and output the front channel bass frequencies from the front speakers (if set to "LARGE" and you cannot change this receiver. 1 Press ?/1 to turn on the receiver if you want . x XXXX SET (Speaker easy setup) • EASY If you have been adjusted...
Operating Instructions
Page 21
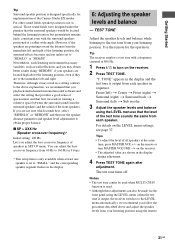
... remote or turn on the receiver. 2 Press TEST TONE. x SP > XXX Hz (Speaker crossover frequency)* Initial setting: 100 Hz Lets you playback multi channel surround encoded software and select the setting that provides a good sense of the Cinema Studio EX modes. Front (left) t Center t Front (right) t Surround (right) t Surround back t Surround (left) t Sub woofer 3 Adjust the speaker levels and balance using the LEVEL menu so that the level of the listening position, the surround effects becomes unclear unless set to turn MASTER VOLUME -/+ on the LEVEL menu settings...
... remote or turn on the receiver. 2 Press TEST TONE. x SP > XXX Hz (Speaker crossover frequency)* Initial setting: 100 Hz Lets you playback multi channel surround encoded software and select the setting that provides a good sense of the Cinema Studio EX modes. Front (left) t Center t Front (right) t Surround (right) t Surround back t Surround (left) t Sub woofer 3 Adjust the speaker levels and balance using the LEVEL menu so that the level of the listening position, the surround effects becomes unclear unless set to turn MASTER VOLUME -/+ on the LEVEL menu settings...
Operating Instructions
Page 22
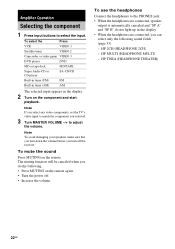
... use the headphones Connect the headphones to match the component you can select only the following . • Press MUTING on the remote again. • Turn the power off the receiver. Amplifier Operation Selecting the component 1 Press input buttons to adjust the volume. Note If you select any video components, set the TV's video input to the PHONES jack. • When the headphones are connected, speaker output is automatically canceled and "SP A" and "SP B" do the following sound...
... use the headphones Connect the headphones to match the component you can select only the following . • Press MUTING on the remote again. • Turn the power off the receiver. Amplifier Operation Selecting the component 1 Press input buttons to adjust the volume. Note If you select any video components, set the TV's video input to the PHONES jack. • When the headphones are connected, speaker output is automatically canceled and "SP A" and "SP B" do the following sound...
Operating Instructions
Page 24
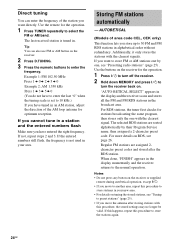
... AM station, adjust the direction of area code CEL, CEK only) This function lets you move to another area, repeat this procedure, the stored settings may no longer be valid. Use the remote for the operation. 1 Press ?/1 to turn off the receiver. 2 Hold down MEMORY and press ?/1 to the normal operation. If not, repeat steps 2 and 3. AUTOBETICAL (Models of the AM loop antenna for stations...
... AM station, adjust the direction of area code CEL, CEK only) This function lets you move to another area, repeat this procedure, the stored settings may no longer be valid. Use the remote for the operation. 1 Press ?/1 to turn off the receiver. 2 Hold down MEMORY and press ?/1 to the normal operation. If not, repeat steps 2 and 3. AUTOBETICAL (Models of the AM loop antenna for stations...
Operating Instructions
Page 28
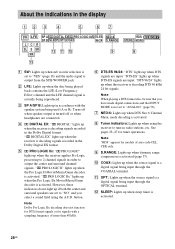
... receiver is activated. DIGITAL EX" lights up when sleep timer is decoding signals recorded in radio stations, etc. PRO LOGIC II" lights up when DTS Neo:6 Cinema/ Music mode decoding is a digital signal being played back contains the LFE (Low Frequency Effect) channel and the LFE channel signal is not set to "YES" (page 18) and the audio signal is activated. H Tuner indicators: Lights up when DTS signals are set to tune in the Dolby Digital format. About the indications in order to "ANALOG...
... receiver is activated. DIGITAL EX" lights up when sleep timer is decoding signals recorded in radio stations, etc. PRO LOGIC II" lights up when DTS Neo:6 Cinema/ Music mode decoding is a digital signal being played back contains the LFE (Low Frequency Effect) channel and the LFE channel signal is not set to "YES" (page 18) and the audio signal is activated. H Tuner indicators: Lights up when DTS signals are set to tune in the Dolby Digital format. About the indications in order to "ANALOG...
Operating Instructions
Page 30
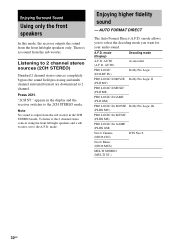
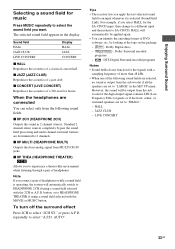
... channel stereo sources (2CH STEREO) Standard 2 channel stereo sources completely bypass the sound field processing and multi channel surround formats are downmixed to select the decoding mode you want for your audio sound. Enjoying higher fidelity sound - There is output from the sub woofer. appears in the 2CH STEREO mode. AUTO FORMAT DIRECT The Auto Format Direct (A.F.D.) mode allows you to 2 channel. AUTO (A.F.D. mode (Display) Decoding mode A.F.D. AUTO) As encoded PRO LOGIC (DOLBY PL) Dolby Pro Logic PRO LOGIC II MOVIE Dolby Pro Logic II (PLII MV) PRO LOGIC II MUSIC...
... channel stereo sources (2CH STEREO) Standard 2 channel stereo sources completely bypass the sound field processing and multi channel surround formats are downmixed to select the decoding mode you want for your audio sound. Enjoying higher fidelity sound - There is output from the sub woofer. appears in the 2CH STEREO mode. AUTO FORMAT DIRECT The Auto Format Direct (A.F.D.) mode allows you to 2 channel. AUTO (A.F.D. mode (Display) Decoding mode A.F.D. AUTO) As encoded PRO LOGIC (DOLBY PL) Dolby Pro Logic PRO LOGIC II MOVIE Dolby Pro Logic II (PLII MV) PRO LOGIC II MUSIC...
Operating Instructions
Page 33
... MULTI) Outputs the front analog signal from the following sound fields are selected, no sound is output from the sub woofer if the digital input signal contains LFE (Low Frequency Effect) signals, or if the front, center, or surround speakers are set to "SMALL". - button, or to HEADPHONE THEATER if using a sound field selected with the 2CH or A.F.D. To turn off the surround effect Press 2CH to 2 channels. For example, if you select HALL for the SA-CD/CD input, then change...
... MULTI) Outputs the front analog signal from the following sound fields are selected, no sound is output from the sub woofer if the digital input signal contains LFE (Low Frequency Effect) signals, or if the front, center, or surround speakers are set to "SMALL". - button, or to HEADPHONE THEATER if using a sound field selected with the 2CH or A.F.D. To turn off the surround effect Press 2CH to 2 channels. For example, if you select HALL for the SA-CD/CD input, then change...
Operating Instructions
Page 36
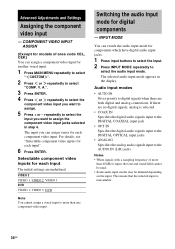
...video input jacks selected in the display. Notes • When signals with a sampling frequency of area code CEL, CEK) You can assign a component video input for each input". 6 Press ENTER. A.". 3 Press ENTER. 4 Press or repeatedly to select the component video input you want to the AUDIO IN (L/R) jacks. The input you can switch the audio input mode for each input The initial settings are both digital and analog connections. VIDEO 2 VIDEO 1, VIDEO 2, VIDEO 3 DVD VIDEO 1, VIDEO 3, DVD Note You cannot assign a visual input to select the audio input mode. Selectable component video...
...video input jacks selected in the display. Notes • When signals with a sampling frequency of area code CEL, CEK) You can assign a component video input for each input". 6 Press ENTER. A.". 3 Press ENTER. 4 Press or repeatedly to select the component video input you want to the AUDIO IN (L/R) jacks. The input you can switch the audio input mode for each input The initial settings are both digital and analog connections. VIDEO 2 VIDEO 1, VIDEO 2, VIDEO 3 DVD VIDEO 1, VIDEO 3, DVD Note You cannot assign a visual input to select the audio input mode. Selectable component video...

Operating Instructions
Page 39
... Settings x DTS 96/24 96 XXXX (DTS 96/24 decoding mode) • AUTO When a DTS 96/24 signal is input, it is played back at 96 kHz sampling frequencies. • OFF Even when a DTS 96/24 signal is input, it is not valid when - PCM" for DVD and SA-CD/CD. • AUTO Automatically switches the input mode between the audio output and visual display is minimized. • N (No) (Delay time: 0 ms) The audio output is selected...
... Settings x DTS 96/24 96 XXXX (DTS 96/24 decoding mode) • AUTO When a DTS 96/24 signal is input, it is played back at 96 kHz sampling frequencies. • OFF Even when a DTS 96/24 signal is input, it is not valid when - PCM" for DVD and SA-CD/CD. • AUTO Automatically switches the input mode between the audio output and visual display is minimized. • N (No) (Delay time: 0 ms) The audio output is selected...

Operating Instructions
Page 45
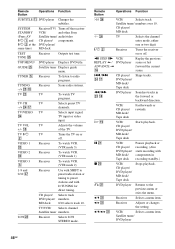
... Satellite tuner channel, disc or track using the numeric buttons, press to Super Audio CD or compact disc. MD/TAPE Receiver e; Selects FM monaural or stereo reception. wg Satellite tuner/ DVD player AV ?/1 1 VCR/ Turns the audio and Satellite tuner/ video components on the TV Satellite tuner/ screen. Remote Button Operations Function A.F.D. ANGLE qs DVD player Selects viewing angle or changes the angles. Satellite tuner/ Changes the sound to preset stations. DVD player/ MD deck CLEAR wh Satellite tuner/ Clears a mistake when DVD player you want during digital...
... Satellite tuner channel, disc or track using the numeric buttons, press to Super Audio CD or compact disc. MD/TAPE Receiver e; Selects FM monaural or stereo reception. wg Satellite tuner/ DVD player AV ?/1 1 VCR/ Turns the audio and Satellite tuner/ video components on the TV Satellite tuner/ screen. Remote Button Operations Function A.F.D. ANGLE qs DVD player Selects viewing angle or changes the angles. Satellite tuner/ Changes the sound to preset stations. DVD player/ MD deck CLEAR wh Satellite tuner/ Clears a mistake when DVD player you want during digital...
Operating Instructions
Page 46
...Receiver Adjusts or changes the setting. TOP MENU/ DVD player Displays DVD title. CD player/ MD deck -/-- wh TV Selects the channel entry mode, either one or two digit. ?/1 2 Receiver Turns the receiver on or off. V/v/B/b wg VCR/ Selects a menu item. TV/VIDEO TV ef Selects input signal: TV input or video input. qg Adjusts the volume of the TV. MD deck 0/10 selects track 10. TV ?/1 TV 2 Turns the TV on or off the receiver VCR/ and other Sony Satellite tuner/ audio/video CD player/ components. CD player/ Selects track DVD player/ numbers...
...Receiver Adjusts or changes the setting. TOP MENU/ DVD player Displays DVD title. CD player/ MD deck -/-- wh TV Selects the channel entry mode, either one or two digit. ?/1 2 Receiver Turns the receiver on or off. V/v/B/b wg VCR/ Selects a menu item. TV/VIDEO TV ef Selects input signal: TV input or video input. qg Adjusts the volume of the TV. MD deck 0/10 selects track 10. TV ?/1 TV 2 Turns the TV on or off the receiver VCR/ and other Sony Satellite tuner/ audio/video CD player/ components. CD player/ Selects track DVD player/ numbers...
Operating Instructions
Page 47
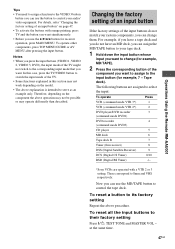
... to assign a function to the VIDEO 3 button before you can use the MD/TAPE button to control the tape deck. The following buttons are operated with orange printing, press TV and the button you use the V/v/B/b button for example, 7 - To reset a button to its factory setting Repeat the above explanation is intended to select the input: To operate VCR (command mode VTR 3*) VCR (command mode VTR 2*) DVD player/DVD recorder (command mode DVD1) DVD recorder (command mode DVD3) CD player MD deck Tape deck B Tuner...
... to assign a function to the VIDEO 3 button before you can use the MD/TAPE button to control the tape deck. The following buttons are operated with orange printing, press TV and the button you use the V/v/B/b button for example, 7 - To reset a button to its factory setting Repeat the above explanation is intended to select the input: To operate VCR (command mode VTR 3*) VCR (command mode VTR 2*) DVD player/DVD recorder (command mode DVD1) DVD recorder (command mode DVD3) CD player MD deck Tape deck B Tuner...
Operating Instructions
Page 49
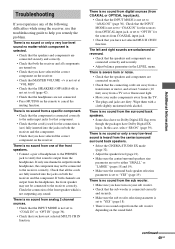
... plugs and jacks are fully inserted into the jacks on both the receiver and the component. • Check that the INPUT MODE is output from COAXIAL or OPTICAL input jack). • Check that you remedy the problem. There is no sound from a specific component. • Check that the component is connected correctly to the audio input jacks for that component. • Check that the cord(s) used for the sources from COAXIAL input jack. • Check that the sub woofer is connected...
... plugs and jacks are fully inserted into the jacks on both the receiver and the component. • Check that the INPUT MODE is output from COAXIAL or OPTICAL input jack). • Check that you remedy the problem. There is no sound from a specific component. • Check that the component is connected correctly to the audio input jacks for that component. • Check that the cord(s) used for the sources from COAXIAL input jack. • Check that the sub woofer is connected...

Operating Instructions
Page 50
... TOP MENU/GUIDE or AV MENU after pressing the input button. 50GB Preset the stations (page 25). • Press DISPLAY repeatedly so that the antennas are tuned to the digital input jacks of this receiver, check the audio setting (settings for the audio output) of an input button" on the receiver. • Remove any obstacles in the path between the remote and the receiver. • Replace all the batteries in Dolby Digital or DTS format. • When connecting the DVD player...
... TOP MENU/GUIDE or AV MENU after pressing the input button. 50GB Preset the stations (page 25). • Press DISPLAY repeatedly so that the antennas are tuned to the digital input jacks of this receiver, check the audio setting (settings for the audio output) of an input button" on the receiver. • Remove any obstacles in the path between the remote and the receiver. • Replace all the batteries in Dolby Digital or DTS format. • When connecting the DVD player...
Operating Instructions
Page 51
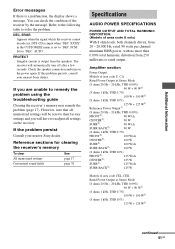
... sections for clearing the receiver's memory To clear All memorized settings Customized sound fields See page 17 page 38 Specifications AUDIO POWER SPECIFICATIONS POWER OUTPUT AND TOTAL HARMONIC DISTORTION: (Models of area code U only) With 8 ohm loads, both channels driven, from 250 milliwatts to "DEC. Set to solve the problem. Check the speaker connection and turn off after a few seconds. rated 90 watts per channel minimum RMS power, with no more...
... sections for clearing the receiver's memory To clear All memorized settings Customized sound fields See page 17 page 38 Specifications AUDIO POWER SPECIFICATIONS POWER OUTPUT AND TOTAL HARMONIC DISTORTION: (Models of area code U only) With 8 ohm loads, both channels driven, from 250 milliwatts to "DEC. Set to solve the problem. Check the speaker connection and turn off after a few seconds. rated 90 watts per channel minimum RMS power, with no more...
Marketing Specifications
Page 2
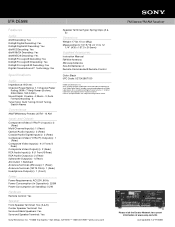
... - 6 Tuner Type: Auto Tuning, Direct Tuning, Station Name Convenience AM/FM Memory Presets: 20 FM - 10 AM Inputs and Outputs Component Video (Y/Pb/Pr ) Input(s): 2 (Rear) Multi-Channel Input(s): 1 (Rear) Optical Audio Input(s): 2 (Rear) Coaxial Audio Digital Input(s): 2 (Rear) Component Video (Y/Pb/Pr) Output(s): 1 (Rear) Composite Video Input(s): 4 (1 Front/3 Rear) Composite Video Output(s): 2 (Rear) RCA Audio Input(s): 6 (1 Front/5 Rear) RCA Audio Output(s): 2 (Rear) Subwoofer Output(s): 1 (Rear) AC Outlet: 1 Switched Antenna Terminal (AM Loop): 1 (Rear) Antenna Terminal (FM 75 Ohm): 1 (Rear...
... - 6 Tuner Type: Auto Tuning, Direct Tuning, Station Name Convenience AM/FM Memory Presets: 20 FM - 10 AM Inputs and Outputs Component Video (Y/Pb/Pr ) Input(s): 2 (Rear) Multi-Channel Input(s): 1 (Rear) Optical Audio Input(s): 2 (Rear) Coaxial Audio Digital Input(s): 2 (Rear) Component Video (Y/Pb/Pr) Output(s): 1 (Rear) Composite Video Input(s): 4 (1 Front/3 Rear) Composite Video Output(s): 2 (Rear) RCA Audio Input(s): 6 (1 Front/5 Rear) RCA Audio Output(s): 2 (Rear) Subwoofer Output(s): 1 (Rear) AC Outlet: 1 Switched Antenna Terminal (AM Loop): 1 (Rear) Antenna Terminal (FM 75 Ohm): 1 (Rear...


