Operating Instructions (Large File - 15.25 MB)
Page 3
... time. 14) Refer all servicing to comply with FCC technical regulations. Increase the separation between the equipment and receiver. - CAUTION You are designed to provide reasonable protection against harmful interference in this manual could void your authority to radio communications. NOTE: This equipment has been tested and found to qualified service personnel...
... time. 14) Refer all servicing to comply with FCC technical regulations. Increase the separation between the equipment and receiver. - CAUTION You are designed to provide reasonable protection against harmful interference in this manual could void your authority to radio communications. NOTE: This equipment has been tested and found to qualified service personnel...
Operating Instructions (Large File - 15.25 MB)
Page 4
... the U.S. You can enjoy multi-channel surround sound. XM Ready® is manufactured under U.S. All rights reserved. ©2008 SIRIUS Satellite Radio Inc. About This Manual • The instructions in some jurisdictions. Dolby, Pro Logic, Surround EX, and the doubleD symbol are of the system itself. STR-DA6400ES Operating Instructions (this manual, ™ and ® marks...
... the U.S. You can enjoy multi-channel surround sound. XM Ready® is manufactured under U.S. All rights reserved. ©2008 SIRIUS Satellite Radio Inc. About This Manual • The instructions in some jurisdictions. Dolby, Pro Logic, Surround EX, and the doubleD symbol are of the system itself. STR-DA6400ES Operating Instructions (this manual, ™ and ® marks...

Operating Instructions (Large File - 15.25 MB)
Page 60
... DIGITAL MEDIA PORT adapter. • Before disconnecting the DIGITAL MEDIA PORT adapter, make sure to turn the receiver off using a DIGITAL MEDIA PORT adapter. You can use the following Sony DIGITAL MEDIA PORT adapters: • TDM-BT1 Bluetooth™ Wireless Audio Adapter • TDM-NW1/NW10 ...function such as TDM-NC1 Wireless Network Audio Client. For details on connecting the DIGITAL MEDIA PORT adapter, see "Connecting components with this manual for details of the network function. You can use the network function of DIGITAL MEDIA PORT adapter, the images are displayed in each...
... DIGITAL MEDIA PORT adapter. • Before disconnecting the DIGITAL MEDIA PORT adapter, make sure to turn the receiver off using a DIGITAL MEDIA PORT adapter. You can use the following Sony DIGITAL MEDIA PORT adapters: • TDM-BT1 Bluetooth™ Wireless Audio Adapter • TDM-NW1/NW10 ...function such as TDM-NC1 Wireless Network Audio Client. For details on connecting the DIGITAL MEDIA PORT adapter, see "Connecting components with this manual for details of the network function. You can use the network function of DIGITAL MEDIA PORT adapter, the images are displayed in each...

Operating Instructions (Large File - 15.25 MB)
Page 112
...connected to select the "Seating Position" for each speaker. To return to the receiver using the on-screen remote (page 128). Adjusts the resolution of the menu guide display... (page 128). Sets the speaker position and impedance manually (page 114). Sets various sound items (page 121). For details, see "9: Calibrating the... Setup Performs Auto Calibration. Makes the settings for Multi Zone (page 120). Setting menu list Menu icon Auto Calibration Speaker Surround EQ Multi Zone Audio Video HDMI Network Quick Click System Description...
...connected to select the "Seating Position" for each speaker. To return to the receiver using the on-screen remote (page 128). Adjusts the resolution of the menu guide display... (page 128). Sets the speaker position and impedance manually (page 114). Sets various sound items (page 121). For details, see "9: Calibrating the... Setup Performs Auto Calibration. Makes the settings for Multi Zone (page 120). Setting menu list Menu icon Auto Calibration Speaker Surround EQ Multi Zone Audio Video HDMI Network Quick Click System Description...

Operating Instructions (Large File - 15.25 MB)
Page 114
... you connect the surround back speakers. You can adjust each speaker manually. Note The Speaker settings are using . The Speaker Pattern screen appears. 2 Press V/v to change the connection from the MULTI CHANNEL INPUT jacks. Analog downmix works when you are only for the ...surround back speaker(s). x ZONE2 If you set to select the speaker pattern after you do not need to "OFF" automatically. Re-set "Center Mix" to "ON" to "ON." x OFF If there is a center speaker connected, this receiver...
... you connect the surround back speakers. You can adjust each speaker manually. Note The Speaker settings are using . The Speaker Pattern screen appears. 2 Press V/v to change the connection from the MULTI CHANNEL INPUT jacks. Analog downmix works when you are only for the ...surround back speaker(s). x ZONE2 If you set to select the speaker pattern after you do not need to "OFF" automatically. Re-set "Center Mix" to "ON" to "ON." x OFF If there is a center speaker connected, this receiver...

Operating Instructions (Large File - 15.25 MB)
Page 115
...press . 3 Press V/v to select the speaker on the screen for music is selected, no sound is distorted, or you can adjust the balance on the Manual Setup screen. Note When one of the sound fields for which you want to adjust the size, then press . 2 Press B/b repeatedly to select a "...-10.0 dB to +10 dB in 0.5 dB steps. You can adjust the distance from the subwoofer or other "LARGE" speakers. You can adjust each channel from 3 feet 3 inches to 32 feet 9 inches (1.0 meter to activate the bass redirection circuitry and output the bass frequencies of each speaker You can...
...press . 3 Press V/v to select the speaker on the screen for music is selected, no sound is distorted, or you can adjust the balance on the Manual Setup screen. Note When one of the sound fields for which you want to adjust the size, then press . 2 Press B/b repeatedly to select a "...-10.0 dB to +10 dB in 0.5 dB steps. You can adjust the distance from the subwoofer or other "LARGE" speakers. You can adjust each channel from 3 feet 3 inches to 32 feet 9 inches (1.0 meter to activate the bass redirection circuitry and output the bass frequencies of each speaker You can...
Operating Instructions (Large File - 15.25 MB)
Page 120
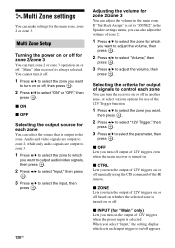
...trigger to adjust the volume, then press . Selecting the criteria for which sets each zone You can turn the receiver on the output of the IR remote. x ZONE Lets you want to adjust the volume, then press . ...1 Press V/v to select the zone you turn the output of 12V triggers on or off manually using the CIS command of 12V triggers when the preset input is always selected. x CTRL Lets...2 Press V/v to the zone. Multi Zone settings You can make settings for zone 2/zone 3 You can turn zone 2 or zone 3 operation on or off. "Main" (this receiver) is selected. Audio and video ...
...trigger to adjust the volume, then press . Selecting the criteria for which sets each zone You can turn the receiver on the output of the IR remote. x ZONE Lets you want to adjust the volume, then press . ...1 Press V/v to select the zone you turn the output of 12V triggers on or off manually using the CIS command of 12V triggers when the preset input is always selected. x CTRL Lets...2 Press V/v to the zone. Multi Zone settings You can make settings for zone 2/zone 3 You can turn zone 2 or zone 3 operation on or off. "Main" (this receiver) is selected. Audio and video ...

Operating Instructions (Large File - 15.25 MB)
Page 172
... × 6 7/8 × 17 inches) (width/height/depth) including projecting parts and controls Mass (Approx.) 17.5 kg (38 lb 10 oz) Supplied accessories Operating Instructions (this manual) Using Network Features (1) Quick Setup Guide (1) GUI Menu List (1) Optimizer microphone ECM-AC1 (1) FM wire antenna (aerial) (1) AM loop antenna (aerial) (1) AC power cord (mains...
... × 6 7/8 × 17 inches) (width/height/depth) including projecting parts and controls Mass (Approx.) 17.5 kg (38 lb 10 oz) Supplied accessories Operating Instructions (this manual) Using Network Features (1) Quick Setup Guide (1) GUI Menu List (1) Optimizer microphone ECM-AC1 (1) FM wire antenna (aerial) (1) AM loop antenna (aerial) (1) AC power cord (mains...
Using Network Features
Page 1
STR-DA6400ES ©2008 Sony Corporation Printed in the basic operation of this receiver first. This manual is written on the assumption that you are skilled in Malaysia 4-104-900-11(1) Multi Channel AV Receiver Using Network Features Please read the operating instructions supplied with this receiver after performing basic connection and setup according to the operating instructions.
STR-DA6400ES ©2008 Sony Corporation Printed in the basic operation of this receiver first. This manual is written on the assumption that you are skilled in Malaysia 4-104-900-11(1) Multi Channel AV Receiver Using Network Features Please read the operating instructions supplied with this receiver after performing basic connection and setup according to the operating instructions.

Using Network Features
Page 9
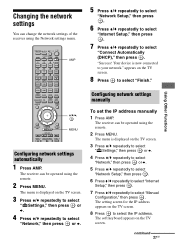
... referring to "Changing the network settings" (page 27), after you have completed this case, the router that is turned to "Configuring network settings manually" (page 27). appears on the TV screen. 6 Press to select "Next." 7 Press to select "Finish." Select "OFF," when you... "ON." "Success! In this process. 8 Press to select "Finish." 9 Press to your network." AMP V/v/b, MENU 1 Press AMP. The setting of the receiver. Note The wizard screen appears on the TV screen. 3 Press V/v repeatedly to select " Settings," then press or b. 4 Press V/v repeatedly to select "Network...
... referring to "Changing the network settings" (page 27), after you have completed this case, the router that is turned to "Configuring network settings manually" (page 27). appears on the TV screen. 6 Press to select "Next." 7 Press to select "Finish." Select "OFF," when you... "ON." "Success! In this process. 8 Press to select "Finish." 9 Press to your network." AMP V/v/b, MENU 1 Press AMP. The setting of the receiver. Note The wizard screen appears on the TV screen. 3 Press V/v repeatedly to select " Settings," then press or b. 4 Press V/v repeatedly to select "Network...
Using Network Features
Page 27
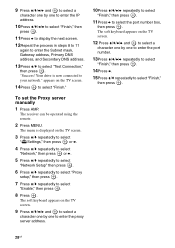
... . The soft keyboard appears on the TV screen. 8 Press to select "Network," then press or b. Configuring network settings manually To set the IP address manually 1 Press AMP. appears on the TV screen. The setting screen for the IP address appears on the TV screen. 3 ...then press . 7 Press V/v repeatedly to your network." Changing the network settings You can change the network settings of the receiver using the remote. 2 Press MENU. The receiver can be operated using the Network settings menu. The menu is displayed on the TV screen. 3 Press V/v repeatedly to...
... . The soft keyboard appears on the TV screen. 8 Press to select "Network," then press or b. Configuring network settings manually To set the IP address manually 1 Press AMP. appears on the TV screen. The setting screen for the IP address appears on the TV screen. 3 ...then press . 7 Press V/v repeatedly to your network." Changing the network settings You can change the network settings of the receiver using the remote. 2 Press MENU. The receiver can be operated using the Network settings menu. The menu is displayed on the TV screen. 3 Press V/v repeatedly to...
Using Network Features
Page 28
... press . 6 Press V/v repeatedly to select "Proxy setup," then press . 7 Press V/v repeatedly to select "Enable," then press . 8 Press . The receiver can be operated using the remote. 2 Press MENU. To set the Proxy server manually 1 Press AMP. Your drive is displayed on the TV screen. 14Press to select "Finish." 10Press V/v/B/b repeatedly to select "Finish...
... press . 6 Press V/v repeatedly to select "Proxy setup," then press . 7 Press V/v repeatedly to select "Enable," then press . 8 Press . The receiver can be operated using the remote. 2 Press MENU. To set the Proxy server manually 1 Press AMP. Your drive is displayed on the TV screen. 14Press to select "Finish." 10Press V/v/B/b repeatedly to select "Finish...
Using Network Features
Page 39
Sony may terminate this receiver is provided by giving you have no recourse against Sony or its terms by MORISAWA & COMPANY LTD. and other countries. In addition, upon termination you will have made of the font also belongs to use the Sony Software or the ... Additional Information Microsoft, Windows, Windows Vista, and Windows Media are trademarks and/or registered trademarks of Microsoft Corporation in the U.S. In this manual, ™ and ® marks are the trademarks of MORISAWA & COMPANY LTD., and the copyright of them. Rhapsody & the Rhapsody...
Sony may terminate this receiver is provided by giving you have no recourse against Sony or its terms by MORISAWA & COMPANY LTD. and other countries. In addition, upon termination you will have made of the font also belongs to use the Sony Software or the ... Additional Information Microsoft, Windows, Windows Vista, and Windows Media are trademarks and/or registered trademarks of Microsoft Corporation in the U.S. In this manual, ™ and ® marks are the trademarks of MORISAWA & COMPANY LTD., and the copyright of them. Rhapsody & the Rhapsody...
Marketing Specifications
Page 2
STR-DA6400ES Features Video Up Conversion: Yes (HDMI Up Conversion from Component, S-Video and Composite to 1080p) Up Scaling: Yes (HDMI Up Scaling up to owner's manual... for compatibility. 5. Stereo) HDMI™ Technology: Intelligent A/V Selector On-Screen Display: Yes BRAVIA® Sync™ : Yes Specifications General A/V SYNC (Lip Sync): Yes (Variable) Day/Night Function: Yes (Night Mode) IR Input(s): 2 (Rear) IR Output(s): 1 (Rear) Multi-Channel...are subject to the Internet via Ethernet cable. ©2008 Sony Electronics Inc. Please visit the Dealer Network for Zone2 Tuner ...
STR-DA6400ES Features Video Up Conversion: Yes (HDMI Up Conversion from Component, S-Video and Composite to 1080p) Up Scaling: Yes (HDMI Up Scaling up to owner's manual... for compatibility. 5. Stereo) HDMI™ Technology: Intelligent A/V Selector On-Screen Display: Yes BRAVIA® Sync™ : Yes Specifications General A/V SYNC (Lip Sync): Yes (Variable) Day/Night Function: Yes (Night Mode) IR Input(s): 2 (Rear) IR Output(s): 1 (Rear) Multi-Channel...are subject to the Internet via Ethernet cable. ©2008 Sony Electronics Inc. Please visit the Dealer Network for Zone2 Tuner ...

