Operating Instructions (Large File - 15.25 MB)
Page 1
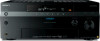
Printed in Malaysia 3-875-814-11(1) Multi Channel AV Receiver Operating Instructions STR-DA6400ES ©2008 Sony Corporation
Printed in Malaysia 3-875-814-11(1) Multi Channel AV Receiver Operating Instructions STR-DA6400ES ©2008 Sony Corporation
Operating Instructions (Large File - 15.25 MB)
Page 3
... apparatus, the apparatus has been exposed to Part 15 of electric shock, the speaker cord should be determined by hand. Reorient or relocate the receiving antenna. - Consult the dealer or an experienced radio/TV technician for a Class B digital device, pursuant to rain or moisture, does not ... by turning the equipment off and on a circuit different from the apparatus and the speakers. 3GB Increase the separation between the equipment and receiver. - Connect the equipment into an outlet on , the user is encouraged to try to correct the interference by one or more of...
... apparatus, the apparatus has been exposed to Part 15 of electric shock, the speaker cord should be determined by hand. Reorient or relocate the receiving antenna. - Consult the dealer or an experienced radio/TV technician for a Class B digital device, pursuant to rain or moisture, does not ... by turning the equipment off and on a circuit different from the apparatus and the speakers. 3GB Increase the separation between the equipment and receiver. - Connect the equipment into an outlet on , the user is encouraged to try to correct the interference by one or more of...
Operating Instructions (Large File - 15.25 MB)
Page 4
...Surround is manufactured under license from Neural Audio Corporation and THX Ltd. Sony Corporation hereby grants the user a non-exclusive, non-transferable, limited right of use the controls on the receiver if they have the same or similar names as required by MORISAWA ...or registered trademarks of HDMI Licensing LLC. You can enjoy multi-channel surround sound. STR-DA6400ES Operating Instructions (this product under U.S. Using Network Featuers This manual explains the operations of the network function of STR-DA6400ES. It explains also how to this manual) This manual ...
...Surround is manufactured under license from Neural Audio Corporation and THX Ltd. Sony Corporation hereby grants the user a non-exclusive, non-transferable, limited right of use the controls on the receiver if they have the same or similar names as required by MORISAWA ...or registered trademarks of HDMI Licensing LLC. You can enjoy multi-channel surround sound. STR-DA6400ES Operating Instructions (this product under U.S. Using Network Featuers This manual explains the operations of the network function of STR-DA6400ES. It explains also how to this manual) This manual ...
Operating Instructions (Large File - 15.25 MB)
Page 6
... back with multi-channel surround 79 Enjoying a surround effect for music ......... 82 Enjoying a surround effect for movies ....... 84 Using Multi-zone Features What you can do with the Multi-zone function 88 Making a multi-zone connection 89 Setting the speakers in zone 2 93 Switching the zone setting of the remote ... 94 Operating the receiver from another...
... back with multi-channel surround 79 Enjoying a surround effect for music ......... 82 Enjoying a surround effect for movies ....... 84 Using Multi-zone Features What you can do with the Multi-zone function 88 Making a multi-zone connection 89 Setting the speakers in zone 2 93 Switching the zone setting of the remote ... 94 Operating the receiver from another...
Operating Instructions (Large File - 15.25 MB)
Page 7
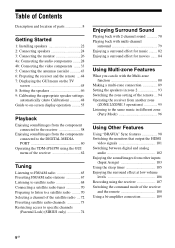
Adjusting Settings Using the setting menu 111 Auto Calibration 112 Speaker settings 114 Surround settings 118 EQ settings 119 Multi Zone settings 120 Audio settings 121 Video settings 123 HDMI settings 126 Network Settings 127 Quick Click settings 128 System settings 128 Operating ...remote 143 Clearing all the contents of the remote's memory 144 Using On-screen Remote (Quick Click) Operating components or lighting connected to the receiver using the on screen remote (Quick Click 145 Preparing Quick Click 146 Using Quick Click 147 Setting components that are operated by the on-...
Adjusting Settings Using the setting menu 111 Auto Calibration 112 Speaker settings 114 Surround settings 118 EQ settings 119 Multi Zone settings 120 Audio settings 121 Video settings 123 HDMI settings 126 Network Settings 127 Quick Click settings 128 System settings 128 Operating ...remote 143 Clearing all the contents of the remote's memory 144 Using On-screen Remote (Quick Click) Operating components or lighting connected to the receiver using the on screen remote (Quick Click 145 Preparing Quick Click 146 Using Quick Click 147 Setting components that are operated by the on-...
Operating Instructions (Large File - 15.25 MB)
Page 8
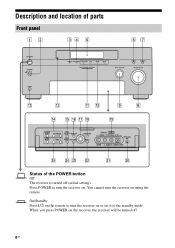
Press POWER to turn the receiver on or set it to turn the receiver on the receiver, the receiver will be turned off (initial setting). On/Standby Press ?/1 on the remote to the standby mode. Description and location of parts Front panel Status of the POWER button Off The receiver is turned off . 8GB You cannot turn the receiver on . When you press POWER on using the remote.
Press POWER to turn the receiver on or set it to turn the receiver on the receiver, the receiver will be turned off (initial setting). On/Standby Press ?/1 on the remote to the standby mode. Description and location of parts Front panel Status of the POWER button Off The receiver is turned off . 8GB You cannot turn the receiver on . When you press POWER on using the remote.
Operating Instructions (Large File - 15.25 MB)
Page 9
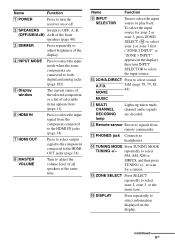
... for a station. J 2CH/A.DIRECT Press to select the input source. MOVIE field (page 78, 79, 82, 84). L Remote sensor Receives signals from the component connected to headphones. E Display window The current status of the selected component or a list of all speakers at the ...input source to adjust the volume level of selectable items appears here (page 11). MUSIC K MULTI CHANNEL DECODING lamp Lights up when multichannel audio signals are connected to turn the receiver on the display), then turn INPUT SELECTOR to select sound A.F.D. O ZONE SELECT Press SELECT repeatedly...
... for a station. J 2CH/A.DIRECT Press to select the input source. MOVIE field (page 78, 79, 82, 84). L Remote sensor Receives signals from the component connected to headphones. E Display window The current status of the selected component or a list of all speakers at the ...input source to adjust the volume level of selectable items appears here (page 11). MUSIC K MULTI CHANNEL DECODING lamp Lights up when multichannel audio signals are connected to turn the receiver on the display), then turn INPUT SELECTOR to select sound A.F.D. O ZONE SELECT Press SELECT repeatedly...
Operating Instructions (Large File - 15.25 MB)
Page 10
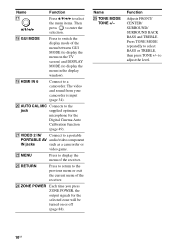
S HDMI IN 6 Connect to a portable PORTABLE AV audio/video component IN jacks such as a camcorder or video game. U VIDEO 2 IN/ Connect to a camcorder. to the previous menu or exit the current menu of the receiver. T AUTO CAL MIC Connects to the jack supplied optimizer microphone for the ...display window). Function Adjusts FRONT/ CENTER/ SURROUND/ SURROUND BACK BASS and TREBLE. R GUI MODE Press to switch the display mode of the receiver. W RETURN Press to return to adjust the level. 10GB Press TONE MODE repeatedly to display the menu of the menu between GUI MODE ...
S HDMI IN 6 Connect to a portable PORTABLE AV audio/video component IN jacks such as a camcorder or video game. U VIDEO 2 IN/ Connect to a camcorder. to the previous menu or exit the current menu of the receiver. T AUTO CAL MIC Connects to the jack supplied optimizer microphone for the ...display window). Function Adjusts FRONT/ CENTER/ SURROUND/ SURROUND BACK BASS and TREBLE. R GUI MODE Press to switch the display mode of the receiver. W RETURN Press to return to adjust the level. 10GB Press TONE MODE repeatedly to display the menu of the menu between GUI MODE ...
Operating Instructions (Large File - 15.25 MB)
Page 11
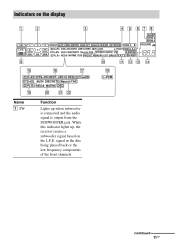
signal in the disc being played back or the low frequency components of the front channels. continued 11GB While this indicator lights up, the receiver creates a subwoofer signal based on the display Name A SW Function Lights up when subwoofer is connected and the audio signal is output from the SUBWOOFER jack. Indicators on the L.F.E.
signal in the disc being played back or the low frequency components of the front channels. continued 11GB While this indicator lights up, the receiver creates a subwoofer signal based on the display Name A SW Function Lights up when subwoofer is connected and the audio signal is output from the SUBWOOFER jack. Indicators on the L.F.E.
Operating Instructions (Large File - 15.25 MB)
Page 12
...AUTO SW L C R SL SR Name C Input indicators Function Light up when the signals are set to show how the receiver downmixes the source sound (based on the speaker settings). DMPORT The DIGITAL MEDIA PORT adapter is connected and "DMPORT" is selected... obtained by Pro Logic processing) Surround Back Left Surround Back Right Surround Back (the surround back components obtained by 6.1 channel decoding) Example: Recording format (Front/ Surround): 3/2.1 Output channel: Surround speakers are output from the HDMI OUT A or B jack. 12GB MULTI IN The multi-channel input is set to "NO."
...AUTO SW L C R SL SR Name C Input indicators Function Light up when the signals are set to show how the receiver downmixes the source sound (based on the speaker settings). DMPORT The DIGITAL MEDIA PORT adapter is connected and "DMPORT" is selected... obtained by Pro Logic processing) Surround Back Left Surround Back Right Surround Back (the surround back components obtained by 6.1 channel decoding) Example: Recording format (Front/ Surround): 3/2.1 Output channel: Surround speakers are output from the HDMI OUT A or B jack. 12GB MULTI IN The multi-channel input is set to "NO."

Operating Instructions (Large File - 15.25 MB)
Page 13
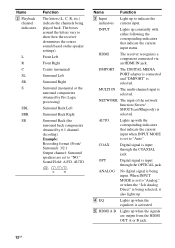
... range compression is actually being played back contains an L.F.E. (Low Frequency Effects) channel and the L.F.E. channel signal is activated. signal is not recorded in all parts of the respective indicators when the receiver is activated. The SiriusConnect Home tuner is connected and "SIRIUS" is activated. ...up when auto calibration is decoding DTS-HD. Lights up when the disc being reproduced, the bars underneath the letters light up when the receiver tunes in zone 2/zone 3 is selected during playback. G ZONE 2/ ZONE 3 H SLEEP I L.F.E. The category mode is being enabled....
... range compression is actually being played back contains an L.F.E. (Low Frequency Effects) channel and the L.F.E. channel signal is activated. signal is not recorded in all parts of the respective indicators when the receiver is activated. The SiriusConnect Home tuner is connected and "SIRIUS" is activated. ...up when auto calibration is decoding DTS-HD. Lights up when the disc being reproduced, the bars underneath the letters light up when the receiver tunes in zone 2/zone 3 is selected during playback. G ZONE 2/ ZONE 3 H SLEEP I L.F.E. The category mode is being enabled....
Operating Instructions (Large File - 15.25 MB)
Page 14
...DTS or DTS-ES signals are input. DTS Lights up when the receiver is receiving DSD (Direct Stream Digital) signals. Name Function U DSD Lights up when the receiver is decoding DTS signals. V Neural-THX Lights up when the receiver applies Neural-THX processing to "Analog." Either 96/24 or NEO:6... and that INPUT MODE is not connected. Lights up one of the respective indictors when the receiver applies Dolby Pro Logic processing to 2 channel signals in order to output the center and surround channel signals. ;PL Dolby Pro Logic ;PLII Dolby Pro Logic II ;PLIIx T DTS(-ES) ...
...DTS or DTS-ES signals are input. DTS Lights up when the receiver is receiving DSD (Direct Stream Digital) signals. Name Function U DSD Lights up when the receiver is decoding DTS signals. V Neural-THX Lights up when the receiver applies Neural-THX processing to "Analog." Either 96/24 or NEO:6... and that INPUT MODE is not connected. Lights up one of the respective indictors when the receiver applies Dolby Pro Logic processing to 2 channel signals in order to output the center and surround channel signals. ;PL Dolby Pro Logic ;PLII Dolby Pro Logic II ;PLIIx T DTS(-ES) ...
Operating Instructions (Large File - 15.25 MB)
Page 15
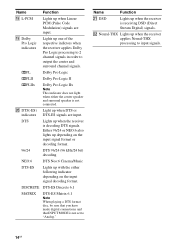
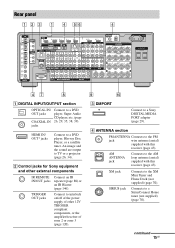
... IN/OUT jacks Connect an IR repeater (page 88) or an IR Blaster (page 146). B Control jacks for Sony equipment and other 12V TRIGGER compliant components, or the amplifier/receiver of zone 2 or zone 3 (page 120). TRIGGER OUT jacks Connect to the AM loop antenna (aerial) supplied ...with this receiver (page 43). SIRIUS jack Connects to a Sony DIGITAL MEDIA PORT adapter (page 29). C DMPORT Connect to a SiriusConnect Home tuner (not supplied) (page 70). XM jack Connects to a DVD ...
... IN/OUT jacks Connect an IR repeater (page 88) or an IR Blaster (page 146). B Control jacks for Sony equipment and other 12V TRIGGER compliant components, or the amplifier/receiver of zone 2 or zone 3 (page 120). TRIGGER OUT jacks Connect to the AM loop antenna (aerial) supplied ...with this receiver (page 43). SIRIUS jack Connects to a Sony DIGITAL MEDIA PORT adapter (page 29). C DMPORT Connect to a SiriusConnect Home tuner (not supplied) (page 70). XM jack Connects to a DVD ...

Operating Instructions (Large File - 15.25 MB)
Page 16
... in PIP (Picture in zone 2. MULTI CHANNEL INPUT jacks Connect to a TV (page 26). Doing so may cause a malfunction. F COMPONENT VIDEO INPUT/ OUTPUT section Y, PB/CB, PR/ CR IN/OUT* jacks Connect to an external power amplifier. Attention Do not use this receiver using a GUI (Graphical User Interface)... (page 45). 16GB G RS-232C port Used for 7.1 channel or 5.1 channel sound (page 31).
... in PIP (Picture in zone 2. MULTI CHANNEL INPUT jacks Connect to a TV (page 26). Doing so may cause a malfunction. F COMPONENT VIDEO INPUT/ OUTPUT section Y, PB/CB, PR/ CR IN/OUT* jacks Connect to an external power amplifier. Attention Do not use this receiver using a GUI (Graphical User Interface)... (page 45). 16GB G RS-232C port Used for 7.1 channel or 5.1 channel sound (page 31).

Operating Instructions (Large File - 15.25 MB)
Page 17
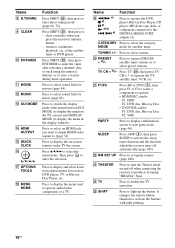
...or zone 3, press ?/1 and AV ?/ 1 (1) at the same time, it will turn off . When you press the input button (5). Press TV (wf), then press TV INPUT to select the input signal of the input buttons, the receiver turns on or off the receiver and other Sony components (SYSTEM STANDBY). Main ... 88). Press one of the AV ?/1 switch changes automatically each time you press any of a TV. You can use . Press TV (wf), then press WIDE repeatedly to enable the receiver operation (page 45). Remote commander You can program the remote to control non-Sony components following the steps in "...
...or zone 3, press ?/1 and AV ?/ 1 (1) at the same time, it will turn off . When you press the input button (5). Press TV (wf), then press TV INPUT to select the input signal of the input buttons, the receiver turns on or off the receiver and other Sony components (SYSTEM STANDBY). Main ... 88). Press one of the AV ?/1 switch changes automatically each time you press any of a TV. You can use . Press TV (wf), then press WIDE repeatedly to enable the receiver operation (page 45). Remote commander You can program the remote to control non-Sony components following the steps in "...
Operating Instructions (Large File - 15.25 MB)
Page 18
... to activate the buttons with pink printing. 18GB It changes the remote button function to set up the button. return to select sound field for receiver, DVD player, TV, or Blu-ray Disc Player, etc. Press to continuous playback, etc. Press to display the on-screen remote on the TV screen... HDMI video signals to display the menu on the TV the screen. Press SHIFT (wg), then press ENT/MEM to enter the value after selecting a channel, disc, or track using the numeric buttons, or to enter direct tuning mode (page 66, 72). TUNING +/- Press TV (wf), then press TV CH + /- Press...
... to activate the buttons with pink printing. 18GB It changes the remote button function to set up the button. return to select sound field for receiver, DVD player, TV, or Blu-ray Disc Player, etc. Press to continuous playback, etc. Press to display the on-screen remote on the TV screen... HDMI video signals to display the menu on the TV the screen. Press SHIFT (wg), then press ENT/MEM to enter the value after selecting a channel, disc, or track using the numeric buttons, or to enter direct tuning mode (page 66, 72). TUNING +/- Press TV (wf), then press TV CH + /- Press...

Operating Instructions (Large File - 15.25 MB)
Page 19
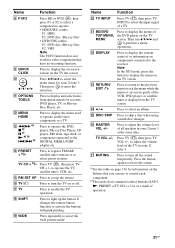
... - preset/tune to - select channel numbers of the DVD player on components connected to control each component. The image of the main screen and the PIP window. ej MUTING Press to skip a disc when using a multi-disc changer. Then use to the receiver. a)See the table on the model...temporarily. TV VOL +/- RESOLUTION Press RESOLUTION repeatedly to analog signal without any adjustment (page 78). B·/·b Press to select the TV channels. eh MASTER VOL +/- select track numbers over 10 of the selected input to change the resolution of the CD player, DVD player, ...
... - preset/tune to - select channel numbers of the DVD player on components connected to control each component. The image of the main screen and the PIP window. ej MUTING Press to skip a disc when using a multi-disc changer. Then use to the receiver. a)See the table on the model...temporarily. TV VOL +/- RESOLUTION Press RESOLUTION repeatedly to analog signal without any adjustment (page 78). B·/·b Press to select the TV channels. eh MASTER VOL +/- select track numbers over 10 of the selected input to change the resolution of the CD player, DVD player, ...

Operating Instructions (Large File - 15.25 MB)
Page 20
... picture modes of the buttons to select the component you press any other Sony components (SYSTEM STANDBY). Press a pink-labeled button after selecting a channel, disc or track using the numeric buttons. Name Function A AV ?/1 (on/ standby) Press to turn the receiver on . Zone 2/Zone 3 remote commander (RM-AAP026) This remote is assigned to operate...
... picture modes of the buttons to select the component you press any other Sony components (SYSTEM STANDBY). Press a pink-labeled button after selecting a channel, disc or track using the numeric buttons. Name Function A AV ?/1 (on/ standby) Press to turn the receiver on . Zone 2/Zone 3 remote commander (RM-AAP026) This remote is assigned to operate...
Operating Instructions (Large File - 15.25 MB)
Page 21
...of or information on components connected to select an album. X B·/·b Press to the receiver. Y DISC SKIP Press to adjust the volume level of a TV. Z MASTER VOL +/- to skip a disc when using a multi-disc changer. wj MUTING Press to turn the TV on or off the sound temporarily. K ...the button. Press TV (qj), then press TV VOL +/- b)The tactile dot is displayed on the TV screen. J V/v/B/b Press V/v/B/b to select the menu items for receiver, DVD player, TV, or Blu-ray Disc Player, etc. TV CH + b)/- P TV ?/1 Press to turn off . Use as a mark of the VCR, ...
...of or information on components connected to select an album. X B·/·b Press to the receiver. Y DISC SKIP Press to adjust the volume level of a TV. Z MASTER VOL +/- to skip a disc when using a multi-disc changer. wj MUTING Press to turn the TV on or off the sound temporarily. K ...the button. Press TV (qj), then press TV VOL +/- b)The tactile dot is displayed on the TV screen. J V/v/B/b Press V/v/B/b to select the menu items for receiver, DVD player, TV, or Blu-ray Disc Player, etc. TV CH + b)/- P TV ?/1 Press to turn off . Use as a mark of the VCR, ...

Operating Instructions (Large File - 15.25 MB)
Page 22
... To fully enjoy theater-like multi-channel surround sound requires five speakers (two front speakers, a center speaker, and two surround speakers) and a subwoofer (5.1 channel system). Getting Started 1: Installing speakers This receiver allows you to use a 7.1 channel system (7 speakers and one additional surround back speaker (6.1 channel system) or two surround back speakers (7.1 channel system.) Example of DVD or...
... To fully enjoy theater-like multi-channel surround sound requires five speakers (two front speakers, a center speaker, and two surround speakers) and a subwoofer (5.1 channel system). Getting Started 1: Installing speakers This receiver allows you to use a 7.1 channel system (7 speakers and one additional surround back speaker (6.1 channel system) or two surround back speakers (7.1 channel system.) Example of DVD or...


