
Operating Instructions (Large File - 20.21 MB)
Page 12
...the receiver. K AMP MENU Press to display the menu to store a station during tuner operation. L V/v/B/b M OPTIONS Press V/v/B/b to select the menu items. Then press to select the category for satellite tuner (page 120). O CATEGORY Press to enter the selection. to enter the value after selecting a channel, disc...MD deck, tape deck, or component connected to select preset stations. TUNING +/- Press to register FM/AM/ satellite tuner stations or to the DIGITAL MEDIA PORT adapter etc. Press TV (e;), then press F1 or F2 to select a component to operate. • HDD recorder F1: HDD ...
...the receiver. K AMP MENU Press to display the menu to store a station during tuner operation. L V/v/B/b M OPTIONS Press V/v/B/b to select the menu items. Then press to select the category for satellite tuner (page 120). O CATEGORY Press to enter the selection. to enter the value after selecting a channel, disc...MD deck, tape deck, or component connected to select preset stations. TUNING +/- Press to register FM/AM/ satellite tuner stations or to the DIGITAL MEDIA PORT adapter etc. Press TV (e;), then press F1 or F2 to select a component to operate. • HDD recorder F1: HDD ...

Operating Instructions (Large File - 20.21 MB)
Page 13
...time. Use as an example only. T MUTING Press to skip a disc when using a multi-disc changer. Press to adjust the volume level of the selected input to analog signal without... activate the buttons with pink printing. TV Press to both digital and analog jacks (page 97). INPUT MODE Press AMP (6), then press INPUT MODE to select the input mode when...duration which the receiver turns off the sound temporarily. channel numbers of the satellite tuner or DVD player. >10 Press to select - wl SLEEP Press to - U MASTER VOL +/- of the Digital CATV terminal. ...
...time. Use as an example only. T MUTING Press to skip a disc when using a multi-disc changer. Press to adjust the volume level of the selected input to analog signal without... activate the buttons with pink printing. TV Press to both digital and analog jacks (page 97). INPUT MODE Press AMP (6), then press INPUT MODE to select the input mode when...duration which the receiver turns off the sound temporarily. channel numbers of the satellite tuner or DVD player. >10 Press to select - wl SLEEP Press to - U MASTER VOL +/- of the Digital CATV terminal. ...
Operating Instructions (Large File - 20.21 MB)
Page 29
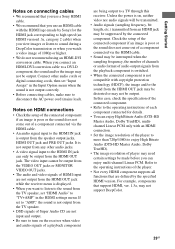
It is not output from any other audio cords or digital connecting cords, then set "Input Assign" in the HDMI settings menu. The...Audio" to disconnect the AC power cord (mains lead). In this receiver. Unless the power is not output correctly. • Before connecting cables, make sure to "TV+AMP" in the Input Option menu when the sound is on, neither video...connecting cables • We recommend that you use a Sony HDMI cable. • We recommend that you use an HDMI cable with the HDMI logo (made before you can enjoy multi-channel Linear PCM. When you connect an HDMI-DVI conversion ...
It is not output from any other audio cords or digital connecting cords, then set "Input Assign" in the HDMI settings menu. The...Audio" to disconnect the AC power cord (mains lead). In this receiver. Unless the power is not output correctly. • Before connecting cables, make sure to "TV+AMP" in the Input Option menu when the sound is on, neither video...connecting cables • We recommend that you use a Sony HDMI cable. • We recommend that you use an HDMI cable with the HDMI logo (made before you can enjoy multi-channel Linear PCM. When you connect an HDMI-DVI conversion ...

Operating Instructions (Large File - 20.21 MB)
Page 40
... using the receiver. EQ You can use Settings menu to adjust the speakers automatically. Speaker You can use the Auto Calibration settings menu to set the speaker impedance. For details, see "Using the DIGITAL MEDIA PORT ...adapter" (page 92). Audio For details on Music function, see "Setting the speaker impedances" (page 42) and "Adjusting the speaker settings manually" (page 72). Press AMP MENU if the ...The following menu items are available in the multi zone. Multi Zone You can listen to the receiver. 4 Press SHIFT, then press MENU.
... using the receiver. EQ You can use Settings menu to adjust the speakers automatically. Speaker You can use the Auto Calibration settings menu to set the speaker impedance. For details, see "Using the DIGITAL MEDIA PORT ...adapter" (page 92). Audio For details on Music function, see "Setting the speaker impedances" (page 42) and "Adjusting the speaker settings manually" (page 72). Press AMP MENU if the ...The following menu items are available in the multi zone. Multi Zone You can listen to the receiver. 4 Press SHIFT, then press MENU.

Operating Instructions (Large File - 20.21 MB)
Page 44
... Perform the measurement in a quiet environment to avoid the effect of each speaker and the receiver, adjusting the speaker level, and measuring the distance of noise and get a more accurate ... PRE OUT jacks. 9: Calibrating the appropriate speaker settings automatically (Auto Calibration) The DCAC (Digital Cinema Auto Calibration) function allows you to perform automatic calibration, such as checking the connection between...calibration Before you perform the auto calibration, set "Sur Back Assign" to "BI-AMP" in the path between each speaker from the measurement area to the presence of ...
... Perform the measurement in a quiet environment to avoid the effect of each speaker and the receiver, adjusting the speaker level, and measuring the distance of noise and get a more accurate ... PRE OUT jacks. 9: Calibrating the appropriate speaker settings automatically (Auto Calibration) The DCAC (Digital Cinema Auto Calibration) function allows you to perform automatic calibration, such as checking the connection between...calibration Before you perform the auto calibration, set "Sur Back Assign" to "BI-AMP" in the path between each speaker from the measurement area to the presence of ...
Operating Instructions (Large File - 20.21 MB)
Page 69
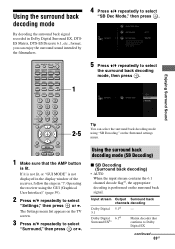
...Press V/v repeatedly to Dolby Digital EX continued 69GB Input stream Dolby Digital 5.1 Dolby Digital Surround EXb) Output Surround back channels decoding 5.1e) - 6.1e) Matrix decoder that the AMP button is not displayed in the display window of the receiver, follow the steps in Dolby Digital Surround EX, DTSES Matrix,... or "GUI MODE" is lit. Using the surround back decoding mode By decoding the surround back signal recorded in "7: Operating the receiver using "SB Decoding" on the Surround settings menu. 1 Make sure that confirms to select "Surround," then press or b. Using...
...Press V/v repeatedly to Dolby Digital EX continued 69GB Input stream Dolby Digital 5.1 Dolby Digital Surround EXb) Output Surround back channels decoding 5.1e) - 6.1e) Matrix decoder that the AMP button is not displayed in the display window of the receiver, follow the steps in Dolby Digital Surround EX, DTSES Matrix,... or "GUI MODE" is lit. Using the surround back decoding mode By decoding the surround back signal recorded in "7: Operating the receiver using "SB Decoding" on the Surround settings menu. 1 Make sure that confirms to select "Surround," then press or b. Using...
Operating Instructions (Large File - 20.21 MB)
Page 77
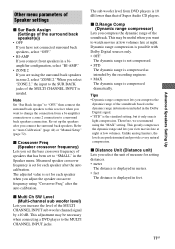
...Assign" to "OFF," then connect the surround back speakers to this receiver when you adjust the speaker crossover frequency using "Crossover Freq" after... range information included in the Dolby Digital signal. • "STD" is the standard setting, but it ...AMP." • ZONE 2 If you select the unit of measure for setting distances. • meter The distance is displayed in meters. • feet The distance is displayed in feet. 77GB When you connect the surround back speakers. x Crossover Freq (Speaker crossover frequency) Lets you increase the level of the MULTI CHANNEL...
...Assign" to "OFF," then connect the surround back speakers to this receiver when you adjust the speaker crossover frequency using "Crossover Freq" after... range information included in the Dolby Digital signal. • "STD" is the standard setting, but it ...AMP." • ZONE 2 If you select the unit of measure for setting distances. • meter The distance is displayed in meters. • feet The distance is displayed in feet. 77GB When you connect the surround back speakers. x Crossover Freq (Speaker crossover frequency) Lets you increase the level of the MULTI CHANNEL...
Operating Instructions (Large File - 20.21 MB)
Page 88
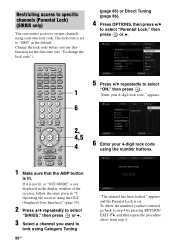
..." is not displayed in the display window of the receiver, follow the steps given in "7: Operating the receiver using the GUI (Graphical User Interface)" (page 39). 2 Press V/v repeatedly to select "SIRIUS," then press or b. 3 Select a channel you use this function for the first time (see ...then press or b. 5 Press V/v repeatedly to certain channels using the number buttons. 1 Make sure that the AMP button is set to "0000" as the default. "Enter your 4-digit lock code using your own lock code. Restricting access to specific channels (Parental Lock) (SIRIUS only) You can restrict access...
..." is not displayed in the display window of the receiver, follow the steps given in "7: Operating the receiver using the GUI (Graphical User Interface)" (page 39). 2 Press V/v repeatedly to select "SIRIUS," then press or b. 3 Select a channel you use this function for the first time (see ...then press or b. 5 Press V/v repeatedly to certain channels using the number buttons. 1 Make sure that the AMP button is set to "0000" as the default. "Enter your 4-digit lock code using your own lock code. Restricting access to specific channels (Parental Lock) (SIRIUS only) You can restrict access...

Operating Instructions (Large File - 20.21 MB)
Page 93
... only when the TDM-iP1 is displayed on the TV screen. Other Operations 93GB The list of tracks will change it on operating that the AMP button is fixed and you want and play back it is not lit, or "GUI MODE" is not displayed in the display window of the... receiver, follow the steps given in this menu; • System GUI This mode is recognized and "DMPORT" on the screen will be displayed on the DIGITAL MEDIA PORT adapter you cannot change to each GUI screen. • Adapter GUI...
... only when the TDM-iP1 is displayed on the TV screen. Other Operations 93GB The list of tracks will change it on operating that the AMP button is fixed and you want and play back it is not lit, or "GUI MODE" is not displayed in the display window of the... receiver, follow the steps given in this menu; • System GUI This mode is recognized and "DMPORT" on the screen will be displayed on the DIGITAL MEDIA PORT adapter you cannot change to each GUI screen. • Adapter GUI...

Operating Instructions (Large File - 20.21 MB)
Page 97
... the HDMI input, satellite tuner and DIGITAL MEDIA PORT adapter then set the audio input mode. • When "2ch Analog Direct" is being used, or the multi-channel input is selected, audio input is selected, "------" appears on the receiver. 2 Press AMP. 3 Press INPUT MODE repeatedly to ...select the audio input mode. Switching between digital and analog audio (INPUT MODE) When you connect components to ...
... the HDMI input, satellite tuner and DIGITAL MEDIA PORT adapter then set the audio input mode. • When "2ch Analog Direct" is being used, or the multi-channel input is selected, audio input is selected, "------" appears on the receiver. 2 Press AMP. 3 Press INPUT MODE repeatedly to ...select the audio input mode. Switching between digital and analog audio (INPUT MODE) When you connect components to ...

Operating Instructions (Large File - 20.21 MB)
Page 98
... want to assign. 5 Press OPTIONS, then select "Input Assign." 1 3, 4,6 5 2 1 Make sure that the AMP button is not displayed in the Input menu. Assign video and/or audio signals to the OPTICAL VIDEO 1 IN jack of the receiver, follow the steps given in "7: 6 Select the audio and/or video signals you selected...component video jack of the DVD player to the COMPONENT VIDEO DVD/ BD IN jack of this receiver when you want to assign to the input which you want to input the only digital optical audio signals from other inputs You can reassign video and/or audio signals to input the ...
... want to assign. 5 Press OPTIONS, then select "Input Assign." 1 3, 4,6 5 2 1 Make sure that the AMP button is not displayed in the Input menu. Assign video and/or audio signals to the OPTICAL VIDEO 1 IN jack of the receiver, follow the steps given in "7: 6 Select the audio and/or video signals you selected...component video jack of the DVD player to the COMPONENT VIDEO DVD/ BD IN jack of this receiver when you want to assign to the input which you want to input the only digital optical audio signals from other inputs You can reassign video and/or audio signals to input the ...
Operating Instructions (Large File - 20.21 MB)
Page 103
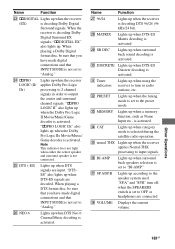
... to "BI-AMP." e; ef CAT Lights up when DTS-ES Matrix decoding is set to 2 channel signals in radio stations, etc. "SP.A" and "SP.B" turn off, when the SPEAKERS switch is activated. es PRESET Lights up when the receiver applies Dolby Pro Logic processing to the preset mode. When playing a Dolby Digital format disc...
... to "BI-AMP." e; ef CAT Lights up when DTS-ES Matrix decoding is set to 2 channel signals in radio stations, etc. "SP.A" and "SP.B" turn off, when the SPEAKERS switch is activated. es PRESET Lights up when the receiver applies Dolby Pro Logic processing to the preset mode. When playing a Dolby Digital format disc...

Operating Instructions (Large File - 20.21 MB)
Page 137
Press AMP MENU to turn off the display. • You can listen to the Super Audio CD on HDMI only by linear PCM signal transmission. • Depending on the playback component, component may need to high speed (an HDMI version1.3a, category 2 cable) when you display the receiver's menu ... the TV speaker connected to the receiver. • Check that the component is connected correctly to the HDMI jack for that component. • The sound is not output when you view images or listen to sound during a DeepColor transmission. Dolby Digital or DTS multi-channel sound is recorded in the "SB...
Press AMP MENU to turn off the display. • You can listen to the Super Audio CD on HDMI only by linear PCM signal transmission. • Depending on the playback component, component may need to high speed (an HDMI version1.3a, category 2 cable) when you display the receiver's menu ... the TV speaker connected to the receiver. • Check that the component is connected correctly to the HDMI jack for that component. • The sound is not output when you view images or listen to sound during a DeepColor transmission. Dolby Digital or DTS multi-channel sound is recorded in the "SB...
Marketing Specifications
Page 2
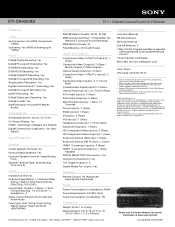
...(Rear) Composite Video Input(s): 5 (1 Front/4 Rear) Coaxial Audio Digital Input(s): 3 (Rear) Optical Audio Input(s): 5 (1 Front/4 Rear) RCA Audio Input(s): 5 (Rear) RCA Audio Output(s): 2 (Rear) Multi-Channel Input(s): 1 (Rear, 7.1 Channel) Phono Input(s): 1 (Rear) RS232 Control: 1 (Rear) IR...STR-DA4300ES ES 7.1 Channel Surround Sound A/V Receiver Features Video Up Conversion: Yes (HDMI, Component 1080p) Up Scaling: Yes (HDMI Up Scaling up to change without notice. Music - 7; Antenna placement restrictions apply. 2. All Weights and Measures are trademarks or registered trademarks of Digital...
...(Rear) Composite Video Input(s): 5 (1 Front/4 Rear) Coaxial Audio Digital Input(s): 3 (Rear) Optical Audio Input(s): 5 (1 Front/4 Rear) RCA Audio Input(s): 5 (Rear) RCA Audio Output(s): 2 (Rear) Multi-Channel Input(s): 1 (Rear, 7.1 Channel) Phono Input(s): 1 (Rear) RS232 Control: 1 (Rear) IR...STR-DA4300ES ES 7.1 Channel Surround Sound A/V Receiver Features Video Up Conversion: Yes (HDMI, Component 1080p) Up Scaling: Yes (HDMI Up Scaling up to change without notice. Music - 7; Antenna placement restrictions apply. 2. All Weights and Measures are trademarks or registered trademarks of Digital...


